FHB Logo Facebook LinkedIn Email Pinterest Twitter X Instagram Tiktok YouTube Plus Icon Close Icon Navigation Search Icon Navigation Search Icon Arrow Down Icon Video Guide Icon Article Guide Icon Modal Close Icon Guide Search Icon Skip to content
Subscribe
Log In
  • How-To
  • Design
  • Tools & Materials
  • Restoration
  • Videos
  • Blogs
  • Forum
  • Magazine
  • Members
  • FHB House
  • Podcast
Log In

Discussion Forum

Discussion Forum

basement questions

measureright | Posted in Construction Techniques on June 21, 2010 01:32am

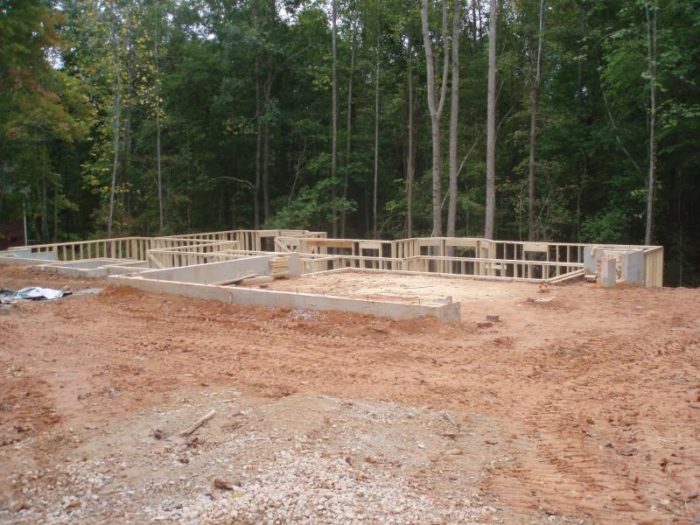
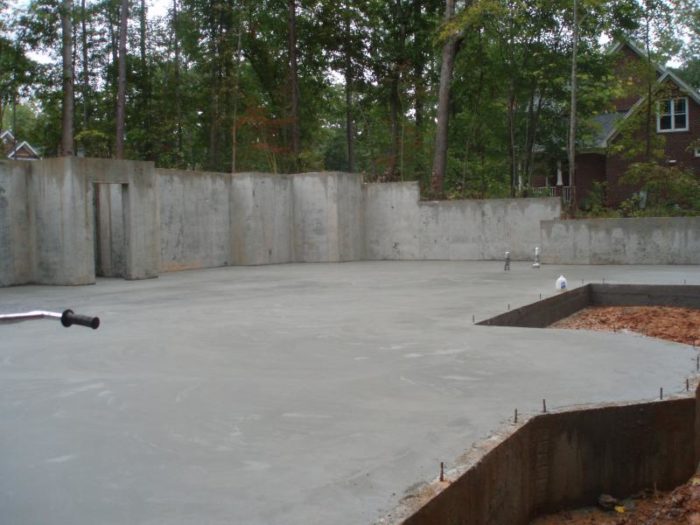
Poured basement, Concrete walls step down  from 9 ft tall at front of house to none for back wall. Homeowner has just decided to finish rear half of the total basement space. No problems with moisture after several hard storms the past couple of months.  Ready to insulate and move forward.  Would appreciate some input on insulating and best practices to incorporate now to eliminate  problems later.    I’ve attached pictures to show basement wall step downs and framing – the finished space is to start from the wall framed in center of basement to back wall.   

1 .Insulation –  been told to use plain batts, no paper.  On interior wall separating finished space from  unfinished  it’s been suggested  to Install thermo ply panels to back of studs behind insulation on unfinished side and then use moisture resistant drywall on finished side.   Read somewhere to NOT use fiberglass insultation.  Why?  What other insulation products would you recommend?

2.  Is there any need to insulate the concrete walls in the unfinished space, – they range from 100%-50% below grade.  

3.  Is there anything I should do on the exterior walls of the finished space that  are concrete stepped down from  50%  below finished grade. Been watching Holmes on Holmes and notice he uses interlocking foam boards, taped and then batts or foam on top of that.  What of that is necessary?  Maybe the question is not what is necessary but what is worth doing.  I want to turn this home over to the homeowners knowing I’ve done everything I can to make it the best home possible. At the same time don’t want to waste money on something that isn’t effectivel.  Everyone seems to have a different suggestion.  I’d appreciate hearing from some of you with experience.  Thanks

Reply
  • X
  • facebook
  • linkedin
  • pinterest
  • email
  • add to favorites Log in or Sign up to save your favorite articles

Replies

  1. Amish Electrician | Jun 22, 2010 06:37pm | #1

    As was so nicely put to me last Fall by the insurance agent, basements are NOT meant to be finished. In two words: moisture happens. Your task is it plan for that.

    IMO, the best first step is to instal radiant heating in the floor. Any moisture will eventually make it to the floor - and your best protection is to 'steam' it away.

    Whether you use hydronic heat or not, the critical thing is to have a dead-flat skim coat put atop the (guaranteed to be)  wavy, back-pitched slab, Make it certain to drain to the sump.

    Your next site where 'wet happens' is the outer wall. Whether it's ground water coming in, or interior humidity condensing on the cool concrete, the face of the wall will get wet. Therefore, your walls should stand off from the concrete. Having such a stand-off will also make it easier for you to have straight interior walls. "Hat" channels are available from drywall vendors that are suitable for this purpose.Let any water that forms on the wall face drain freely to the floor.

    I agree that insulation is not as critical below grade. Insulation ought to stop maybe 6" above the floor, and be a type that does not absorb moisture. Impervious insulation, like sprayed foam, needs no vapor barrier.

    Whatever you cover the walls with should also stop an inch or two from the floor. Cover the gap with your baseboard. If you need to fill the gap, use that plastic molding stuff.

    If you use metal studs, pierce the track in every stud bay, so any water that accumulated can drain out.

    Indeed, if you do it right, the outside interior walls will be supported by anchors into the foundation walls, rather than by sitting on the floor.

    Electrical, where possible, ought to be mounted to the outside walls. Various extensions can be used to bring the faces of the boxes out flush with the wall.

    Floor coverings ought to be in small pieces - say 6' x 9'- so that you can roll them up and carry them out when they get wet.

    You're best served leaving the ceiling accessible. You'll need access to all that stuff up there, sooner or later.

    Don't forget code required exits and code limits on ceiling height.

  2. k1c | Jun 22, 2010 07:28pm | #2

    You should look for FHB articles on basement finishing.  Few hard storms are no guarantee that your new house will be water proof in the future, it could be next year.  Foundation walls are treated with coating and drainage sheets that lead the water to catch pipe next to the footing.  If these measures were not taken, you could be inheriting a problem that you could be blamed for. 

    If the foundation was not protected this way, then you could recommend to the HO that they install indoor types of drain that catch the leak through footing/foundation joint and cracks in the foundation wall.  This kind of drain should go to indoor sump pump.

    One reason the glass fiber insulation should not be used in the basement is that once the fiber gets wet, it will take forever to dry and also will lose its insulating value.  Better choice will be to use foam boards (pink or blue).  Glue the boards directly to the foundation wall and attach 1x3 furring strips also directly to the boards using tapcon screws.  Seal all joints (sides as well as top and bottom) with low expansion spray foam.  I would not rely on any kind of tape to seal the joints.  The warranty on these tapes is 10 years only.  I agree with installing electricals outside of the wall.  If area is big enough for studded wall, electricals can go inside the wall.  Use metal studs and use bracing for outlet boxes, or the box may push in when plug is pushed in.  You will also need fire stops on top of the stud wall where it meets the joists of the floor above.  Also insulate the joist bays and caulk the sill plate/foundation top if this joint was not insulated at the time of the construction.

    If you separate the living space from utility space with insulated wall and door, you shouldn't have to insulate the unused space.  The boiler may heat it anyway.  I doubt it, but make sure the unused space will not be ice cold, to protect the water pipe.

    Hope it helps.

    1. Geoffrey | Jul 13, 2010 08:15pm | #3

      Just a couple of thoughts:

      whether you use wood or metal studs, neither should contact  concrete, it should be PT that contacts the crete and the plate (wood or metal) set on the PT

      If you use metal studs you will have to be sure to protect your NM cable where it passes thru the prepunched holes in the studs...or you will need to use BX cable.

      Using tapcons (or similar ) to fasten furring strips defeats the purpose of installing the foam boards with glue and sealing all joints. Instead, install the foam as mentioned, then frame your wall 1-3" off the foam wall.

      You probably will not need fireblocking but you will (and should if not required to) need to fire seal any penetrations (electrical and/or plumbing etc.) through to the 1st floor. I would do it throughout the basement.

      If you insulate the ceiling of the basement (and you should, both finished and un-finished sides) and use fiberglass, use un-faced fiberglass and cover (at least on the unfinished side) with tyvek, installing as if it were an outside wall...print side out (facing the basement floor).

      Since this is a home you built, I assume you installed a footing drain and sealed the foundation properly on the exterior.I also would assume that a 6-mil vapor barrier was installed under the slab on the interior.

      I would apply a sealer such as Dry-Lok to the walls before installing the foam boards.

      Also don't forget to add some type of sound deadening beyond just insulation.

      Good Luck

      Geoff

  3. Scott | Jul 13, 2010 08:47pm | #4

    There used to be some excellent articles on basement insulation here:

    http://buildingscience.com/

    I've heard that they are still there, but you need to dig around in the website a bit.

    I have a similar basement to the one you describe (stepped foundation), and I used a furred out 2x4 wall with FG and vapor barrier. No problems so far; but ask me in 20 years. I also put 2" SM underground around the perimeter and under slab areas with heated tile.

    But at the time my budget was tight and this was the only option. If I were to do it "right", I would glue 2" SM to the concrete and build the wall inside that. A bit more expensive, but eliminates the possiblility of condensation damage.

    Shoulda Woulda Coulda....

  4. Clewless1 | Jul 17, 2010 09:08am | #5

    It looks like you are in the middle of construction on this house?! Personally, I'd insulate all perimeter walls of the basement. If your occupied/heated space is only the daylight portion ... you never know when they might want the rest of the basement finished or used/heated. Otherwise the basement is a big waste of time. Don't insulate interior walls at all.

    Yes, below grade walls are routinely insulated (I'm assuming you are in a heating climate). If you don't want a step in your wall, frame a new wall on the inside of the basement wall and insulate it. Some use fiberglass, others use EPS (pink/blue board). If not backfilled, put the EPS on the outside.

    I assume you have a water membrane and e.g. drain tile on the exterior of the basement walls. No problems in recent months means nothing, really in terms of 'water tightness'. If you've designed for your climate/rain/site, you shouldn't have issues w/ water in a basement.

Log in or create an account to post a comment.

Sign up Log in

Become a member and get full access to FineHomebuilding.com

Video Shorts

Categories

  • Business
  • Code Questions
  • Construction Techniques
  • Energy, Heating & Insulation
  • General Discussion
  • Help/Work Wanted
  • Photo Gallery
  • Reader Classified
  • Tools for Home Building

Discussion Forum

Recent Posts and Replies

  • |
  • |
  • |
  • |
  • |
  • |
View More Create Post

Up Next

Video Shorts

Featured Story

Vintage Sash Windows Get an Energy-Efficient Upgrade

Low-e storm panels improve the energy efficiency of these old sash windows without changing their classic look.

Featured Video

Micro-Adjust Deck-Baluster Spacing for an Eye-Deceiving Layout

No math, no measuring—just a simple jig made from an elastic band is all you need to lay out a good-looking deck railing.

Related Stories

  • From Victorian to Mid-Century Modern: How Unico Fits Any Older Home
  • Designing the Perfect Garden Gate
  • Vintage Sash Windows Get an Energy-Efficient Upgrade
  • Design and Build a Pergola

Highlights

Fine Homebuilding All Access
Fine Homebuilding Podcast
Tool Tech
Plus, get an extra 20% off with code GIFT20

"I have learned so much thanks to the searchable articles on the FHB website. I can confidently say that I expect to be a life-long subscriber." - M.K.

Get home building tips, offers, and expert advice in your inbox

Signing you up...

This site is protected by reCAPTCHA and the Google Privacy Policy and Terms of Service apply.
See all newsletters
See all newsletters

Fine Homebuilding Magazine

  • Issue 332 - July 2025
    • Custom Built-ins With Job-Site Tools
    • Fight House Fires Through Design
    • Making the Move to Multifamily
  • Issue 331 - June 2025
    • A More Resilient Roof
    • Tool Test: You Need a Drywall Sander
    • Ducted vs. Ductless Heat Pumps
  • Issue 330 - April/May 2025
    • Deck Details for Durability
    • FAQs on HPWHs
    • 10 Tips for a Long-Lasting Paint Job
  • Issue 329 - Feb/Mar 2025
    • Smart Foundation for a Small Addition
    • A Kominka Comes West
    • Making Small Kitchens Work
  • Issue 328 - Dec/Jan 2024
    • How a Pro Replaces Columns
    • Passive House 3.0
    • Tool Test: Compact Line Lasers

Fine Home Building

Newsletter Sign-up

  • Fine Homebuilding

    Home building tips, offers, and expert advice in your inbox.

  • Green Building Advisor

    Building science and energy efficiency advice, plus special offers, in your inbox.

  • Old House Journal

    Repair, renovation, and restoration tips, plus special offers, in your inbox.

Signing you up...

This site is protected by reCAPTCHA and the Google Privacy Policy and Terms of Service apply.
See all newsletters

Follow

  • Fine Homebuilding

    Dig into cutting-edge approaches and decades of proven solutions with total access to our experts and tradespeople.

    Start Free Trial Now
    • Facebook
    • Instagram
    • X
    • LinkedIn
  • GBA Prime

    Get instant access to the latest developments in green building, research, and reports from the field.

    Start Free Trial Now
    • Facebook
    • YouTube
  • Old House Journal

    Learn how to restore, repair, update, and decorate your home.

    Subscribe Now
    • Facebook
    • Instagram
    • X

Membership & Magazine

  • Online Archive
  • Start Free Trial
  • Magazine Subscription
  • Magazine Renewal
  • Gift a Subscription
  • Customer Support
  • Privacy Preferences
  • About
  • Contact
  • Advertise
  • Careers
  • Terms of Use
  • Site Map
  • Do not sell or share my information
  • Privacy Policy
  • Accessibility
  • California Privacy Rights

© 2025 Active Interest Media. All rights reserved.

Fine Homebuilding receives a commission for items purchased through links on this site, including Amazon Associates and other affiliate advertising programs.

  • Home Group
  • Antique Trader
  • Arts & Crafts Homes
  • Bank Note Reporter
  • Cabin Life
  • Cuisine at Home
  • Fine Gardening
  • Fine Woodworking
  • Green Building Advisor
  • Garden Gate
  • Horticulture
  • Keep Craft Alive
  • Log Home Living
  • Military Trader/Vehicles
  • Numismatic News
  • Numismaster
  • Old Cars Weekly
  • Old House Journal
  • Period Homes
  • Popular Woodworking
  • Script
  • ShopNotes
  • Sports Collectors Digest
  • Threads
  • Timber Home Living
  • Traditional Building
  • Woodsmith
  • World Coin News
  • Writer's Digest
Active Interest Media logo
X
X
This is a dialog window which overlays the main content of the page. The modal window is a 'site map' of the most critical areas of the site. Pressing the Escape (ESC) button will close the modal and bring you back to where you were on the page.

Main Menu

  • How-To
  • Design
  • Tools & Materials
  • Video
  • Blogs
  • Forum
  • Project Guides
  • Reader Projects
  • Magazine
  • Members
  • FHB House

Podcasts

  • FHB Podcast
  • ProTalk

Webinars

  • Upcoming and On-Demand

Podcasts

  • FHB Podcast
  • ProTalk

Webinars

  • Upcoming and On-Demand

Popular Topics

  • Kitchens
  • Business
  • Bedrooms
  • Roofs
  • Architecture and Design
  • Green Building
  • Decks
  • Framing
  • Safety
  • Remodeling
  • Bathrooms
  • Windows
  • Tilework
  • Ceilings
  • HVAC

Magazine

  • Current Issue
  • Past Issues
  • Magazine Index
  • Subscribe
  • Online Archive
  • Author Guidelines

All Access

  • Member Home
  • Start Free Trial
  • Gift Membership

Online Learning

  • Courses
  • Project Guides
  • Reader Projects
  • Podcast

More

  • FHB Ambassadors
  • FHB House
  • Customer Support

Account

  • Log In
  • Join

Newsletter

Get home building tips, offers, and expert advice in your inbox

Signing you up...

This site is protected by reCAPTCHA and the Google Privacy Policy and Terms of Service apply.
See all newsletters
See all newsletters

Follow

  • X
  • YouTube
  • instagram
  • facebook
  • pinterest
  • Tiktok

Join All Access

Become a member and get instant access to thousands of videos, how-tos, tool reviews, and design features.

Start Your Free Trial

Subscribe

FHB Magazine

Start your subscription today and save up to 70%

Subscribe

Enjoy unlimited access to Fine Homebuilding. Join Now

Already a member? Log in

We hope you’ve enjoyed your free articles. To keep reading, become a member today.

Get complete site access to expert advice, how-to videos, Code Check, and more, plus the print magazine.

Start your FREE trial

Already a member? Log in

Privacy Policy Update

We use cookies, pixels, script and other tracking technologies to analyze and improve our service, to improve and personalize content, and for advertising to you. We also share information about your use of our site with third-party social media, advertising and analytics partners. You can view our Privacy Policy here and our Terms of Use here.

Cookies

Analytics

These cookies help us track site metrics to improve our sites and provide a better user experience.

Advertising/Social Media

These cookies are used to serve advertisements aligned with your interests.

Essential

These cookies are required to provide basic functions like page navigation and access to secure areas of the website.

Delete My Data

Delete all cookies and associated data