FHB Logo Facebook LinkedIn Email Pinterest Twitter X Instagram Tiktok YouTube Plus Icon Close Icon Navigation Search Icon Navigation Search Icon Arrow Down Icon Video Guide Icon Article Guide Icon Modal Close Icon Guide Search Icon Skip to content
Subscribe
Log In
  • How-To
  • Design
  • Tools & Materials
  • Restoration
  • Videos
  • Blogs
  • Forum
  • Magazine
  • Members
  • FHB House
  • Podcast
Log In

Discussion Forum

Discussion Forum

Cedar Post set in masonry column

user-2409187 | Posted in General Discussion on December 29, 2015 06:23am

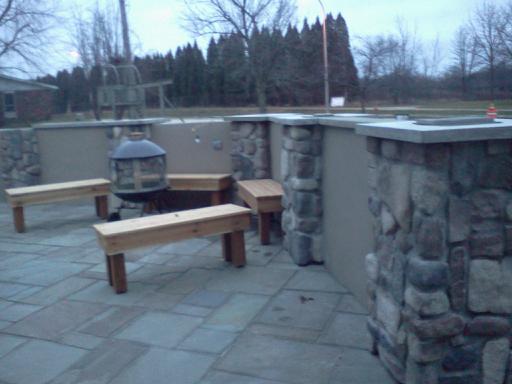
This is a design question. Take a look at the photo. Each masonry column is topped off with a 26x26x 2″ thick cement cap. At the center of this cap is a 8 5/8″ square opening into which a 8.5″ square cedar post will fit. Each post lies on a gravel base, aprox. 3′ below the cap, and extends above the cap another 4′. A 12″ deep gravel base allows for good drainage should water ever enter the masonry column. Each column rests atop a footer, so frost heaving is not an issue.  Now comes the technical question.

The masonry column caps are heavy and so are the wall caps between them. I propose to lay the 12″ gravel base within each column first, then install column and  wall caps. After this is done, I propose to thread the (treated) cedar posts through the tight cap openings. The posts are plumbed. Now a flexible glue-like caulk is used to seal the tiny gaps between masonry cap and wood column. 8 columns are done in this fashion. Next, these posts are linked to each other with a double 2×8 beam, aprox 4′ above the masonry caps. A 5 foot deep shade structure composed of cedar 2×3’s and 2×6 “rafters  rests upon the post-beam framework. It’s not a lot of weight, but decent enough.

My question: Do I need to secure each post to the bottom of each masonry column in order that 1. the post never moves out of plumb and 2. the post can not be lifted up by strong winds? Remember, the 26×26″ masory cap atop each masonry column tightly fits around the cedar post, so there is no movement at that point, safe for seasonal expansion/.contraction. And remember too that the beam above ties the posts one to the other. The lattice shade structure provides additional sturdiness. 

I’m  asking, because it will be very difficult to raise each 26″ x 26″ masonry cap high enough to pour buckets of rock into the column, to serve as both as “footer” and filler around the cedar post. Each cap has to be laid into a bed of mortat. I suppose it will be much easier to lay all masonry caps into mortar beds, level them, let them dry, and only then proceed with the cedar posts.

I hope the photo below and my word picture above are sufficient to illustrate the point I am trying to make. 

Wot thinkst? And…um…can we please avoid joke-ish comments 🙂 Thanks.

Mel

www.froscarpentry.com

Reply
  • X
  • facebook
  • linkedin
  • pinterest
  • email
  • add to favorites Log in or Sign up to save your favorite articles

Replies

  1. DanH | Dec 29, 2015 09:29pm | #1

    I would want to somehow "pin"

    I would want to somehow "pin" the bottom of the post, to keep it from sliding sideways.  I don't have any ideas on how to do it, though, given your overall scheme.

    It's unclear whether your "shade structure" has any sort of canvas or sheet goods "sheathing".  If so, I'd be concerned about uplift and want to do something about that.  Less so if it's all open gridwork.

  2. mark122 | Dec 29, 2015 10:14pm | #2

    if your just wanting/needing some kind of way of locking the post in place you could pour some concrete in the hole before you set the post.

    1. DanH | Dec 30, 2015 07:43am | #3

      But in any sort of damp climate it would be risky to set the post in concrete.  At most, pour maybe 4" of concrete into the hole, then put a pin (rebar) projecting 4 inches in the bottom of the post, so that the post end rests on the concrete, not in it.  And be sure to apply a rot treatment to the post end before placing.

      1. mark122 | Dec 30, 2015 08:22am | #4

        right but the OP says they are not only cedar, but they are also treated. also the water that will get in there will be very limited. plus she has several inches of gravel in there already that will help drain.

        one can create a void for draining by placing a 2x4 against the interior masonry wall, pour and before the post is set remove the 2x.

        1. DanH | Dec 30, 2015 08:31am | #5

          Treated cedar or not, apply rot treatment to the cut end.

        2. User avater
          user-2409187 | Dec 30, 2015 08:59am | #6

          Thanks, Mark. You understood me correctly and your idea is well worth considering. I will give thought to drilling a weep hole or two through the masonry column so that any water collecting in the channels (created by the removed 2x4 forms) is drained to the outside of the column. My main concern is that each post is not in direct contact with water (should that ever happen). 

           To be clear, my posts are cedar. They have been "treated" with a brushed-on sealant, but that means little to me. Once each post is set, it won't see the light of day again. And if my posts don't outlive me (I'm a spry chicken at age 65) I'm gonna be hugely disappointed :)

          Others have pointed to the need to "pin" each post to the base material. I see the wisdom of that. I'm scratching my head...and...um...the thought comes to mind that if I make extractable formwork and pour a concrete base, I could insert a square piece of plywood with, say, a 5/8" dia. bolt attached into the column and let it come to rest on top of the wet concrete. This would create a centered hole for the 1/2"" pin that is screwed into the bottom of the post. I'd have to be sure to remove the plywood and the form work before the concrete sets up too much. I worry though that this method may yield a post that is not perfectly plumb, because the pin at the bottom of the post and the cap on top of the masonry pillar (sp?) leave no wiggle room. I'll give this some more thought.

          Good stuff guys. I raise a virtual glass of Erdinger Hefeweizen in your direction! :)

          Mel

          http://www.froscarpentry.com

          1. User avater
            user-2409187 | Dec 30, 2015 11:35am | #7

            Another thought. Pour the footer as Mark mentions, and in addition place a 3" PVC pipe in the middle. Pull the pipe along with the form work (see Mark's comments). After the footer dries, reinsert the PVC pipe and pour a small amount of  wet mortar into the pipe. Pull the PVC pipe. Now insert the cedar post with 6" of rebar protruding from the bottom center. 

            I think I got some names confused in my reply above...sigh. A "senior moment" :)  Anyways...the shade structure above the posts is "open"; no wind lift to worry about...well, a little bit. The bigger issue simply is wind "push" on the entire structure.

            Mel

  3. User avater
    user-2409187 | Jan 01, 2016 10:49am | #8

    I thought it fitting to show you the result of our discussion. Here are the posts, snug and tight and ready to bear the load above them; a 6' deep shade structure made of cedar and installed at a slight pitch. I'll try to post a photo when the whole shebang is done. You can view the whole project at http://www.froscarpentry.com

    Thanks, everyone, for weighing in.

    Mel Fros

    1. DanH | Jan 01, 2016 02:17pm | #9

      So how did you end up handling the butt ends of the posts?

      1. User avater
        user-2409187 | Jan 01, 2016 02:52pm | #10

        Vell (imagine a Dutch-German, 100% American accent :)...my son eest ze boss and I must obey him...sigh. He ruled out pouring cement cuz of the kalt. Talk about these younglings upstaging their Elders!!! Grrr,,,,Here's what we did:

        1. We poured sharp-edged, smallish gravel into each column and tamped. 2. We placed all the wall and column caps in their respective positions. They each weigh quite a bit. 3) With rolling scaffolding to aid us, we climbed on the wall and lifted each 8' post on top (no beer allowed just yet.) Then we needled each post through its cap and plumbed it. Remember, the cut-out in each cap makes for a fairly tight fit, with only 1/16" expansion room on all sides. 3) With the help of Frauchen (wife), we "boys" lifted each colum cap (we made them!) up and she snuck two support bricks underneath. With dust pans in hand we shoveled more gravel into the 2" voids twixt post and MSUs. About a bag per post, which means that aprox 12" of post near the bottom isnow firmly help in place. 4. We lowered the caps back into place and checked for plumb. Everything went perfectly as planned.

        You can see the project at http://www.froscarpentry.com

        Behave, everyone! (I don't :)

        Mel

Log in or create an account to post a comment.

Sign up Log in

Become a member and get full access to FineHomebuilding.com

Video Shorts

Categories

  • Business
  • Code Questions
  • Construction Techniques
  • Energy, Heating & Insulation
  • General Discussion
  • Help/Work Wanted
  • Photo Gallery
  • Reader Classified
  • Tools for Home Building

Discussion Forum

Recent Posts and Replies

  • |
  • |
  • |
  • |
  • |
  • |
View More Create Post

Up Next

Video Shorts

Featured Story

Pressure Washing Made Portable

This electric pressure washer is compact, lightweight, and easy to maneuver.

Featured Video

SawStop's Portable Tablesaw is Bigger and Better Than Before

The 10-in. Jobsite Saw PRO has a wider table, a new dust-control port, and a more versatile fence, along with the same reliable safety mechanism included in all SawStop tablesaws.

Related Stories

  • An Easier Method for Mitered Head Casings
  • Tall Deck on a Sloped Lot
  • Making and Installing Wood Wall Paneling
  • Hand-Sanding Hack

Highlights

Fine Homebuilding All Access
Fine Homebuilding Podcast
Tool Tech
Plus, get an extra 20% off with code GIFT20

"I have learned so much thanks to the searchable articles on the FHB website. I can confidently say that I expect to be a life-long subscriber." - M.K.

Get home building tips, offers, and expert advice in your inbox

Signing you up...

This site is protected by reCAPTCHA and the Google Privacy Policy and Terms of Service apply.
See all newsletters
See all newsletters

Fine Homebuilding Magazine

  • Issue 331 - June 2025
    • A More Resilient Roof
    • Tool Test: You Need a Drywall Sander
    • Ducted vs. Ductless Heat Pumps
  • Issue 330 - April/May 2025
    • Deck Details for Durability
    • FAQs on HPWHs
    • 10 Tips for a Long-Lasting Paint Job
  • Issue 329 - Feb/Mar 2025
    • Smart Foundation for a Small Addition
    • A Kominka Comes West
    • Making Small Kitchens Work
  • Issue 328 - Dec/Jan 2024
    • How a Pro Replaces Columns
    • Passive House 3.0
    • Tool Test: Compact Line Lasers
  • Issue 327 - November 2024
    • Repairing Damaged Walls and Ceilings
    • Plumbing Protection
    • Talking Shop

Fine Home Building

Newsletter Sign-up

  • Fine Homebuilding

    Home building tips, offers, and expert advice in your inbox.

  • Green Building Advisor

    Building science and energy efficiency advice, plus special offers, in your inbox.

  • Old House Journal

    Repair, renovation, and restoration tips, plus special offers, in your inbox.

Signing you up...

This site is protected by reCAPTCHA and the Google Privacy Policy and Terms of Service apply.
See all newsletters

Follow

  • Fine Homebuilding

    Dig into cutting-edge approaches and decades of proven solutions with total access to our experts and tradespeople.

    Start Free Trial Now
    • Facebook
    • Instagram
    • X
    • LinkedIn
  • GBA Prime

    Get instant access to the latest developments in green building, research, and reports from the field.

    Start Free Trial Now
    • Facebook
    • YouTube
  • Old House Journal

    Learn how to restore, repair, update, and decorate your home.

    Subscribe Now
    • Facebook
    • Instagram
    • X

Membership & Magazine

  • Online Archive
  • Start Free Trial
  • Magazine Subscription
  • Magazine Renewal
  • Gift a Subscription
  • Customer Support
  • Privacy Preferences
  • About
  • Contact
  • Advertise
  • Careers
  • Terms of Use
  • Site Map
  • Do not sell or share my information
  • Privacy Policy
  • Accessibility
  • California Privacy Rights

© 2025 Active Interest Media. All rights reserved.

Fine Homebuilding receives a commission for items purchased through links on this site, including Amazon Associates and other affiliate advertising programs.

  • Home Group
  • Antique Trader
  • Arts & Crafts Homes
  • Bank Note Reporter
  • Cabin Life
  • Cuisine at Home
  • Fine Gardening
  • Fine Woodworking
  • Green Building Advisor
  • Garden Gate
  • Horticulture
  • Keep Craft Alive
  • Log Home Living
  • Military Trader/Vehicles
  • Numismatic News
  • Numismaster
  • Old Cars Weekly
  • Old House Journal
  • Period Homes
  • Popular Woodworking
  • Script
  • ShopNotes
  • Sports Collectors Digest
  • Threads
  • Timber Home Living
  • Traditional Building
  • Woodsmith
  • World Coin News
  • Writer's Digest
Active Interest Media logo
X
X
This is a dialog window which overlays the main content of the page. The modal window is a 'site map' of the most critical areas of the site. Pressing the Escape (ESC) button will close the modal and bring you back to where you were on the page.

Main Menu

  • How-To
  • Design
  • Tools & Materials
  • Video
  • Blogs
  • Forum
  • Project Guides
  • Reader Projects
  • Magazine
  • Members
  • FHB House

Podcasts

  • FHB Podcast
  • ProTalk

Webinars

  • Upcoming and On-Demand

Podcasts

  • FHB Podcast
  • ProTalk

Webinars

  • Upcoming and On-Demand

Popular Topics

  • Kitchens
  • Business
  • Bedrooms
  • Roofs
  • Architecture and Design
  • Green Building
  • Decks
  • Framing
  • Safety
  • Remodeling
  • Bathrooms
  • Windows
  • Tilework
  • Ceilings
  • HVAC

Magazine

  • Current Issue
  • Past Issues
  • Magazine Index
  • Subscribe
  • Online Archive
  • Author Guidelines

All Access

  • Member Home
  • Start Free Trial
  • Gift Membership

Online Learning

  • Courses
  • Project Guides
  • Reader Projects
  • Podcast

More

  • FHB Ambassadors
  • FHB House
  • Customer Support

Account

  • Log In
  • Join

Newsletter

Get home building tips, offers, and expert advice in your inbox

Signing you up...

This site is protected by reCAPTCHA and the Google Privacy Policy and Terms of Service apply.
See all newsletters
See all newsletters

Follow

  • X
  • YouTube
  • instagram
  • facebook
  • pinterest
  • Tiktok

Join All Access

Become a member and get instant access to thousands of videos, how-tos, tool reviews, and design features.

Start Your Free Trial

Subscribe

FHB Magazine

Start your subscription today and save up to 70%

Subscribe

Enjoy unlimited access to Fine Homebuilding. Join Now

Already a member? Log in

We hope you’ve enjoyed your free articles. To keep reading, become a member today.

Get complete site access to expert advice, how-to videos, Code Check, and more, plus the print magazine.

Start your FREE trial

Already a member? Log in

Privacy Policy Update

We use cookies, pixels, script and other tracking technologies to analyze and improve our service, to improve and personalize content, and for advertising to you. We also share information about your use of our site with third-party social media, advertising and analytics partners. You can view our Privacy Policy here and our Terms of Use here.

Cookies

Analytics

These cookies help us track site metrics to improve our sites and provide a better user experience.

Advertising/Social Media

These cookies are used to serve advertisements aligned with your interests.

Essential

These cookies are required to provide basic functions like page navigation and access to secure areas of the website.

Delete My Data

Delete all cookies and associated data