FHB Logo Facebook LinkedIn Email Pinterest Twitter X Instagram Tiktok YouTube Plus Icon Close Icon Navigation Search Icon Navigation Search Icon Arrow Down Icon Video Guide Icon Article Guide Icon Modal Close Icon Guide Search Icon Skip to content
Subscribe
Log In
  • How-To
  • Design
  • Tools & Materials
  • Restoration
  • Videos
  • Blogs
  • Forum
  • Magazine
  • Members
  • FHB House
  • Podcast
Log In

Discussion Forum

Discussion Forum

Ceiling design help needed

FastEddie | Posted in General Discussion on July 17, 2007 02:48am

I plan to overlay the existing sheetropck ceiling in the kitchen with beadboard.  Got two questions:

The ceiling height is about 8-1/2 feet.  The beadboard is grooved both sides.  One side has a center groove, the other has only the outside chamfers.  Which side to show?  I am thinking that the center groove will make for too many lines in the ceiling.  the boards are a fraction over 3″ wide.

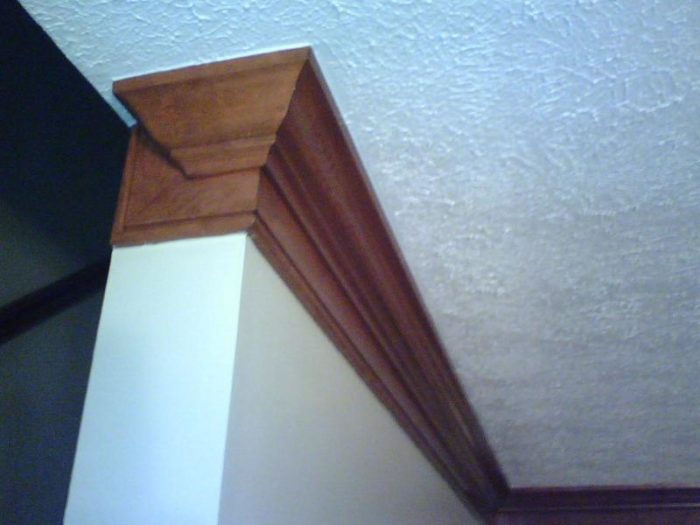
I don’t know how to finish off the perimeter.  The picture shows what I have: a 5″ band around the top of the walls, with crown.  The crown obviously will go away.  That will leave a 3″+ unstained stripe on the band.  I was thinking about adding a new band just wide enough to cover the unstained area, and finish it to match the ceiling.  (Finish unknown at this time, probably painted.)  The cabinets have a large flat area at the top, so I essentially have the same condition there.


“Put your creed in your deed.”   Emerson

“When asked if you can do something, tell’em “Why certainly I can”, then get busy and find a way to do it.”  T. Roosevelt

Reply
  • X
  • facebook
  • linkedin
  • pinterest
  • email
  • add to favorites Log in or Sign up to save your favorite articles

Replies

  1. YesMaam27577 | Jul 17, 2007 05:14pm | #1

    That's a fairly good looking cornice treatment. I'd probably try to pull it all off, saving it for a complete reinstallation.


    Politics is the antithesis of problem solving.

  2. User avater
    Sphere | Jul 17, 2007 05:26pm | #2

    Personally, I like the 6'' with the center bead. I feel the 3" is too busy for cieling.

    What I'd do, is add a bead to the flat face, this is done on the tongue edge, just past the VEE. An 1/8th inch bead can be made with a molding head cutter on a table saw. A single bead cutter i smade by Craftsman IIRC, I have the whole set, and one that makes a triple bead...that can be used if ya bury two in a sacrifical fence or just grind them away.

    I also have a beading handplane for short runs.

    Is this 3/4" thick stock or 5/16th?  Either way, a fearther board set up is mandatory.


  3. User avater
    Sphere | Jul 17, 2007 05:27pm | #3

    Oh, yeah. Can ya not pull the crown and re-hang it after the bead board is up?


  4. Piffin | Jul 17, 2007 06:16pm | #4

    The detail you have there now is a basebord upside down - not uncommon if you want to repeat it.
    One that is more common here for a two piece crown is a 1x4 with a bead on the bottom corner that compliments the beaded cieling, then a large bedmold to the cieling.

    I would use strapping screwed perpendicular to the trusses or whatever framing above to get good nailing surfacce for the T&G beaded.

    I also think the narrow beading is awfully busy for that sort of cieling. Sounds like 9/16" x3-1/2" fir we get.
    AZEK makes a very nice 5" wide x 1/2" thick that isn't so busy. We acan alkso buy other patterns with wider faces. Princeton Primelock is one.


    Welcome to the
    Taunton University of
    Knowledge FHB Campus at Breaktime.
     where ...
    Excellence is its own reward!

    1. FastEddie | Jul 17, 2007 06:48pm | #5

      Sounds like everyone is agreeing that the narrower boards would look busy.  So I'll install it with the full face down, which will give a bead/joint every 3", or about the same as a 6" board with a center groove.

      It happens that the ceiling joists run perpendicular to the way I want to install the boards, so if I add strapping I would just put it directly under the joists.  The boards are almost 3/4".  Would I have a problem nailing them up with 2-1/2" 15 ga nails?  That would give me about an inch of nail into the joist.

      And I'm not sure I understand the recommendation for the existing crown.  Should I remove it and reinstall to the new beadboard?"Put your creed in your deed."   Emerson

      "When asked if you can do something, tell'em "Why certainly I can", then get busy and find a way to do it."  T. Roosevelt

      1. User avater
        Sphere | Jul 17, 2007 07:21pm | #6

        That is what I thought about the crown. Just rehang it after the BB. 

      2. Ragnar17 | Jul 17, 2007 07:53pm | #8

        Sounds like everyone is agreeing that the narrower boards would look busy. 

        Not me.  ;)  But I think I'd need to know more about the size of the kitchen and the architectural style of the house before making a strong recommendation.

        Generally speaking, I think large expanses do not look as good with finer details.  One way to get around this would be to break up a large expanse into smaller sections (see how Maverick's photos use box beams to break up the space).

        Even going with a 5" or 6" format may look too busy if the kitchen ceiling is very large. 

        You also asked about which side to expose.  In Colonial Revivals, I like the bead to be showing.  Sometimes on Craftsman houses, I'll let the V-side show because it's a little less fancy and seems to fit the Craftsman style better.  You'll have to decide what fits your own house the best.

        Hope that helps.

        Edited 7/17/2007 12:56 pm ET by Ragnar17

        1. FastEddie | Jul 17, 2007 08:22pm | #9

          I already have the boards, so there's only two choices.  I would have preferred 6" boards, but that wasn't an option.  I got a super deal on this stuff, and now I'm trying to find a use for it.

          The house is a simple modern colonial, two story brick front vinyl siding.  Kitchen is about 10x18', and I want to run the boards the long way.  Cabinets and trim are stained pine, like the crown in the picture.  Walls are painted, with a stained chair rail.

          DW is out of town for 2 weeks, so I thought this would be a good time to do it."Put your creed in your deed."   Emerson

          "When asked if you can do something, tell'em "Why certainly I can", then get busy and find a way to do it."  T. Roosevelt

          1. Piffin | Jul 18, 2007 12:16am | #12

            "DW is out of town for 2 weeks, so I thought this would be a good time to do it."oh man! You like living on the edge, don't you?;) 


            Welcome to the Taunton University of Knowledge FHB Campus at Breaktime. where ... Excellence is its own reward!

      3. Piffin | Jul 18, 2007 12:12am | #10

        The strapping needs at least 2-1/2" screws or 8d ring nails. 15 ga nails would hold the beaded just fine, but not the strapping every 16". The whole thing would be down on you rheads 


        Welcome to the Taunton University of Knowledge FHB Campus at Breaktime. where ... Excellence is its own reward!

      4. Piffin | Jul 18, 2007 12:14am | #11

        oops, forgot about the crown.You have to remove it to do this project. What goes back up depends on your taste.BTW, is thios the same room where you just replaced the floor with stained wide pine?? Next time, start at the top and work down. 


        Welcome to the Taunton University of Knowledge FHB Campus at Breaktime. where ... Excellence is its own reward!

        1. FastEddie | Jul 18, 2007 06:27am | #14

          Yep, same room with the new floor.  I bought 250 sf 1x9 t&g pine flooring and 400 sf 1x3+ t&g pine beadboard for $200.  All of the beadboard is still wrapped in the plastic.  Couldn't pass up that deal. 

          The old sheet vinyl floor was so ugly it had to be the first to go.  DW wants to change/add the kitchen ceiling lights, and she thinks like the "designers" on tv: "just put a light here and here and here, and it will look great".  "Ok, so how do I get power to it?"  "I don't know, call an electrician or something."    So for a while my hought was to remove all the sheetorck, add lights as directed, and put up the beadboard.  Then I had a revolution!  Put up a low-voltage monorail system, the kind where you can bend the track into an s-curve.  So I'll apply the beadboard over the sheetrock, therby cutting the work in half, and just hang the monorail off the beadboard."Put your creed in your deed."   Emerson

          "When asked if you can do something, tell'em "Why certainly I can", then get busy and find a way to do it."  T. Roosevelt

  5. maverick | Jul 17, 2007 07:39pm | #7

    personally, I like the narrower cut

  6. deskguy | Jul 18, 2007 02:13am | #13

    I used the skinny stuff in my house, I really like it.  In the powder room, I wanted crown below it, so I rabbeted out some slightly thicker board and framed it on the perimiter to keep an even reveal for the crown.  (photo 3676) 

    The second photo is my dining room.  I boxed the perimiter, installed the BB and used a simple cove moulding to finish.  This was the first time I'd ever trimed a house so I was just making this stuff up as I went.  Others will probably have better ideas for you, but I thought I'd share some pics in case they could be of any help.

    P.S.  When your done, you will have sore shoulders.

    1. Piffin | Jul 18, 2007 03:47pm | #15

      The narrower is a really good choice in bathrooms because they are smaller 


      Welcome to the Taunton University of Knowledge FHB Campus at Breaktime. where ... Excellence is its own reward!

      1. deskguy | Jul 19, 2007 01:59am | #16

        After posting that I was thinking that I don't know if I've ever seen larger beadboard on a ceiling.  Maybe that's why I like the narrower?  A wider board might look nicer with large crown.  Anything on the ceiling looks better than the drywall though.

Log in or create an account to post a comment.

Sign up Log in

Become a member and get full access to FineHomebuilding.com

Video Shorts

Categories

  • Business
  • Code Questions
  • Construction Techniques
  • Energy, Heating & Insulation
  • General Discussion
  • Help/Work Wanted
  • Photo Gallery
  • Reader Classified
  • Tools for Home Building

Discussion Forum

Recent Posts and Replies

  • |
  • |
  • |
  • |
  • |
  • |
View More Create Post

Up Next

Video Shorts

Featured Story

Fast, Accurate Wall Framing

A rear addition provides a small-scale example of how to frame efficiently.

Featured Video

Builder’s Advocate: An Interview With Viewrail

Learn more about affordable, modern floating stairs, from design to manufacturing to installation.

Related Stories

  • Podcast Episode 693: Old-House Hazards, Building Larsen Trusses, AI in Construction
  • FHB Podcast Segment: Finding Hazardous Materials in a Fixer-Upper
  • A Classic Paint Sprayer Gets a Thoughtful Refresh
  • Podcast Episode 692: Introduction to Trade Work, Embodied Carbon, and Envelope Improvements

Highlights

Fine Homebuilding All Access
Fine Homebuilding Podcast
Tool Tech
Plus, get an extra 20% off with code GIFT20

"I have learned so much thanks to the searchable articles on the FHB website. I can confidently say that I expect to be a life-long subscriber." - M.K.

Get home building tips, offers, and expert advice in your inbox

Signing you up...

This site is protected by reCAPTCHA and the Google Privacy Policy and Terms of Service apply.
See all newsletters
See all newsletters

Fine Homebuilding Magazine

  • Issue 332 - July 2025
    • Custom Built-ins With Job-Site Tools
    • Fight House Fires Through Design
    • Making the Move to Multifamily
  • Issue 331 - June 2025
    • A More Resilient Roof
    • Tool Test: You Need a Drywall Sander
    • Ducted vs. Ductless Heat Pumps
  • Issue 330 - April/May 2025
    • Deck Details for Durability
    • FAQs on HPWHs
    • 10 Tips for a Long-Lasting Paint Job
  • Issue 329 - Feb/Mar 2025
    • Smart Foundation for a Small Addition
    • A Kominka Comes West
    • Making Small Kitchens Work
  • Issue 328 - Dec/Jan 2025
    • How a Pro Replaces Columns
    • Passive House 3.0
    • Tool Test: Compact Line Lasers

Fine Home Building

Newsletter Sign-up

  • Fine Homebuilding

    Home building tips, offers, and expert advice in your inbox.

  • Green Building Advisor

    Building science and energy efficiency advice, plus special offers, in your inbox.

  • Old House Journal

    Repair, renovation, and restoration tips, plus special offers, in your inbox.

Signing you up...

This site is protected by reCAPTCHA and the Google Privacy Policy and Terms of Service apply.
See all newsletters

Follow

  • Fine Homebuilding

    Dig into cutting-edge approaches and decades of proven solutions with total access to our experts and tradespeople.

    Start Free Trial Now
    • Facebook
    • Instagram
    • X
    • LinkedIn
  • GBA Prime

    Get instant access to the latest developments in green building, research, and reports from the field.

    Start Free Trial Now
    • Facebook
    • YouTube
  • Old House Journal

    Learn how to restore, repair, update, and decorate your home.

    Subscribe Now
    • Facebook
    • Instagram
    • X

Membership & Magazine

  • Online Archive
  • Start Free Trial
  • Magazine Subscription
  • Magazine Renewal
  • Gift a Subscription
  • Customer Support
  • Privacy Preferences
  • About
  • Contact
  • Advertise
  • Careers
  • Terms of Use
  • Site Map
  • Do not sell or share my information
  • Privacy Policy
  • Accessibility
  • California Privacy Rights

© 2025 Active Interest Media. All rights reserved.

Fine Homebuilding receives a commission for items purchased through links on this site, including Amazon Associates and other affiliate advertising programs.

  • Home Group
  • Antique Trader
  • Arts & Crafts Homes
  • Bank Note Reporter
  • Cabin Life
  • Cuisine at Home
  • Fine Gardening
  • Fine Woodworking
  • Green Building Advisor
  • Garden Gate
  • Horticulture
  • Keep Craft Alive
  • Log Home Living
  • Military Trader/Vehicles
  • Numismatic News
  • Numismaster
  • Old Cars Weekly
  • Old House Journal
  • Period Homes
  • Popular Woodworking
  • Script
  • ShopNotes
  • Sports Collectors Digest
  • Threads
  • Timber Home Living
  • Traditional Building
  • Woodsmith
  • World Coin News
  • Writer's Digest
Active Interest Media logo
X
X
This is a dialog window which overlays the main content of the page. The modal window is a 'site map' of the most critical areas of the site. Pressing the Escape (ESC) button will close the modal and bring you back to where you were on the page.

Main Menu

  • How-To
  • Design
  • Tools & Materials
  • Video
  • Blogs
  • Forum
  • Project Guides
  • Reader Projects
  • Magazine
  • Members
  • FHB House

Podcasts

  • FHB Podcast
  • ProTalk

Webinars

  • Upcoming and On-Demand

Podcasts

  • FHB Podcast
  • ProTalk

Webinars

  • Upcoming and On-Demand

Popular Topics

  • Kitchens
  • Business
  • Bedrooms
  • Roofs
  • Architecture and Design
  • Green Building
  • Decks
  • Framing
  • Safety
  • Remodeling
  • Bathrooms
  • Windows
  • Tilework
  • Ceilings
  • HVAC

Magazine

  • Current Issue
  • Past Issues
  • Magazine Index
  • Subscribe
  • Online Archive
  • Author Guidelines

All Access

  • Member Home
  • Start Free Trial
  • Gift Membership

Online Learning

  • Courses
  • Project Guides
  • Reader Projects
  • Podcast

More

  • FHB Ambassadors
  • FHB House
  • Customer Support

Account

  • Log In
  • Join

Newsletter

Get home building tips, offers, and expert advice in your inbox

Signing you up...

This site is protected by reCAPTCHA and the Google Privacy Policy and Terms of Service apply.
See all newsletters
See all newsletters

Follow

  • X
  • YouTube
  • instagram
  • facebook
  • pinterest
  • Tiktok

Join All Access

Become a member and get instant access to thousands of videos, how-tos, tool reviews, and design features.

Start Your Free Trial

Subscribe

FHB Magazine

Start your subscription today and save up to 70%

Subscribe

Enjoy unlimited access to Fine Homebuilding. Join Now

Already a member? Log in

We hope you’ve enjoyed your free articles. To keep reading, become a member today.

Get complete site access to expert advice, how-to videos, Code Check, and more, plus the print magazine.

Start your FREE trial

Already a member? Log in

Privacy Policy Update

We use cookies, pixels, script and other tracking technologies to analyze and improve our service, to improve and personalize content, and for advertising to you. We also share information about your use of our site with third-party social media, advertising and analytics partners. You can view our Privacy Policy here and our Terms of Use here.

Cookies

Analytics

These cookies help us track site metrics to improve our sites and provide a better user experience.

Advertising/Social Media

These cookies are used to serve advertisements aligned with your interests.

Essential

These cookies are required to provide basic functions like page navigation and access to secure areas of the website.

Delete My Data

Delete all cookies and associated data