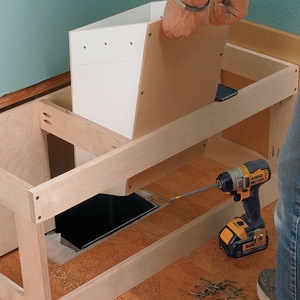
When installing crown moulding on kitchen cabinets, how do you handle the small reveal where the side stile extends past the side panel? Do you notch the stile or the back of the crown moulding?
Discussion Forum
Discussion Forum
Up Next
Video Shorts
Featured Story

Fine Homebuilding is excited to be the official media partner of the 2024 Building Science Symposium series! This event offers builders, tradesmen, architects, designers and suppliers to discuss topics ranging…
Featured Video
Video: Build a Fireplace, Brick by BrickHighlights
"I have learned so much thanks to the searchable articles on the FHB website. I can confidently say that I expect to be a life-long subscriber." - M.K.


Replies
Some use a end panel, some pad out just where crown goes, and some notch the stile.
Sometimes you can pad out the end panel with a peice of scribe molding.
Thanks for the reply Matt..I have used that method once before and it seemed to work out ok, but it is nice to know that others do the same.
I notch the stile vs. notching the crown. Cleaner finished look, and quicker.
I usually only notch if the crown has 3/8" or greater projection on the flat horizontal section where it meets the cabinet.
The cabinet joint I used to work for left that up to the installers. So, about half cut the endstile, the other half inverted a bit of single-knife-edge trim into the space to flush it out.
Either way, it's a pain. Either way looks either spiffy or junky. In about a half decade of griping about it, I never heard of a better answer short of a flush end panel, ir fancy finished end panel--which was a whole 'nuther can-o-worms.
I think the flush end panel looks the best by far. The hard part is getting somebody to pay for them.
The hard part is getting somebody to pay for them.
Or, integrating the kind of QC a factory needs to build them that way, too . . . (despite having 1/32" tolerances on the CNC machines & point-to-point machines . . . )Occupational hazard of my occupation not being around (sorry Bubba)
What's "single-knife-edge trim"?
What's "single-knife-edge trim"?
Solid lumber strip, 5/8" wide, 5/16" thick, long as the stick run through the moulder. One edge is milled with a flattened ogee, the resulting profile looking (with a bit of squint) like a knife blade. The trim thus produced can be used instead of scribing end panels back to a wall, or for triming a 1/4" finished back panel under a knee space or the like.
"Single" is often used to contrast with "double knife edge" trim, too (which has two milled edges).Occupational hazard of my occupation not being around (sorry Bubba)
From my admittedly limited experience, I would recommend putting in a thin filler strip. Recently the guy I work with cut the styles and had a hard time getting a level cut and a cut that was in exactly the right place, not to mention that holding even a flush cut recip saw so it doesn't bounce around is difficult. The resulting lack of fit was one of the many things the GC complained about when he held up paying us! Don't know about notching the back of the crown, but I would think that'd also be difficult.
(I haven't read others' responses before posting this, so I may regret what I posted!)
"holding even a flush cut recip saw so it doesn't bounce around is difficult."Huh? In cabinetry? He ever try good old fashioned hand tools?
Yeah, I would have tried a "Japanese" pull saw (or even a back saw), but he had his way of doing it. The problem is, if you are off by a hair in your trimming, the gap is apparent. Filler strip shows a line where it goes against the back side of the crown, but that is usually not as visible as messing up the styles. I would probably have trimmed the styles (if I had chosen that way of doing it) before the cabinets were in place too.
Is this misalignment between the stile and cabinet side typical?
Are they factory-produced units?
Yes, most stiles are 'extended' slightly so they can be scribed to an adjacent wall or, as an option, the end of the cabinet can be 'skinned' with a flush panel.
Jeff
Yes, most stiles are 'extended' slightly so they can be scribed to an adjacent wall or, as an option, the end of the cabinet can be 'skinned' with a flush panel.
Edit: I think I failed to understand what you were saying. See my post to Capn Mac.
I'm surprised to hear this (but maybe I shouldn't be). When I build my own cabinets, I make the stiles flush with the end of the unit. When the specific unit will butt into a wall, then I'll let the "ear" hang over about 1/4" (or more if the wall is really bad) for scribing purposes like you said.
But it sounds like this one-size-fits-all approach only results in a nuisance "ear". That is, it interferes with finish carpentry, and (if it can be leveled with a skin) the projection is not adequate to really allow scribing anyway.
It always amazes me the way the owners of multimillion dollar factories make such poor design decisions. My guess is that they have the overhanging stile because they just don't want to have to align the two components (the stile and the cabinet end). That would be too hard. ;)
Edited 4/13/2007 12:17 pm ET by Ragnar17
Well, you have to keep in mind that you screw the stiles together in the field, too. If they were flush with the cabinet carcass the cabinet has to be *perfect* or the stiles won't fit tightly together.
Even if you make *perfect* cabinets, I've never seen *perfect* drywall ;o)
Jeff
Edited 4/13/2007 12:16 pm ET by Jeff_Clarke
Even if you make *perfect* cabinets, I've never seen *perfect* drywall ;o)
Well, that's what the scribing ear is for. When I'm measuring in the field for cabinets, I'll check to see how far out of level the wall is, and size the ear accordingly. In old houses, of course, it can be quite significant -- 3/4" in about three feet is the worst I've come up against so far.
A person can always use some quarter-round or the equivalent, too, but I think a scribed transition looks the cleanest.
I understand your point about ganging the units, too. It could help there to have the stiles just a teency bit proud.
they just don't want to have to align the two components
Well, there's a big, strong, element of "always been done that way."
But, the bigger part of it is that, by having some "ear," with the 1/8 to 3/16" gap between adjacent endpanels, box-to-box, there's some play to get the frames aligned and plumb and square (or as much as the job allows).
Where this falls down, where it has always fallen down, is at exposed ends.
So, for those companies that care, they machine the dado so that a thin, but matching, plywood panel can be added to a box with an exposed end.
Here's the "gotcha" on that. You start buying sheet goods for end panels by the truck and railcar load, you tend to select them by price, not necessarily by uniform thickness. Even if you do care about uniform thickness, the supplier will vary every so often, messing you up a tad. You start trying to engineer the product production cycle to turn out 800 & 900 cabinet boxes per day, and you compromise on things.
Oh, and if you are acompany that does not care so much, for exposed ends, you just change the end panel to have a veneer on the outside of the endpanel (which is oh so pretty in 3/8" flakeboard anyway).Occupational hazard of my occupation not being around (sorry Bubba)
Is this misalignment between the stile and cabinet side typical?
Yes. "Classic" factory-made endstile being 1-1/2" wide & 3/4" (nominally) thick, which has a 13/16" wide, 1/4" deep dado let in 1/2" fro mthe inside edge (once made up into a face frame). The factory can then assemble, by hand or in a box clamp, endpanels in thicknesses from 1/2" to 3/4", holding them flush to the inside, giving a clean inside appearance.
This way, all the boxes (or carcasses, if one prefers that term) are built on the line in the same way. For the 5 to 7 percent needing a finish panel, an piece of 1/8" or 1/4" veneered ply can be set in the "remainder" of the endstile dado.Occupational hazard of my occupation not being around (sorry Bubba)
This way, all the boxes (or carcasses, if one prefers that term) are built on the line in the same way. For the 5 to 7 percent needing a finish panel, an piece of 1/8" or 1/4" veneered ply can be set in the "remainder" of the endstile dado.
So it sounds like you're saying that the cabinet described by the original poster should have been specified with a veneered panel to fill the gap. Is that correct? Once the veneered panel is installed, is the stile edge then flush?
saying that the cabinet described by the original poster should have been specified with a veneered panel to fill the gap. Is that correct? Once the veneered panel is installed, is the stile edge then flush?
Actually, I'm not sure I can say that. Many of the companies out there don't offer a flush panel, per se. They will sell you a matching bit of flat stock with a "blank" stile on it, but not necessarily a fitted end panel.
Better than 3/4 of the factories out there (this is a guess based on observation) don't really offer a true "flush" end, excepting in their frame-less, "euro," cabinet lines.
Not surprising, really. Most places build the face frames separately from the carcass. Many build the carcass on the face-down face frame. That means the dimensions for the parts have to come from the inside "out." Any variances get "eaten" by the "slack" space from the carcass edge to the edge of the end stile.Occupational hazard of my occupation not being around (sorry Bubba)
Thanks for the info, CapnMac.
Most of my clients want to stick with the old look in their homes, which translates to custom made cabinetry. For this reason, I haven't had a whole lot of exposure to the methods of high-volume manufacturers. There have been a handful of times that the cabinets were not custom made. On those jobs, I guess we just got lucky, because we didn't have a problem with the end panels not being flush.
Regards,
Ragnar
Don't cut anything.
Add a filler strip that will come out flush with the edge of the stile.
Run the crown over the filler strip.
this thread makes my head hurt ...
Jeff Buck Construction
Artistry In Carpentry
Pittsburgh Pa