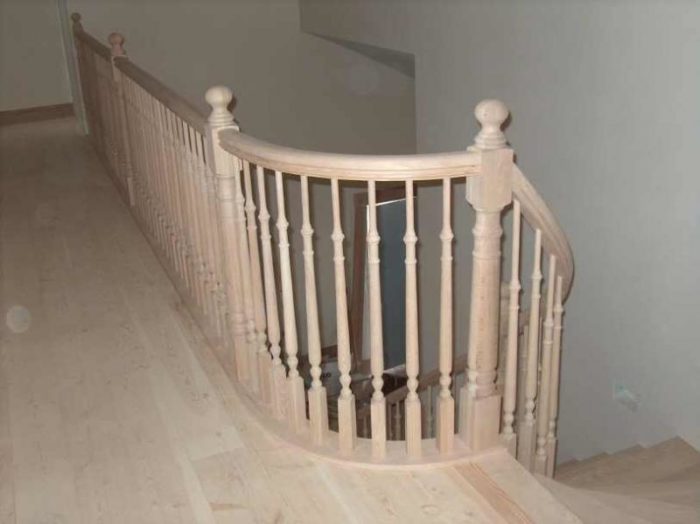
Hello, finished up a stair job today that had a small section of curved rail. After the usual trial & error cuts & a bit of sweating, we got it done. Was wondering about any pointers for cutting these twisted pieces. More specifically, how to mark them for the cuts. I held this one in place along side the newels and scribed a couple marks to get the cuts in the ball park. Once those cuts were made, the rail was laid on the treads, top end against the square base of the upper newel. On the bottom, I set a square newel cutoff in the same location as the finished newel would be. Transferred marks from these points with a straightedge, some scribing, and a little eye-balling. Is there an easier way to do this? Seems to me that even if you figured out the exact angles for the miter saw, they would be kinda useless since the rail won’t sit flat on the saw table anyway.
Anyways, was happy with how everything fit in the end, I’m just wondering how some of you with lots of practice do these. I’ve just got a few of these under my belt, & never had a teacher to show me how.
Thanks, Mike


Replies
no idea on how to accomplish this any different than how you did it yourself...
...mostly wanted to say nice job!
btw...where in the state are you located? My former wife was from Fairmont and I used to spend a bit of time down there...
knowledge without experience is just information.... Mark Twain
http://www.cobrajem.com
Charlie, I'm about 40 miles east of Fairmont, between Blue Earth & Albert Lea.
mike, looks like you should be telling instead of asking..
great work !
Thanks guys, I love doing stuff like this, but man sometimes cutting these gets me a little nervous. Just always looking for any little tricks.
Mike
Mike
I'd just like to learn how to install straight rail and spindles, never mind the curved stuff. Great looking work.
greg in overcast connecticut
I've never had to do one like that and probably never will but yours looks great! I'd do the same as you described. A good eye and luck helps.
blue
One of the tools we use to plot and mark cut lines on a helically curved rail is one of those center finding attachments you find on and engineer's combination square.Do you know what I am talking about? It's a V-shaped attachment so it touches the rail at two points so the line of the ruler part of the square is perpendicular to the tangent at that point. Maybe I should pull it out and photograph it tomorrow.
I've got a question for you though. What kind of heights did you set your level rail and the rake rails at that you were able to get them to intersect and meet at the newel at the exact same height without goosenecking the rake rail. Usually when the newel is right at the edge of the tread like you have it that generally makes the rake rail high and the level rail on the low side to accomplish that without a gooseneck.
Still that looks like and excellent job. What are they going to do there? Carpet the upstairs balcony and then put a runner down the stair? Or is that 1 x 4 base some other kind of design feature.
View Image
Jerrald, I don't remember for sure what the rail heights ended up at, other than they had to meet code of 34-38 off the nose of the tread. Does the increased inclination angle of the curved handrail affect how they will meet up at the newel? You've got me wondering now.
Not familiar with the tool you're describing, a pic would be great.
That one by four rail is part of the design I guess. I didn't design it, just put it together.
I've got more questions for you, but I gotta go hook up the trailer & be off to work. I'll try and check back tonight.
Thanks, Mike.
arcticcat "Not familiar with the tool you're describing, a pic would be great."
Mike, it turns out I left my camera at my brothers this past weekend so no photo but here's a little rendering of the tool (engineer's combination square center finding attachment) and the principle I'm talking about so I hope this helps with that.
View Image
"Jerrald, I don't remember for sure what the rail heights ended up at, other than they had to meet code of 34-38 off the nose of the tread. Does the increased inclination angle of the curved handrail affect how they will meet up at the newel?"
Yes it does. But unfortunately I don't really have the time to do a sketch of what I'm referring to there tonight but hopefully I can find the time to illustrate for you tomorrow.
"That one by four rail is part of the design I guess. I didn't design it, just put it together."
The reason I asked is here's a picture of a railing we did that I've posted here before where the balcony is going to be carpeted with the carpet running up to the balcony nosing and then as it runs down the stairs the carpet becomes a runner. You see the similarity? That's why I asked.
You'll also notice that to get the rake rail to join the level balcony right over the newel where we have it placed we had to gooseneck it to get it up there.
Click For Larger Photos
View Image
View Image
Nineteen times out of twenty if the newel is right at the leading edge of the top tread you will need to gooseneck it to get it up to right place on the newel or the rake rail will probably be higher than it should be. The one time it does work is when the conditions are such that you can have the level balcony rail at it minimun and the rake at it maximum allowable by code and with maybe a little luck of the Irish they then line up.
View Image
Jerrold,
I picked up on a couple things that you did differently then Mike, The balusters on the stairs in your picture appear to be shorter in length, and, also your upper railing is`nt set close to the edge like in Mike`s picture you have a wider piece on the floor so you probably centered the balusters on that and that is why the goose neck is needed in my opinion.
Edited 3/15/2006 8:34 pm ET by Shavey
Shavey, that's a good observation but the rake rail balusters in the photos I posted are shorter because they are sitting on top of a parapet type stringer (a closed carriage stair) where Mike's balusters are set onto treads (an open carriage stair) but that's actually all immaterial. What matters is not the length of the baluster but the height of the railing off the leading edge of the tread.
Here's a stair that is more like Mikes in that the balusters are seated on the tread and you'll notice there is a gooseneck on this one too.
View Image
I will draw this out tomorrow so you guys can see just what I am talking about.
View Image
Nice work and a good thread
busta ":0)
The only other thing i can think of is that the post height on your second post may have to be adjusted up, Mike also has a curved landing at the top of his stairs which happens to land right in line with his first post. So i`m thinking he layed out the top hand rail section first and installed it and then worked down the stairs from there, and thanks for pointing out the other difference in your picture
Okay Shavey (et al) what I was talking about the other day when I said that "Nineteen times out of twenty if the newel is right at the leading edge of the top tread you will need to gooseneck it to get it up to right place on the newel or the rake rail will probably be higher than it should be." is this...
In the sketch below you see the heights that the typical stair codes allow for railings on the balcony and rake rails. I've placed a newel right at the leading edge of the balcony where design-wise it looks best and you'll notice that if I use the Rake Rail Minimum Height a join it right into the newel without using a gooseneck it will come in below the height of the balcony rail. One of the things that fabricators and manufacturers do to solve this dilemma is they create what's called a landing newel which has what we call an "Extended Anchoring Box" where the section of the newel you would anchor the rail too is taller than on a typical newel.
View Image
The problem is when you have a standard or typical newel on one end of the balcony and a Landing Newel on the other if you look up at the balcony rail from below while it looks "okay" in the eyes of many it just doesn't look right. You would be far better off design-wise with a kind of balanced symmetry where the newels on both ends of balcony look the same having the same size "anchoring box". But then you have another problem which is that with a standard newel the ""anchoring box" isn't big enough to anchor the rail rail to so you have two choices:
Raise the Rake Rail height and...
Use a gooseneck
While using the Raise the Rake Rail height solution may seem the easiest there is a design problem that can come with it. It makes the whole rake Balustrade appear higher and more massive in proportion to the balcony rail. In the photo below I've taken the stair photo I posed in msg# 70871.12 and drawn in in red the line the rake rail would follow if the rake rail height was raised so that I wouldn't have to gooseneck it at the top.
View Image
The rake balustrade while okay as far as the code is concerned would then appear way to high and large with respect to the balcony rail. It would just look wrong. In addition to that if the base newel or volute ("birdcage") is on the first step of the stair the top of it is then almost at chest height which looks really weird. And many people find a rail rail set at the maximum height allowed by code "too high" for comfort.
This is not to say that you always should gooseneck a rake rail because there are times where you can set the rake rail higher and it will be okay but as I alluded to earlier "Nineteen times out of twenty" it just isn't the right thing to do.
View Image
Each application has it`s own set of circumstances i guess...did you consider putting in a post of substantial proportion at the bottom of the stairs could that have given you a little more breathing room concerning the height in the rail.
Shavey "Each application has it`s own set of circumstances i guess...did you consider putting in a post of substantial proportion at the bottom of the stairs could that have given you a little more breathing room concerning the height in the rail."
Yes but for the three reasons I just mentioned we wouldn't do that. 1. The whole rake Balustrade would appear disporpotionaly higher and more massive in respect to the balcony rail, 2. In addition to that if the base newel or volute ("birdcage") is on the first step of the stair the top of it is then almost at chest height which looks really weird, and 3. many people find a rail rail set at the maximum height allowed by code "too high" for comfort.
You can't tell me that you think in the case of this stair that you think a rail follwing the red path line would look okay???
View Image
(And my own personal taste sees goosnecking as more elegant and graceful than running rake rails right into the posts which I think looks "herky-jerky")
View Image
It looks fine as is jerrold i`m not complaining and goose necks are very nice when finished off. Nice job!!
OK, I got a little more time now than I did this morning.
The best I can remember, the balcony rail height was 36, and I'm thinking the curved rail was 35 or 35.5 or so. When I first held the piece in position, I was pleasantly suprised to see how close they were in height but I can see that wouldn't always be the case, just as with a straight rail. I have done with post-to-post rail as you mentioned, keeping the balcony rail at minimum and running the rake rail at max, if I have a small block on the newel that they must meet on.
The engineers combination square would have been quite helpful, will have to look at getting one for next time.
I see what you mean about the one by four rail that the newels & ballisters sit on. Myself, I would normally have had it sit on the subfloor & run the flooring into it so they are flush. (I install a lot of hardwood flooring also and like making the curved nosings and cutting the flooring into them) . I'm guessing that the flooring guy maybe didn't want to mess with it so he had them make it as an overlay piece. I actually do like the look tho.
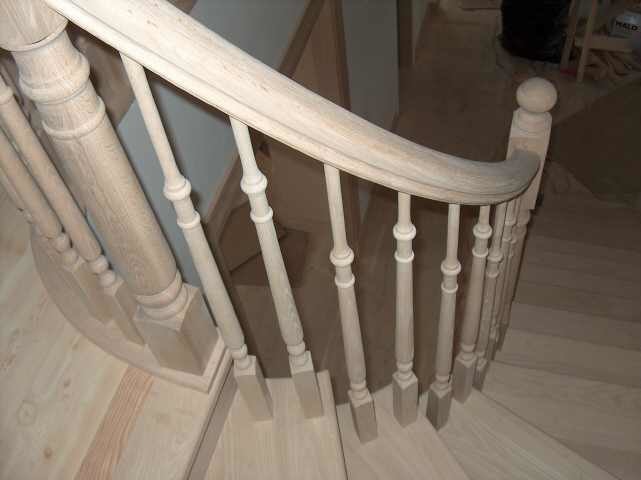
If you look at the pics you can see that the curved rail runs into a newel mounted to the tread. Would you have eliminated that post and joined the straight rail directly to the curved? I realize the pitch would change, just wondering if that would look or work any better.
By the way, the pics of your work are awesome, you are quite a craftsman. Thanks for the replies.
Mike
arcticcat - "If you look at the pics you can see that the curved rail runs into a newel mounted to the tread. Would you have eliminated that post and joined the straight rail directly to the curved? I realize the pitch would change, just wondering if that would look or work any better. "
Mike to tell you the truth we would never put a post there but you are sort or caught between a rock and a hard place when you're dealing with a J-shaped stair because the pitch of the rake rail on the straight section is different than the pitch on the curved rake. I've talked about this once upon a time here before with Stan (Cherry stairs with pitch change).
The problem is just what do you do at the pitch change? Mitering the two different pitched rails looks terrible and if you wanted to put an easing in there for a more rounded transition it looks terrible too because it's such a small slice of the full easing piece and there wouldn't be any helical twist in it either to get the helical curved rake oriented correctly to the straight rake rail. Since I don't know of any stair part manufacturer who makes the kind of transition easing you would need as a stock part what we do is custom make our own transition easing for J-Stair jobs.
View Image
View Image
It's about a 1' long section of rail (or longer) that is ever so slightly eased and twisted so that the railing profiles line up.
View Image
Jerrald, thanks for the pics. I can see that the transition would be trickier than I was picturing. How do you calculate how much twist that transition piece would require? Do you carve these out of solid stock? Something like this is a little beyond me, at this point anyway, I'm just curious how you would go about it.
Thanks for the replies,
Mike