If this is something that requires soldering or could end up damaging the pipe requiring its replacement, then the answer is yes. If it’s just a matter of unscrewing something and screwing on a replacement, then I can tackle it myself.
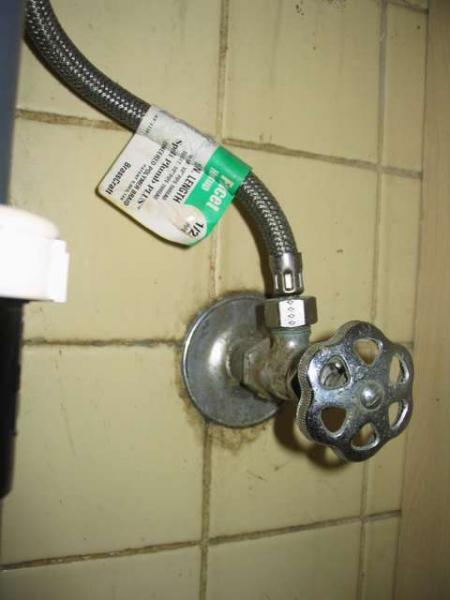
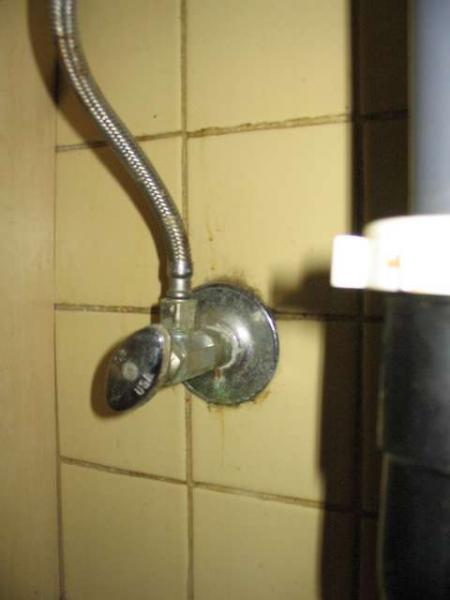
I have a leak from the shutoff valve for the hot water supply to the lav in our main bathroom. The supply lines are all galvanized, The leak doesn’t seem to be from the connection of the flexible supply line to the valve, nor the connection of the valve to the pipe that sticks out from the wall — it seems to be coming from the valve stem. It’s not dripping a whole lot, but it’s enough that I ican’t store toilet paper under the sink any more. 🙁
What are the names for the different parts here, anyway?
Thanks,
Rebeccah


Replies
Rebecca,
If the leak is really from the valve stem then it is an easy fix.
Two options:
One is replace the valve a new valve. Shouldn't be involved unless you have a soldered on valve, which from the pics it doesn't look like. I think from what I see that you will find the valve to be threaded on to a 1/2" pipe fitting at the wall. Look closely to make sure.
The other is to repack or tighten the packing nut .
Packing nut is the nut on the valve body just below the valve handle.
They generally (or at least used to be in the old days) have a form of packing material squeezed under the nut into a cavity that surrounds the valve stem. Turn off the house water, remove the hnadle from the stem, loosen and remove the packing nut.
There will be either a small donut of somewhat fiborous material under the nut or a fiborous string that is wound into the cavity. Pull out what is there and head off to a GOOD hardware or plumbing supply place. Replace with new material .
Sometimes all it takes is tightening that nut just a bit to add compression to the material that is already there. Turn the valve to the middle of it's travel , then tighen the nut. Re open valve completely then turn back in 1/4 turn is what I was taught. Supposed to keep it from getting frozen in place with the last 1/4 turn in .
Edit. Valve is called a "T" stop out here.
Sink Supply Hose off the stop to the sink
Edited 3/27/2007 12:41 am by dovetail97128
Rebeccah,
If you look behind the handle you can see a nut that the stem goes through.
On occasion ive been able to tighten this nut and get the water to stop leaking.
It takes 2 wrenches, 1 on the nut and 1 on the body of the valve. slowly twist the wrenches towards each other while applying greater pressure to the nut. you dont want to twist the valve body.
hope that made sense, usually all it takes is about a quarter turn or less.
You have seen a lot of posts here, you know to trust the previous 2 posters.
Own opinion is also that 2 wrenches and a 1/2 turn on the gland (nut behind the handle) will fix it.
Might be worth replacing both of those with new quarter-turn angle stops. Shut off the water to the house, remove the existing stops, wrap some white teflon tape around the stub threads, put on the new stops, and reconnect the flex lines. There are a few different types of angle stops, so make sure to buy new ones that will work with your stubs and flex connectors. Some water will flow out when you remove the old ones so have a small bucket and a rag handy. IIRC your house is one story so it shouldn't be much, if any.
If you decide to replace the stop be aware of this: There are about 6 different kinds of 1/4 turn stops. It can get a little confusing when you go to the store and start looking a new ones. Best to have the old one with you if at all possible.
Thanks to all.I will try, in order:
1. Tightening the packing nut
2. Repacking the packing nut
3. Replacing the valve.Dovetail, thank you for the terminology. I had gotten a ball valve to replace it with on my last HD/OSH run, and on closer inspection at home noted it is an angle stop not a T stop, and it's made for connection to copper tubing, so it's completely wrong. If I can avoid replacing the valve, that will be all to the good.Rebeccah
Doing a tile job a few weeks ago, there was a shut-off to the toilet on the wall that was made of plastic. First one I have seen. You pull the plastic knob to shut off water, or push, I can't remember. It was the cheapest looking thing, I wouldn't trust it in my house. This was a high dollar condo in a high rise.
It looked to me like trouble waiting to happen! This is not a place to skimp. Maybe the thinking is it won't rust.
Brant
When you said "galvanized" I got scared. The other posts suggest taking the valve apart and replacing the "packing", cork or rubber washers. Please try this first, before replacing the shut-off completely. I have had bad luck undoing threaded connections in galvanized pipe. (rusted pipe, broken connections etc.) I think that the guys are right, should be able to fix the valve.
And take the sticker of the braided supply line, for cryin' out loud!! You wanna look professional, don't cha?
Hey, quit yer carpin', karp!That label has been there since before I bought the house, and it tells me what size the braided line is! I was actually glad to see it as I was contemplating whether or not those lines needed replacing (there may be another leak where the braided line connects to the faucet, or maybe it's just a poor seal of the penetration through the sink top, and splashed water getting down through).Any way, thanks for the caveat about threaded connections to galvanized pipe. That was a concern of mine, too, which is why I mentioned it.Rebeccah
Sorry about the carpin', just hate stickers, on windows, mirrors, sinks, supply lines, stainless fan hoods, acrylic tubs, blah,blah,blah. Is it nap time yet?
I peeled the sticker off the lav in the back bathroom. All it had on it were nearly worn-off cleaning instructions.The previous owners of this house were a piece of work.Anyway, I tightened the packing nut a little less than 1/4 turn (that was as far as it would go), and the leak seems to have stopped.Phew. That was easy.Rebeccah
Now the next lesson is how to keep your pants up so you don't show the dreaded "plumbers crack", You are qualified to have one now. Just for info purposes, the wall stops generally (in my experience ) unthread from the galvinzed pipe without too much struggle. If they don't what usually happens is the " pipe nipple "( a term used to describe a short length of pipe) that is in the wall unscrews from the elbow.
Next up will be the kitchen sink, which has a drain leak somewhere -- there's been a BIG pot under it for several months, and it now has about 4" of water in it.Yesterday I redid the drain for the lav in the back bathroom. My fiance and his buddy had removed the lav and mirrored medicine cabinet and a hunk of drywall over a month ago, so the plumbers could get to the vent. Then my fiance lost interest, and I've been the one putting the bathroom back together again over the last several weeks. Cleaned the disgusting shower, replaced the greenboard, primed and painted the patched area, replaced the tileboard, cut primed painted and placed 1x4 trim pieces as baseboard to match (in style if not in color) the other walls, replaced the lav cabinet and top, turned the door to the cabinet around so that it opens the useful direction, hooked up the supply and drain connections to the lav, glued the shower door assembly to the pan so it doesn't move 1/4" to 1/2" when you lean on it, and caulked the shid out of everything (i.e. shower surround, lav abutments, edges of tileboard). Discovered that the drain leaked after everything was put back together, because there was about a 1 1/2" offset between the rough-in drain pipe and the closest I could get the trap, and even with the flexible pipe the previous owners had used, there was too much asymmetrical pressure on the connections. So I got a bunch of different replacement parts, and played around until I got a combination that fit without binding. Now it doesn't leak any more. The only think I have left to do in there is to reinstall the medicine cabinet.As for the butt crack -- I keep it hidden with elastic-waist sweat pants.Rebeccah
Rebeccah - You are a woman after my own heart! Way to Go!
Oh geez, that term "crack" is so vulgar... can't we use the polite term "plumber's cleavage"?
The best solution is to buy "Longtail" tee shirts from Duluth Trading. It's all I wear anymore, ever. I take no pleasure feeling a breeze on my lower back, and I don't want other people walking off the job.
Now the next lesson is how to keep your pants up so you don't show the dreaded "plumbers crack", You are qualified to have one now.
Here is the answer to "plumbers crack'
Rebeccah -
Tightening will probably fix it for a while, but keep an eye on it. If it starts leaking again, just replace it rather than try to re-pack it. It can be done, but it isn't really worth the hassle. You can replace the whole valve for under $10.
Yeaa!!! Now do not ever touch it again.
Unless, you decide to rip out all that galvanized water pipe, ouch!!$$$
It seems like since tightening the packing nut, there is less flow to the faucet. Is this normal? I thought maybe I was imagining it, but Kalim complained about it this morning, too.Rebeccah
Never mind, I just checked the aerator. Seems I dislodged some rust particles while turning the valves back and forth. Three of the four pinholes in one of the pieces of the aerator were plugged.Rebeccah
Now your thinking!! Logic solves most of the stuff in this industry.
Yeah, tighten the packing nut a tad. If necessary it can be repacked. Replacing the valve should not be necessary unless the stem is badly scored or eroded.