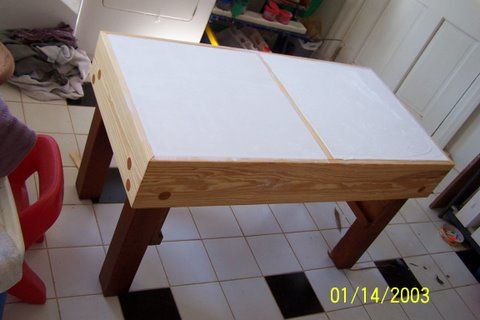
DW just filled this heavy worktable I made, with (2) 23x23x2-1/2″ pours of plaster of Paris (about 11 gallons). Her question is about pinholes. the surface finish is nice, and she was careful when mixing and pouring to avoid entraining air – but some came up anyway.
This is a work surface for clay; needs to stay absorbant. What is the best way to fill up the pinholes so they won’t telegraph onto the clay workpieces? More PofP?
Forrest – DW said, “ask the guys – they’ll know”
Edited 1/14/2008 12:49 pm by McDesign


Replies
Joint Compound should do it well.
Spheramid Enterprises Architectural Woodworks
"Success is not spontaneous combustion, you have to set yourself on Fire"
drill them larger and refill 'em..
Life is not a journey to the grave with the intention of arriving safely in a pretty and well preserved body, but rather to skid in broadside, thoroughly used up, totally worn out, and loudly proclaiming
WOW!!! What a Ride!
Forget the primal scream, just ROAR!!!
hey... i saw the title and i said ...."that's forrest"
how did i know that ?Mike Smith Rhode Island : Design / Build / Repair / Restore
I thought exactly the same thing!The best reward for a job well done is the opportunity to do another.
<I thought exactly the same thing!>
Well, okay, as long as I'm not pushin' the envelope of what's appropriate in a Fine Homebuilding forum (that's excluding the flare-up a few days ago!)
Y'all'd tell me iffin' I was wouldn't'cha?
Forrest - Getting info where the info is
no... it must be something in how you write your titles... or some tip-off wording
kinda like a "tell" in pokerMike Smith Rhode Island : Design / Build / Repair / Restore
He's one of the few here not complaining about DW.
I think there actually on the same team in Forrestville.[email protected]
you got your bags packed for JLC yet ?Mike Smith Rhode Island : Design / Build / Repair / Restore
Got my room reserved.
Just hoping the economy holds out long enough for me to make this worthwhile.
They are charging to get on the floor this year even if you attend classes.
I won't miss it; hope to see you there you commie liberal![email protected]
early registration usually gets you free floor admissionMike Smith Rhode Island : Design / Build / Repair / Restore
What IMERC said: drill larger and fill them.
What JTC says: drill larger; then scratch / gouge the inside of the holes with a dental tool or stiff bent wire to provide a tooth for the POP filling. Even better would be to gouge the hole into a bell shape (wider at bottom) to provide a "key" lock and a tooth.
Vacuum the holes thoroughly before filling.
Jim
I did a lot of plaster casting back in art school. I always used more POP to fill the pinholes. Just squegee it in. The sooner you do it, the better.
Mike Hennessy
Pittsburgh, PA
I'm wondering- if your wife ( or you) held a vibrating sander on the frame after pouring the plaster, would that cut down on the pinholes?
Kinda like vibrating concrete during a pour.
She did tap on the sides and bottom; made a good amount of bubbles come up. Sander probably would've been better.
Forrest
that's a good idea. connecting it to anything that would shake or vibrate would help. bubbles are an inevivitable part of the chemical reaction when you mix plaster with water, and aggitating the form helps the bubbles up and out.
Drive round tooth picks into the holes, snap them off, then sand them flush.
Woods favorite carpenter
I thought this was probablly your thread also.... and boy was I hesitating to open it. <G>
Mike
Trust in God, but row away from the rocks.
Let it set for a few days. put some 60 grit sandpaper on a block and have at the surface with it exposing all the bubbles. You'll have to change the paper often because the plaster will still be wet (unless you did this 2 months ago). Once all the bubbles are exposed and open, mix up a 'slip' of plaster with water....very loose so you can pour it on almost like water. Quickly trowel it into the surface filling all voids.
Strike it off with with a pool trowel or a wide spackle knife. Plaster needs to cure before she can use it to knead clay on
Oh, and the above posters were right. When you cast plaster, you should agitate the mold a few times right after the pour. I used to strike it several times on the sides with a wooden stick. This causes any surface bubbles that may be trapped on the surface of the cast to float up and away. It also helps fills voids the same way when you agitate concrete when pouring a foundation form.
Thanks for all the good advice. She's down there right now, squeegee-ing in some loose stuff into the pinholes; then maybe this weekend she'll block-sand it flat.
BT is the best!
Forrest
Hello there I worked in a production Pottery for ten years. I don't
Claim to be a plaster master but as it relates to clay I have some experience. If you are using this table only to wedge clay the
bubbles wont hurt at all. If you truly need a flat surface to work on
the sanding idea is probably your best bet.Joint compound will be a different hardness I.E. will absorb water differently and affect the
drying rate of your piece.
That said if your needs are such that a perfectly smooth and flat surface are required, I think I would bite the bullet and re pour the
plaster. It will be hard to sand it perfectly flat and if there are bubbles on top there are probably bubble through out the slab. Also plaster is inexpensive.
So tips on casting a plaster slab:
Slowly slowly !!! Miking plaster is the hardest part! Power drills
will fill it with bubbles for sure. stirring is a much better adjective.
I know that is not always an option, but let it be a guide.
Research the proportions carefully for your application overall
hardness, strength, porosity vary greatly depending on water percentage.
Support the finished piece fully. Plaster has a very low tensile strength, preparing clay (Wedging or Needing) can over time cause it to fail.
It will take a very long time to dry ( at least initially).
So in short the bubbles came from the mixing process. Every step
from pouring dry plaster into bucket, to adding water, to mixing and finally pouring plaster in mold must be done with every effort not to
trap air in plaster.
Then vibrate plaster in mold. If everything went well some bubbles
but not a lot will be left. I have found that a palm sand works well.
If any thing more aggressive is needed it's a lost cause. All of this must be done before the plaster starts to set ( heat up).
One other thing plaster expands as it sets so if you need to remove it from the mold take that into consideration.
I hope this helps, plaster can be tricky but once you have your system it easily repeatable.
Thanks for the thoroughness - just read it to DW. She says perfectly flat's not her goal, but she's concerned that heavy wedging will break edges off bubble pinholes and integrate bits into the clay. Hence the question about filling the holes.
She mixed the stuff by sifting plaster into a large flat tray of water, then "raking" with a spatula when it took ten seconds to disappear from being sprinkled on the surface. Really few bubbles, but she doesn't want any bits in the clay.
This wedging table came to her (all that I could keep was the legs!) with (rotten) canvas stretched over the plaster - is this the hot tip?
Forrest - DW just said "I love BreakTime - anything happens to you, I'm keeping up the relationship!"
Hey, we're not in to relationships here.A Great Place for Information, Comraderie, and a Sucker Punch.
Remodeling Contractor just outside the Glass City.
http://www.quittintime.com/
Aw, he!!, get in touch with your feminine side already.
Forrest - cutting intricate curves (in a variety of materials) with my new jigsaw blades
Nothing I'd like better, but she left for work.A Great Place for Information, Comraderie, and a Sucker Punch.
Remodeling Contractor just outside the Glass City.
http://www.quittintime.com/
Had some time this AM; was inspired to go through my jigsaw - new cord, new guide blocks and alignment, general clean and grease.
Forrest
call me if you ever need more inspiration.
I'm full of it.A Great Place for Information, Comraderie, and a Sucker Punch.
Remodeling Contractor just outside the Glass City.
http://www.quittintime.com/
I'm full of it.
if there was ever a door held open with the welcome mat out...
this is it...
Life is not a journey to the grave with the intention of arriving safely in a pretty and well preserved body, but rather to skid in broadside, thoroughly used up, totally worn out, and loudly proclaiming<!----><!----><!---->
WOW!!! What a Ride!Forget the primal scream, just ROAR!!!
How much easier can I make it.
Not often the punchline is given and you fill in the blanks.
This from a guy that can only remember the punchline, never the lead in.A Great Place for Information, Comraderie, and a Sucker Punch.
Remodeling Contractor just outside the Glass City.
http://www.quittintime.com/
Forrest
The plaster on the wedging table is better not to be covered with canvas as it collects residue from the clay and gets a dusty surface after it dries. Clay has silica in it and as you know would not be good to breathe in that clay dust. You can use a piece of hardie board it will still absorb the moisture in the clay if it's used for reclaiming the scrap clay from the bucket for drying to be reused for pottery and there won't be any chips in the surface of the hardie that will migrate into the clay. Some people use a granite or marble slab to wedge on then no worries about the pinholes or clay drying in the plaster. I'll try to look up some of my pottery sites and send you the links if they have any info on this subject
Zeeya
View Image
hey glad to be of help.
One nice thing about plaster is that it burns out at a temp
way below before any clay vitrifies (hardens or becomes stone). So
other than some very small flaws in surface of piece nothing bad will
happen.
On another note if your using it to prepare clay, it's not always necessary or good. The purpose of the plaster is to dry out the clay.
Like after you through it on the wheel (and don't want to keep the
results). Then the clay will be to wet, so you wedge it on the plaster.
this removes the water and if you wedge it properly the air bubbles.
But if you are just preparing clay that is already dry enough, The
plaster will often make it to stiff. That's where the canvas comes in.
You can actually wet the canvas to keep it from drying the clay out. On a side note you don't put the canvas on plaster, any surface will do
(plywood is common). I don't even do that. A sturdy bench with
Masonite on top is almost perfect. Cheap easy to clean and no splinters.
As long as I am rambling on...
A slight pitch on the table helps with back ache !
I hope this helps Oh I forgot mixing.No guarantees but here's how I do it.
I make a batch that is large enough to use a power mixer (on of those thing you stick in a drill) but small enough to fit in a five gallon bucket. maybe half full not to much more if I can help it.Measure out plaster and put in bucket. then add premeasured water
slowly and gently. then mix slowly. Those mixers seam to be designed to pull the surface down the middle to the bottom, DON'T LET IT!!!
Go slow enough to avoid pulling air in but as fast as you can get away with. That's the trick Really,also you can use the mixer to paddle the bubbles up as you go. Then don't slop it into the form, slowly pour it in. Vibrate the sides and leave it alone.
Edited 1/15/2008 6:56 pm ET by Henley
Dang man, somebody filled up your foosball table with plaster. Gonna have a bitch of a time playing now.
jt8
"It is difficult to get a man to understand something when his salary depends on his not understanding it." --Upton Sinclair
It's snow - don't y'all play like that, this time of year?
Forrest - warm
I work in a pottery studio and we have all of our plaster surfaces covered with canvas. It keeps the plaster from migrating into the clay if any of it breaks off but still allows the plaster to absorb water.
Ryan