FHB Logo Facebook LinkedIn Email Pinterest Twitter Instagram Plus Icon Close Icon Navigation Search Icon Navigation Search Icon Arrow Down Icon Video Guide Icon Article Guide Icon Modal Close Icon Guide Search Icon Skip to content
Subscribe

In every issue you'll find...

  • Expert insights on techniques and principles
  • Unbiased tool reviews
  • Step-by-step details to master the job
  • Field-tested advice and know-how
Subscribe Now!
Subscribe
  • How-To
  • Design
  • Tools & Materials
  • Videos
  • Blogs
  • Forum
  • Magazine
  • Members
  • FHB House
  • Podcast
  • Join
  • Log In
Subscribe

Discussion Forum

Discussion Forum

Framing for clerestory-style windows in shed addition.

intromission76 | Posted in General Discussion on February 14, 2022 03:33pm

Hey Folks,

Hoping for some advice.

I’m installing 2 awning windows up high in my son’s room (a shed addition to the main house). Only have to be concerned with snow loads, and plan was to over-engineer this to be on the safe side. This wall is under the eave.

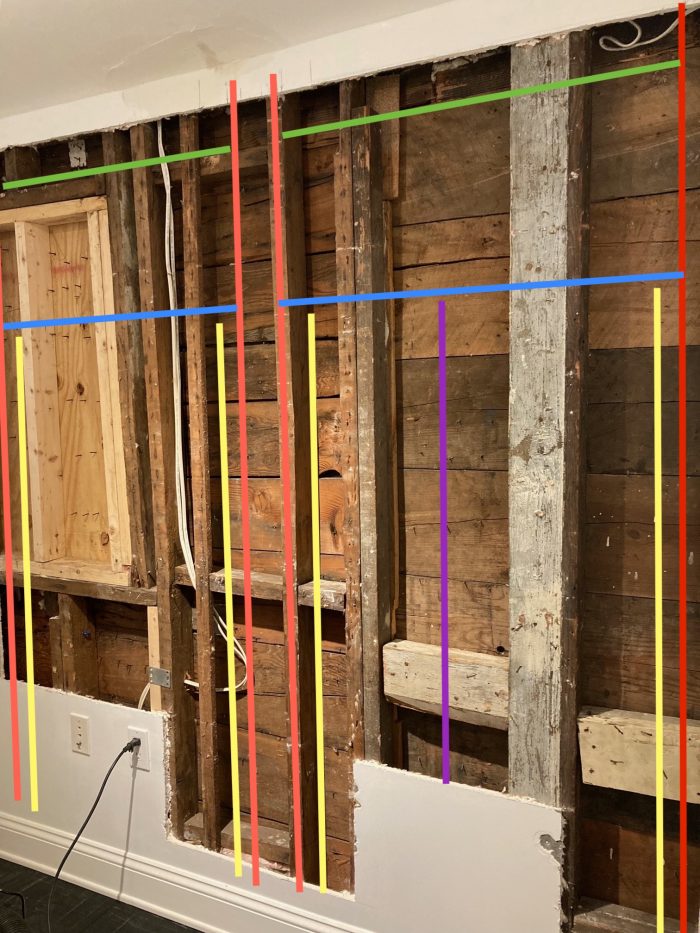
Didn’t find what I expected once I started removing sheetrock. 

Tell if I’m wrong on this, but my understanding was, for a 34″ x 14″ window I would have to have my king and jack studs going all the way to the bottom plate, the header could be 2 2 x 4 with a sandwiched piece of 1/2″ osb. I’m going to leave a small space between the header and top plate to reroute some wiring.

Question I had was looking at what was probably a window on the left before: Can I have one of my king and jack studs rest on that sill from the prior window? Can I also cut part of the right side king/jack studs of that framing and use as a cripple? Would simplify things a bit, and if that framing will support the load I’ll just go with that.

Some of those horizontal blocks, are these meant as a fire block or to keep the studs in line? I’ll need to remove them temporarily to reach the bottom plate with my additional studs, but I can cut some new blocks to insert if they belong there.

I’m a little worried I won’t be able to slip the new studs in floor to ceiling without removing even more sheetrock at the bottom and top. Anyone have a suggestion for that? Would rather not mess with the baseboard or having to redo corners.

Thanks in advance!

Reply

Replies

  1. User avater
    UncleMike42 | Feb 14, 2022 04:07pm | #1

    I would cut out the top and patch that when you are done, if you really don't want to disturb the baseboard. Photo looks like you are in for some ceiling patching anyway.

    But you seem to have a fine assortment of framing and nail-catchers.

    Not sure where you got the idea a couple 2x4s are ok.

    http://www.southernpine.com/app/uploads/SS_1-6L.pdf

    Your header size will depend on species and grade.

    You have not said how long the shed roof is, and this is critical to size the headers.

    Speaking of headers, the window sill is not sized to be a header, so you really cannot use it to hold up the loads.

    Best plan is to plan and install dedicated jack studs all the way to the bottom plate.

    1. intromission76 | Feb 14, 2022 05:27pm | #2

      Gotcha! Good point about the sill. Thank you!
      So re: headers, I was only saying 2x4 + because it seemed with 34" wide window I'd be ok? I also don't want to bring the window too low down on the wall-Idea was for it to be up top. A 2x6 header might bring it down too low. You raise a point I hadn't considered though in that the windows are so close together. I don't think I'd like the header to span both windows, would rather make them separately. What if I reinforced that area in between with an addition king stud? It would then be 3 studs nailed together in the center.

  2. User avater
    UncleMike42 | Feb 14, 2022 08:34pm | #3

    How long is the roof that sits on this wall?

    1. intromission76 | Feb 14, 2022 08:54pm | #4

      About 6.5 ft, with the rafter tails that overhang, just shy of 8 ft.

      1. User avater
        UncleMike42 | Feb 15, 2022 07:12am | #5

        Then your idea for a pair of 2x4s is not such a terrible idea.

        What does the local building department say?

        Tables in building codes only include double 2x4 for interior load bearing wall use. all the exterior wall tables start with a single 2x6.

        Not sure where I suggested a longer header and single one. You are better off with two headers and intermediate support.

        1. intromission76 | Feb 15, 2022 09:18am | #6

          Oh, understood, I wasn't implying you suggested it, just that it made me wonder-It was something I had not considered.

          The framing on the old window appears to be 1 2x4 on top of another, without the extra sandwiched piece of 1/2" plywood.

        2. intromission76 | Mar 11, 2022 04:16pm | #7

          Alright, I'm back with some updates-I think everything is framed well enough now to proceed but am curious about a couple of things. I did end up using 2x6 lumber for the headers to play it safe-2 pieces above each opening with plywood sandwiched in between.

          First question is can I get away with keeping these cripple studs where they are and not completely removing them and installing new ones at the ends of the sill? I feel like things are beefy enough there for a couple of small windows. I could use some additional mending plates to wedge in additional 2x4's on the left side if folks think that may be a weaker area.

          Second, the small gap where I had to reroute/tuck the wiring to the plug, when it comes to insulating, can I just spray Great Stuff within the gap and over the Romex as well? I was thinking of using spray foam in all the visible gaps between the board sheathing as well.

          My plan is to remove shingles/put up OSB along the outside before making my openings. Is the finishing on the inside (batt insulation, drywall) typically done last? There is some foul weather tomorrow so I thought I might do that first before the exterior stuff.

  3. User avater
    UncleMike42 | Mar 11, 2022 06:30pm | #8

    One reason to finish the exterior before doing insulation and drywall is to make sure your new work does not end up wet. Errors and weather events can happen and it would be a lot easier to recover if the inside of the wall is still open. Drywall can be better fit after the windows are installed.

    What is going on with the loose electrical wire on the right side? I hope the black electric tape between the windows is leftover from holding the cables temoporarily as a convenience, and not trying to patch up some NMC outside a proper box. I know it would mean drilling a few more holes, but this is the time to take care of wiring issues.

    I don't have an opinion on the cripple studs, but would want a continuous path of wood to the floor. It is not like that window is going to weigh all that much, (unless you think your son will use it as a regular exit to sneak out, and even then only if he is on the heavy side (which would make it that much harder to get through the window))

    Since you are putting OSB over the patchwork wood walls on the outside, I would be inclined to make sure it is well sealed and forget all the gaps in the original boards. Will you put a layer of house wrap over the OSB?

    You can use some foam between the studs. If you don't have a pro gun, you might want to wait till the windows are in and get window and door foam and do around the windows and that gap at the same time.

    I cannot tell from the photos; are all the joints where your framing meet connected with screws and/or nails?

    I like the look of those headers better than the 2x4s.

    Thanks for the updates.

Log in or create an account to post a comment.

Sign up Log in

Become a member and get full access to FineHomebuilding.com

Video Shorts

Categories

  • Business
  • Code Questions
  • Construction Techniques
  • Energy, Heating & Insulation
  • General Discussion
  • Help/Work Wanted
  • Photo Gallery
  • Reader Classified
  • Tools for Home Building

Discussion Forum

Recent Posts and Replies

  • |
  • |
  • |
  • |
  • |
  • |
View More Create Post

Up Next

Video Shorts

Featured Story

Schneider Electric Recalls Line of Electrical Panels

The QO Plug-on-Neutral Load Centers can overheat causing burns and fire hazards. Consumers should contact Schneider Electric for inspection, repair, or replacement.

Featured Video

How to Install Exterior Window Trim

Learn how to measure, cut, and build window casing made of cellular PVC, solid wood, poly-ash boards, or any common molding material. Plus, get tips for a clean and solid installation.

Related Stories

  • Track Lighting for Functional Ambiance in Busy Spaces
  • Keep Craft Alive Podcast: Ep. 19, Jesse Neumann, Arborist
  • FHB Podcast: Special Edition With Neil Freidberg of Louisiana Pacific and Kyle Stumpenhorst of RR Buildings
  • DeWalt Recalls 12-in. Sliding Compound Miter Saws

Highlights

Fine Homebuilding All Access
Fine Homebuilding Podcast
Tool Tech
Plus, get an extra 20% off with code GIFT20

"I have learned so much thanks to the searchable articles on the FHB website. I can confidently say that I expect to be a life-long subscriber." - M.K.

Get home building tips, offers, and expert advice in your inbox

Signing you up...

This site is protected by reCAPTCHA and the Google Privacy Policy and Terms of Service apply.
See all newsletters
See all newsletters

BOOKS, DVDs, & MERCH

Shop the Store
  • Outdoor Projects
    Buy Now
  • 2021 Fine Homebuilding Archive
    Buy Now
  • Code Check Building 4th Edition
    Buy Now
  • Pretty Good House
    Buy Now
  • Shop the Store

Fine Homebuilding Magazine

  • Issue 309 - Aug/Sept
    • 10 Steps to Install Crown Molding on Cabinets
    • How to Get Sturdy Walls Without OSB
    • Choosing the Right Construction Tape for the Job
  • Issue 308 - July 2022
    • Pretty Good House Book Excerpt: Copper Farmhouse
    • 10 Dos and Don'ts for Electric In-Floor Heat
    • A Sturdy Rail for Outdoor Stairs
  • Issue 307 - June 2022
    • How to Raise a Post-Frame Home
    • Trimming Deck Stairs
    • Evolving an Energy-Efficient Envelope
  • Issue 306 - April/May 2022
    • Framing Stairs to an Out-of-Level Landing
    • Building a Zero-Energy Home for Less
    • Good-Looking and Long-Lasting Traditional Gutters
  • Issue 305 - Feb/March 2022
    • The Steady Surge in Residential Solar
    • The Fine Homebuilding Interview: William B. Rose
    • How Good Is Your Air Barrier?

Fine Homebuilding

Follow

  • twitter
  • facebook
  • instagram
  • pinterest

Newsletter

Get home building tips, offers, and expert advice in your inbox

Signing you up...

This site is protected by reCAPTCHA and the Google Privacy Policy and Terms of Service apply.
See all newsletters
See all newsletters

Membership & Magazine

  • Online Archive
  • Start Free Trial
  • Magazine Subscription
  • Magazine Renewal
  • Gift a Subscription
  • Customer Support
  • Privacy Preferences

Taunton Network

  • Green Building Advisor
  • Fine Woodworking
  • Fine Gardening
  • Threads
  • About
  • Contact
  • Advertise
  • Careers
  • Copyright
  • Terms of Use
  • Site Map
  • Do not sell my information
  • Privacy Policy
  • Accessibility
  • California Privacy Rights

© 2022 The Taunton Press, Inc. All rights reserved.

X
X
This is a dialog window which overlays the main content of the page. The modal window is a 'site map' of the most critical areas of the site. Pressing the Escape (ESC) button will close the modal and bring you back to where you were on the page.

Main Menu

  • How-To
  • Design
  • Tools & Materials
  • Video
  • Blogs
  • Forum
  • Reader Projects
  • Magazine
  • Members
  • FHB House

Podcasts

  • FHB Podcast
  • ProTalk

Webinars

  • Upcoming and On-Demand

Account

  • Log In
  • Join

Podcasts

  • FHB Podcast
  • ProTalk

Webinars

  • Upcoming and On-Demand

Popular Topics

  • Kitchens
  • Business
  • Bedrooms
  • Roofs
  • Architecture and Design
  • Green Building
  • Decks
  • Framing
  • Safety
  • Remodeling
  • Bathrooms
  • Windows
  • Tilework
  • Ceilings
  • HVAC

Magazine

  • Current Issue
  • Past Issues
  • Magazine Index
  • Subscribe
  • Online Archive
  • Author Guidelines

All Access

  • Member Home
  • Start Free Trial
  • Gift Membership

Shop the Store

  • Books
  • DVDs
  • Taunton Workshops

More

  • FHB Ambassadors
  • Reader Projects
  • Podcast
  • Customer Support

Account

  • Log In
  • Join

Newsletter

Get home building tips, offers, and expert advice in your inbox

Signing you up...

This site is protected by reCAPTCHA and the Google Privacy Policy and Terms of Service apply.
See all newsletters
See all newsletters

Follow

  • twitter
  • facebook
  • instagram
  • pinterest

Join All Access

Become a member and get instant access to thousands of videos, how-tos, tool reviews, and design features.

Start Your Free Trial

Subscribe

FHB Magazine

Start your subscription today and save up to 70%

Subscribe

We hope you’ve enjoyed your free articles. To keep reading, become a member today.

Get complete site access to expert advice, how-to videos, Code Check, and more, plus the print magazine.

Start your FREE trial

Already a member? Log in