Hang wallcabs using rail and fitting

I may make a change to the system we use for hanging wall cabinets, and this opening post in the thread will describe what I am considering.
Note to readers: what is shown and discussed here is not something that can be done by an installer of cabinets, but rather a hardware item for which cabinets are shop-machined, and the hardware installed there, before shipment to the jobsite.
Camar is a French hardware outfit with stateside distribution by Peter Meier. I think I have those facts right. Camar makes a wallcab suspension fitting that fixes to wallcab upper back side corners, and is fixed into the cab sides with either screws or pressed-in dowels.
Mind you, this system is meant for wallcabs made with at least 16mm (5/8″) thickness carcase sides. We use 19mm (3/4″) sides.
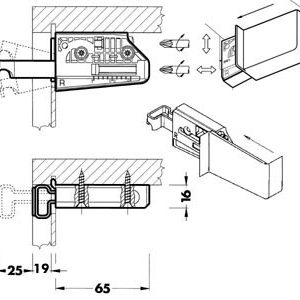
Here is a drawing that shows the Camar suspension block design.
Note the two screwdriver-tip symbols. They depict how a tool is used to make both up-down and in-out adjustments, so cabs can be leveled and aligned.
Cab carcase parts get special machining either by CNC or other means, so that there are appropriate notches in carcase backs and sides to accommodate the system. Each suspension block’s “hook” engages an extruded aluminum wall cleat that is continuous across the backs of a run of cabs. The cleat has a shallow “Z” profile, and is screwed to the wall at each stud. A little shimming is usually required to get the cleat straight, although arrow-straightness is not required.
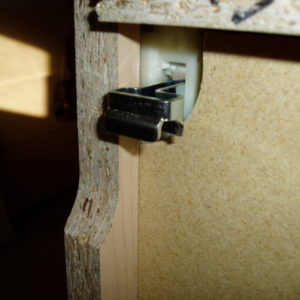
Here is a pic of what the suspension “hook arm” looks like sticking through the back of a wallcab top corner.
The feature that engages the cleat is clearly seen in the pic. A pair of these is rated for a load of 200 pounds. Being an engineer myself, I know what “rated” means, and trust these things to handle plenty of cabinet load.
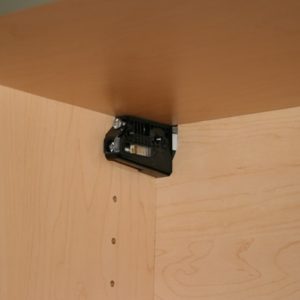
The downside elements of this system is appearance, and to a lesser degree, cost. Here is what a fitting looks like before the finish cover cap is snapped on.
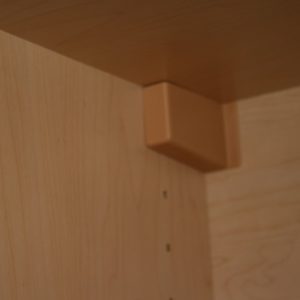
And here is one dressed with its cover cap. Covers are available in black, white, beige, brown (maybe) and I believe special colors are available.
The “appearance” is a thing that has to be explained to some folks, probably, but many others may never notice or question it.
The beauty of the whole scheme, according to those who use it regularly, is how it transforms a typical installation from a gang-em-up-and-hoist-the-whole-run thing, to something else entirely. Each separate cab is handled by a solo worker, hoisted up and hung onto the bar, slid up to its neighbor, tweaked into place using the adjusting screws, then joined to the neighbor with screws or sexbolts.
Cost is about $3.00 per wallcab, and that includes the cost of the cleat and screws for fastening it to the walls.
If you have hung wall cabinets with this system, please tell us of your experience.


Replies
is that how Ikeas are installed?
This pic clipped from Ikea's site would suggest it, but I cannot say for sure. The thing you can see inside, looking at the edge of the open door, suggests a suspension block cover.
I don't do Ikea cabs, so that is all I can say.
View Image
View Image
"A stripe is just as real as a goddamn flower."
Gene Davis 1920-1985
Gene,
I do alot of work behind our installer. I'm the finsher more often than not.
I happen to spy those in a kitchen I am currently completing. Oddly enough they were not in all of the wall cabinets. I haven't had the chance to find out what the deal is or why our cabinet guy seemingly disregarded them and hung the cabinets with screws anyway.
Cabinets were from Kountry Kraft.
Eric
You must be dying watching the snow fall during your black out!
[email protected]
Gene,
I install a lot of cabinets made by Leicht from Germany. They have a similar system but the whole piece is behind the thin back panel. The only thing you see from the inside are 2- 1" diameter plastic plugs. Installing these are a dream. They adjust the same way you describe. I have not used the ones you have.
Ken