FHB Logo Facebook LinkedIn Email Pinterest Twitter X Instagram Tiktok YouTube Plus Icon Close Icon Navigation Search Icon Navigation Search Icon Arrow Down Icon Video Guide Icon Article Guide Icon Modal Close Icon Guide Search Icon Skip to content
Subscribe
Log In
  • How-To
  • Design
  • Tools & Materials
  • Restoration
  • Videos
  • Blogs
  • Forum
  • Magazine
  • Members
  • FHB House
  • Podcast
Log In

Discussion Forum

Discussion Forum

Help beef up my hidden bookcase

vintage1 | Posted in Construction Techniques on March 1, 2007 12:21pm

At the request of a client, I am building two hidden bookcases to conceal some security closets.  I found the thread here about the pivot hinges and have seen some examples of others doing this. 

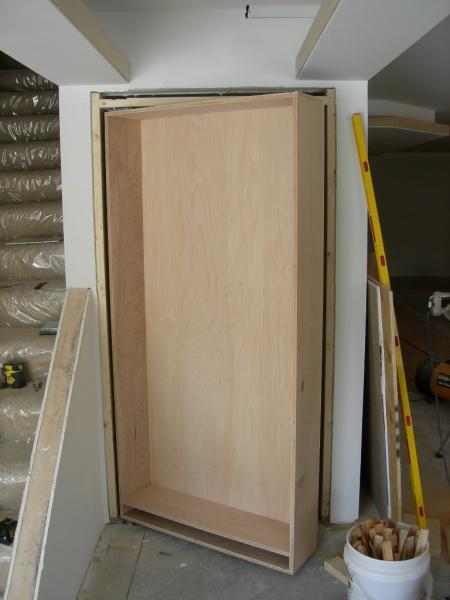
How do you beef these things up?  The cases are 76″H x 36″W x 9″D.  I started with 3/4″ ply sides, base and top, glued and screwed.  1/2″ ply on the back also glued and screwed.  I mounted them onto the hinges (pivot hinges from Forma) and they sag.  They are also way to wobbly to swing open once they are weighted. 

As of now, I am thinking of using some steel “X” braces or turnbuckles to strengthen them.  I also considered double layers of plywood for the sides and top/bottom, but I don’t think that will accomplish much. 

Any suggestions out there?  In one previous post, someone said their helper was standing on the unit and it opened really smooth, I’ve got a long way to go to get there.

Advice appreciated.


Reply

Replies

  1. Piffin | Mar 01, 2007 12:56am | #1

    That was me.

    Mine was somewhat larger - 48" x about 7' high and 10" deep.

    I use 3/4" ply for the back and then a couple of 3/4" pine 1x8 vertical behind the backs. The casing on the front helps too.

    But I think the main diff is that I had some fixed shelves that make the center solid.

    I'm not sure how you made joints, but all of mine were dadoed tight fit and then glue and screws to hold.


    Welcome to the
    Taunton University of
    Knowledge FHB Campus at Breaktime.
     where ...
    Excellence is its own reward!

    1. vintage1 | Mar 01, 2007 01:35am | #2

      Piffin,

      Thanks for the reply.  I was thinking about making at least one shelf fixed.  I might consult with the owner and see if we can make it two. 

      Space is at a premium behind the bookcase so I can't even spare 3/4" thickness for the  1x backers, but I might try some 1/4" plate steel.

      I didn't dado the joints, just glued and screwed.  Trying to keep it simple but it might come back to haunt me.


      1. Piffin | Mar 01, 2007 01:47am | #3

        I see that you probably don't have space on the outside either. I see the two most critical things would be thicker back and a fixed shelf or two. if you can do a fixed shelf, line this to the inside with 3/8" or 1/2" birch ply on the back up to the shelf, and again from shelf to top - all surfaces glued. When building mine, I had a perfectly flat table to clamp it up on to assure true shape.Then when we hung it, it still wanted to sag a quarter inch on off side and out a quarter at the top. That is when I added the extra 1x8s on the back. Used slower setting glue and screws for that, then swung it closed and shimmed slightly up and in from where it should be for th eweekend to give it a set. Then we added the casing trims to the front and that is when it turned out fine with Mark riding on it. Will this be paint grade? or trying to stain? 


        Welcome to the Taunton University of Knowledge FHB Campus at Breaktime. where ... Excellence is its own reward!

        1. vintage1 | Mar 01, 2007 02:14am | #4

          These will be paint grade.  I used B-2 birch with that in mind, but the homeowners saw them and wanted to stain them, because they thought the wood looked "so nice".  I talked them out of that since all the other trim in the project will be painted and I wasn't very careful about the glue. 

          When you added the 1x's and used a "slower setting glue", what did you use?

          A perfectly flat table would have been nice.  I now have a slight twist in one of the cases but I think I can pull that out with a turnbuckle or some diagonal bracing on the back.

          1. Piffin | Mar 01, 2007 02:26am | #5

            PL Premium. It is slow to set - giving me time to twist and shim the box to the place and shape I wanted, but it cures up hard and doesn't creep. Most of the joist were TitebondII and screws though. 


            Welcome to the Taunton University of Knowledge FHB Campus at Breaktime. where ... Excellence is its own reward!

          2. Piffin | Mar 01, 2007 02:30am | #6

            For something like this - I ask at begionning if they want stain or paint and don't start until they let me know.Still, no matter how muych i tell them ahead of time about 20% of them wil want to change to stain and I just tell them it is impossible because different materials and proicedures and costs make it a whole different job. If they want to pay twice to do it all over again, that is fine. Otherwise, they get to go home with the same girl they came to the dance with. 


            Welcome to the Taunton University of Knowledge FHB Campus at Breaktime. where ... Excellence is its own reward!

          3. ponytl | Mar 01, 2007 04:16am | #7

            when you wedjed it in for the weekend... did you put some "counter twist" for lack of a better word.... into it?   anytime i think something will rack or twist ...i try to build some into it (counter) ....  learned that from building race cars almost like building spring into something......

            p

          4. Piffin | Mar 01, 2007 04:25am | #8

            Yes - that's what I meant about wedging and shiming it into position - just a tweak and a half opposite the way it wanted to settle to counter-tension it. 


            Welcome to the Taunton University of Knowledge FHB Campus at Breaktime. where ... Excellence is its own reward!

          5. User avater
            JeffBuck | Mar 01, 2007 11:07am | #9

            I like that idea of shimming it thicker ... with say 3/4 ply ...

            on the inside of the back.

            cut tight and jammed in there ... that'd really tighten up the back.


            thinking out of the box here ... if sagging was really an issue ... a metal flat strap ... strung from the top "far" corner ... the point that really hangs out there ... diagonal across the top ... then down the back ... would hold her up nice and tight.

            morticed in ... preplanned ... could even be skined over with some 1/4 ply.


            tough part would be keeping the tension as U mounted it.


            Jeff    Buck Construction

             Artistry In Carpentry

                 Pittsburgh Pa

  2. Norman | Mar 01, 2007 06:21pm | #10

    You did see the large article about this in FHB a couple of issues ago, right?

    1. vintage1 | Mar 02, 2007 03:27am | #14

      I did.  That article showed an inswing bookcase, the construction shown would not work for an outswing.

  3. RedRobertson | Mar 01, 2007 07:31pm | #11

    The box is too open and prone to rack. You need a couple of fixed shelves to divide up the space.

    1. vintage1 | Mar 02, 2007 03:38am | #16

      I ended up installing a fixed shelf in the case today and reinforced the back w/ 3/4" ply.  I also used a turnbuckle to take the rack out.


      1. DougU | Mar 02, 2007 03:52am | #17

        Vintage

        I've probably built 10 or 12 hidden doors in the last several years and I always build them with double 3/4" ply on the sides with one single 3/4" ply on the back, if anybody thinks that 3/4" ply is going to cause a sag they dont understand plywood very much.

        Glue and screw everything together and you'll have a box that cannot sag. If you are getting sag its probably your hinges not your box.

        I've hung 10" deep bookcases that were 7' tall by about 36" wide, all on 4 of the biggest SOSS hinges that I could find. No sag in the hinges what so ever.

        I've also hung hidden doors with a steel rod that sits in a thrust (not sure if I have the right termanology, the bearing that fits on your wheel shaft, tappered)bearing. The bearing is epoxied into the floor and if the steel rod fits tight there is no way for sag. I've hung bookcases that could handle 2-300 pounds with little effort.

        For the type of bookcase that you have pictured I'd use the bearing mounted in the floor with epoxy. If you build your box tight you should have no problems.

        Doug


  4. peteshlagor | Mar 01, 2007 07:39pm | #12

    All these guys have great ideas and know what they're talking about, BUT...

    Why bother?

    Even a spacially distracted autistic can tell there is a volume inside that structure that has some form of entry or purpose.

    If they gotta hide their contraband, fir in a wall a couple of feet.  That space invites questions.


    1. Piffin | Mar 01, 2007 11:51pm | #13

      you ain't no fun!;) 


      Welcome to the Taunton University of Knowledge FHB Campus at Breaktime. where ... Excellence is its own reward!

    2. vintage1 | Mar 02, 2007 03:36am | #15

      Pete,

      I don't have the benefit of being a "spacially distracted autistic" but I don't know how you would know that this book case isn't just built into the wall, maybe the photo doesn't show enough detail.  

      Not sure what you mean by furring in a wall a couple of feet, but we are already on this path, and trying to make it work.


Log in or create an account to post a comment.

Sign up Log in

Become a member and get full access to FineHomebuilding.com

Video Shorts

Categories

  • Business
  • Code Questions
  • Construction Techniques
  • Energy, Heating & Insulation
  • General Discussion
  • Help/Work Wanted
  • Photo Gallery
  • Reader Classified
  • Tools for Home Building

Discussion Forum

Recent Posts and Replies

  • |
  • |
  • |
  • |
  • |
  • |
View More Create Post

Up Next

Video Shorts

Featured Story

Tall Deck on a Sloped Lot

When deck posts exceed what the prescriptive code tables allow, it's time to consult a structural engineer for post sizing and possible bracing.

Featured Video

Micro-Adjust Deck-Baluster Spacing for an Eye-Deceiving Layout

No math, no measuring—just a simple jig made from an elastic band is all you need to lay out a good-looking deck railing.

Related Stories

  • Sharp-Blade Solution
  • Podcast Episode 684: Masonry Heaters, Whole-House Ventilation, and Porch Flooring
  • FHB Podcast Segment: Repairing an Old Home While Maintaining Its Integrity
  • Tools and Gear for the Moms Who Get it Done

Highlights

Fine Homebuilding All Access
Fine Homebuilding Podcast
Tool Tech
Plus, get an extra 20% off with code GIFT20

"I have learned so much thanks to the searchable articles on the FHB website. I can confidently say that I expect to be a life-long subscriber." - M.K.

Get home building tips, offers, and expert advice in your inbox

Signing you up...

This site is protected by reCAPTCHA and the Google Privacy Policy and Terms of Service apply.
See all newsletters
See all newsletters

Fine Homebuilding Magazine

  • Issue 331 - June 2025
    • A More Resilient Roof
    • Tool Test: You Need a Drywall Sander
    • Ducted vs. Ductless Heat Pumps
  • Issue 330 - April/May 2025
    • Deck Details for Durability
    • FAQs on HPWHs
    • 10 Tips for a Long-Lasting Paint Job
  • Issue 329 - Feb/Mar 2025
    • Smart Foundation for a Small Addition
    • A Kominka Comes West
    • Making Small Kitchens Work
  • Issue 328 - Dec/Jan 2024
    • How a Pro Replaces Columns
    • Passive House 3.0
    • Tool Test: Compact Line Lasers
  • Issue 327 - November 2024
    • Repairing Damaged Walls and Ceilings
    • Plumbing Protection
    • Talking Shop

Fine Home Building

Newsletter Sign-up

  • Fine Homebuilding

    Home building tips, offers, and expert advice in your inbox.

  • Green Building Advisor

    Building science and energy efficiency advice, plus special offers, in your inbox.

  • Old House Journal

    Repair, renovation, and restoration tips, plus special offers, in your inbox.

Signing you up...

This site is protected by reCAPTCHA and the Google Privacy Policy and Terms of Service apply.
See all newsletters

Follow

  • Fine Homebuilding

    Dig into cutting-edge approaches and decades of proven solutions with total access to our experts and tradespeople.

    Start Free Trial Now
    • Facebook
    • Instagram
    • X
    • LinkedIn
  • GBA Prime

    Get instant access to the latest developments in green building, research, and reports from the field.

    Start Free Trial Now
    • Facebook
    • YouTube
  • Old House Journal

    Learn how to restore, repair, update, and decorate your home.

    Subscribe Now
    • Facebook
    • Instagram
    • X

Membership & Magazine

  • Online Archive
  • Start Free Trial
  • Magazine Subscription
  • Magazine Renewal
  • Gift a Subscription
  • Customer Support
  • Privacy Preferences
  • About
  • Contact
  • Advertise
  • Careers
  • Terms of Use
  • Site Map
  • Do not sell or share my information
  • Privacy Policy
  • Accessibility
  • California Privacy Rights

© 2025 Active Interest Media. All rights reserved.

Fine Homebuilding receives a commission for items purchased through links on this site, including Amazon Associates and other affiliate advertising programs.

X
X
This is a dialog window which overlays the main content of the page. The modal window is a 'site map' of the most critical areas of the site. Pressing the Escape (ESC) button will close the modal and bring you back to where you were on the page.

Main Menu

  • How-To
  • Design
  • Tools & Materials
  • Video
  • Blogs
  • Forum
  • Project Guides
  • Reader Projects
  • Magazine
  • Members
  • FHB House

Podcasts

  • FHB Podcast
  • ProTalk

Webinars

  • Upcoming and On-Demand

Podcasts

  • FHB Podcast
  • ProTalk

Webinars

  • Upcoming and On-Demand

Popular Topics

  • Kitchens
  • Business
  • Bedrooms
  • Roofs
  • Architecture and Design
  • Green Building
  • Decks
  • Framing
  • Safety
  • Remodeling
  • Bathrooms
  • Windows
  • Tilework
  • Ceilings
  • HVAC

Magazine

  • Current Issue
  • Past Issues
  • Magazine Index
  • Subscribe
  • Online Archive
  • Author Guidelines

All Access

  • Member Home
  • Start Free Trial
  • Gift Membership

Online Learning

  • Courses
  • Project Guides
  • Reader Projects
  • Podcast

More

  • FHB Ambassadors
  • FHB House
  • Customer Support

Account

  • Log In
  • Join

Newsletter

Get home building tips, offers, and expert advice in your inbox

Signing you up...

This site is protected by reCAPTCHA and the Google Privacy Policy and Terms of Service apply.
See all newsletters
See all newsletters

Follow

  • X
  • YouTube
  • instagram
  • facebook
  • pinterest
  • Tiktok

Join All Access

Become a member and get instant access to thousands of videos, how-tos, tool reviews, and design features.

Start Your Free Trial

Subscribe

FHB Magazine

Start your subscription today and save up to 70%

Subscribe

We hope you’ve enjoyed your free articles. To keep reading, become a member today.

Get complete site access to expert advice, how-to videos, Code Check, and more, plus the print magazine.

Start your FREE trial

Already a member? Log in