I’m hoping you guys can double-check me on my technique for a header replacement. I’ve posted some pics that show the situation. Especially look at “Header.jpgâ€
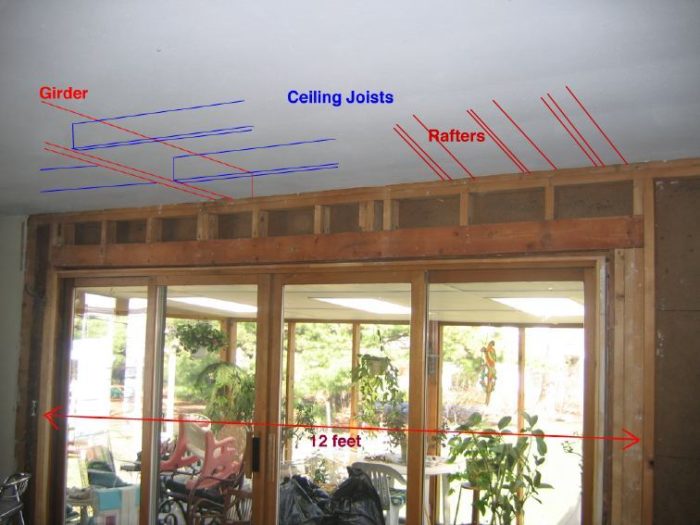
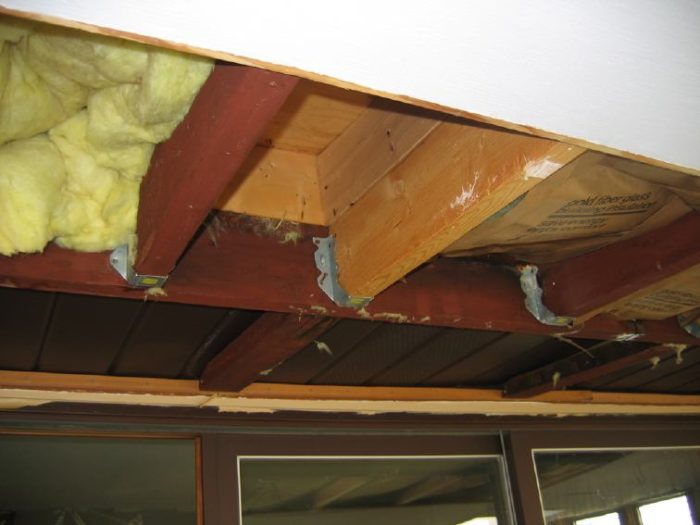
A 12-foot wide header over some patio doors needs replacing because it has way too much load on it. It’s sagging almost an inch at the worst spot, and the sliding doors are starting to bind. The engineer has spec’d a double 11-7/8 LVL as the replacement. I hope to jack the top plate level, remove the old header and cripples, and insert the new LVL lumber under the top plate.
I thought I’d fasten the girder to the top plate with Simpson ties. When I jack up the girder it should lift the top plate up with it and hold it there while I remove the old header and cripples. For a number of reasons, I would strongly prefer not to have to remove the slider unit and reinstall it afterwards. My concerns are:
a. With the girder jacked up and supported, do you think the top plate will still sag between the girder and the two king studs when I remove the old header? If so, would I just keep jacking until the LVL fits under the sags?
b. What would be the best way to distribute the load under the jack so I don’t just jack the floor joists into the basement? Do I need to run a post or two between the floor joists and the basement slab? (2×10 joists 16†oc – bearing on foundation wall directly under patio doors)
c. Because the house has a wide boxed cornice I really can’t access the header from the exterior side, doubly so since a screen porch roof is fastened to the fascia of the cornice. I can run the sawzall between the inside face of the sheathing and the header and cut the nails to free the old header. But I have no way to re-fasten the sheathing to the new header. Do you think it’s important? Appearance is not an issue since the porch roof comes down almost to the top of the door jamb.
d. Do you think there’s anything in the cornice assembly that pushes on the header and will want to move when the old header is removed?
I think my plan will work alright, but I’d sure appreciate the benefit of your experience if you spot any pitfalls. Thanks guys.
-DougR


Replies
Hi DougR,
Here's my take on your situation:
Attaching Simpson ties from girder to top plate is a good thing. Jacking and or stabilizing girder beam seems the right move as depicted in your drawing since girder seems to be supporting all ceiling joists. Top plate appears to be support rafters only.
After attaching top plate to girder, I would just barely jack up the girder...enough to stabilize ceiling. I think it is better to cut away header and cripples at this point, and then afterwards, slowly jack up girder a little bit to make room for new header. Since the existing header is tied to the top plate via cripples, as well as being nailed to the King Studs and, as you earlier mentioned, the exterior sheathing is nailed to the header....trying to jack up the top plate while existing header is still attached at all these various points may overstress the top plate. No need to take chances here.....stabilize first, cut away second, then jack and position new header last....least ways that would be the procedure I would follow in this situation.
a. Chances are that the top plate may still sag since this developed over time...however jacking may help the situation since you report sag is no greater than 1 inch. I would jack a bit at a time and hope that sag would "
reverse" itself...but would not push this too far. If top plate stays permanently bowed, I would simply remove enough of the material from the underside with a hand plane or electric plane and or router, and then install new header stock directly underneath. Don't worry about having to shave off some of the underside from the doubled top plate...the new header is going to do all the work anyway.
b. Yes. Where you set up your intial jacking post, set up a post in the basement directly in line ( or as close as possible) so as to help distribute the load. I would lay a plank on the floor and then set up my jack on top of that.....and in the basement, I would put a 2x plank underneath the floor joists, place another 2x plank on the basement floor, and position my post to fit in between this "plank sandwich."
Although the structure is just a single story, if you have these items available, use them...to some it may be overkill. but better to play it safe. Only way I would not support floor joists from basement is if there was an existing wall in the basement already. You mentioned the foundation wall located underneath patio doors, but I suspect that jacking will take place farther back from this position...therefore the reason I would reccommend a support post.
c. I would apply some very heavy beads of construction adhesive to the inside of the exterior sheathing when installing the new header; since you say you have no way to mechanically fasten the sheathing to the header. The header will be nailed off properly on the interior side to the King studs, as well as reattached to the existing top plate... and with new drywall being nailed to the header, it should be just fine.
d. NO. Your shed roof is attached to your fascia...this is just an anchoring point...there is no "push" at this location...least there should not be...and I seriously doubt there is. That shed roof looks very small and rather light weight...you should not expect to encounter any problems with this when doing the header replacement. If worries persist, then throw up a 2X4 wall underneath these shed rafters. Wall does not need to be 16 inch centers...2FT OC or even slightly larger ( 30 inches) will suffice.
Just my 2 cents.
Good luck on your project.
Davo
Davo-Thanks for your comments - all good ideas. I like your suggestion to support the girder and remove the old header before jacking the top plate all the way up. If worst comes to worst and the top plate won't straighten out, I'll try shaving the underside like you suggest. The only problem there is that it won't restore a nice straight line where the wall meets the ceiling.I'll let you know how it turns out. Thanks.-DougR
Doug,
You mentioned replacing the Kings and Jacks around the slider. If you do this, you will be leaving the slider free standing and it will be in the way while you R&R the studs.
I would do things slightly different from Davo.
I would place pads consisting of 5 ea 32" 2x4s on edge between 2x8s flat below the temp king posts under the girder and at each end of the one in the basement. Nail the 2x4s together with a zigzag patern, alternating zigs with zags on every other board. Nails about 3"-4" OC. Be sure and place the pads across the floor joists.
I would also use an 8' I-beam header (2 ea 2x4s and 1ea 2x6) under the rafter tails in the porch and jack it in the center. Jack up the girder jack and the rafter jack the same. Nail 4" OC, staggering across the width (1 1/2") of the 2x6.
The bow in the top plate will disappear as soon as you have it back on the new door header.
SamT
Thanks for your suggestions. I put in the new header last weekend and it all went pretty smoothly. My intuition told me the pads & supports you recommended were probably more than the situation required, so I set up something simpler and kept a close eye on things with the option to back off and try your method if it looked necessary.I attached the bottom of the girder to the top plate with metal angles, screwed a 3 ft. 2x10 to the underside of the girder, centered a 4x4 post on the girder about 2 ft. from the wall, put a 6-ton bottle jack under the 4x4, and put the jack on a 4 ft. 2x12 running across the floor joists. In the basement I fitted 2x4s between the bottoms of the floor joists and the slab about 2 ft from the foundation wall. I didn't do anything with the porch roof.I jacked up the girder just until I could see the top plate lift a bit. At this point I checked the basement and while the 2x4s were pretty snug, it seemed like most of the load was being carried at the foundation. I removed the old header and cripples (the hardest part of the whole process) and jacked the girder up some more. There was still a slight sag in the top plate that wouldn't go away - about 1/8th inch of the original 1 inch sag. Since the old cripples were nailed from above through the top plate, I cut those nails with the sawzall. These imbedded nails in the top plate seemed to rule out using a planer or router to shave the sag out. I probably could have gotten rid of it by jacking up the roof rafters from the porch side, but it didn't seem worth the effort. To the naked eye the ceiling plane looked straight now.So I slipped in the new LVL header and called it a day. It took about 4 hours total, with a helper on hand for 2 of those 4 hours.
good job, looks great. the before is quite bewildering, I mean who would do that? well, I've seen some weird stuff too...
Looks good to me. I hate it when a header is a 1/4" too small to fill the gap. Shims and Great Stuff if you can't live with it.
I am very glad your dangerous, amateurish method worked. Seriously.
The problem is not that it doesn't work sometimes, even many times. The problem is that it does work many times. . . just not all times.
As a contractor or advisor, I can't afford the risk of those "not all" times.
SamT
Wait a second. Why do you say my method is "dangerous and amateurish?" That's pretty harsh. Please elaborate.
Why did he say that? Because you didn't do it HIS way. Therefore, it wasn't done right.
You were very optimistic. Which is ok, as you were working on your own home and not gambling with anyone elses hearth.
I would much, much rather spend $150 and an hours time to insure that reasonably possible mishaps are prevented.
You picked up a 12' span of two roofs with two flat 2 by's supported at one point. On top (bottom?) of that, the top plate was side hung from the lifting device. By 8 nails!!!!
How much do you think using all that extra wood I suggested would have cost you?
How much would it cost to replace one piece of glass in your slider?
What if the roofs had dropped 2' or 3'? Now how expensive does a dozen sticks and a couple pounds of nails sound? Very cheap insurance, eh?
IIRC, the working shear strength of a 16d nail is 300#. your roof weighs something like 15# sqft. You supported 12' x 20' of roof. Call it 2 tons.
The problem is not that it doesn't work sometimes, even many times. The problem is that it does work many times. . . just not all times.
SamT
Sam-I still think you're being a little alarmist, but I have to admit you make a good point. There is one scenario I had NOT considered until I thought over your latest post. What if my connection between the girder and top plate had failed AFTER I removed the old header? The top plate could conceivably collapse on top of the sliders. Your temporary support of the rafters on the porch side would have saved the day. A very unlikely scenario, and even more unlikely to happen without plenty of warning, BUT you are right that it's possible - and preventable.I understand your point about developing a false sense of security just because these things ALMOST always turn out fine. I will be mindful of that in the future. Thanks.-Doug
Doug,
If I save one DIYer from replacing a slider, I have lived a good life (|:>)
SamT
Looks basically doable. The big question, without seeing into the ceiling, is how/how well the beam on the left is attached to the rim joist and plate/wall above it. You don't want the beam to tear loose and drop the wall load. In theory it should end up under the upper wall, but in theory there should have been a better header above the door.
In terms of support below, if you have an unfinished basement (or a suspended ceiling you can open up) then it would be ideal to install jack posts under each jack above. If the basement ceiling is finished with drywall then you can probably put a wide board across it and jack against that without doing too much damage.
I'd just jack enough initially to remove the existing header and cripples, then jack up just enough more to get the new header in. For best results you can let the jacks down with the new header in, measure its deflection, then jack up again and shim the bottom ends and top middle to compensate.
Don't forget to think about where you put the jacks, with regard to working room. You need to be sure, especially, that you can get the new header into the area with the jacks in place, or else position it beyond the jacks before lifting. And you need to be sure you have room for a stepladder, and room to "swing" your saws, hammers, etc to remove the old piece and install the new one. But of course you want the jacks as close to the wall as possible.
doug... do yourself a favor and take the slider out... then reinstall it after you solve your header problem