How to hang this invisibly?
Hey fellas!
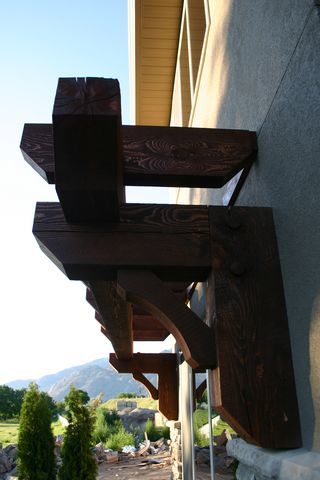
I’ve been looking at this pergola/window shade and I can’t figure out they hung it without big honkin’ screws showing. My better half likes the look of it and wants something similar over a few of our windows. I can build the thing out of fir but it’s gonna be a tad heavy. Sometime ago I saw invisible fasteners that looked like a keyhole combination. You rabbetted a metal plate into the piece to be hung and mounted the hanging pin on the wall. Then you slid the piece over the pin, pushed down and it locked into place. Probably not acceptable from an engineering standpoint, but it looked very tidy. Anyway, how would you guys hang something like this? The wall is stucco over OSB, so there’s plenty of wood for screws to bite into. Thanks to all.
Cheers,
Ken
You live and learn. At any rate, you live.


Replies
Bed rail fasteners. Similar to the keyhole thingies you mention, but they have three lugs each. Rockler sells them.
"Put your creed in your deed." Emerson
"When asked if you can do something, tell'em "Why certainly I can", then get busy and find a way to do it." T. Roosevelt
Keylock fasteners for newel posts might work. Could be something similar that's galvanized? If dogs run free, then what must be,
Must be, and that is all.
True love can make a blade of grass
Stand up straight and tall.
In harmony with the cosmic sea,
True love needs no company,
It can cure the soul, it can make it whole,
If dogs run free.
Synthetic Stucco? Installed with a rain screen detail?
If unsure of the presence of the rain screen detail best take care about punching holes into it without really good and carefully installed flashing and water proofing details.
The product has essentially been banned by legislation here in Ore. unless installed with the rain screen , and even with the rain screen I cannot find an insurance company here that will will insure me if I allow it's use on a building I contract for.
I just found myself in a large pile of dung over this issue.
The key hole hangers should work to hold up the screen/shading device.
Thanks, Dovetail. Yep, bedrail fasteners - that should do it. I just couldn't put my finger on the name of the hardware.As far as rain screening goes, well, that's a big controversy up here too. Vancouver and the rest of the Wet Coast enacted new rain screen regs just about 2 years ago. Designers have to add an extra inch of airspace between the outer and inner skins, etc. etc. However, where we live in the Interior the rules don't apply. Possibly because we're living in an area considered Canada's only desert or due to the fact that the gov't loves to enact rules specific to certain areas. I dunno. Anyway, the house is OSB, tar-paper, chicken wire, scratch coat & acrylic stucco. No leaks...yet. Flashing details over windows is pretty good though.
By the way, we love Oregon. What a great State!Cheers!
KenYou live and learn. At any rate, you live.
If you have chicken wire and a scratch coat, I don't think you have eifs. I think you have a modified cementitious stucco."Put your creed in your deed." Emerson
"When asked if you can do something, tell'em "Why certainly I can", then get busy and find a way to do it." T. Roosevelt
Are you sure the screw holes arent just plugged?
No, the pics don't show it, but I've looked real close and there's no screw holes. I can't imagine how a building inspector would allow something like this to hang on a few screws, but I can't seem to figure out how they did. That's why I asked the BreakTimers for recommendations and the bed rail fasteners came up.Lastly, what does EIF mean? I'm not real big on the stucco knowledge. Thanks.Cheers,
KenYou live and learn. At any rate, you live.
eifs = exterior insulated finishing system. aka fake stucco. usually a layer of foamboard covered by acrylic texture. easy to form into shapes and detail, light weight, cheaper than real stucco, damages easily. Can be damaged by a young boy throwing a baseball against it."Put your creed in your deed." Emerson
"When asked if you can do something, tell'em "Why certainly I can", then get busy and find a way to do it." T. Roosevelt
"Can be damaged by a young boy throwing a baseball against it."
Or a bunch of drunks with ski poles. They made the mistake of using it on most of the buildings at Whistler. It looks like a genetically modified woodpecker got loose.
Thanks I keep transposing letters when I post about the stuff.
DUH!
They can't get your Goat if you don't tell them where it is hidden.
could it be that they were lagged through holes and then that last diagonal cove piece was installed to cover the holes? just a thought.
"it aint the work I mind,
It's the feeling of falling further behind."
Bozini Latini
http://www.ingrainedwoodworking.com
Now, that's a possibility. I've got take a closer look. Thanks for the insight.
Cheers!You live and learn. At any rate, you live.
Ken, osb and stucco is not enough to hang that off of. It needs to be lagged into framing. That one was probably lagged from inside through some blocking.
No,rlrefalo. I know these guys and thinking that far ahead is not part of their game. Now, they may got hold of stud via lag screws, but it'll take closer inspection. I agree about the weight though. I picked up a load of fir at Home Futile today and it's damned heavy. So, the bed rail fasteners are definitely out. I just don't want to chew the #### out of the wood with screws and such. What would an archy tell a millwork shop to use to mount something like this I wonder? I'll keep inspecting.Cheers,
KenYou live and learn. At any rate, you live.
Ken,Your photos don't show the tops of the brackets. It could be that the installers simply toe-screwed down at an angle from the top with Timberlocks or similar. That would be a lousy detail IMO, but easy and fast.Bill
Hi Bill!I took a peek in the half-light last night at the units. Some soffit lighting acted like a flashlight and it allowed me to see a small space between the back of the wood brackets and the wall. All I could was what appeared to be a single rod/bolt going into the wood bracket from the back. Could it be a bracket that's mounted to the wall first and then a bolt is put through the wood at right angles? If you look at the attached photo it makes me think that might be what they did. Thanks for your assistance though. And no, there aren't any screws from the top - I checked.
Cheers,
KenYou live and learn. At any rate, you live.
Ken,The giant lag from the inside seems increasingly likely. If a bracket with a knife plate were attached to the wall, you would have seen its shadow last night when the gap was backlit.Another possibility is that the corbel assembly is placed over a threaded rod that protrudes from the wall and a nut & washer are inserted and tightened through one of the cross-bored holes, then a plug added to conceal them later. This is akin to a handrail joining bolt. This is a strong method, and stealthy, too. This would have been tight when new, but a gap develops as the timbers dry and shrink. Same thing would happen with the giant lag from inside.Bill
Bang on, Bill. It's so nice to get help from the breaktimers and to have the proper terms used to describe a part or installation. Such as, corbel - do you think I could come up with a single word to describe that assembly? That's perfect. And a "knife plate" - now that describes perfectly what I've seen used to support large 8" x 8" columns - a slit or knife cut is run thru the bottom, then the column is bolted solid thru. And you're absolutely right about the lumber drying and shrinking and leaving a small gap.
As far as the threaded rod goes, I've got one stud and two slip studs on both sides of the window frame - as you can from an old photo when the house in the framing stage. I should be able to put the corbels close to the edge of the window frame and find solid anchoring. Thanks for your assistance.
Cheers,
KenYou live and learn. At any rate, you live.
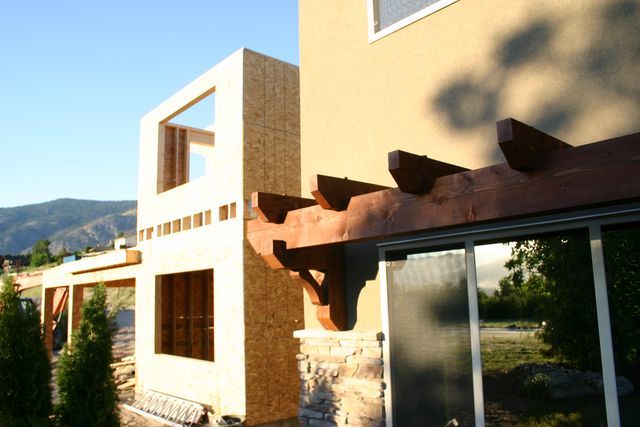
Finished! I found solid wood beside the door (duh) and lagged the whole sheebang into it with 8 inch lag screws. Rock solid and you can even swing off it - I know because I put it to the test. Thanks for all the suggestions fellas.Cheers,
KenYou live and learn. At any rate, you live.
Nice looking diagonal members! Where did you hide those lag screws?
BruceT
Thanks, brucet9. The curved braces cover the recessed holes where the lags went in. I checked with the builder yesterday to find out what he does. And yes, he puts solid blocking in the wall cavity during the framing stage. Unfortunately, as my house is already built I had to improvise, but I've got lots of bite in the studs close to the window unit. Onto the next project - it'll probably make my wife scream, but never a dull moment around our place. I think I've got some beaver in my blood or something as I can't seem to stop chewing into wood!Cheers,
KenYou live and learn. At any rate, you live.
That looks great, north guy. I like the added detail on the corbels, and the curf around the ends of all the boards. Really gives it that finished look.--------------------------------------------------------
Cheap Tools at MyToolbox.netSee some of my work at AWorkOfWood.com
Ken,Congratulations. The finished arbor looks very attractive.Bill
Quite funny that while we were still chewing over how to go about it and you just got on with it. Thanks for posting the pics. It looks great - sets off the door nicely and matches the fence.
I don't think I've ever seen a tidier back yard! Don't you have spiders where you live?
Edited 5/7/2008 8:48 pm ET by fingersandtoes
I'm with rlrefalo, way too heavy to attach only to sheathing and stucco. Maybe that one was hung that way, but that doesn't mean it's okay. I'd secure it from the inside with giant lag screws through blocking. I'd rather patch the wall on the inside than repair the stucco and sheathing later when it starts pulling loose. --------------------------------------------------------
Cheap Tools at MyToolbox.netSee some of my work at AWorkOfWood.com
One of the threads is from Dovetail. I wondered then if there is 2x4 tail? inside the similarly shaped hollow in the 4x4 post? 2x4 would be bolted to the backer in the wall and the post would be slipped over the 2x4, although I don't know if this would be strong enough. I'd be worried about the wood deteriorating, eventually.
The bed hardware would not have holes big enough for bolts or thick enough to prevent racking, I would think.
Hi k1c:I think Bill Brennen had it down pat when suggested a bolt. I could only see a single protrusion through the wall and into the corbel when I looked at it last evening. The soffit lighting highlighted the gap in the wall and the corbel (due to shrinkage) and all I could see was a single protusion about 3/4" in diameter. That's what I'll use if I can make it work out to a nearby stud. Thanks for your thoughts.Cheers,
KenYou live and learn. At any rate, you live.
"if I can make it work out to a nearby stud" If not just cross block 2x on the flat at your given hight.
"If not just cross block 2x on the flat at your given hight."I think I would cross-block at both the top and bottom of the corbel.
BruceT
I was looking at it and thinking the stair parts assembly kinda. The picture you show also have the doweled plug.
So How bout a carrage bolt thru the blocking with a recess to lock the nut and washer on the block and it's flush. Install the block with the bolt attached thru sheathing and that's the stud/rail bolt.
Maybe like 3/8" galvie.
I think ClaysWorld post to me [104127.24] is really meant for you.
BruceT
I guess I come from another school, but it really bothers me when I can't see how something is supported. I do similar brackets quite a bit and always hang them with oversized bolts and washers.
Thanks to all. I finished it today. Pics and details to follow.Cheers,
KenYou live and learn. At any rate, you live.