Getting ready to finish 11 oak, 6 panel doors, what’s the best position to spray finish? I’ve heard of putting lag bolt in center of top and bottom edge and then resting bolt on sawhorse to be able to rotate. How do the pro’s do it?
Discussion Forum
Discussion Forum
Up Next
Video Shorts
Featured Story
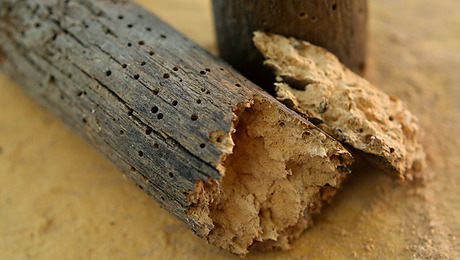
Learn how to fight wood-boring beetles and prevent home infestations with expert advice from Richard D. Kramer, an authority in pest control.
Featured Video


Highlights


"I have learned so much thanks to the searchable articles on the FHB website. I can confidently say that I expect to be a life-long subscriber." - M.K.


Replies
I use a lazy susan rig suspended from a frame or the flooor joists, and drive 3" dw screws in the top thru a wooden bar. The bar has screw hooks that let me hang the door on the joists to dry.
Others I have seen work are nails driven into the bottom edge 3/4"
or so, and screw eyes driven onto the door top with matching centers; then paint and cure. If any questions, advise
I've done the nails or dw screws through the top and bottom and lay it over a pair of horses w a 2x6x12 on top - 3 doors at a time, but the problem is the dust, never get the screws quite centered and the doors want to lay flat. NExt time I will try hanging them verticle.
"... nails or dw screws through the top and bottom and lay it over a pair of horses w a 2x6x12 on top..."
That's what I've done. Finish one side, then flip 'em over so no dust lands on them while they dry.
The final debate for Bush and Gore was on Tuesday. They both had a gentleman's agreement for this one -- If Bush forgot an important fact; Gore made one up for him. [Jay Leno]
my painter gets all the door in one room ... usually an unfinshed basement or garage ... then .. with a stack of paint stir sticks and some finish nails handy ... he sets them up (standing up) in a zig-zag pattern .....
/ / / / /
just like that! Uses the sticks at the tops to "tack" them together ....
then works his way from one side to the next.
Jeff
I have a picture from last week (brush painting. We put lags in with a short length of 1/2 copper for a bearing (a washer on each end of the tubing), and you can see the notch in the 3/4 plywood holder. It worked good - one thing we learned that we think makes it a lot better is getting on each end and finding the balance point rather than just the center measurement. This helps them "stay".
Edited 4/29/2005 11:46 pm ET by Fonzie
Self
The painter that we use nails/screws two cleats on to the bottom of the door, perpendicular to the door. If there hollow core interior doors the cleats can be as short as 8 - 10", heavier exterior doors need a bit longer cleat.
The doors are standing with all sides(except the bottom) exposed, he can paint all 5 sides with out ever moving/turning the doors.
Doug
Here is what we do. First, with the doors stacked and spaced with stickers, we completely finish both top and bottom edges, using sealer, followed by a couple coats of finish. Spray or brush, but if spraying, take care to not overspray much on the door faces.
Then, in a space large enough, we stand the doors up in an "angle walk" domino fashion, using a couple of 1x3s as floor rails, and another couple 1x3s tacked to the tops to brace everything. Once the first two doors are standing with a top rail tacked on, standing the rest is a one-man job. Then we spray away.
Here is a pic. If you've the space, you can do it as one long string, but we've always ended up with parallel strings.
While what you suggest would probably work fine in some instances, I forsee problems with the set-up if spraying faster setting materials like cat-lacs, shellac and such.Seems to me that even with an HVLP, you could easily suffer bounce and drift off of one door onto the already dried side of its neighbor. Result of that would then be a rough finish.Whenever possible, I shoot my doors in the shop or on site with them individually mounted on upside-down T-leg stands with holes for revolving centered lag. Make those once and they'll last a lifetime. The doors can be shot in the horizontal position and once shot on both sides, they can be revolved to a vertical position and wheeled over to be nested quite tightly with the "neighbors". Takes about 2 minutes tops for one guy alone to mount a door in these stands...with no danger of one getting away and becoming dinged or worse. Lay 'em on carpeted sawhorses of the appropriate heighth to closely match door edge to stand hole, drill and sink lag thru the stand into door. Go to other end...repeat. Tighten lags (with small 1/2" ply washer in between door edge and stand) to the point where there is sufficient resistant to hold door still while shooting......but still allow for easy revolving. Knowledge is power, but only if applied in a timely fashion.