How would you fix this porch roof?
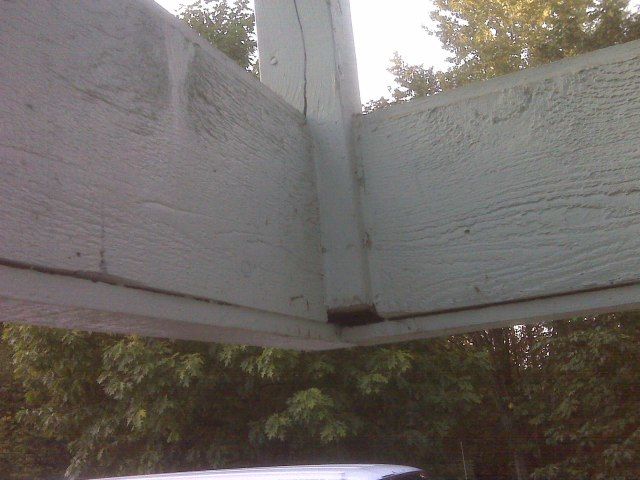
This is the third ‘rot repair’ project I’ve had at this house. The front entry has a roof over it with 2 foot x 8 foot glass panels for the roof. The trim at the top of the panels and some of the carpentry has dried out and shrunk, leaving pathways for water to get into the supporting beam and rot it out. My task today was to fix those problems and deal with the rot. I got the sources taken care of but the rot is another story and another day.
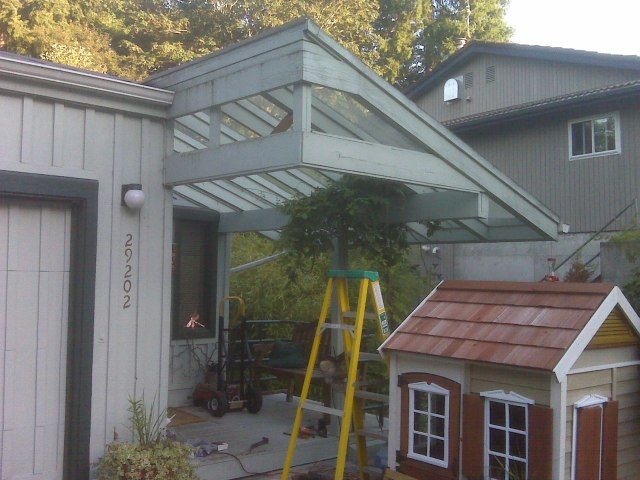
We thought about simply tearing it down, but the front of the house is very very plain with just a garage and a door, so it’s the only thing of interest, and we’d like to keep it.
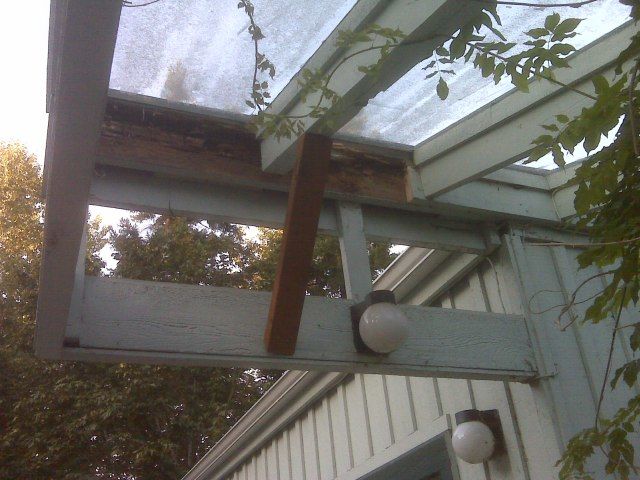
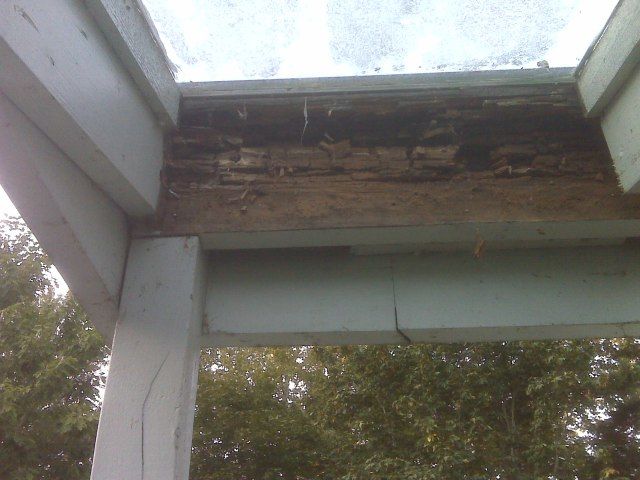
The problem is that the upper supporting beam is cantilevered out about 5 feet and both of the main 2x8s are rotted. As you can see in the pics below, I’ve removed one of them and the other one is at least 50% totally gone.
I’m trying to figure out how to replace or patch these without having to detach the entire structure from the house. If I replace the entire beam I’ll have to take the whole top part of the structure apart including the fascia boards and trims, cut all the beams free with sawzall, support them, put in new beams and then tie it all back together. Pshew!
Is there any other way to fix this? I was thinking of somehow incorporating a steel member up high, or putting in a post. Not sure what I think of the post — most of me doesn’t like it.
The lower member is likely just a 2×8 wrapped. I would suspect it’s cantilevered also but don’t know for sure.
Edited 9/27/2008 11:53 pm ET by geoffhazel
Edited 9/27/2008 11:54 pm ET by geoffhazel


Replies
How hard do you want to work and what do you want it to look like?
MAYBE you could with careful application of a sawzall get the old out and slide in a new 2x8, but by the time you were done you might have as much labor as tearing off and redoing it.
You could also "sister" on a beam above or below somehow, but that's going to look like heck. I'd take a new post over that solution.
Another thought is to add an angled brace from the lower 2x8 to the wall below.
I'm guessing you don't get much snow? If this is true, you might consider leaving well enough alone. As long as you have the moisture problems taken care of, and it hasn't sagged yet, it's probably going to be fine. I'd guess most of the weight is born by the lower beam. Perhaps you can cover the rotted wood with plywood or something.
Regardless of your method, you need to address what caused the rot. Most likely that will inform what approach you should take.
Frankie
Flay your Suffolk bought-this-morning sole with organic hand-cracked pepper and blasted salt.
Thrill each side for four minutes at torchmark haut. Interrogate a lemon.
Embarrass any tough roots from the samphire. Then bamboozle till it's al dente with that certain je ne sais quoi.
Arabella Weir as Minty Marchmont - Posh Nosh
"Is there any other way to fix this? "
Well you could start by shooting whoever designed this thing.
Is the cant dropping at all? It doesn't seem that this was engineered properly. There should be a post on that corner in my opinion to better carry that framing and the two outer panels of glass, that's point load. Or at least there should be a diagonal bracket member halfway down the cant to the side of the building.
The reason for the rot (other than the fact the framing might not be PT), is because there's no upper venting. The regular day to day condensation on the glass, and the moisture from all that greenery that's growing inside is collecting at the highest point and has nowhere to go except into the wood and out the sides when it cools down. It's probably always wet up there.
Right where it's rotten on the top there is where a vent should be, all the way across the top of the glass. It's having the greenhouse effect but it's not built like a greenhouse is to take care of that.
Also, I see the sun shining on the trees in the back, but not on this side of the house. I realize the time of day can dictate that, but if an area doesn't get any sun, that's another invite to rot.
The way I see it (from what I can see only by picts) is you probably could save this and your ideas of doing this are along the right track.
Start by jacking the outer corner up to level and sticking a post there....even of only temporary. Run 2x4 top & bottom plates total length a third of the way down from the top and install your temp 2x4 wall...I use deck screw for this type of stuff.
Get to work with your sawzall up top, slip out that framing and slip in new PT members. It looks like the one 2x8 is IN the building and not applied onto it, another PITA. Hopefully there's not rot behind or under that. (is that the garage there?).
After the framing is in....oh by the way, how is the "rot" situation with the end of the window-framing rafters? It looks like it may be ok, but if not, you might be SOL and just have to call it a re-do. Anyhow, if they are good, I would attach Some sort of Simpson ties to them. I know they don't look great, but tough...they can be stained.
Now, you have to figure out some way to vent that thing up top like I mentioned. Otherwise, it's just going to happen again.
Looking at it further, I think I would put a post on the end of that built up main beam and install diagonal bracing on both side of the corner cant.
What's that thing in front, a schmancy dog house? I think it should clash a little more with the house.
Have fun...
Thanks for the critique of the grandaughter's playhouse. I'll let her know your thoughts.
Oops...don't do that!
I'M SORRY I'M SORRY I'M SORRY!!all I said was that it clashes...but I did slip my size 12 in my mouth didn't I?I really didn't mean it as an insult. Honestly.
I agree, that thing is pushing the limits of what can and can't be done. I also agree that temporary framing will be your best bet while you deal with the rot. I suspect that once you get in there with the sawzaw, you'll be replacing more than you bargained for. Work slow and smart, one board at a time. A couple things don't make alot of sense to me about it: That lower beam that is cantilevered, how is it attached to the house? I hope its not just toe-nailed. Also, one 4x4 for that beam is definately not enough. I'd put up two 6x6 minimum, with footers.
We've got a customer right now that just had four dormers remodeled, and now wants a deck over the flat roof of the front porch. Problem is, the flat roof of the front porch has been leaking for sixty years, and the joists, beams, and posts, all have significant rot. My boss is trying to talk them into going all new and that is their safest and best bet.
Edit: You might think about just tearing the thing down, too! In the state it is now, it is a serious saftey hazard. You could beld a shed roof, and trim it to match the existing house.
Edited 9/28/2008 11:51 am ET by arcflash
that gutter does not look good
Without seeing the rest of the house and how the canopy is integrated into it, from a design standpoint, its hard to say whether the whole thing should come off or not. And if another design is more warranted.
After looking at it and considering the options, the HO decided to remove two panels and cut it back about 4 feet. That would keep the "look" and avoid putting in a post, which would be in the flow from the driveway to the front door. It would also avoid tearing out both joists all the way back to the front door.I found that the rot only went back another two panels, so it was pretty straightforward work. Oh, and we found that the lower member IS cantilevered, it goes into the wall, so we don't feel bad letting it handle the one joist that's still sticking out.I'll post some pics after I get all the parts and pieces on. The top trim work is "built up" from 7 different pieces of wood.
When putting the trim back on, I discovered another route for the water to get into the structure. The metal roof overhangs the fascia and trim work, and needed a small piece of flashing to route the water coming down the edge into the gutter. You can see where they made a little dam/diverter of caulking to do the same thing, but it doesn't catch water coming off the fascia or down the inside edge of the metal roof.
I fashioned and installed the missing flashing today.
View Image
View Image
Edited 9/30/2008 2:23 pm ET by geoffhazel
I'm not a roofer, but I did stay at a Holiday Inn last night...
You need to fashion more of a kick on that flashing. Also, if you don't slide it under the existing flashing, you are taking a risk of the caulking failing and negating all your efforts. Do you intend to inspect the condition of the caulk every 6 months?
Now I'm sorry I didn't take a shot of the piece I ADDED... these shots are both the BEFORE pictures.
The new piece is a 3 x 4" alum with two sides and slips under and behind the existing roofing and routes the water into the gutter. Slots in the bottom trim go over the flange
Not sure why the roofers didnt' add it in the first place. It wasn't much water, didn't even drip, but over time wound up causing quite a bit of damage.
Edited 9/30/2008 9:07 pm ET by geoffhazel
Flashing 'kick out' under the siding and into the gutter. Maybe trim siding up higher from/off the roof, too? I'd clean the metal roof real well up that last channel and then I'd caulk my flashing to it so water doesn't run under it. Tough detail, though.
Edited 10/23/2008 8:58 am ET by Clewless1
As someone who usually likes the non-traditional, i'd agree about another design being warranted. A simpler, more rectilinear form would match the house better. And still do everything this canopy does.
geoffhazel, great pics of the project, good job of finding additonal problems with this project and coming up with a good solution! post some finished production pics. raw
Welcome to Breaktime RAW.
Now fill out your profile and say hello.
"Everyday we learn something new. Take life as a test and shoot for a better score each day. It doesn't have to be an "A" the next day, but let's hope it improves." 08/27/08
Matt Garcia 1986-2008 22 yo Fairfield City Council Member, shot 09/01/08 RIP
Pics of the finished project all painted. First two from the street and driveway side, third is what we replaced of the rotten board. Had some treated outdoor wood, so it's got the knife marks in it but painted up doesn't look too bad.The owner said that some people who have visited since the repair (and had been to the house before) didn't even notice the change, they had to be told that the overhang is nearly 4 feet shorter, so we hardly detracted from the "look", which is a good thing.edit: If you look really carefully at the last shot, you'll see at the bottom of the post there's a little half-inch filler block. I was kinda pissed at myself that I wound up with a gap there, but put the block in, glued and nailed it in, and said "well, there you go, it should look mostly OK when painted" -- and it does. And then I got to looking at the before pics again, and saw that the OLD POST had the same gap! The deal is that the post goes down as low as the beam, but the side pieces hang a half inch LOWER to give a channel for the wire that went to the light (that is now removed). I've been noticing lately that it's hard when doing a repair job where you have to take everthing apart and then put it back together again to notice every deatil and get things back not only the way they came apart, but perhaps even BETTER than they were to start with.Anyway, I thought it was funny that I was kicking myself for overlooking something that the guy before me had overlooked too.Edited 10/22/2008 7:46 pm ET by geoffhazel
View Image
View Image
View Image
Edited 10/22/2008 7:54 pm ET by geoffhazel
Edited 10/22/2008 7:56 pm ET by geoffhazel
Impressive you could stop water entry,,,,but,,,the fascia at the top looks butt stacked and the return end looks odd. The whole thing otiginally,to me, looks like a couple of amateurs built it as they smoked too much weed. What purpose does this thing serve anyway and what "look" are they going for...spaceship greenhouse, jey canopy built from wood. i don't get it, but honestly why did you post this job?
Why did I post it? Because I was tasked with repairing it. There was some rot, and when we started digging in, we found more than we bargained for. Given that it was cantilevered out 5 feet, and two of the three members holding it up were nearly gone, I was wondering what route to pursue in fixing it. As usual, I got some good ideas from the folks here along the way. As far as keeping it or why it was there in the first place, the house is built on a hill, three levels, and from the street side, there is just a big double wide garage door and a front door. Period. The angled canopy gives it a bit of "interest" and "curb appeal", and was, in the opinion of the homeowner, worth preserving.As far as the stacked trim, etc. etc, well let's just say there are a few places in the design that are of similar nature. This was the third repair job I had on the same house.