Ok this is wide open… and this is still FHB… but on my loft project (i’m into 6 figures and 3yrs for planing zoning engineering plans) to build it exactly as i would have anyway… but as the head zoning guy told me “if it was easy everyone would be doing it”
scope of the deal is… 100yo all brick big timber laid out on a 16ft sq grid about 35,000 sf before loft areas are installed (20ft ceiling second floor will get divided with a sleeping/office loft in most units)
ok so far have stamped plans for lofts to be 16′ wide 20′ deep finish grade 3″ x12″ x20′ glue lams laid flat set on steel this will be finshed floor and finished ceiling from below…
all floors except the loft part will be scored polished stained concrete
per plans everything lines up drains ect… most mechanicals exposed… all beams that will be exposed have been sandblasted & sealed
onsite concrete countertops…
ceiling ht for lower units is 12′ upper units 20′ (loft area less than 50% of upper unit)
ok this is “upscale urban” anything that is defective adds “character” and anything exposed is a “design feature”
but i’m looking for ideas to make each trades job easier/ faster and what to have on site for each… i have scissor lifts… forklifts… bobcats, coredrill ect… ice machine & coffee onsite….
90% will be inside and the time/money factor will start to hurt and the draws on the construction loan get bigger
thanks as always
Pony


Replies
With high walls and ceilings maybe you'll needa "warm room" cause you cant heat a large open warehouse of area. I Seen it, experience that, and suggest wearing warm clothes in the winter. And this was in Southern California. Heat always rises, hot at top and cold at floor level.
but i'm looking for ideas to make each trades job easier/ faster and what to have on site for each I'd ask the tradespeople, and the boss's,, except the sub who is going to do your sprinkler system,, for you already have that one covered. As you already know Ponytl, you probaly have all your special order items,at home under your bed. Wow,, sounds like a handful, that project of yours. Enjoy,, Jim J
Jim... you have me pegged... this project really started in 1998... but jump'n through government hoops... waiting for other development in the area... and finish'n up other projects take 5x as much time as i ever allow for...
i think i have all the hoops cleared.... I know i have every plumbing fixture.... lock set... and hardware item accounted for... plus some, I never have had a fondness for money... but STUFF thats my weakness... (maybe a sickness) but it just feels good to know i have 10 pallets of balwin brass hardware to use when i need it...
pony
I will suggest, that you fly Sam T to your project , Ponytl. If my memory serves me correct, do you not buy All sorts of odds and ends, light fixtures, plumbing fixtures etc, from e-bay and wherever else?? a question comes to my mind Ponytl,, now I know that you have all sorts of Permits in hand, do tell, what all did you do concerning "point loading" and the rest of the engineering on your Project? any Geotechs involved?? or did you use a structrual engineer and more concrete. do I have this right-- an old, old building, being rehabed into residential,, once again, Wow, more like two hand fulls. Jim J
>>ok so far have stamped plans for lofts to be 16' wide 20' deep finish grade 3" x12" x20' glue lams laid flat set on steel this will be finshed floor and finished ceiling from below...
Pony, what I see from your description is a 20'x16' grid laid on top of a 16'x16' grid, is that correct? and the steel is the ceiling or is it the bottom of the 3x12 planks?
If you are using glulam planks for floor/ceiling, how are you keeping dust from settling down to the first floor?
Anyway, some ideas for you to . . . Industrial compressor with remote manifolds and regulators. 50' lines on airtools from regulator. The wrenches your steel guys use take a tremendous amount of air. Lasers to help the ironworkers center and plumb and elevate their columns. Spider boxes for electricity. Small dumpster inside for lunch trash. 1 laborer whose only tool is a pushbroom. He will increase productivity and quality of almost every man on the site.
It sounds fun, I wish I were there.
SamT
The bottleneck I see from here is going to be material delivery to the floor setters trying to snake those 20' planks through the 16' grid of columns, I would not want to have him traveling that many times that far with the forks 13' in the air.
Iron, provided they are well equipped, is fast. Flooring can be just as fast. Have the ironworkers setting iron right in front of the floorers. Or build the floor from the forklift door outwards, leaving a material delivery opening. Use 2 laborers with Big Box type carts to move it around the floor.
A good layout carp can hand a cutlist to a cutoff saw and you can stock the floor with framing as fast as it is laid. Bring in the framers after the floor is complete.
Warm room. . . tincan framing, 1/4" DW inside and wrap it with tyvec. Cheap 4/0 door. PVC furniture. A microwave for each 10 people, is what? An 8$ bonus for the job?
I've got to agree with the idea of building the breakroom for the guys into your plans. More than anything it would show a good level of appreciation and respect for the people doing the work. Bringing all the subs together for breaks etc might also go a long way toward coordinating all their work. Probably much better than those weekly jobsite meetings.
We are currently working on a large residential project (25,000 sqft house) and last week th PM announces that there will be no more eating or drinking inside the building, all breaks must be taken outside. We had been using the foyer, which will recieve 2" of mudpack and then tile on the floor, as our break/lunch room. I have a trash can and a microwave onsite for my guys to use. We had been working Saturdays to try and get complete by their target date, but no more.
Thanks for the input... the loft deal is pretty simple.... the building is a 16' x 16' grid
the loft part is 16 wide and 20 deep... (the glue lams are 20') the only support the gluelams need /require is a steel ledger through bolted to the brick wall at one end... and a single 6x6 x16' ft steel support that runs under at the 16' out mark that ... (means i lose no more than 9.5 inches in headroom for total loft floor construction) the 6x6 steel also sits on what amount to 2 jackstuds lag bolted to the 8x8 collums... these jackstuds have already been bolted into place long and a laser was set up they were marked and cut before the all exposed wood was sandblasted... so they are in place the 6x6 steel will just sit on these... the glue lams overhang the steel by 4'... the lofts are open to the living area below... steel railing fab on site (right now i'm looking at some pretty cool steel conveyer that was an overrun to use as the railing infill....)
as you know glue lams are built with a crown... these will not have a crown and they will have a grove milled in each abutting edge that will receive a plywood spline... the rear steel ledger will be predrilled so that 3/8 lag bolts can be used to fasten the lams to the ledger... the 6x6 beam gets a drilled flange welded to one upper edge for the same thing...
the front & rear of the building will have balconys... and has large openings that i have already cut... the idea is to have the steel in place when the gluelams arrive and it will go from the truck dirrect to the loft... it's a full truckload of gluelams and they said they will drop the trailer for a few days at no charge...
the breakroom is already in place... on most of my jobs i have coffee makers... microwave... refrigerator... gas grill... & ice machine and the guy with the broom usually knows how to cook... i stock up at sams frozen burgers...hot dogs... bottled water... this is memphis... it doesn't get real cold here...
every vertical surface/post is already marked with one true level line... for reference...
the spider boxes are there.... I also have a supply of steel, plasma cutter, drill press, & welders & torch... when in doubt... we use steel
this being an old warehouse it has a loading dock (soon to be porches) but during the gutting i just kept my dumptruck (20ft grain bed rear split doors) backed to the dock... vs have'n dumpsters the gutting took 70 trips to the c & d landfill (8mile trip) i pay by the load (vs by the yard or ton) @ $66 a load CASH with my truck at the dock i can drive the bobcat into the bed and compact/crush the loads pretty good... so i think i get as much in this truck as i do a 40yd hand loaded container @ $275 a container... plus i can go dump it and be back empty in less than 30 min.... so i look at it as this truck has already saved me about 15K just in trash...
if someone will tell me how to post pictures... i'll post post some...
I'm pretty lucky... i only do my own projects... I'm way hands on... i get to collect every tool known to man... i don't rush... my plans only have enough detail to get them approved so i can design as we go... this project will have 20 total units... but no 2 have to be the same as far as fixtures, materials and finish... if it's not going to be fun... why do it...
i started out with nothing... and have most of it left
pony
>>but it just feels good to know i have 10 pallets of balwin brass hardware to use when i need it...
I can relate to that.
>>grove milled in each abutting edge that will receive a plywood spline...
A 20' spine or are you going to seal the edge between 2 10' pieces? Maybe spine the the spines? Or make your spines out of TnG and glue 'em?
Is this a 2 story building? You have upper units, lower units and you are putting lofts in the upper units. Right?
With only 20 units, you're going to have some really big apartments or quite a bit of "yard" between them. It looks like the upper units at least areusing at least 640 sqft of building floor space, say 1000' 'cuz you said the loft is less than 50%, but that still leaves 750sqft of "yard". This is fun trying to "See" what you're working with from the clues you "drop."
Enjoy the weather in Memphis, as it's been in the 20's for a week here in Columbia, Mo.
SamT
Things that are clear in my mind... usually take alot of explaining so others can paint a picture... but i'll do my best
the building (old part pre 1945) is aprox 80 deep and aprox 150 across the front... built as 2 stories all brick exterior walls... big beam or big timber inside those 4 walls build on and aprox 16" sq grid... the lower (1st) floor... has 16" sq columns with "cast iron caps" on these caps rests the 16x20 second floor support beams and the 8" x 8" column that goes thru the floor all the way to the cast iron caps that support the main roof beams ... the "floor 2nd system that rests on the 16" x 20" beams (all this is heart pine) is floor joists that measure 2 1/2 to 3" x 12" which is decked in 2x6 heart pine T&G... on top of this is 1x3 t&g hardwood... the 2x12 roof joists rest on 8x14 beams and the roof is decked in 1x8 pine...
i started with the roof... 90% was sound... over a hundred or so years they did manage to build up 6 to 10 inches of soild roofing... i took 27 truck loads off... i don't know the tonage but we couldn't fill a dumptruck because of wt... I insulated the roof system with a 6" foamboard ontop of the wood decking and added a 5 ply hot mop... i also added a 16" cant to the parapit (sp) wall and used torchdown on the cant... insulating on top lets me leave the roof decking,joists & beams exposed in the upstairs units... thus requiring no finish out..
there are "front" and "back" units the back units face the mississippi river and arkansas... the "front" units face east and the downtown skyline... there is a 6' wide interior center hallway that runs most of the length of the bld.
the units aline with the 16' wide front to back "bays"
The rear lower units are single bay units have no loft area and are the smallest units 2@ 560sf and 3@ 610sf these all have rear patio areas and no view.... the 3 front lower units are double bay units and are 2br and are aprox 1120sf ea all have exposed big beams and columns.. exposed brick and drywall ceilings between the big beams...
The upper rear units are the "loft" units with a 560sf footprint and a 320sf loft there is a balcony off the mainfloor and off the loft (44"x 88" balcony size) one above the other... which adds aprox 60sf of living space (if you measure like they do a FL condo) 1br full bath up and 1/2 down...
the upper front units are double bay units with an 1120sf footprint... they have one 320sf loft "office" thats above the living area and are 2br 2ba... there is also one single bay front unit with a loft thats about the same as the rear units...
this was an old refrigerated warehouse and had a rear 25x25ft pumphouse with 20ft ceiling ht... this will make one unit with a 14 x 25ft loft.... it will have it's own rooftop deck
i started with structural engineers... they had to state that the building was structurally sound and would do what i wanted it to do... i had to do the phase 1 envromental stuff... i had to get design approval from the city ( a 1yr process ) i spent 47 days in court to get the fire dept off my back.... then every system had to be engineered and stamped... the structural (loft, balcony ect) had to have engineers drawings and stamped...
What you do get from the city is a 10yr tax freeze at preimprovement value and there is a program here where you get a 90K 3% loan that u can use for structural and mechanical it's a second and it's paid back to u at the finish of the project... (your prime lender likes this) you also get a 10-20% tax credit (federal) for all money spent on the improvments above the purchase price of the prop.... Then it's in an enterprize zone (federal) if you hold the property for 5yrs after it's finished and sell it before 9 years then there are no capital gains on the property....
there were 100 year old right of ways...alleys ect... that had to be deeded back to me... after 6 months of dealing and finishing the zoning... they forgot to record it as rezoned... took me 3 days of listening to tapes of meetings to find where it had in fact been rezoned... and prove this...
what i hope will happen with the gluelams... 1. i hope they are stable 2. i hope they are true 3 i hope they mill the grove dead center so there is no top or bottom... I'm planning to cut the plywood splines onsite and never even thought of the splines butt joints... I figured on the bottom lagbolts holding them to the steel and using some large ratchet straps to pull them tight before lag bolting.. the beauty of doing "urban lofts" in old building anything you screw up on adds character...
ok now there is an 80x80 foot addition on the rear that was put on in 1945 (they suppiled food for the troops out of this bld) it's divided front to back so that there are 2 40x80ft bays both with 14ft ceilings... I've kept the north end of the building upper & lower front to back and this rear building for "my apartment".... as it works out with the loft area in my unit I'll have aprox 15k sq ft in my unit... 3200 of it garage... i was also able to get the lot north of me... which borders my unit.. most of this will be a 160 x 40 ft "courtyard" for my unit... my wife hasn't warmed up to the "urban thing" yet... so this might end up being the citys largest rental unit....
there is also a common roof top deck area... i thought about a walking track on the roof... but still don't know about that one yet
i'll try to post some pictures....
as you guys can tell this is real personal to me... all my projects are... and all input is valued... I love good ideas... and better ways to do things...
pony
Thanks Ponytl,,, Jim J
ok ment to toss this out there.... I'm pretty sure the curtain/firewalls between units will be metal studs (some be'n almost 20') with 5/8 type x rock...
i did this on another project and it seemed to work...
i used a 2x wood baseplate under the bottom metal track... (all this is on top of concrete floor) it seemed to work... used a plate seal product under the wood baseplate ... wood was shot down... and metal track was then screwed to the top of the wood... other than i just liked the way it worked out... i did have somewhere/something to fasten the wood baseboard to..
my other idea... on these firewalls is to drywall one side and then spray a layer of a water activated adhesive insulation onto the backside of that drywall to add a little mass for sound insulation.... before hang'n the other side...
Thanks, pony.
Looking forward to seeing your pictures.
SamT
Oops! I forgot. . .
Exposed copper plumbing
SamT
View Image
The pictures are links to the home page. Just click the pic to go there
View Image
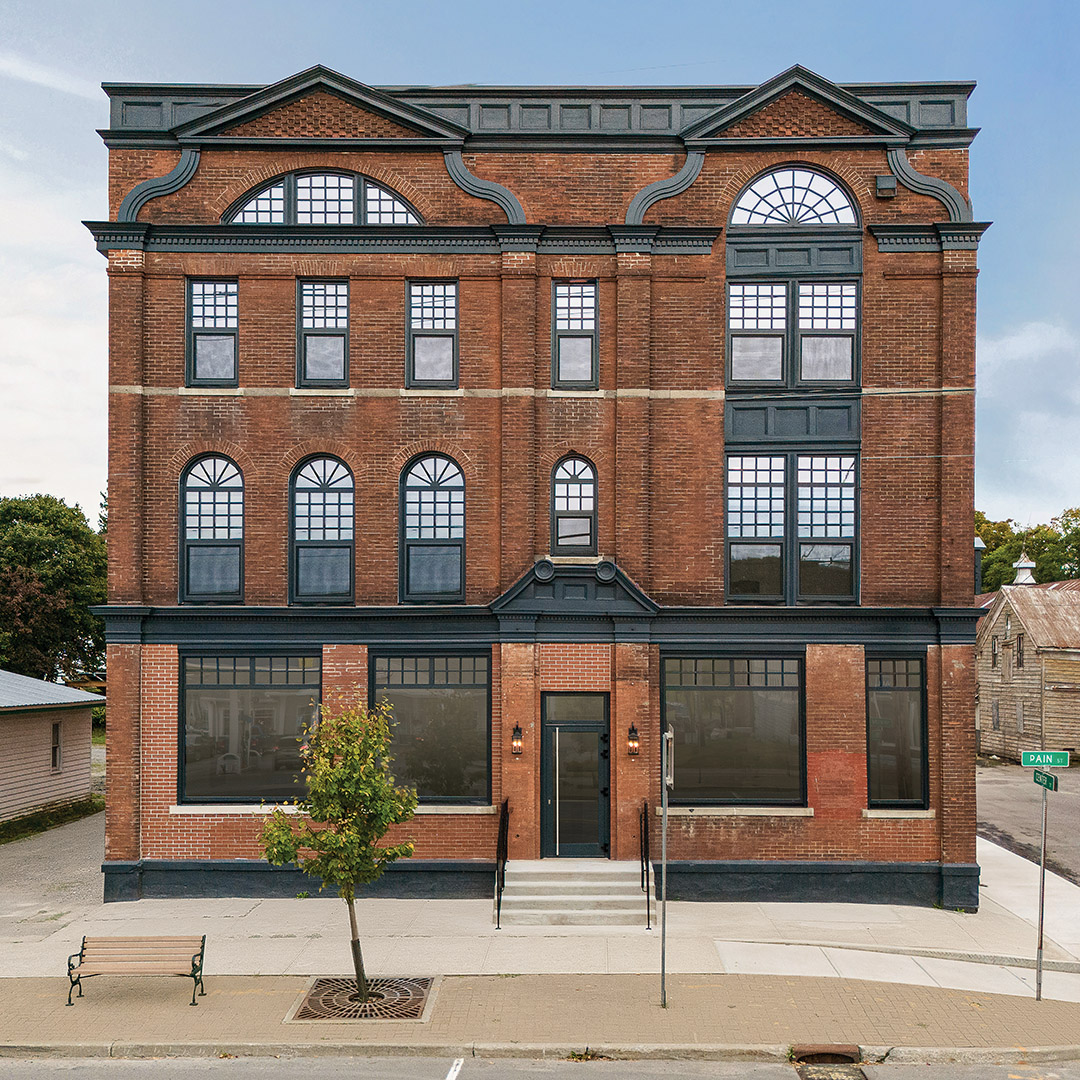
I'm going to try to post a few pictures.. these are what i have in this computer... most are take'n from across the street (my warehouse where i store alot of my "junk" but i have an office and restrooms there) these are mostly pics of the outside front... where it went from painted back to brick... i think there are a few of me in the "pump house" where we are casting all the concrete lintels (white portland fine white sand with wire & rebar in smooth steel molds i built) I'll get some better pics of the inside and rear...
Was that a tree growing outa' that roof drain?!?!?!?
It sure looks a lot better without those old coats of paint.
Thanksfor sharing.
SamT
Ponytl,
Looks like the pyramid in the background of one of your pictures.
I live in Cordova and have built several houses in Harbor Town.
Glad to see you fixin up part of the riverfront.I saw in the paper the other day where Memphis is one of the last riverfronts undeveloped in the country.
We will have to get together and do a breaktime fest in Memphis.
Email me and I'll buy you a beer for all the good work in helping restore downtown.
ANDYSZ2 I MAY DISAGREE WITH WHAT YOUR SAYING BUT I WILL DEFEND TO THE DEATH YOUR RIGHT TO SAY IT.
>>if someone will tell me how to post pictures... i'll post post some...
First, save you pictures as .jpeg type in the poorest quality that will pass. This shrinks the files size dramatically and as curtesy to dial up userts, you want to keep them at around 50K or smaller whenever you can. Rename them to something that has some meaning.
when you are writing a post, about 4" under the text window you type in is a row of buttons. One says "attach Files". Click on that one and follow directions. After you click on "Upload" go make a fresh cuppa so you can keep your self occupied. When the upload is complete your screen will change.
On a side note, if you scan pictures into the computor, always scan them at the highest resolution you can, and save them as .bmp type. This will be your original and you don't want to mess with it, so work form a copy.
SamT