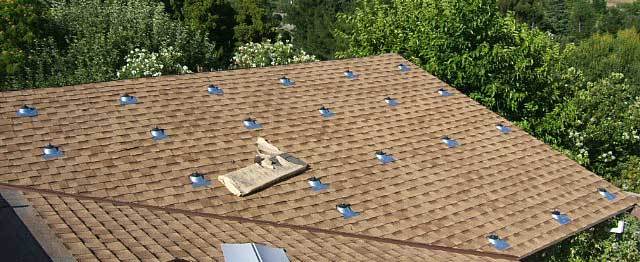
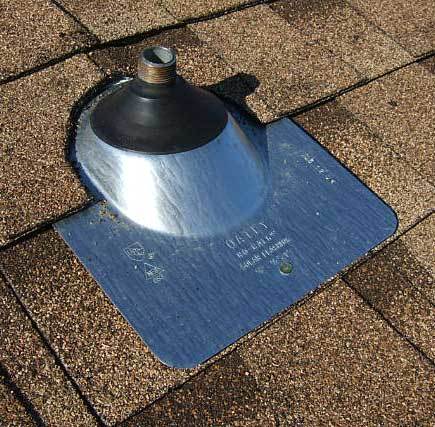
The new roof is mostly down. I noticed that all the stanchions (for solar panels), solatube flashing, vent flashing, etc. has one or more exposed nails holding the lower edge down. Is this common? I can’t think of any other way to do it myself, but it still doesn’t make me feel like I have a roof that will last 30 or more years – even if they glop on some black plastic roof cement. If this isn’t it, what is best practice?
Thanks, Wayne


Replies
dood...........
With that many protusions, I would have underlayed that whole roof section with I&W shield eave to ridge. Barring that, I would set the sides of the vent collars (not the bottom) into blackjack. I would cap that face nail with the best silicone money can buy. I would be concerned about the height of those pipes coming out of the collars. Snow packed up against will allow water to seep in during the freeze-thaw cycle, especially if those pipes are significantly warmer than ambient winter air. I will slide a collar down onto the pipe, pencil a line where the boot ends and then pull it off. Then I will apply a fat bead of blackjack or silicone above that line. Then when I'd slide that collar back down, the boot was well set into sealant. Then I'd caulk on a bead for ####-and-giggles.
As far as that one or two exposed nail on flashing, another thing I would do is slap a piece of scrap I&W shield on the underside of the collar or flashing. This will seal the nail as it punches through the flash without causing a water trap at the bottom of the collar.
Thanks for the response - kind of along the lines of what I was thinking. Maybe they are still planning on comng back and laying on 50-year silicone or something like that. I'll ask the GC tomorrow, but I wanted some more ideas like yours before talking to him.
Maybe I should have added a detail or two. SF Bay Area - most snow I've ever seen here was a whopping 1/16th" - must have stuck around for an hour or two - so the whole snow/freeze/thaw thing isn't really an issue. The stanchions will hold horizontal rails that will support solar electric panels. Underlayment is 30# felt.
It's been said that silicon on metal can increase the deterioration of the metal.
A person with no sense of humor about themselves is fullashid
Silicone doesn't stick to metal more than a few years either. Oncce it stiffens up and the metal moves with thermal expansion, the bond breaks
Welcome to the Taunton University of Knowledge FHB Campus at Breaktime. where ... Excellence is its own reward!
Those boot flashings should be one shingle lower cut in. That way, the nails can be on the side flanks and covered . The water still runs out on the headlap of the bottom one.
If it has to be somewhat exposed and needs a fastener to seat, you could get some of the fasteners made for metal roofing with neoprene washers and replace the nails with them.
I far prefer the first method though, it looks much better and there is less chance of water blowing in the sides. Are these seated in mastic?
Welcome to the
Taunton University of Knowledge FHB Campus at Breaktime.
where ...
Excellence is its own reward!
Piffin,
You got me curious so I went back up to take a look. I can't see any evidence of mastic though that doesn't mean there isn't any. On the other hand, there isn't any on the roof, though every other product they need is up there. Maybe they used the fix-it-all (see pic). The other pics are of the work in progress in a valley and a vent stack. I realize it's not really fair to post these without seeing how they finish it off. Of course that's kinda hard - it will all be down when I come home tomorrow.
The roof is a combo of 3/12 and 4/12 pitches (solar panels going on a 4/12). Underlayment is 30# felt, 1-1/2" overlap. Average rainfall appx. 25" annual, usually Nov through March (of course 2 storms in June since the roof was off - LOL).
Wayne
Having a few exposed nail heads at the end of a normal roofing job is not uncommon. I wouldn't necessarily consider that a normal roofing job though. I think that spray paint is just to make the flashings visually blend in with the rest of the roof a little better. Concerning the 'dollop' of mastic on the nail heads, yea, that is common practice, but I find that the polyurethane roof cement is much better than the bituminous (tar) kind. I have seen, first hand the tar kind is sometimes very short lived. As far as using mastic in other places, that is exactly what it is - mastic, and should not be relied on for long term waterproofing. It just holds things in place. Proper lappage of the roofing materials is what makes it shed water. Matt
Your valley pictures show no continuous felt or IWS laid the length of your valley.Not much felt overlap where the narrow valley sheets lap.
I was gonna bring that up ( there's some other minor things I don't like about the valley detail shown, but there's more than one way to skin a cat), but I only rely on I&WS and felt (or Titanium) to protect during re-roofing. Otherwise, I try to install a roof system that doesn't need belts AND suspenders (except tile which needs belts, suspenders, and a pellet gun to kill the squirrels). What's pictured is a work in progress and not entirely suspect, but the boot installation and the immediate reliance on "covering the whole roof with I&WS" throws up some flags.OOPS, I did it again.............................
ya know greencu-----
I am not sure that there is ANYTHING wrong with those boot installations.
I can't quite tell from the pictures----especially can't tell from the close up angle----
you guys must have WAY better eyes than me
2 very broad things
1) the premise we have always operated on when installing waste stack flashings( which these are) ---is
The lower edge of the bottom OVERLAPPING shingle should hit on a line more than halfway down the pipe----but not much below the pipe. about 2/3ds is perfect.
when I look at the closeup it looks about halfway---but I can't really tell----a side shot, or a straight overhead shot might reveal the 2/3 down I am looking for.
here is why---- We want that WSF to act like a step flashing. any water that gets on it must be spilled back out onto the shingles.
so it has to overlap and be interwoven with the shingles in certain proportions to work the way we want it to.
assuming a 12" high shingle with a 5" "tab" portion
in the picture shown-----if an additional course of shingles overlaps the wsf---the bottom edge of the shingle will be WAY out of position----there won't be enough shingle UNDER the wsf for it to work properly in all situations. done as you guys are insisting----the top edge of the underlying shingle will not be far enough up hill under the wsf.
any water running downhill and hitting the pipe will spread out ---and may spread under the shingles and hit on a line ABOVE the top edge of the underlying shingle----leak.
so-----the installer was in a boderline situation and had to make a judgement call. I think he probably made the best one----cause I think an additional overlapping course would have been the wrong one.
2) the nail on the lower edge of the waste stack flashing.
As long as they get sealed with geocel----I have NO problem with that nail.
In fact I usually put 3 nails along that bottom edge----and seal 'em with geocel.
I know, I know---good roofing practice strives to avoid exposed fasteners.
But---almost always when I see a wsf NOT nailed at that edge-----time, expansion and contraction,snow, ice, and yes---squirrels lift that edge up inviting a leak---and worse.
this April i had a prospective customer with a baby squirrel in her house for 4 days----point of entry--- wsf lifted up about 1 1/2 inches.
Now----the possibility exists that each and every wsf I have ever installed has been done wrong----but they have never leaked .
very best wishes,
Stephen
Steve-
I understand your reasoning and realize it's very well thought out and in theory I agree. In practice, though, I prefer to see as little of the flashing as possible and unneccesary face nails are one of my pet peeves.
If possible, I only like to see metal directly below the pipe. This way the flashing can be nailed lower on the sides and the nails will be covered. Now, I seldom use the type flashing pictured. We either custom fabricate from copper or use lead boots which lend themselves to my type installation better. I realize in this situation the neoprene gasket models are the only thing that would work, but a lot of my repair work is replacing 10 yr old WV flashings when the gaskets break down.
If you look at the full roof plane picture again, you'll see some of the flashings are installed your way, but most are installed my way. IMHO, they need to be all the same, whether it's your method or mine.
On the squirrel issue, I once had one chew a hole in the shingles in the middle of a roof plane. He may have gotten in another way and chewed out there. OOPS, I did it again.............................
for anybody interested,
I would suggest refrencing
William E. Johnson ( Roofers Handbook)
also----Roofing Handbook---by Mcgraw /Hill
or even the Certainteed Shingle applicators manual.
to my eye-----it looks like the installation falls pretty well within the parameters outlined. The exact position of the flashing varies from course to course and I think falls within the " approved techniques"---perhaps I am mistaken.
I do know I have personally installed over 1,000 of these babies, as I described---with no problems.
Best wishes to all, stephen
take a closer look at the pic ...
looks like they got 46 outta 47 with better overlaps.
Jeff Buck Construction
Artistry In Carpentry
Pittsburgh Pa
OK, just for you
I took a better look seeYou have double vision!I see 21 of them, and only maybe five that are done right enoughI'll admit that there are a couple thjat are hard to trell way back there that I have to assume are donme same way as near ones in same rowSo - When's your next optometrists visit? You really shouldn't be driving in your condition;)
Welcome to the Taunton University of Knowledge FHB Campus at Breaktime. where ... Excellence is its own reward!
I looked again ...
I see 106 ...
they keep multiplying!
pretty soon ... no roof ... all holes.
Jeff Buck Construction
Artistry In Carpentry
Pittsburgh Pa
Easy there son, it's just jacks, not jackrabbits
Welcome to the Taunton University of Knowledge FHB Campus at Breaktime. where ... Excellence is its own reward!
Is it best practice? I don't believe so.
Universal practice? Almost.
I believe best practice would have the flashings nailed on the edges high enough so the nails are covered by shingles.
Rich Beckman
Another day, another tool.
If it doesn't look right it probably isn't. I don't know about solar, couldn't some of those be tied together in attic?
I'm with the Piffmeister...One more course of shingles should be on top of the flashing so water couldn't get blown sideways under the lower edge of the flange. I think that's a bigger risk than the nail penetration. At this point, unless your contractor is one very special individual, you could have them seal under those edges with a quality caulk and cover the nails heads while they're at it.
Now, if you had shown those photos after they did only one...
Al Mollitor, Sharon MA
Update - shared the pics with the GC today and he talked with the roofing sub. Bottom line is I'm feeling much better now. Many of you have mentioned that the most important thing about a GC - HO relationship (beyond a good contract!) is trust. My GC has references going back to 1988; many of them repeat customers. Everything I've seen so far says he is conscience and thorough.
He has worked with this roofer for many years, on similar shallow-slope roofs with no issues. He told me that the 3/12 part of the roof has I&W under the whole area. Regarding the exposed nails, they will be coming back and applying some industrial sealant that is not corrosive and pretty much lasts forever (very nasty to work with).
The challenge with the solar panel stanchions is that their layout (in order to get the desired 3 KW on the roof) was off with the layout of the shingles, so we didn't get the side coverage that you all mentioned was better. That's why they had to put the nail instead of the sides to prevent wind uplift.
The GC will also be out on Monday to look at the job and see if there is anything he is concerned about. Thanks again for your input reinforced for me that although the solution wasn't ideal it is still workable.
I hate to say it but GC and roof sub are both wrong. There should be one more row of shingles on top. Do a mock-up of both without goop and run a hose on it.
I have been told a good roofer doesn't use goop. Roofers if I am wrong speak up. I wouldn't call myself a roofer but I have done a couple dozen shingle jobs without gooping it up.
I have been told a good roofer doesn't use goop.
I don't know if I'm a good roofer or not, but in 20 years, I've only used one can of mammy and that was for some temporary repairs 'til it quit raining. REMEMBER THE BOSTON BATWANGER.
What do you use when you have step flashing to a masonry wall?
Jon Blakemore RappahannockINC.com Fredericksburg, VA
What do you use when you have step flashing to a masonry wall?
Don't understand your question unless you're pulling my leg. If I have step flashing abutting a masonry wall, I'd counter flash with the same metal as the steps.REMEMBER THE BOSTON BATWANGER.
I'm assuming that you install a kerf in the masonry for the counter flashing. Do you then bed the counter-flashing in some type of silicone or polyurethane or is there another way that I don't know about?
Jon Blakemore RappahannockINC.com Fredericksburg, VA
I'm assuming that you install a kerf in the masonry for the counter flashing. Do you then bed the counter-flashing in some type of silicone or polyurethane or is there another way that I don't know about?
We cut into the horizontal mortar joints (usually - sometimes we cut a kerf thru everything parallel to the roof) with a diamond blade which produces about an 1/8" wide kerf. The counter flashing flags fit into the kerf and we normally use colored Geocel caulk (tripolymer - what ever that is) to fill the small resulting gap (which is too narrow to accept mortar).REMEMBER THE BOSTON BATWANGER.
You ain't no roofer, you're an artist!
Welcome to the Taunton University of Knowledge FHB Campus at Breaktime. where ... Excellence is its own reward!
You ain't no roofer, you're an artist!
What? That's fighting words........................................OOPS, I did it again.............................
The last several years, it seems that I am only dealing with flashings on new and renovation work so our flashings are lead or copper base and lead counters, but here is a drawing of how I learned to let in counters to a cut mortar jointWe broke it with a return on itso that it sort of snapped in place, like the barb on a fish-hook gicving a good hold. Goes in but doesn't want to come out. we would seat it in a small bead of caulk and then caulk the surface oppening.
Welcome to the Taunton University of Knowledge FHB Campus at Breaktime. where ... Excellence is its own reward!
Excellent. one contractor I worked for cut strips of lead and tapped it in the joint.
I've used that detail, but don't anymore. My guys have gotten good enough with a diamond blade that there's not enough room, usually, to push it in unless it's almost flattened like a hem. I make 99% of our flags in the shop and I slightly overbend the top flange so it wedges in the reglet. Then we caulk a small bead and rivet to the previous flag.OOPS, I did it again.............................
Piffin,
What's the reason for this lip?
View Image
SamT
That is called a return. Water that hits it is redirected back to the break instead of wandering out into the field/ not necessary when step flashing, but an absolute when running the base as a single piece.Same idea as the return on a W style valley
Welcome to the Taunton University of Knowledge FHB Campus at Breaktime. where ... Excellence is its own reward!
"The challenge with the solar panel stanchions is that their layout (in order to get the desired 3 KW on the roof) was off with the layout of the shingles, so we didn't get the side coverage that you all mentioned was better. That's why they had to put the nail instead of the sides to prevent wind uplift."That may be what he told you, but it is not so. I studied that photo and almost every one of them could be instaled one more lap under the shingles. It would look better and be more watertight. Sounds like they are relying more on the ice and water shield to keep leaks at bay than on good workmanship. But that I&W has holes in it where the pipes stand up. Leaks will follow the pipe right down through. It won't be qa lot of water, just a few drops every time it blows hard when it is raining, so you are unlikely to ever see watersign on yopur cieling, but the next roofer will see the long term damage to the sheathing when he does the tear off . 'Course, this roofer will be retired to Florida or pushing up daiseys by then.Aside from that, solar installers and roofers have never seen eye to eye. I can't tell you how many times I have been called back to a perfectly good roof to fix a leak that was caused by solar guys drilling holes in it and trusting to luck instead of flashings. I would bet that your roofer was spending some time cussing out the fact that he had to do so much cutting when he should have been grateful that they were at least getting them in along with the roof so he could flash them properly.Alas, he failed.
I can tell you why he did too. The way he lapped these meant that he only needed to cut one shingle neatly for each stem pipe. These archy lam shingles can be hard to cut neatly so he made his job slightly easier the way he did it.
Welcome to the Taunton University of Knowledge FHB Campus at Breaktime. where ... Excellence is its own reward!
Piff......"These archy lam shingles can be hard to cut neatly"
Try using tin snips , the compoud left or right hand ,Weiss brand three for #14.00.
Hmm.. depending on his PV setup, a large portion of that roof might not even see much rain.
I've seen (not installed) some roof mounted PV's that had locking edges. I would imagine this would have the effect of having an awning over that section of the roof, thereby reducing the amount of rain actually flowing on the shingles.
jt8
A pessimist sees the difficulty in every opportunity; an optimist sees the opportunity in every difficulty. -- Sir Winston Churchill
If my shinglers ever install a boot face nailed like that, they will have to replace it. The boot pictured is installed incorrectly as Piffen noted. Not all of the boots pictured are wrong, but there is no reason for that face nail. I'd insist that they be redone.
REMEMBER THE BOSTON BATWANGER.
Anyone got pic of it done the right way?
A person with no sense of humor about themselves is fullashid
Why did you ask the question? Because it didn't look right? Now what do you do with the advice you got from here? You can't just go up to your boss and tell him some guys on the internet said he is wrong. You need documentation. FH archives, internet site, and a roofing book. I'd give him three. He might give you a raise for caring or he might fire you. I had two bosses in past that didn't believe 5/12 pitch was 22 1/2 degrees. Neither of them fired me when I showed them it was.