Hey Guys, I need to repoint the stone foundation in some spots. The old mortar is very soft and I don’t want the new to be too hard and brittle. Anybody know a recipe that would be suitable. Will probably only need to mix small batches at any one time.
Discussion Forum
Discussion Forum
Up Next
Video Shorts
Featured Story
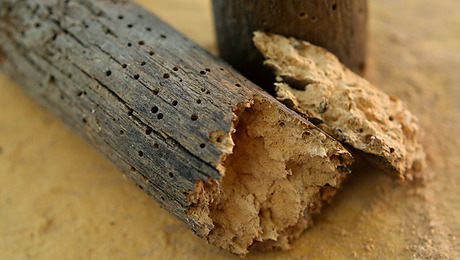
Learn how to fight wood-boring beetles and prevent home infestations with expert advice from Richard D. Kramer, an authority in pest control.
Featured Video

Highlights


"I have learned so much thanks to the searchable articles on the FHB website. I can confidently say that I expect to be a life-long subscriber." - M.K.


Replies
In that situation I use the S mix- 2:1:9 (Portland:lime:sand). If you want softer go 1:1:6,it,s rated ~ 350 psi, good for exterior above grade.
Steve
Thanks, just what I needed.
If your foundation dates from before the 1880s, it's likely the original mortar was lime/sand with no portland cement at all.
When repointing above grade, I would not hesitate to replicate lime/sand mortar. It's not too difficult to exactly match the orginal (the repointed areas will be invisible when completed).
To replicate the original mortar, you match the sand (coarseness and color) and tint the lime to a slightly brownish-yellowish color. Usually a local sand source can be located to match the original sand. A light acid wash of the newly repointed area exposes the sand, replicating a century of natural weathering to create an invisible repair.
If you have a lot of repointing to do, but only an occasional hour or two to work, then the big advantage of lime mortar is that unused mortar, kept moist and relatively sealed, can be used almost indefinitely.
A few years back I rebuilt a large section of my barn foundation and mixed all the mortar in one afternoon, and then worked on the project at my leisure over a couple years! I only had to rent (and clean!) a mixer for one day to mix 24 bags of hydrated lime and 3.6 tons of sand.
Another advantage to lime mortar is its ease of use. It's sticky and stays where you put it, without the weeping and slumping that even a small amount of portland will cause.
I can give you more specific information if you're interested. Attached is a photo of that barn foundation I mentioned.
Allen
WNYguy,I'm curious... Other than the clue that you used 24 bags of lime to 3.6 tons of sand, is there a more manageable ratio that we could learn to mix a lime mortar? I'd love to try this someday on a more modest scale. Thanks.
That works out to about 1 part lime to 3 parts sand.
Allen
nice job Allen
Allen, nice work on the barn. Any Idea how that ratio works out by volume ?
After I logged off this morning, I realized I neglected to give you the ratio! Sorry about that.
By volume, 1 part hydrated lime to 3 parts sand. I buy 50-pound bags of hydrated lime at an agricultural supply store for about 8 dollars a bag.
I'm an amateur stonemason (though I've done a couple small jobs for pay), so I particularly appreciate your compliment.
I did a small job on my own house in October, and hand-mixed what I needed in a tub. I covered it with plastic and used it over the span of a week or so as I had time. That's really one of the great things about not having any Portland cement in the mix. Lime mortar "cures" by drying out and through a chemical reaction with atmospheric carbon dioxide (essentially turning the lime back into limestone).
Portland cement chemically reacts WITH water to cure. It's a great invention, and certainly has its uses!
Most of what I know about the subject has been gleaned from a friend and mentor of mine who has made a living as a stonemason since the early 1990s, specializing in lime mortar masonry. His philosophy is that when working on an early 19th century building, using 10 percent Portland cement is 10 percent wrong.
Alas, however, he adds a small amount of Portland for masonry that is at or below grade. Which I do, as well.
Allen
Edited 1/24/2008 11:01 pm ET by WNYguy
Very nice work!A few years ago I ran into an old mason andhis technique was much the same. Restored oldmasonry in Annapolis, Md and would source sandlocally and use the lime mix you describe.Very difficult to detect the repairs.
Thanks for sharing!Mclaren
Mclaren, it's heartwarming to hear of that old mason. Fifteen years ago, masons using lime mortar (with no portland) here in the U.S. was almost unheard of. It has become much more accepted now, however, for restoration work.
My stonemason friend once had to hire a couple masons to help with a large project. He met A LOT of resistance from them ... "We've been doing it OUR way for THREE generations!" they'd say. OK, ummm, that's since the 1920s, eh? But THIS building is from the EIGHTEEEN twenties!
Aaargh.
Allen
Out bank barn
Hi Allen - many years past since original thread, hope you see this. I don't see the photo of your barn you reference. About to start a similar project, I think so I'd love to see if possible. Thanks.
Im no expert but did work with my good friend who was a stonemason, I bough t mortar mix added a little Portland and just a little lime, If you use too much lime it will bleed out and ruin your job, There were masons here using to much lime and all there jobs are streaked with lime stains for years after. For a little bit at a time a drill with a sheetrock blender and a bucket works good. also a masons bag that looks like a big cake icing bag works well.
Yeah, I think a bucket at a time is probably perfect.
Bobbys, that sounds rather curious to me.
Lime mortar takes much longer to cure than does portland cement. It's true that when a wall is hosed down or wetted beforethe lime mortar sets (maybe 24 hours or so), white streaks will run down the wall.
But a weak acid wash, immediately followed by clean water after the mortar has set will easily clean it up.
I've worked extensively with lime mortar (hydrated lime and sand, NO portland at all), and have had only beautiful results. After all, lime mortar was pretty much all that was used through the Middle Ages until the mid-19th century.
Allen
Heres pics of a wall i did by myself , My understanding of your mix is that its the same mix used to train Masons because it can be taken apart after the wall is built,Again i can only say what i learned and believe me i ask every mason his mix, I worked with Masons doing blocks in NJ, They were Irish and worked rebuilding London after the war, they added lime but as i remember maybe half a bag, One bag of Mortar Then sand, The more lime the easier it is to work I know hundreds of years ago there was no portland , I had asked the same Q, Why not just use lime, I was told they had there own lime yards they worked and "tilled" and it may have taken a year just to be able to use, I understand lime will set up over time but there would not be enough time to support loads, Your wall looks nice
bobbys, thanks for sharing those. Wow, that was a big project! That sort of random, interlocking rounded-stone look is very Arts & Crafts, and turned out very nicely.
One of the secrets of laying up a more traditional style stone wall is to keep level surfaces as the wall goes up. This results is a somewhat "coursed" wall, even with the roundish stones of a "rubble" wall, which is typical of 19th-century masonry here in the East.
It's true that lime mortar doesn't have the compression strength of portland mortar, but it's certainly adequate for most applications. There are plenty of 300-year-old examples of masonry buildings that testify to that! Repeated water saturation is the true enemy of lime mortar, so roofs and working gutters are especially important.
The "tilled" lime yards sounds interesting. With the commercial availabilty of hydrated lime, the old system of "burning" and slaking, ect., isn't necessary today, although I don't really know what "tilled" means in this case.
Allen
Thanks i get a lot of complements but only i know how bad i screwed up, My old stonemason friends came over and taught me, I was going over blocks and depending on my mix, I have not yet learned the art yet of WHERE each stone goes for bearing, Thats years away, I loved learning the 3d effect where stones stick out, One must prop them up while the mix drys, My biggest worry was having to cut the stone but never cut one in the whole wall, another thing was the time i never figured on. going back and rakeing the joints when the mortar was just right involves getting up at 2 in the night and working with a light.On a wall like yours its ALL about bearing, thats real tough to do, Unfortunately my friends died, One was a Greek Mason, The other a GERMAN, I helped them sometimes to learn, I cant find there pics of there work but when i do i want you to see them, They won many awards.at the time they died i was learning some arch work, We spent hours looking for rocks that worked just right, Its a lotta fun and not work when you enjoy it. again im not a mason if any Masons are reading this.