My flooring nightmare (so this is modern carpentry?)
I recently bought a house that has its share of quirks. Part of it is from the mid-1800’s, it was the original Schoolhouse #11 here in Hollis, NH, then it was relocated and added on to in the 1950s, then about 15 years ago it was again expanded by adding a second story containing a bathroom, 2 bedrooms and a loft. The loft floor squeaks and moans the whole way across and after reading up on how to remedy this I tried to add screws to the joists…except I couldn’t find any. So I started digging.
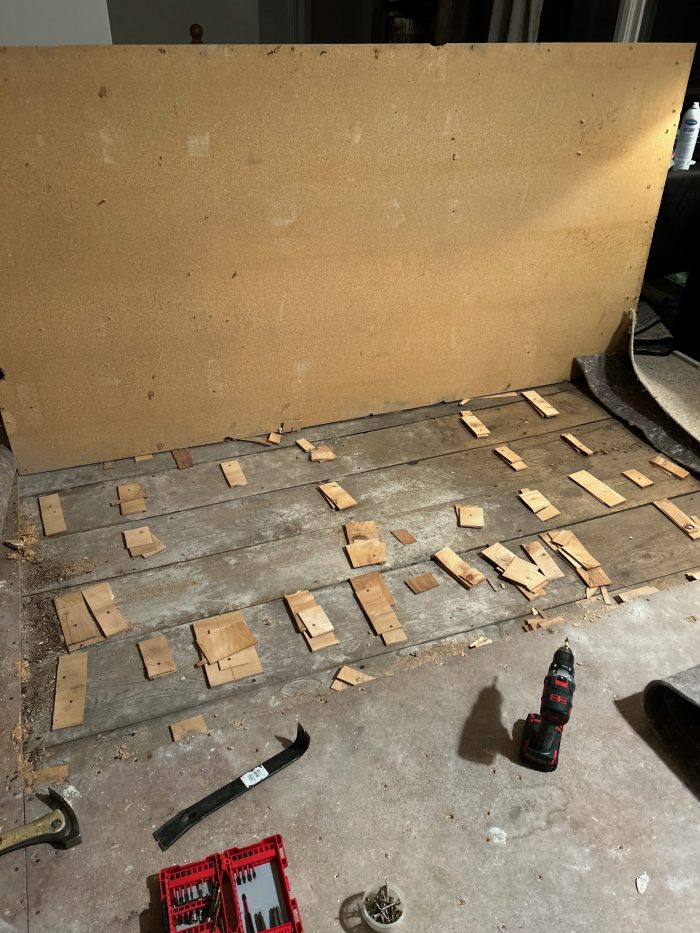
It turns out there is carpet on top of 4×8 MDF boards which are on top of shims which are on top of an original attic floor and under that is another space before you reach the ceiling of my living room. Throw in a bunch of self leveling cement that was added somewhere along the way and you have my loft floor. There are stacks of shims which are nailed down separately, then there are random lines of nails at the adjoining edges of MDF board which essentially attach to nothing.
This is modern carpentery!!??
So how do I get my loft floor to a safe, livable, relatively squeakless condition?
Now that I understand what is under there I know I can pull up the MDF boards (there are 6 of those plus another dozen pieces along the edges), clear out the shims and other debris and get down to old wood planks. The old planks are clean and dry but of varying sizes and definitely not flat. But they also don’t squeak.
After I get back down to that level, what should I do? There are large spaces in between the old boards and which must be supported by old joists running perpendicular to them somewhere. After I secure the old boards, should I create some sort of floating floor above them that is level? How do I do that? Then what material would I use on top of that if I wanted to use carpet again?
Another thing; the two long edges of the room are roughly 12 feet apart and the floor in the middle of the room is about 2 inches lower than the edges.
I’ll try to attach some photos here and appreciate any advice you may have.


Replies
I also live in an old schoolhouse from the 1800's. Keep in mind that these were not built by homebuilders. They were more often than not built by volunteers in the community that were farmers. I doubt they had any expectation that they'd still be standing 150+ years later. Bless them, they built these pretty well with what they had at their disposal.
What you are now dealing with is subsequent owners patching it together rather than handling correctly. Big fun.
What we did with the flooring before laying new LVT was we replaced the broken and rotten spots of the 3/4" TIG. Then we overlaid with new 3/4" plywood to get a uniform surface. Required pulling trim and cutting doors down a bit but added strength and uniformity (as uniform as possible since there wasn't a straight floor in the building).
BTW, this is the time to add any supports to joists that you might require.
Old historic buildings are an exercise in patience and thinking around corners. Especially if they have been neglected for generations. Good Luck.
Changing floor height can negatively impact the top step riser height.
After you’ve gutted all the misc crap and before you begin to reconstruct, know where you want that top of finished floor to be at the stair.
If you can, work from there with the rest of the room.
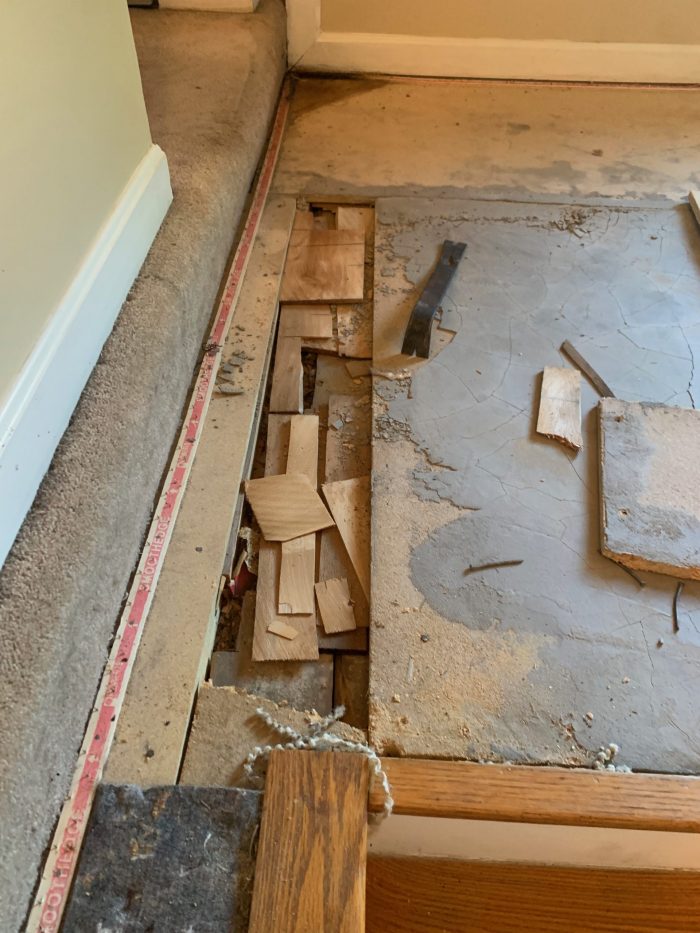
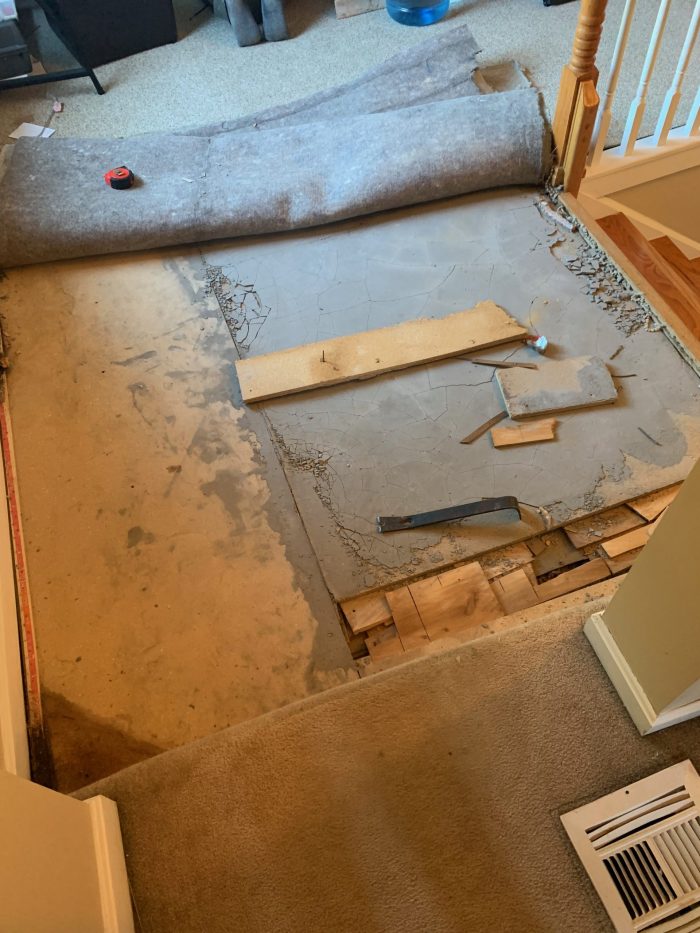
Calvin, thanks for replying. Indeed, that is the crux of the matter at this point. The top of the stairs is a full 3 inches higher than the original subfloor/ attic roof. Im attaching photos. To complicate matters there are heating ducts running under the original boards too. The corner where the stairs join the loft is a high traffic area and to the left is one step up to my bedroom and bathroom. So there’s a step, stairs, and ductwork all in this one corner where the old school house joins the newer construction. I need to resecure the old boards and then build up 3” to match the bottom of the baseboards opposite the stairs.
Not sure what to build that 3 inches from.
You mention building up to match the bottom of the baseboard.
Think this out. The basebd is trim. You can redo that where it will be when you’re done. Way easier to do the base than to build up the floor.
If this simplifies your work, I’d do it that way.
I’ve done a whole lot of remodels on old whacked out places for a living. The easiest were on those that hadn’t been cobbled up over the years.
While pictures help, on site viewing is the only real way to give you advice. But, more pictures the better. And, long wide angled shots showing the big picture, all the better.
Moving ductwork, even when flexible, is sometimes impossible. I take it that these ducts supply both floors?
If you were able to make the upper floor close to the way you want it height wise, would rebuilding the stairs so all risers were the same be something you’d consider?
The rise height from the landing to the upper should be the same as all the risers of that stair. Way safer!
Can you post some more wide angle photos? And maybe a good scaled floor plan?
If you were in NW Ohio I’d stop by.
Good
I grew up in NE Ohio!
So I mentioned the baseboards because the bottom of them are the same height as the top of the stairs and then there is the “gully” in between.
The stairs themselves are solid and I don’t want to screw them up. The heating ducts are fine for now and when I eventually move the furnace ( it’s in the kitchen) they will be accessed from underneath.
So I’m “building up” the sagging middle of the room.
This is what they half heartedly did with the shim stacks.
Did I mention I have a baby? I work on this stuff at night and naptimes and then I pull the carpet back over and clean up so he can get around safely. I will need to fix the floor in sections. I am thinking the first section is the top of the stairs since it’s the worst and will set the height for the room.
In other words, the room
Looks normal but I’ll send some more photos so you can see the big picture.
And, May I add, 90% of my squeaks are gone! Section by section I’ve cleaned out the floor and it’s ready to implement….. some thing
Grew up in Solon. College at BGSU.
Decided on a more enjoyable career………
Never out of work, always another job, got old, retired.
So, living in while doing…..you probably will reach sainthood before you’re done.
This is a good place for answers.
Was anything removed below that may have caused the sinking? Somewhere in the pictures there looked like a hewn beam exposed.
MDF is cheap.
You might want to replace with a sheathing rated for floor use.
Depending on the specific material, (plywood, OSB, cement board), and thickness, it will be stamped with a span rating. (how far apart the supports need to be.) This also assumes a specific fastener pattern.
Once you decide what material to use for the better subfloor layer, adjust your desired end elevation to allow for finish flooring of your choice. (carpet and padding, for example),
Then you know where the supports need to be.
Two ways to hit this, Start with a bigger board, say, 2x4, and cut down to fit. (so that with these cut and in place at or below the span rating spacing, the subfloor panels set securely where you want them)
the second way is to stack up layers. at locations closer together than the ratings, and secure so they do not move. Construction adhesive and fasteners are helpful to keep the layers where you want them. (but with little lungs around, you want to be careful in choice of adhesives)
Hang in there, Understand about the challenges of home remodeling and child care.
Hi Uncle Mike! So the floor joists at the bottom of it all are 26” apart ( give or take) … I’m slowly making my way across the room and fixing / replacing old attic / subfloor boards and attaching with screws to the joists. Making sure they are level along the way.
I’m looking into getting some nice wide planks to finish the floor…. BuT! As I move across the room section by section what is happen is there is a dip in the middle of the room of up to 3” lower in spots than the top of the stairs which is where I’ve set the standard for height.
The next layer above the subfloor needs to solve that problem before I can put any finished floor on the very top.
What do you suggest? I’ve been thinking 5/8 plywood ?
It is important to figure out what is going on with that dip.
The primary concern is with the joists. Is it a single joist that has moved or failed? or do all the joists have a dip in the same place in the middle?
Because of the gap between the floor and ceiling below, you may have a challenge figuring out which members (joists or beams below or at sides) carry the loads.
Once you figure that out, 5/8 plywood might be rated for a 24 inch on center support. So not quite what you need for your joist spacing. Each sheet should have a stamp with the ratings. You should be able to get a person where you buy them to explain what they mean. (might have to look hard to find this person)
Here is a quote from a Weyerhauser (they make plywood and other building materials) site
NWFA Recommendations
Part III of the SUBSTRATES:Wood Subfloor section of the installation guidelines gives general subfloor installation info as well as recommended panel thicknesses. Glue-nailing of the subfloor panel to joist is generally recommended. 23/32" OSB is recommended for joist spacing up to 19.2" on-center. 7/8" OSB is recommended for spacing up to a maximum of 24" on-center while 1 1/8" OSB is recommended for spacing up to 32" on-center.
UM42, my concern is that it is likely that the joists in place were probably never intended/sized to carry the live or dead loads that were later placed upon them. It sounds as though every time there was deflection there was just another attempt at leveling, putting on more weight, causing more deflection.
Without going all the way to replacement, it may be necessary to sister something to the joists and use that to level the space and bring it up to the level of the top of the stairs.
As has been said above, hard to know without being there.
What is the dimension of the joists? Is their span the roughly 12 feet you referred to?
Flseminarian, the joists are 2x8s and they run east west and have roughly 26”in between. I Believe there are 4. The sides of the room are also east west and have big support beams that are higher than the floor. The boards run north south on the joists and do not always span the 12 feet.
I agree that these boards were never intended to carry the load they are now.
When we say span, we mean distance between supports. (so a 12 foot long joist supported at each end and in the middle would span 6 feet)
I am trying to understand the scope of the room. Please correct anything I get wrong.
the 2x8 joists run east and west. spaced at 28 inch centers? (26 between plus one board width)
are there four in the middle or field of the floor plus one at north and south ends? (attached to the beams that are higher than the floor?) (so that the room is 5 times 26 inches or a bit under 12 feet wide)
How long are these joists? How are they supported?
Sooner or later we need to have a sketch.
Was the original frame post and beam like a barn?
In one of your photos you have what appears to be a an 8x8 or so hewn beam. Is that part of the original structure or an added decorative feature for the ceiling below?
Calvin, part of it is the old schoolhouse #11 from the 1800s. The subfloor I’m dealing with was the old attic floor I suppose. It was moved from a couple miles away to this location in 1927. Here is a photo from the 1950s. And another photo of it now…
https://s3.amazonaws.com/finehomebuilding.s3.tauntoncloud.com/app/uploads/2023/02/07135928/194762_1675796367_ED769DB1-6EC0-4C8D-B07C-D4259D083938.jpeg
The beam you mention that runs east and west is at the top of this photo?
What is on the left side? is that another beam that the joists are attached to?
Yes.
On the left is a huge problem. It’s where the old schoolhouse joins the new construction 😆🥲there is ductwork, plumbing, and electrical wires all in there
So Just to make sure there is no confusion, the room is about 12 feet in one dimension. The joists run perpendicular to this dimension at about 28 inches on center (from center of one to the center of the next.
What is the other dimension of the room, the length of the joists from the support at one end to the support on the other end?
How are the joists supported at their ends? Do they rest on top of something or are they nailed into something?
Calvin, UM, FlSem, Here is a quick look, if this helps I’ll make more
The pictures didn’t post.
Beautiful Sunday tho!