FHB Logo Facebook LinkedIn Email Pinterest Twitter X Instagram Tiktok YouTube Plus Icon Close Icon Navigation Search Icon Navigation Search Icon Arrow Down Icon Video Guide Icon Article Guide Icon Modal Close Icon Guide Search Icon Skip to content
Subscribe
Log In
  • How-To
  • Design
  • Tools & Materials
  • Restoration
  • Videos
  • Blogs
  • Forum
  • Magazine
  • Members
  • FHB House
  • Podcast
Log In

Discussion Forum

Discussion Forum

Need advice on amount of jack studs needed

user-6746049 | Posted in General Discussion on February 5, 2017 09:35am

We are putting in a passthrough on a weight bearing wall in a one story home with basement. The opening is 5′.6″ wide and the headers are two 2×8’s. There are two sets of jack studs and two king studs. Would like to make the opening a little wider and wondered if we can eliminate one set of jack studs on each side for the opening size. From what I’ve read thus far one set of jack studs and one king on each side should be enough but need as many opinions as possible as it’s my wife that needs convincing  We just had a builder here that didn’t put any jack studs in it all at the beginning and we were fortunate that my wife was taking pictures of them building it and when she showed me I knew there was no support.Anyway,  I feel I overbuilt it but she still wants the extra jack studs….Really need those opinions/discussions so we can move forward in the building process.


Reply
  • X
  • facebook
  • linkedin
  • pinterest
  • email
  • add to favorites Log in or Sign up to save your favorite articles

Replies

  1. DanH | Feb 05, 2017 09:45am | #1

    What's overhead?  Is this a load-bearing wall, and, if so, what sort of load?

    1. user-6746049 | Feb 05, 2017 12:22pm | #2

      It's a load bearing wall with a roof overhead ....is this what you are asking?

      1. DanH | Feb 05, 2017 02:11pm | #3

        So there is a gable end above the wall?  No occupied floor?

        What about snow load?

        1. user-6746049 | Feb 05, 2017 10:07pm | #8

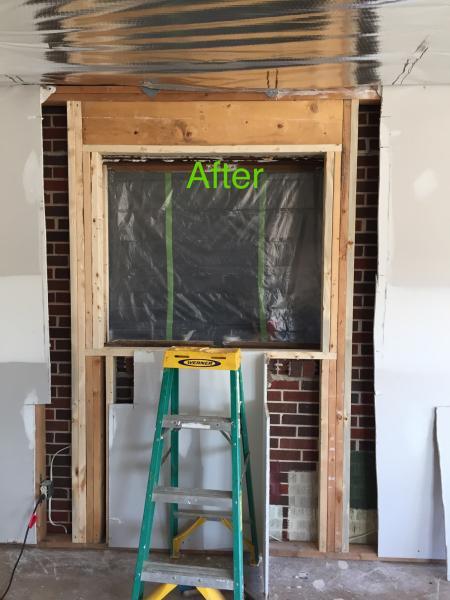
          Pass through not on gable end

          Thank you for the data and specs. The passthrough will be built between the old part of the brick house and the new addition with siding(included picture in this post). It won't be on the end of gable. We live in high altitude area in WV and see our fare share of snow and the ground snow load is 30. There is no occupied floor above. Was hopping to take out one inner jack stud on both sides which would leave just one jack stud on both sides and two king studs. We have the majority of the studs in the original picture covered in drywall but the original posting pic shows them well. 

          West Virginia

          Use IBC 2003—20 psf-30 psf with Case Study Areas at higher elevations —And—

          Contact Local Building Officials for determining required snow loads

  2. catmandeux | Feb 05, 2017 05:36pm | #4

    There the the span tables for

    Here are the span tables for headers:

    https://archive.org/stream/gov.law.icc.irc.2012/icc.irc.2012#page/n150/mode/1up

    EDIT:

    Number of jack studs required is also listed in the tables.

    1. user-6746049 | Feb 05, 2017 10:09pm | #9

      thank you for the span tables

  3. User avater
    user-2409187 | Feb 05, 2017 05:42pm | #5

    Here is a simple solution that adds 3" of space

    As a general rule-of-the-thumb a single shoulder stud is fine. This gives you 1.5" of bearing on each end of the header. A second shoulder stud on each end gives you three inches of bearing, which is preferred for large clear -spans such as a garage door.  

    My suggestion is very simple, and meets your wife's need: Put in a new header that is 3" larger than the existing one. Here's how it works:

    Add two king studs; one on each side of the existing king studs. Screw temporary support 2x4's to the other side of the wall's top and tie plates. These studs will help to temporarily bear the load whle you work. Remove the header. Remove the two innermost jack studs; one from each side. Now you have increased your opening width by 3". Now cut the inner two king existing king studs (one on each side) so they become jack studs; points of bearing for your new header. In this manner you have achieved 3" of jack bearing on each end of the header. You have added 3" to the rough opening. You have added two king studs. You have not compromized the integrity of the design.  Good luck...and...um...pass me a Bier! :)

    . 

  4. User avater
    coonass | Feb 05, 2017 08:47pm | #6

    Jas,
    Two jacks are perfectly fine. If you want to compromise replace the extra jacks with 1x4s or use some Simpson header hangers.

    KK

  5. DanH | Feb 05, 2017 09:15pm | #7

    Is that real brick back there?  Assuming that used to be an exterior wall and you've since added on to make it interior, are we looking from the "outside in" or the "inside out"?

    I'm guessing "outside in", since the brick joints are cleanly struck, so the stud wall we're looking at is only "load bearing" to the extent that it carries some sort of roof load that is not born by the original structure.  This would be pretty much nothing at all, in most situations.

    I suspect the framing you have is way overbuilt.

    1. user-6746049 | Feb 05, 2017 11:08pm | #10

      Yes it's real brick and exterior wall

      You were correct in guessing you are outside looking in. New additions were built on both ends of the old house. I've included a pic of the old house in this post. Lots of pictures if you check out each post. What happened was is that we had a carpenter come in to install a pass through, my wife took pictures of the building process and when she showed me that days work in the photo (included) I noticed there were no jack studs under the header and it was merely framed in. We had to tear out the drywall and install a set of jack studs under the header but they at least had the king studs installed. My wife insisted on an additional king stud at each end and an additional set of jack studs. I too feel it's over built and want to reclaim a little space and wonder if just one jack stud under each end of header and the 2 king studs at both ends will suffice. 

      1. DanH | Feb 06, 2017 07:31am | #11

        Without knowing the details of how the roof works overhead it's hard to say for sure, but I suspect it was fine the way it was originally built.  I don't think it's a load-bearing wall, and the header isn't really required.

        But note that if you are intending to widen the brick opening you may need to install some sort of new header in the brickwork.  And the framing on the other side of the wall may be load-bearing and require careful consideration if you widen the opening.

  6. user-6746049 | Feb 06, 2017 11:47am | #12

    found a pic with the rafters

    Thank you for the energy that you have put into this post. I came across this pic and think it might be helpful. Ive circled the area that we are working on. we wont be widening the brick portion.

    1. DanH | Feb 06, 2017 01:33pm | #14

      OK, it's carrying a roof load, but nothing extreme.  The opening on the far left is about as wide, and you need not do any more than you have there.

  7. User avater
    mikeljon | Feb 06, 2017 12:28pm | #13

    so, obviously it's weight bearing and you need the header (the trusses are loaded onto the top plate above, so the studs you removed were carrying load). If you look to the right, the other, larger opening is framed with one jack stud on either side.

  8. finefinish | Feb 06, 2017 02:50pm | #15

    Hi there, The rule of thumb (which is very conservative) says a header 6' or less in length needs one jack per side, over 6' needs 2 jacks per side, over 12' needs 3 per side.  You need one per side in your situation.  Again, if you want some extra peice of mind add a Simpson header hanger and you have your belts and suspenders..

    1. user-6746049 | Feb 06, 2017 07:48pm | #16

      We measured the board at being 8" wide

      Since the board is 8" wide but only 5'.6" (under 6 feet) would we need 2 jack studs on each side or just one on each under the header? 

      1. florida | Feb 07, 2017 11:32am | #17

        If it makes you nervous just screw through the king studs and into the header with some 8" Timberlok screws. I'd use 4 on each end and never think about it again.

      2. finefinish | Feb 07, 2017 04:52pm | #18

        One on each side is all you need.  

      3. finefinish | Feb 07, 2017 04:52pm | #19

        One on each side is all you need.  

Log in or create an account to post a comment.

Sign up Log in

Become a member and get full access to FineHomebuilding.com

Video Shorts

Categories

  • Business
  • Code Questions
  • Construction Techniques
  • Energy, Heating & Insulation
  • General Discussion
  • Help/Work Wanted
  • Photo Gallery
  • Reader Classified
  • Tools for Home Building

Discussion Forum

Recent Posts and Replies

  • |
  • |
  • |
  • |
  • |
  • |
View More Create Post

Up Next

Video Shorts

Featured Story

Podcast Episode 689: Basement Garages, Compact ERVs, and Safer Paint Stripper

Listeners write in about ventilation and radon control and ask questions about tightening basement garages, ventilation solutions, and safer paint stripper.

Featured Video

Micro-Adjust Deck-Baluster Spacing for an Eye-Deceiving Layout

No math, no measuring—just a simple jig made from an elastic band is all you need to lay out a good-looking deck railing.

Related Stories

  • Design and Build a Pergola
  • Podcast Episode 689: Basement Garages, Compact ERVs, and Safer Paint Stripper
  • FHB Podcast Segment: Are Single-Room ERVs the Answer?
  • Fire-Resistant Landscaping and Home Design Details

Highlights

Fine Homebuilding All Access
Fine Homebuilding Podcast
Tool Tech
Plus, get an extra 20% off with code GIFT20

"I have learned so much thanks to the searchable articles on the FHB website. I can confidently say that I expect to be a life-long subscriber." - M.K.

Get home building tips, offers, and expert advice in your inbox

Signing you up...

This site is protected by reCAPTCHA and the Google Privacy Policy and Terms of Service apply.
See all newsletters
See all newsletters

Fine Homebuilding Magazine

  • Issue 332 - July 2025
    • Custom Built-ins With Job-Site Tools
    • Fight House Fires Through Design
    • Making the Move to Multifamily
  • Issue 331 - June 2025
    • A More Resilient Roof
    • Tool Test: You Need a Drywall Sander
    • Ducted vs. Ductless Heat Pumps
  • Issue 330 - April/May 2025
    • Deck Details for Durability
    • FAQs on HPWHs
    • 10 Tips for a Long-Lasting Paint Job
  • Issue 329 - Feb/Mar 2025
    • Smart Foundation for a Small Addition
    • A Kominka Comes West
    • Making Small Kitchens Work
  • Issue 328 - Dec/Jan 2024
    • How a Pro Replaces Columns
    • Passive House 3.0
    • Tool Test: Compact Line Lasers

Fine Home Building

Newsletter Sign-up

  • Fine Homebuilding

    Home building tips, offers, and expert advice in your inbox.

  • Green Building Advisor

    Building science and energy efficiency advice, plus special offers, in your inbox.

  • Old House Journal

    Repair, renovation, and restoration tips, plus special offers, in your inbox.

Signing you up...

This site is protected by reCAPTCHA and the Google Privacy Policy and Terms of Service apply.
See all newsletters

Follow

  • Fine Homebuilding

    Dig into cutting-edge approaches and decades of proven solutions with total access to our experts and tradespeople.

    Start Free Trial Now
    • Facebook
    • Instagram
    • X
    • LinkedIn
  • GBA Prime

    Get instant access to the latest developments in green building, research, and reports from the field.

    Start Free Trial Now
    • Facebook
    • YouTube
  • Old House Journal

    Learn how to restore, repair, update, and decorate your home.

    Subscribe Now
    • Facebook
    • Instagram
    • X

Membership & Magazine

  • Online Archive
  • Start Free Trial
  • Magazine Subscription
  • Magazine Renewal
  • Gift a Subscription
  • Customer Support
  • Privacy Preferences
  • About
  • Contact
  • Advertise
  • Careers
  • Terms of Use
  • Site Map
  • Do not sell or share my information
  • Privacy Policy
  • Accessibility
  • California Privacy Rights

© 2025 Active Interest Media. All rights reserved.

Fine Homebuilding receives a commission for items purchased through links on this site, including Amazon Associates and other affiliate advertising programs.

  • Home Group
  • Antique Trader
  • Arts & Crafts Homes
  • Bank Note Reporter
  • Cabin Life
  • Cuisine at Home
  • Fine Gardening
  • Fine Woodworking
  • Green Building Advisor
  • Garden Gate
  • Horticulture
  • Keep Craft Alive
  • Log Home Living
  • Military Trader/Vehicles
  • Numismatic News
  • Numismaster
  • Old Cars Weekly
  • Old House Journal
  • Period Homes
  • Popular Woodworking
  • Script
  • ShopNotes
  • Sports Collectors Digest
  • Threads
  • Timber Home Living
  • Traditional Building
  • Woodsmith
  • World Coin News
  • Writer's Digest
Active Interest Media logo
X
X
This is a dialog window which overlays the main content of the page. The modal window is a 'site map' of the most critical areas of the site. Pressing the Escape (ESC) button will close the modal and bring you back to where you were on the page.

Main Menu

  • How-To
  • Design
  • Tools & Materials
  • Video
  • Blogs
  • Forum
  • Project Guides
  • Reader Projects
  • Magazine
  • Members
  • FHB House

Podcasts

  • FHB Podcast
  • ProTalk

Webinars

  • Upcoming and On-Demand

Podcasts

  • FHB Podcast
  • ProTalk

Webinars

  • Upcoming and On-Demand

Popular Topics

  • Kitchens
  • Business
  • Bedrooms
  • Roofs
  • Architecture and Design
  • Green Building
  • Decks
  • Framing
  • Safety
  • Remodeling
  • Bathrooms
  • Windows
  • Tilework
  • Ceilings
  • HVAC

Magazine

  • Current Issue
  • Past Issues
  • Magazine Index
  • Subscribe
  • Online Archive
  • Author Guidelines

All Access

  • Member Home
  • Start Free Trial
  • Gift Membership

Online Learning

  • Courses
  • Project Guides
  • Reader Projects
  • Podcast

More

  • FHB Ambassadors
  • FHB House
  • Customer Support

Account

  • Log In
  • Join

Newsletter

Get home building tips, offers, and expert advice in your inbox

Signing you up...

This site is protected by reCAPTCHA and the Google Privacy Policy and Terms of Service apply.
See all newsletters
See all newsletters

Follow

  • X
  • YouTube
  • instagram
  • facebook
  • pinterest
  • Tiktok

Join All Access

Become a member and get instant access to thousands of videos, how-tos, tool reviews, and design features.

Start Your Free Trial

Subscribe

FHB Magazine

Start your subscription today and save up to 70%

Subscribe

Enjoy unlimited access to Fine Homebuilding. Join Now

Already a member? Log in

We hope you’ve enjoyed your free articles. To keep reading, become a member today.

Get complete site access to expert advice, how-to videos, Code Check, and more, plus the print magazine.

Start your FREE trial

Already a member? Log in

Privacy Policy Update

We use cookies, pixels, script and other tracking technologies to analyze and improve our service, to improve and personalize content, and for advertising to you. We also share information about your use of our site with third-party social media, advertising and analytics partners. You can view our Privacy Policy here and our Terms of Use here.

Cookies

Analytics

These cookies help us track site metrics to improve our sites and provide a better user experience.

Advertising/Social Media

These cookies are used to serve advertisements aligned with your interests.

Essential

These cookies are required to provide basic functions like page navigation and access to secure areas of the website.

Delete My Data

Delete all cookies and associated data