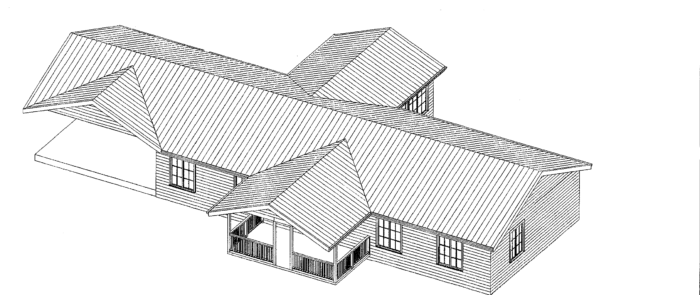
Ok, remember the big remodeling project that I’ve been babbling about for the past few weeks? Well, I’m working hard on it and completely stumped on how I can frame the front porch roof to achieve the size and appearance that I’m shooting for (see conceptualized drawing attachment).
<!—-><!—-> <!—->
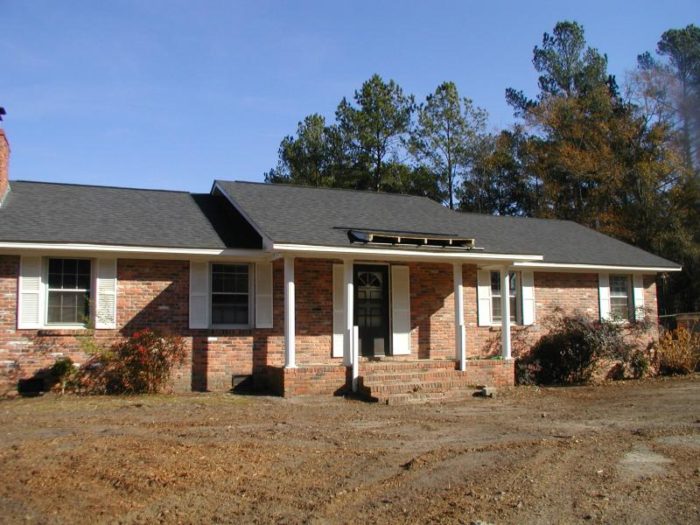
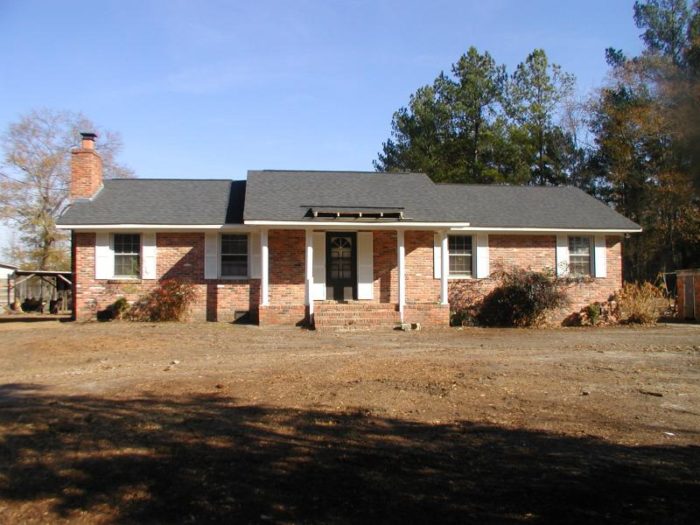
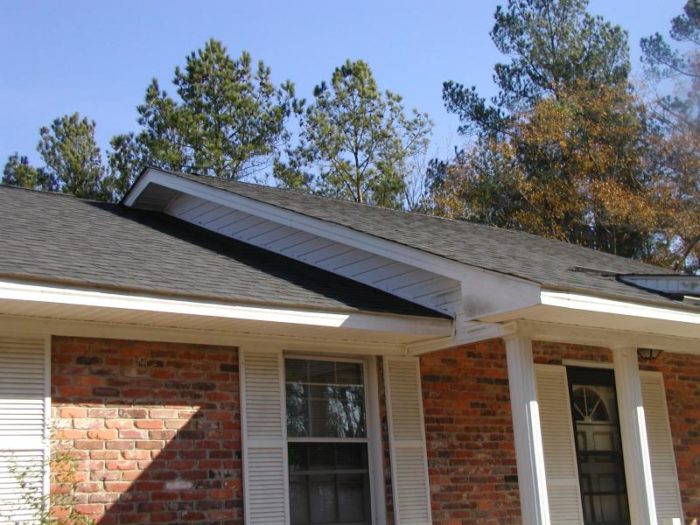
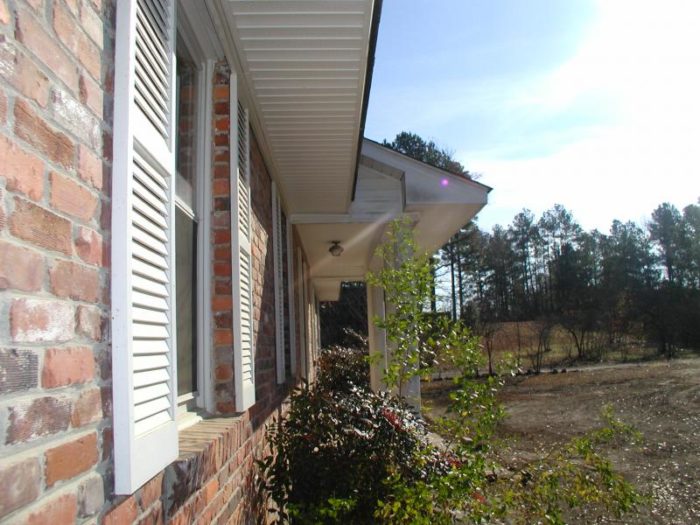
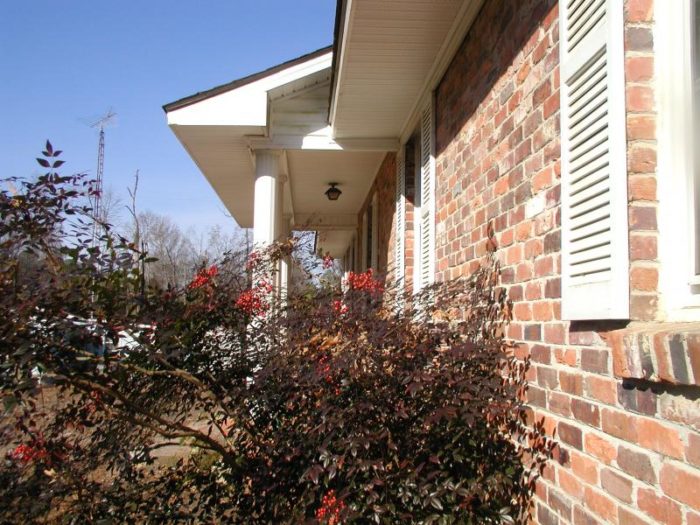
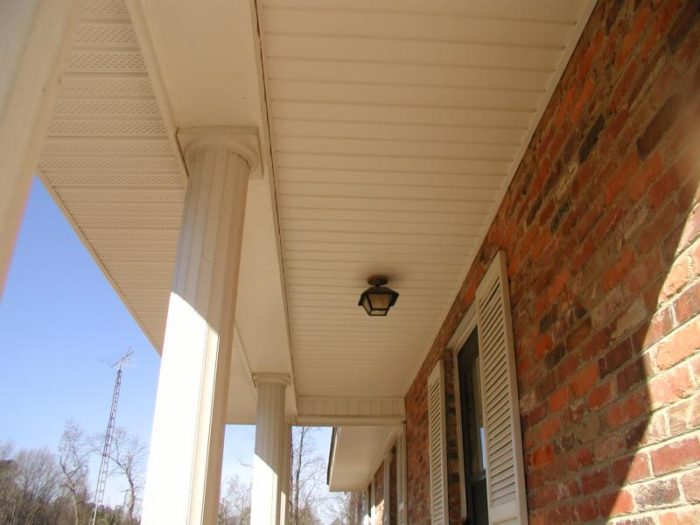
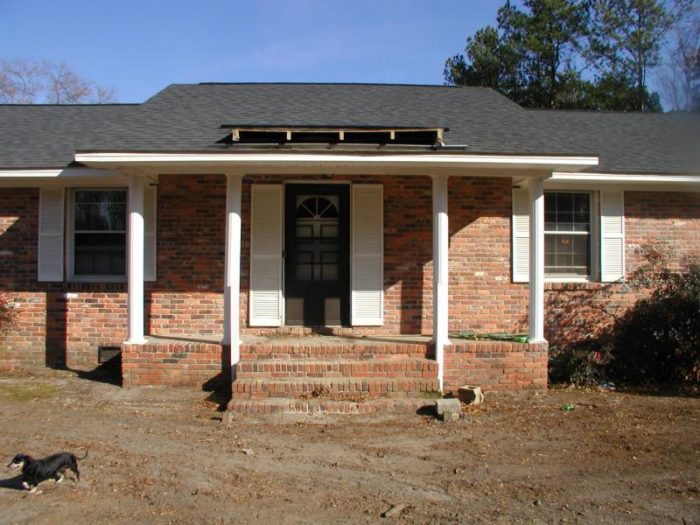
The porch is currently 18’W x 4’D. I want to maintain the width of 18’, but extend the porch outward to a depth of 12’ (2/3rds the width). Here’s the problem: The current porch roof is a shed type that was accomplished by elevating the rear center portion of the house roof at the ridge beam. I want the redesigned porch to have a gable roof instead of a shed roof, but I can’t figure any way to make it work without completely removing the front center portion of the house roof, scabbing the ridge beam (B.I. will love that), and then building the gable roof from scratch.
<!—-> <!—->
Note: The attached conceptual image implies that the house has a slab foundation, but it doesn’t. It is built on a crawl space foundation. The exterior will either be finished with a different brick (hate the current one) or vinyl siding and a brick skirt wall that will follow the perimeter of the house…including the front porch. The concept image also shows a den addition on the rear and a double carport on the west end.
<!—-> <!—->
I sure hope you guys will be interested in this. Remember, I’m not a contractor, but I’m trying to do all of this work myself…with the help of some valuable friends.
<!—-> <!—->
I’ve attached several pics to offer some perspective on this dilemma. I apologize to you dial-up guys. I don’t know how to compress the pics.
<!—-> <!—->
Thanks in advance for any assistance with this.
New knowledge is priceless.
Used knowledge is even more valuable.


Replies
Is it a Cathedral ceiling inside where the front shed roof is?
There's several ways that could be framed if it's not cathedral. The way it looks like to me is that the rafters don't even sit on the front wall where your front door is. At that point the bottom of the rafters are raised from the top plate.
If you have that situation and you have ceiling joists in there, all you have to do is cut a birdsmouth in the bottom of the rafters and frame a kneewall. Nail the kneewall into the side of the ceiling joists and install angled braces from the kneewall to the ceiling joists.
I do this all the time when you have a situation like yours or when you have a situation where you have a house that has the same common rafters all the way through but one section of the house has a jog in it. Therefore you have a bigger overhang and the bottom of the rafters are off the top plate. Sometimes you need a kneewall and sometimes it works out where you can sit the rafters by cutting a birdsmouth in on top of a plate sitting on top of the ceiling joists.
"Is it a Cathedral ceiling inside where the front shed roof is?"
Nope, no cathedral ceiling anywhere. Standard 8' ceilings throughout.
Didn't really follow the method you described. Would it be a lot of trouble to sketch it? Or maybe refer me to a link that illustrates the idea? (I rode the short bus to school)
The interior of the house is completely gutted, including the ceilings. I'll take some photos below the porch roof at key areas and attach them to another post. BTW, how do I make the pics open with the post?New knowledge is priceless.
Used knowledge is even more valuable.
Here's a quick drawing.Joe Carola
Reduce them b/4 you include them in the post. If the pic is wider than normal even the type will run longer across the screen. We'll need to scroll left and right just to read the post.
thanks.A great place for Information, Comraderie, and a sucker punch.
Remodeling Contractor just outside the Glass City.
http://www.quittintime.com/
"Reduce them b/4 you include them in the post. If the pic is wider than normal even the type will run longer across the screen. We'll need to scroll left and right just to read the post."
Sorry. That was my first time adding an attachment. I've got to learn how to reduce the size.New knowledge is priceless.
Used knowledge is even more valuable.
no problem man. Just fine tune your posting techniques and you will be in bizness. Good luck on your ambitious undertaking.
*I just went from dialup to cable. Fast loading but still the BIG size on the screen. I've finally entered the zero's. 7 yrs later.A great place for Information, Comraderie, and a sucker punch.
Remodeling Contractor just outside the Glass City.
http://www.quittintime.com/
My apologies to all for the oversized pics. I downloaded the Irfanview, so I'm gonna try this again with just one pic to see if I have it right now.
Thanks for all the assistance. If this works, I'll resubmit the other pics with an additional post.New knowledge is priceless.
Used knowledge is even more valuable.
the screen size is great....the file size is about 20 times too big, and the format is wrong
use .jpg not .bmp
and instead of 2 mb you want about 1/10 mb (around 100 kb )
look in the photO section for good examples.... and don't get discouraged...
you're making good progress
Mike Smith Rhode Island : Design / Build / Repair / Restore
When I open other posts that have pics attached, the pics automatically open without clicking on the link. But mine aren't doing that. New knowledge is priceless.
Used knowledge is even more valuable.
mw,
Start off with just pic link in your post. After you got that down, you can follow a procedure that will imbed them in your post.A great place for Information, Comraderie, and a sucker punch.
Remodeling Contractor just outside the Glass City.
http://www.quittintime.com/
When I open other posts that have pics attached, the pics automatically open without clicking on the link. But mine aren't doing that.
The dialuppers and even some cable guys (me) will be thankful for that.
If you're doing a thread in the photo folder, auto pics shouldn't surprise anyone. But if your posting the auto pics in the talk threads, the thread simply won't load for all the talkers. If you somehow managed to get that 2mb to auto open, I think you'd shut down BT!
blue "...if you just do what you think is best testing those limits... it's pretty easy to find exactly where the line is...."
From the best of TauntonU.
Please bear with me; I'm trying to figure out how to get this picture sizing like it needs to be. Let me know how if this attachment is the right size and format...New knowledge is priceless.
Used knowledge is even more valuable.
Much better.
Now, what was the question?
blue"...if you just do what you think is best testing those limits... it's pretty easy to find exactly where the line is...."
From the best of TauntonU.
uh...New knowledge is priceless.
Used knowledge is even more valuable.
EXCELLENT... RIGHT SIZE PIC, RIGHT SIZE FILE, & right format
View ImageMike Smith Rhode Island : Design / Build / Repair / Restore
"EXCELLENT... RIGHT SIZE PIC, RIGHT SIZE FILE, & right format."
Thanks, Mike. I'll resubmit all of the pics in my next post.New knowledge is priceless.
Used knowledge is even more valuable.
>>>>EXCELLENT... RIGHT SIZE PIC, RIGHT SIZE FILE, & right format
yeah, but what is it??
:-)_______________________________________________________________
I wonder where my get up and go went
You are aprt of the reason I loaded it so fast - you had snuck it in already!;)
Welcome to the Taunton University of Knowledge FHB Campus at Breaktime. where ... Excellence is its own reward!
Have attached all files once more, including two attic views. See original post for more info.
Thanks.New knowledge is priceless.
Used knowledge is even more valuable.
Many thoughts so far.
BTW, what CAD program for the concept and do you want to post the floorplan layout up here as an attachment too?You have a lot of foundation work to do first. Good job on the pictures, BTW. Future advcie, you don't ned all of them - or you could point out the most important ones.Does the rear addition need to be where it shows or would a cross gable ridge work? I don't know the floor plan. The roof line in the concept is different than what you have.Do you plan to remove all the brick veneer? What I am thinking is that to redo all the exterior, add enough to nearly double the size of the house and do all this extrra foundation work, along with stripping the inside, you better have bough this at a bargain price or be in a hot market, or you would have been better off to just build new. Porch especially. porches are nice, but what you have to do to get it is going to cost a lot compared to your payback when you sell. Unless it made an otherwisew unsaleable house move faster, the large increase to the porch could be a loss for you.Now then, you asked about framing it at the roof stage. That is the easy part.
You'll have a couple beams perpendicular to the house for the rafters to land on, presumably supported by columns similar to what you have. The house end of those beams will bneed framing under them supported to foundation in that front wall. so if you are extending say 12', then with brick and the wall thickness the beams will be more like 12'8" long sized to span just under 12'
You do not have ridge beams by the way. You only have ridge boards for attaching the rafters. There is little or no structural value there. The other purlins and the triangle formed with the ceiling joists/rafter ties and with the collar ties is what makes up the structural part. You could get trusses for framing this roof over porch, then just cut rafters for the tie-in at valleys, or even have the truss package made for the whole thing, both addition gale dormers and the garage. or like you said, run a ridge board perp to the old and frame to it with rafters. There is no need to worry about overlaoding the existing if you also use ceiling joists tied as rafterties to complete the triangle
Welcome to the Taunton University of Knowledge FHB Campus at Breaktime. where ... Excellence is its own reward!
First of all, thanks for all the great feedback. You guys are an awesome resource to a wannabe like me.
"BTW, what CAD program for the concept and do you want to post the floorplan layout up here as an attachment too?"
Using Better Homes & Gardens Pro 7. It's capable of much better enhancement, but we haven't cornered the learning curve that the software requires. I'm attaching a floorplan with this post.
"You have a lot of foundation work to do first."
I teach diesel technology for the local tech school in our area. We have a Cat mini-excavator that I plan to take on a brief field trip to create some trenches for the footings (grin).
"Good job on the pictures, BTW. Future advcie, you don't ned all of them - or you could point out the most important ones."
Thanks. Advice noted.
"Does the rear addition need to be where it shows or would a cross gable ridge work? I don't know the floor plan. The roof line in the concept is different than what you have."
Don't know what a cross gable ridge is. The concept image is somewhat flawed due to our mediocre skills in using the design software. The den addition will come off og the dining room with a gable roof. At least that's the plan.
"Do you plan to remove all the brick veneer?"
I'm definately removing the chimney. The fireplace wasn't worth fixing and I prefer another window and the wall space. Can always install a portable fireplace later. The hearth and surrounding brick are already gone. (Bought a cheap demo hammer from Harbor Freight that has already paid for itself). As for the brick veneer, that's the "butt-ugly" brick that I posted about a few weeks ago. I either want to replace the brick or install vinyl. Some have suggested vinyling over the brick, but I'm not crazy about that idea. I need to modify some door and window openings. between that and removing the chimney, it just makes more sense to me to demo the brick siding and start with a clean slate.
"What I am thinking is that to redo all the exterior, add enough to nearly double the size of the house and do all this extrra foundation work, along with stripping the inside, you better have bough this at a bargain price or be in a hot market, or you would have been better off to just build new. Porch especially. porches are nice, but what you have to do to get it is going to cost a lot compared to your payback when you sell. Unless it made an otherwisew unsaleable house move faster, the large increase to the porch could be a loss for you."
This house belonged to my wife's parents. We plan to sell our current home to our daughter and move into the remodeled house upon completion. My wife and I will probably live in this house for the remainder of our "coherent" lives. I'm not approaching this as an investment. I've been a DIY'er all my life. I'll be 50 this year, so this is probably my last hoorah. My primary concern is comfort, contentment, and doing the job in such a way that I can say that I did it myself and feel good about it. I've budgeted 60K for this remodel with every intention of doing all the work myself. Unrealistic? Naive? Just plain nutz? I'm sure I'm guilty of each. What can I say? I'm going for it.
"Now then, you asked about framing it at the roof stage. That is the easy part."
I'm surprised to hear that. I've been racking my brain over that part.
"You'll have a couple beams perpendicular to the house for the rafters to land on, presumably supported by columns similar to what you have."
With you so far.
"The house end of those beams will need framing under them supported to foundation in that front wall."
Does that mean that the house end of the beams will rest on the top plate of the house exterior walls?
"so if you are extending say 12', then with brick and the wall thickness the beams will be more like 12'8" long sized to span just under 12'."
Think I understand that part.
"You do not have ridge beams by the way. You only have ridge boards for attaching the rafters. There is little or no structural value there. The other purlins and the triangle formed with the ceiling joists/rafter ties and with the collar ties is what makes up the structural part."
Letting my ignorance show again, but learning more all the time.
"You could get trusses for framing this roof over porch, then just cut rafters for the tie-in at valleys, or even have the truss package made for the whole thing, both addition gale dormers and the garage."
Would love to do that. Sure would be simpler. Can't see my skimpy budget allowing for it, though. I suspect a whole lot of stick framing is inevitable.
"or like you said, run a ridge board perp to the old and frame to it with rafters. There is no need to worry about overlaoding the existing if you also use ceiling joists tied as rafterties to complete the triangle."
My biggest concern about the ridge board is trimming and supporting the rafters that are currently connected to the elevated center portion. Won't that elevated portion have to be lowered so that it is concentric with the rest of the ridgeline?
MichaelNew knowledge is priceless.
Used knowledge is even more valuable.
If you really need to shorten the existing rafters, then follow the sketch Framer posted earlier to support them with a stem wall/kneewall.
But it seems to me that the existing soffit on the front porch is at the same elevation you would want the new porch cieling to be at, so you would not need to shorten and/or remove rafters, only to beef up the outer beam as you remove columns. Some of this will not be clear until you get into this demo a bit further as far as which is easier to do.The two perpendicular beams running back into the front wall that I referenced do not have to sit on top of the top plate of the existing wall. They can pocket in lower at whatever elevation is needed. My point was mainly that you would need about three jack studs directly under each of the bean ends in the wall. Thanks for the floorplan jogs. I'll look at them later when I get a chance. I suspect you'll have many more questions as time goes on so they;'ll be handy
Welcome to the Taunton University of Knowledge FHB Campus at Breaktime. where ... Excellence is its own reward!
I apologize for being so dense, but I'm still confused. I've got an elevated shed roof that jogs the ridge line. I want to convert the shed roof to a gable roof that will extend 8' farther out from the front of the house than the current shed roof does (Front porch will maintain it's current width of 18' but extend outward from 4' to 12' with a gable roof overhead). How do I go about creating a continuous ridge line for the gable to tie into? Are you saying that I should tie into the existing ridge line? If so, I don't have a clue how the valley's of the gable can be blended with the side walls of the shed roof. I'm not grasping the concept at all. I guess I'm more of a visual learner. Can you refer me to a visual that shows what the finished frame should look like?
Thanks again,
MichaelNew knowledge is priceless.
Used knowledge is even more valuable.
can't refer you, but I think I'm going top play with this in Softplan so I can post views.But tonight is out. I've been productive since 3:30 AM and I have a permit hearing at 6PM and my SP key is on the laptop at a job.
Welcome to the Taunton University of Knowledge FHB Campus at Breaktime. where ... Excellence is its own reward!
Oh yeah, a cross gable dormer setup would slide the den over directly opposite the porch so the same ridge is in a straight line for both. not terribly important in your case, just a thought.BTW, the facade looks familiar, did you post it a few months ago when fiorst chasing ideas about this project?
Welcome to the Taunton University of Knowledge FHB Campus at Breaktime. where ... Excellence is its own reward!
mw... your gable dormers look like they wil be simple lay-on valleys
using the existing roof frame / sheathing as the support
View ImageMike Smith Rhode Island : Design / Build / Repair / Restore
"mw... your gable dormers look like they wil be simple lay-on valleys using the existing roof frame / sheathing as the support"
Thanks, Mike. I'm assuming that it would be wise to peel back the roofing where the framing meets the sheathing for the tie in. Is that correct?New knowledge is priceless.
Used knowledge is even more valuable.
Thanks, Mike. I'm assuming that it would be wise to peel back the roofing where the framing meets the sheathing for the tie in. Is that correct?
Nope, you'd weaken the structure.
What forces are you trying to withstand?
blue"...if you just do what you think is best testing those limits... it's pretty easy to find exactly where the line is...."
From the best of TauntonU.
I think we are talking about just peeling back the roof to the sheathing then planting a Scotch Valley ( lay on valley as Mike Smith calls it) onto the sheathing. No structural issues that I can see other than tie down / uplift. What are your wind codes?
regards
Markhttp://www.quittintime.com
Okay, so you are concerned with uplift right? Solve that issue without disturbing the existing sheathing. I cannot conceive of a reason why you'd want to stip out the existing sheathing unless you intended to take out the existing rafters.
If you want to overdo it, bolt a 2x10 layed on valley board. Glue under the plank before you lay it. Crawl into the attic and nail/screw the sheathing to the valley plank. Clinch the fifty spikes that you sent through the top.
While you're still in the attic, crill and install some u-bolts. Use stainless steel for the bolts and nuts...grade 3 will do. When you come out, use some hefty washers.
The valley will stay on fine when the winds come.
I'd probably be happy with just nailing a 1x6 down to the existing rafters if it was my locality though.
blue"...if you just do what you think is best testing those limits... it's pretty easy to find exactly where the line is...."
From the best of TauntonU.
I agree with you 100%. I wasn't proposing stripping off the sheathing
regards
Markhttp://www.quittintime.com
uh, blue....
NOBODY was going to strip the sheathing... the OP was asking if he should strip the roofing ...... not the sheathing
oh well....
it's ok , mark... i've met jim... you'd have a ball with himMike Smith Rhode Island : Design / Build / Repair / Restore
"the OP was asking if he should strip the roofing ...... not the sheathing"
Right.
What's a "wind code" and where can I find that info?
Michael New knowledge is priceless.
Used knowledge is even more valuable.
Michael,Do you want to keep the shed roof and ridge the way it is, higher than the rest of the house?If so, it's very easy to frame your gable roof over that by doing what I posted to you in my drawing. The valleys are very easy also. Is the answer yes?Joe Carola
"Do you want to keep the shed roof and ridge the way it is, higher than the rest of the house?"
I'm open to all options.
"If so, it's very easy to frame your gable roof over that by doing what I posted to you in my drawing. The valleys are very easy also."
I understood the drawing, but that's not the part that's got me stumped. I'm trying to figure out how to convert the current shed roof to a gable roof that will extend the front of the porch out another 8 feet. The only plan that works in my mind is to completely rebuild the front center portion of the roof from scratch. If there's an easier way, I'm definately anxious to know what it is. I just can't imagine any other way of pulling it off.
MichaelNew knowledge is priceless.
Used knowledge is even more valuable.
Michael,You don't have to cut off the shed roof. All you have to do is cut off the 4' overhang like I showed you in the drawing and put a kneewall under the rafters. Now come out your 12' width with headers and frame a gable roof. The gable ridge will sit on top of your existing shed roof no higher then the existing ridge that is higher than the rest of the house.Your valley sleepers will lie flat on top of the existing shed roof sheathing and rafters.Does this make any sense so far?Joe Carola
"You don't have to cut off the shed roof. All you have to do is cut off the 4' overhang like I showed you in the drawing and put a kneewall under the rafters. Now come out your 12' width with headers and frame a gable roof."
I understand that part.
"The gable ridge will sit on top of your existing shed roof no higher then the existing ridge that is higher than the rest of the house."
I understand that part, too.
"Your valley sleepers will lie flat on top of the existing shed roof sheathing and rafters. Does this make any sense so far?"
Ok, I think I see now what you're describing. You're proposing that I build the gable on top of the exisiting elevated shed roof and extend out until it achieves the required distance for the extended porch. Let me know if that's not what you're saying.
It's a workable solution, but I'm not sure the aesthetics of that look would be very appealing. (trying to imagine it). I'd prefer to completely conceal any evidence of the elevated shed portion. Just don't know how to make that happen without dismantling the shed roof entirely and building the gable from scratch, beginning at the ridge...which would be an awful lot of work.New knowledge is priceless.
Used knowledge is even more valuable.
In your conceptual dwg you show your current shed porch roof section being lowered down to match the main roof (which in my opinion looks nicer)
If you do that, then you'd have to remove that shed roof on the front side, and cut back the rear rafters to match. Then you could re-frame the whole thing.
If you keep the shed roof as it is, you will have to run your porch beams out perpendicular to house however long your span is. Then build gable, and set commons all the way back to where your current shed roof intersects. From there, do your overlaid valleys. Chuck
"In your conceptual dwg you show your current shed porch roof section being lowered down to match the main roof (which in my opinion looks nicer)"
Exactly.
"If you do that, then you'd have to remove that shed roof on the front side, and cut back the rear rafters to match. Then you could reframe the whole thing."
That's the only solution I can think of, too. Just hoping someone could pull a framing rabbit out of their hat and show me an easier way to pull it off.
"If you keep the shed roof as it is, you will have to run your porch beams out perpendicular to house however long your span is. Then build gable, and set commons all the way back to where your current shed roof intersects. From there, do your overlaid valleys."
Yep. I had that part figgered out. It's the part at the ridge that's giving me fits. I guess I'll just have to accept the fact that there is no shortcut solution to the goal that I'm aiming for.
Thanks for the feedback.
MichaelNew knowledge is priceless.
Used knowledge is even more valuable.
Darn it Mike. I was having some fun till you ruined it with the facts.
For the record, I'm not opposed to laying a valley board over shingles.
blue"...if you just do what you think is best testing those limits... it's pretty easy to find exactly where the line is...."
From the best of TauntonU.
same here... strip the shingles... don't strip the shingles
sometimes not stripping protects the interior just enough to avoid disasterMike Smith Rhode Island : Design / Build / Repair / Restore
sometimes not stripping protects the interior just enough to avoid disaster
Exactly!
blue"...if you just do what you think is best testing those limits... it's pretty easy to find exactly where the line is...."
From the best of TauntonU.
I'll be removing the shingles at the point where the framing of the roofs intersect. When construction fails prematurely, you can often trace it back to the preparation that went into it. I just don't like the idea of nailing roof plates on top of shingles.
Michael New knowledge is priceless.
Used knowledge is even more valuable.
I just don't like the idea of nailing roof plates on top of shingles.
I don't either but I don't lose sleep over the dozen or so that I've done over the years. I figure if the shingles deteriorate enough, the valley board will sink about 1/4". I don't think anyone will notice unless they have sophisticated tracking devices accurately measuring the amount of travel of the roof shingles over a very long period of time....say 100 years.
Sometimes, the risk of water intrusion overnight is more worrisome than the above known defect. That's when I make the call, like Dr. House....it aint by the book, but it works.
blue"...if you just do what you think is best testing those limits... it's pretty easy to find exactly where the line is...."
From the best of TauntonU.
"BTW, the facade looks familiar, did you post it a few months ago when fiorst chasing ideas about this project?"
Haven't previously posted any pics or images, but I have posted several threads regarding this project.New knowledge is priceless.
Used knowledge is even more valuable.
There ya go! took me three seconds to oopen that one, Hallelujah!
Tonight you can rest easy knowing you learned a new skill here!Now get the rest of them up so we can see the problemfrenchy - you watching this?
Welcome to the Taunton University of Knowledge FHB Campus at Breaktime. where ... Excellence is its own reward!
Hahahahaha.
I'm sure all the dialuppers will be thrilled with your 2mb pics!
blue"...if you just do what you think is best testing those limits... it's pretty easy to find exactly where the line is...."
From the best of TauntonU.
I'm interested, but you'll have to learn how to resize photos and/or be mor eselectiove. It would take me over half an hour fopr all those to view. You can down;load, install, and resize with Irfanview that fast.
Use Irfanview
open the picture
go image>resize> select 720 W and 72DPI
save as ( new name)
then upload here.
Welcome to the
Taunton University of Knowledge FHB Campus at Breaktime.
where ...
Excellence is its own reward!
mw....i'm also interested.. but you'd get alot more participation if you resize your attachments ( and IrfanView is my software of choice for that )
or you can reset your camera so the pics do not create such big filesMike Smith Rhode Island : Design / Build / Repair / Restore