FHB Logo Facebook LinkedIn Email Pinterest Twitter X Instagram Tiktok YouTube Plus Icon Close Icon Navigation Search Icon Navigation Search Icon Arrow Down Icon Video Guide Icon Article Guide Icon Modal Close Icon Guide Search Icon Skip to content
Subscribe
Log In
  • How-To
  • Design
  • Tools & Materials
  • Restoration
  • Videos
  • Blogs
  • Forum
  • Magazine
  • Members
  • FHB House
  • Podcast
Log In

Discussion Forum

Discussion Forum

Need some tips on hanging casing

ToyMakr | Posted in Construction Techniques on December 12, 2005 10:10am

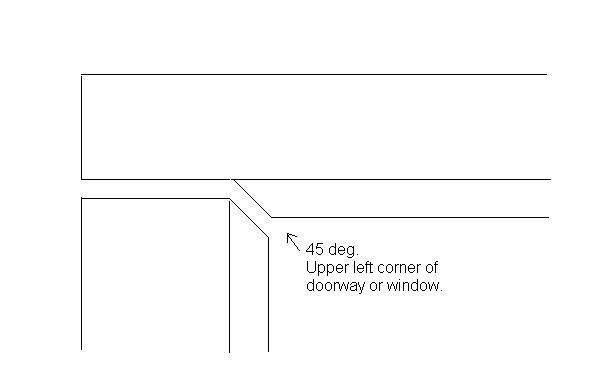
Hi.  I’ve got a bunch of casing to hang.  As you can see in the attachment, each joint requires 2 cuts on each piece.  I drew the sketch with a gap between the pieces to (hopefully) make it easier to see.  I’m having trouble getting that little miter joint to fit well. 

Does anyone have any tips for getting better results when marking and cutting this type of joint?  I’m making the straight cuts with a portable table saw and the miter cuts with a compound miter saw. 

Thanks!

Reply
  • X
  • facebook
  • linkedin
  • pinterest
  • email
  • add to favorites Log in or Sign up to save your favorite articles

Replies

  1. jackplane | Dec 12, 2005 10:46pm | #1

    The bottom cut is straightforward. The upper one- you'll probably need to cut the 45 w/ a handsaw and guide, or a chisel with a guide. Or you could build a custom (hand-used) mitre box for this.


  2. MrJJ | Dec 12, 2005 11:38pm | #2

    If you have a sliding compound miter saw with a depth stop, you can cut that little 45 with little effort. After cutting the straight part on the table saw, just set your depth adjust screw, make a sub-fence (to bring the trim 3-4 inches from the fence) and away you go.

    -------------------------------
    People are entitled to their own opinions; People are not entitled to their own truth.

    Jacob

  3. User avater
    NickNukeEm | Dec 13, 2005 12:34am | #3

    I made a cherry clock with mortise/tenon doors with this detail.  First, setup the table saw to cut just up to the bead miter  IIRC, I actually cut these with the edge on the table, running it through multiple times, leaving just enough material to clean up with a chisel.)  Then I constructed a jig so the rails/stiles (or casing) fit snuggly sandwiched between two pieces of hardwood mitered to 45 degrees.  With the rails-stiles/casing clamped in place, I used a wide, very sharp chisel resting on the hardwood jig to pare the miters until they fit right.  I only had two doors, however, and the clock was a Christmas present for my wife.  In a business/production setting, depending on the number you have to do, you might want to try a faster method.

    You could probably miter the casing bead, then rip the excess on the table saw.  The jig would still come in handy to clean up the cut to get a tight joint.


    "I am the master of my fate, I am the captain of my soul."  Invictus, by Henley.

    1. ToyMakr | Dec 14, 2005 07:41pm | #4

      Thanks for the advice.  Unfortunately, I don't have a sliding compound miter saw, just a regular one, so the depth stop is not available.  However, Nick's suggestion of a "sandwich" jig got me thinking.  Using a couple of pieces of scrap molding, I made the jig you can see in the attachments.   It's attached to the fence of the saw with double sided carpet tape (love that stuff!)

      It works pretty well, as long as I perfectly cut the total length of the piece.  If I cut too short or too long, the miter ends up offset one way or the other, of course. Then I have to trim a little, try again, trim a little, try again... etc.

      1. m2akita | Dec 15, 2005 04:36am | #5

        Look at Gary Katz's web page, there is an article there on doing what are called Jack-miters.  Pretty close to what I think you are doing.

        web page: http://www.garymkatz.com/TrimTechniques/Jack-MiterJig.htm

        I like the sandwich jig idea to though.  Im actually going to be doing some trim like this for the first time tomorrow.

        -m2akitaLive by the sword, die by the sword....but choose your sword wisely.

  4. User avater
    Matt | Dec 15, 2005 04:49am | #6

    Why don't you just do this with a 2 piece build-up?

    1. ToyMakr | Dec 15, 2005 05:40am | #8

      Matt,  I'm doing it this way because that's how it's done in the rest of the house.  This new stuff is going in an addition.  But what did you have in mind?  Did you mean use a 1x3 and then a separate piece for the small ogee part?

      M2 - that's an interesting link.  I may consider trying to screw the whole thing together before I hang it and see how that works.

      Another question: what's the best way to deal with a door jamb that isn't flush with the wall, but is inset a little bit?  That really screws up the angle.  Would you plane some off the back of the casing?  Shim out the door jamb?

      1. stinger | Dec 15, 2005 08:01am | #9

        If you think of the way a swoop miter is done at the end of a stair tread, you can make a nifty router jig that will handle the jack miter detail, but you need to compromise and have the long straight part of the mating surfaces offset from the cockbead line.

        It can be done for ells and tees.  Made with good jigs, the joints are hairline, and if snugged with pocket screws, become just about invisible if the work is painted.

        I have attached a pic of what the joint looks like when made thus.  The scale shows moldings 3-1/2" in width, with the edge beads 1/2" wide.  The circle in the pic depicts a 3/8" diameter router bit.  See how the horizontal mating joint needs to rise because of the fillet the router makes in the corner?


        File format
      2. stinger | Dec 15, 2005 08:03am | #10

        Cutting back the wall under the casing will get the edge to seat down on the jamb, but there may be an issue with the out-of-plane rock the casing will take, if the wall is quite proud of the frame face.

      3. User avater
        Matt | Dec 15, 2005 02:01pm | #11

        >> I'm doing it this way because that's how it's done in the rest of the house.  << 

        Is it really?  Must be a pretty old house.  Generally, modern trim techniques would pretty much preclude that kind of joinery unless it's at least close to a million dollar house.   Remodelers might do that kind of thing, but then again, the price of some of their additions is easily the same or more than a complete entry level house would cost. 

        I do think you should match the rest of the house though, but still think even if the original is done like you are proposing, the new stuff could be a very close replica with a 2 piece buildup.  Having a 2 pc also helps you to compensate for discrepancies between the wall plane and the edge of the door/window jambs.  

        >> Did you mean use a 1x3 and then a separate piece for the small ogee part?  <<

        Yes

        >> Another question: what's the best way to deal with a door jamb that isn't flush with the wall, but is inset a little bit?   <<

        To add to what stinger said, trim carps deal with this every day.  First plans of attack are to a) nail the sheetrock tight to the framing with roofing nails.  These are placed such that they will be hidden by the casing.  b) the first 1" of so of the drywall can literally be beaten into submission with a hammer, although "tapped" might be a little better word. 

        Edited 12/15/2005 6:11 am ET by Matt

        1. ToyMakr | Dec 15, 2005 05:29pm | #12

          It's definitely not a million dollar house, but it was built in 1935.

          And I think I will be "tapping" down the sheet rock in places.

          After struggling to get a perfect joint the other day, I took a closer look at some of the joints on the "old" stuff.  After 70 yrs of settling and so on, they aren't perfect either (of course, they may not have been perfect when installed originally).  Maybe I should not worry about it so much, and also put 10 coats of paint on it, and it will really look authentic ;-)

          1. User avater
            Matt | Dec 16, 2005 02:37am | #13

            A little caulking and paint make the carpenter what he aint! :-)

        2. stinger | Dec 16, 2005 04:09am | #14

          We call it rock bashing.  Or ripping.  The thing I dislike most about it is the mess it makes on the floors.

          I keep promising myself, but I always forget.  Next house I build I will run around for one whole afternoon with a power plane, and thin down all opening perimeters.

          1. User avater
            Matt | Dec 17, 2005 02:19am | #15

            Seems like maybe factory applied jambs (windows and doors) should be 4 5/8 rather than 4 9/16s (assuming 2x4 walls).  As far as the mess - get a cleaning person :-) - I LOVE my cleaning people.

  5. mike4244 | Dec 15, 2005 05:32am | #7

    Rip the straight piece first. Layout and cut the miters with a small handsaw, a backsaw works good.Place the head and jamb pieces on horses.Clamp to the horses so you can run the back saw thru the miter for a perfect cut. This method of cutting the jackmiters will shorten the distance between the legs slightly,allow for it .Biscuits or pocket screws on the back side will hold it together on thebench.Then you can install it as a unit.

    mike

  6. User avater
    JeffBuck | Dec 17, 2005 03:13am | #16

    table saw and a miter guage.

    the overcut is on the back side and hidden .. never to be seen again.


    I took a look at the Gary Katz link ... I'd simply run that thru the table saw standing up ... with the blade set at a 45 and at the right height ... kiss the bottom ... and clean out the corner with 2 swipes of a sharp utility knife or a light touch with a sharp chisel. What am I missing here?

    Now that I think about it ... the original poster cut could also be chopped at the  compound mitersaw by tilting the stock forward a bit. Just cut to the line ... again ... overcut is on the back ...

    Jeff

        Buck Construction

     Artistry In Carpentry

         Pittsburgh Pa

Log in or create an account to post a comment.

Sign up Log in

Become a member and get full access to FineHomebuilding.com

Video Shorts

Categories

  • Business
  • Code Questions
  • Construction Techniques
  • Energy, Heating & Insulation
  • General Discussion
  • Help/Work Wanted
  • Photo Gallery
  • Reader Classified
  • Tools for Home Building

Discussion Forum

Recent Posts and Replies

  • |
  • |
  • |
  • |
  • |
  • |
View More Create Post

Up Next

Video Shorts

Featured Story

Fast, Accurate Wall Framing

A rear addition provides a small-scale example of how to frame efficiently.

Featured Video

Micro-Adjust Deck-Baluster Spacing for an Eye-Deceiving Layout

No math, no measuring—just a simple jig made from an elastic band is all you need to lay out a good-looking deck railing.

Related Stories

  • A Practical Perfect Wall
  • Smarter Stop Block
  • Square Walls Solo
  • Deck-Board Pry Bar

Highlights

Fine Homebuilding All Access
Fine Homebuilding Podcast
Tool Tech
Plus, get an extra 20% off with code GIFT20

"I have learned so much thanks to the searchable articles on the FHB website. I can confidently say that I expect to be a life-long subscriber." - M.K.

Get home building tips, offers, and expert advice in your inbox

Signing you up...

This site is protected by reCAPTCHA and the Google Privacy Policy and Terms of Service apply.
See all newsletters
See all newsletters

Fine Homebuilding Magazine

  • Issue 332 - July 2025
    • Custom Built-ins With Job-Site Tools
    • Fight House Fires Through Design
    • Making the Move to Multifamily
  • Issue 331 - June 2025
    • A More Resilient Roof
    • Tool Test: You Need a Drywall Sander
    • Ducted vs. Ductless Heat Pumps
  • Issue 330 - April/May 2025
    • Deck Details for Durability
    • FAQs on HPWHs
    • 10 Tips for a Long-Lasting Paint Job
  • Issue 329 - Feb/Mar 2025
    • Smart Foundation for a Small Addition
    • A Kominka Comes West
    • Making Small Kitchens Work
  • Issue 328 - Dec/Jan 2025
    • How a Pro Replaces Columns
    • Passive House 3.0
    • Tool Test: Compact Line Lasers

Fine Home Building

Newsletter Sign-up

  • Fine Homebuilding

    Home building tips, offers, and expert advice in your inbox.

  • Green Building Advisor

    Building science and energy efficiency advice, plus special offers, in your inbox.

  • Old House Journal

    Repair, renovation, and restoration tips, plus special offers, in your inbox.

Signing you up...

This site is protected by reCAPTCHA and the Google Privacy Policy and Terms of Service apply.
See all newsletters

Follow

  • Fine Homebuilding

    Dig into cutting-edge approaches and decades of proven solutions with total access to our experts and tradespeople.

    Start Free Trial Now
    • Facebook
    • Instagram
    • X
    • LinkedIn
  • GBA Prime

    Get instant access to the latest developments in green building, research, and reports from the field.

    Start Free Trial Now
    • Facebook
    • YouTube
  • Old House Journal

    Learn how to restore, repair, update, and decorate your home.

    Subscribe Now
    • Facebook
    • Instagram
    • X

Membership & Magazine

  • Online Archive
  • Start Free Trial
  • Magazine Subscription
  • Magazine Renewal
  • Gift a Subscription
  • Customer Support
  • Privacy Preferences
  • About
  • Contact
  • Advertise
  • Careers
  • Terms of Use
  • Site Map
  • Do not sell or share my information
  • Privacy Policy
  • Accessibility
  • California Privacy Rights

© 2025 Active Interest Media. All rights reserved.

Fine Homebuilding receives a commission for items purchased through links on this site, including Amazon Associates and other affiliate advertising programs.

  • Home Group
  • Antique Trader
  • Arts & Crafts Homes
  • Bank Note Reporter
  • Cabin Life
  • Cuisine at Home
  • Fine Gardening
  • Fine Woodworking
  • Green Building Advisor
  • Garden Gate
  • Horticulture
  • Keep Craft Alive
  • Log Home Living
  • Military Trader/Vehicles
  • Numismatic News
  • Numismaster
  • Old Cars Weekly
  • Old House Journal
  • Period Homes
  • Popular Woodworking
  • Script
  • ShopNotes
  • Sports Collectors Digest
  • Threads
  • Timber Home Living
  • Traditional Building
  • Woodsmith
  • World Coin News
  • Writer's Digest
Active Interest Media logo
X
X
This is a dialog window which overlays the main content of the page. The modal window is a 'site map' of the most critical areas of the site. Pressing the Escape (ESC) button will close the modal and bring you back to where you were on the page.

Main Menu

  • How-To
  • Design
  • Tools & Materials
  • Video
  • Blogs
  • Forum
  • Project Guides
  • Reader Projects
  • Magazine
  • Members
  • FHB House

Podcasts

  • FHB Podcast
  • ProTalk

Webinars

  • Upcoming and On-Demand

Podcasts

  • FHB Podcast
  • ProTalk

Webinars

  • Upcoming and On-Demand

Popular Topics

  • Kitchens
  • Business
  • Bedrooms
  • Roofs
  • Architecture and Design
  • Green Building
  • Decks
  • Framing
  • Safety
  • Remodeling
  • Bathrooms
  • Windows
  • Tilework
  • Ceilings
  • HVAC

Magazine

  • Current Issue
  • Past Issues
  • Magazine Index
  • Subscribe
  • Online Archive
  • Author Guidelines

All Access

  • Member Home
  • Start Free Trial
  • Gift Membership

Online Learning

  • Courses
  • Project Guides
  • Reader Projects
  • Podcast

More

  • FHB Ambassadors
  • FHB House
  • Customer Support

Account

  • Log In
  • Join

Newsletter

Get home building tips, offers, and expert advice in your inbox

Signing you up...

This site is protected by reCAPTCHA and the Google Privacy Policy and Terms of Service apply.
See all newsletters
See all newsletters

Follow

  • X
  • YouTube
  • instagram
  • facebook
  • pinterest
  • Tiktok

Join All Access

Become a member and get instant access to thousands of videos, how-tos, tool reviews, and design features.

Start Your Free Trial

Subscribe

FHB Magazine

Start your subscription today and save up to 70%

Subscribe

Enjoy unlimited access to Fine Homebuilding. Join Now

Already a member? Log in

We hope you’ve enjoyed your free articles. To keep reading, become a member today.

Get complete site access to expert advice, how-to videos, Code Check, and more, plus the print magazine.

Start your FREE trial

Already a member? Log in

Privacy Policy Update

We use cookies, pixels, script and other tracking technologies to analyze and improve our service, to improve and personalize content, and for advertising to you. We also share information about your use of our site with third-party social media, advertising and analytics partners. You can view our Privacy Policy here and our Terms of Use here.

Cookies

Analytics

These cookies help us track site metrics to improve our sites and provide a better user experience.

Advertising/Social Media

These cookies are used to serve advertisements aligned with your interests.

Essential

These cookies are required to provide basic functions like page navigation and access to secure areas of the website.

Delete My Data

Delete all cookies and associated data