*
I recently had to replace windows in a plaster wall house and had to patch in areas around the openings with drywall shimmed out to near the same plane as existing plaster walls.. I then used drywall mud to fill larger gaps and waited til fully dry then mudded and taped around the areas and the gaps– usuallyusing more than one pc of tape to overlap each other to cover wide gaps for strength.After this tape joint was dry then I continued with another layer of mud, and so on ’til final coats were all flush and evenly feathered to existing wall surfaces.If a lot of shrinkage happened on first fill of gaps I applied another coat and allowed to dry before taping. paul l.
Discussion Forum
Discussion Forum
Up Next
Video Shorts
Featured Story

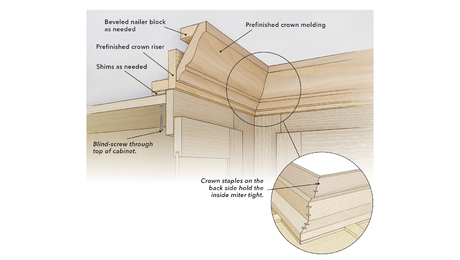
Use these assembly techniques when installing crown risers and molding to minimize visible gaps and nail holes.
Featured Video
How to Install Cable Rail Around Wood-Post CornersHighlights
"I have learned so much thanks to the searchable articles on the FHB website. I can confidently say that I expect to be a life-long subscriber." - M.K.
Fine Homebuilding Magazine
- Home Group
- Antique Trader
- Arts & Crafts Homes
- Bank Note Reporter
- Cabin Life
- Cuisine at Home
- Fine Gardening
- Fine Woodworking
- Green Building Advisor
- Garden Gate
- Horticulture
- Keep Craft Alive
- Log Home Living
- Military Trader/Vehicles
- Numismatic News
- Numismaster
- Old Cars Weekly
- Old House Journal
- Period Homes
- Popular Woodworking
- Script
- ShopNotes
- Sports Collectors Digest
- Threads
- Timber Home Living
- Traditional Building
- Woodsmith
- World Coin News
- Writer's Digest


Replies
*
I recently had to replace windows in a plaster wall house and had to patch in areas around the openings with drywall shimmed out to near the same plane as existing plaster walls.. I then used drywall mud to fill larger gaps and waited til fully dry then mudded and taped around the areas and the gaps-- usuallyusing more than one pc of tape to overlap each other to cover wide gaps for strength.After this tape joint was dry then I continued with another layer of mud, and so on 'til final coats were all flush and evenly feathered to existing wall surfaces.If a lot of shrinkage happened on first fill of gaps I applied another coat and allowed to dry before taping. paul l.
*
The best thing to use is a setting type joint compound like Durabond, which you mix yourself. Mix it up thick, fill the major voids, and then tape and spackle with regular joint compound. An alternative would be using Gypsolite, which is brown coat plaster.
*
Chris,
Sounds like I'm working out the same details as you. Finishing out an area of a house that had useless closets (because of shape); first, built the stud wall and rocked it to roughly even with the existing plaster wall plane ('roughly' because nothing is true in this old house). I applied a modified joint compound to the bigger gaps - waited for it to dry. Came back and redressed those gaps again. Waited. Then did a first sanding.
Now I'm doing a method of wall repair that I first heard about in FHB, author was Mario Rodriquez, were you apply 36" wide Fiberglass mesh to the wall, use a bonding agent - rolled on like paint. Next, follow it up with joint compound or modified joint compound several more times, very, very thin layers -- less than 3/32 of an inch. The final step is to add a little moisture to the surface and make a "slurry" to get it polished looking. So far so good.
*Chris,The best fix for your problem is to find a supplier who sells plaster in your area. You can feather in the texture and it will look alot better than trying to mix up a drywall mud solution.Put a primer over the drywll if you installed it smooth side out, mix up your basecoat of plaster and trowel it on.To make the feather joints un-noticible, put masking tape over the existing plaster and extend over the drywall approx 1/8". When the plaster is put on, pull the tape off (quickley) and feather the joint with a paint brush. This way you wont get any humps.If you have a finish coat of plaster, feather it in the same way.
*
I agree with Jeff: real plaster is really a good way to go. I had to fill some holes in a client's wall where whoever put in the original kitchen counter gouged out the plaster to make the counter fit. I used USG Red Top wood-fiber plaster (I have a bunch of it around -- you can use Structolite, but I hear it is significantly weaker) to quickly fill in the hole. You just mix it with water and trowel it on; it is easier to work with than Durabond because it has lots of body and, not surprisingly, looks like real plaster. There was enough of the old lath remaining that I didn't need to add any. Within an hour or so, the finish plaster can go on .... in this case i cheated and used lightweight mud because the repair area was inconspicuous.
To strengthen some repairs I use the fiber-mesh tape or expanded metal lath screwed to the studs. The problem I have with the drywall compounds is that they come out looking like compound -- my attempts to make them look more like plaster only looked like bad mud jobs ... maybe just my lack of ability. The plaster adheres well and is rock-solid.
There are also those who argue that a large mud repair will pop out or spall from plaster because of the dissimilar thermal expansion/contraction of the two substances. I have no experience with this.
*
Ditto for Andrew's advice.
As he suggested, you may have problems going the plaster
route unless you can get good adhesion, referred to as
"suction" in the trade, from your plaster to whatever
substrate it is placed on. To prevent future delamination,
use a plaster bonder applied to the substrate. This
material, like a thick pink paint, cand be brushed, rolled
or sprayed on. Sets up fast and can be plastered over with
hours and up to 10 days. Several manufacturers use it. The
brand I use comes from USG - Plaster Bonder. But Larsen
Products also makes one called Plaster Weld.
Goo
*The method I mentioned based on the Mario Rodriquez article is fast, easy, and looks fine. It sounds like you are patching. It will work fine.A couple of points were brought out that I would like to clarify. First, the adhesion is fine. The modified joint compound is made up of mason's sand and usg joint compound - it sticks tenaciously and 'works in' well. It is applied to a continuous blanket of fiberglass mesh that is adhered to the existing wall. You also have the added protection of the concrete/plaster bonder.The marginal differences btwn. coefficients of thermal expansion for the mixtures are no worse than that which exists between scratch coats and finish coats of plaster.The finish look is fine too. The key to this is putting it on so thin, barely filling in the voids between the fiberglass mesh. The "slurry" as a final treatment makes it look hard and polished.Finally, if you make a mistake you just go over it as long as you kept the application coats 'thin.'The other methods mentioned by Andrew, and others, are the more traditional methods. I know they work too but I think they have less margin for error.good luck with whatever you choose.
*
Thanks for all the info. I called my nearby building materials company to see what they had. They carry bonding agent and Structolite. They recommended I tear out the drywall strips I have already put up and screw down wire lathe instead and then plaster over, using the bonding agent on the feathered surfaces. I have a bit of time already invested in putting up the drywall, so I would rather not tear it out. Would it work to just coat all of the surfaces with bonding agent - drywall and plaster - and use structolite over it all? Is there something I could use that wouldn't require the bonding agent?
*Whenever I have had to marry two wall surfaces together I have always cringed at the thought of packing layer upon layer of joint compound and feathering it out for all of the obvious reasons. What I have found easiest is to feather the wall by progressively shimming to the joint,behind the drywall. This is less noticable than a hump in the wall and all the work involved with feathering and sanding and cussing and swearing.
*
I removed a couple of small (non-load bearing) header and side walls that had been around some old doors. This left me with vacant strips in the old plaster and lathe walls. I have drywalled these strips, and now need to patch and feather with something, but I'm not sure what would be the best product. It is more than just a tape and mud project. There are substantial gaps that need filling between the drywall and old plaster - up to maybe 1x1". It is all very uneven. Should I be using an actual plaster of some kind to fill these gaps and feather out the uneven surfaces, or is there something else more versatile?