I am new to the router table and determined to get experiance! I have recently purchased a Rail and Stile 3 bit router set to make raised panel doors with in my kitchen. I am having some problems with the thickness of the wood. I used a piece of 3/4″ wood to cut the raised panel with but it seems as though it will not fit into the Rail or Stile. After looking at the specs of the bit, I think this bit might require a 5/8″ piece of wood to fit properly.
Have a look at the picture I included and let me know if my router is not setup properly or if the wood really needs to be 5/8″ to work with the rail and stile.
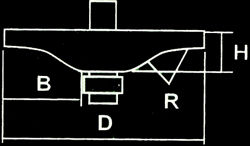
Here’s the specs of the bit that correspond to the picture:
H = 5/8″ <– this is what’s got me thinking it could be the wood.
R = 7/8″
D = 3-1/2″
B = 1-1/2″
My Rail and Stile are both 1″ tall (H = 1″, below bearing, cutting area) and don’t seem to be causing any problems.
Thanks, Mike


Replies
Greeting R,
as a first time poster Welcome to Breaktime.
You may be able to find some help here on Breaktime, the FineHomebuilding forum.
If not, the FineWoodworking 'Knots' site, a sister publication also from Taunton, would be more attuned to that particular vein of question. Knots
Cheers
damn, am I fat!
You have to cut the back of 3/4" material so it will fit in the slot. You can cut it with the panel raiser bit or a back cutter bit or by other bits or methods. A couple of hints with paneled doors. Do the cope cuts on your rails and stiles first with a backing block to prevent the end from blowing out. Cut the bead and groove next so any blowout gets removed. When routing the panel, start on the end grain and work the piece counter clockwise. Again, this will remove any blowout from the crossgrain cut.
Beat it to fit / Paint it to match
You may be up against some old-fashioned conventions that are not always spelled out.
The three-piece panel kits, as is, often give you a panel that is "proud" of the stiles & rails. That was a common woodworking style for a while. So, to get a panel flush to the frame, you often need a rabbet or small cove on the back of the panel to get you the 7/32 - very strong 3/16 "tongue" on the panel that best fits the stile and rail.
Now, if you cove the back of the raised panel, you generally want to mill a "flat" where the panel engages the stile & rail. You can "get away" with using just part of the panel bit, but the radius makes a "wedge" like profile in relation to the dado it goes in that can be annoying when assembling the doors.
If you "need" a pure flat back on the raised panel, your stock will need to be less thick than the dado is from the back of the milled stile & rail--that is, if you also must have the raised panel flush to the outside of the frame.
You can just make a couple more passes with the panel cutter until the panel edge is "skinny" enough to fit the stile & rail dado, too.
Newb,
In a phrase. "Trial-test-error-adjust-retry-repeat until it is time for bed.
The Rail and stile assembly effort requires you have a bunch of wood scraps for a host of trial and error setups. Everything said is true so far by the previous posters. Specifically the Knots reference. In fact the rail & style with raised panels is a frequent topic in Fine Woodworking.
First off before anything else is set or adjusted you need to realize that good construction is only possible if the materials are thicknessed properly. By that I mean all rails and all styles are the same thickness. Similarily any panels you fit need to be the same thickness as each other. If the thickness varies then you'll have a bunch of pieces that fit but the plane of the face or back will be different. Belt sanding to fit is not an attractive option.
Safe to say it all needs to be thicknessed dead on (1/16" max total variance). Even 1/16th is sloppy.
Scraps allow you to mill and dryfit your test pieces so save the cutoffs no matter what the size is. (obviously really small pieces can snap in the cutters and drive into your brain so be carefull)
Your cutter in the picture is a raised panel bit. That will mill the panel but it isn't going to fit together the pieces of the frame. I'll review the drawing after this is posted but commonly there are 2 or 3 cutters that are provided in a "set" One for raising the panel. One to cut the 'male' one to cut the 'female'. (sometimes the stile cutter is bi-.
-I reviewed the picture you supplied and the cutter pictured is a panel raising bit. Use a dado head to back cut the panel to relieve the panel proudness. Dado it then sand or plane it to smoothness.-
The last thing is you need to do is to cut yourself some slack. While a router table is a much better tool than a router alone, Milling long pieces on a 2 foot square table isn't the most accurate format. Woodworkers that build items larger than cabinet doors use a shaper or use a table saw with dado head to mill the majority and use a router to finish the cuts.
So far I've built 8 full size passage doors using my 1/2 inch shank Craftsman shaper (I don't think it is still sold). Running 8 foot long 1-3/8" thick Oak & Walnut thru the shaper is a Tai Chi excercise in taking small cuts and figuring out transitional hand movements as you move the board past the cutter heads. This is a slow and steady activity. Dips and waves and chipout can waste a lot of your time... and of course provide you trial and error pieces.
Edited 12/7/2006 2:09 pm by booch