Hi,
I was wondering if somebody could offer some insight on siding replacement.
We are thinking about replacing the Alum siding on our house with Hardie and I have some questions.
1- Under the Alum siding, we have the aluminized 1/4″ cardboard thingie. I am not sure what you call it. After removing the Alum siding, will you wrap the whole house with Tyvek, over this aluminized cardboard?
2- If the budget allows, would you add additional insulation (styrofoam, etc) before re-siding? I understand that they could be some wall thickness issues, window reveals, etc.
3- Should I expect that the butt joints between the Hardie planks be caulked? Is this required and if you overlap it correctly there is no need for caulking?
4- Stainless screws or just nails? My preference is SS screws. Opinions?
5- I am correct to assume that the siding is painted after it is installed, correct?
6- Is it possible to get a ballpark figure on how much it cost to install Hardie Smooth siding in the Wash DC/Northern VA area?
7- Things to look for or specifiy clearly in a contract
Thanks in advance and Thank you for the valuable information offered by you guys.


Replies
Are you going to do it or sub it out?
You need to figure out what size/type you want. I use the 6 1/4 (5" exposure), that size you can blind nail with roofing nails or stainless ring shank. FHB did an article on fiber cement back in '01 http://www.taunton.com/store/pages/fh_toc_140.asp I think Journal of light construction has some articles too. JH was about $70 material for me, labor was $6600 for a 3000 sq ft house. The referrals from the hardie website gave a quote of $12k, I supply nails and siding.
Click on the PDF on the below link. Also, give the hardie reps in your area a call and they'll answer a lot of your questions and be able to refer you to houses in your area that are already siding and in the process, so you can see it up close and ask questions.
http://www.jameshardie.com/homeowner/installation/hardiplank_installation.php
First what do you mean by 1/4" aluminized cardboard thingie? I understand that to mean Thermo-Ply sheathing, which IMO is garbage. Second I'd leave the recommended gaps between planks and caulk with premium polyurethane caulk as well as install felt "cards" underneath (Basically, a 4" wide piece of 15# felt that laps over the piece of siding below wherever a joint occurs). Make sure your windows and wall penetrations are correctly flashed. I'd pass on the SS screws if you're blind-nailing and go for HDG roofing nails or framing nails instead (you can get both from Maze Nails, although they're pricey). Although some manufacturers offer pre-painted siding, it's better to just prime and paint after installation. BTW, make sure you prime cut ends and joints for the longest lasting paint job. Labor, I can't even guess given your area. As for a contract, make sure it spells out specifically what is inlcuded and what isn't, and make sure you get all the details in writing; i.e., what kind of nails, the flashing details, etc.
The shiny cardboard junk is there to provide a smooth surface. They sell it as "insulation", but it's really there to bridge over the surface of old siding under the AL siding. If there was no old siding there, then there was no need for the shiny cardboard.
So my question: What is under the shiny cardboard? You really can't effectively put Hardie over old siding unless you either horsefeather it or install lath to provide a smooth surface.
Following up DanH's post'
He is correct about the shiney aluminized cardboard or in some case foam board. The fact that you said this is under aluminum siding indicates a job that is maybe 20+ years old. My concern would be like Dans'. What is underneath it? What kind of damage may be hidden, and what is the condition of the original flashing?
Those answer can add a significant cost to your job if all is not well behind the "cardboard thingie".
BTW, you may want to use the opportunity of this job to add insulation to your exterior walls, and air seal them, if the budget will allow for it.
Dave
Thank you for your replies.Let me see if can clarify several things. The outermost layer of my house is the alum siding. Under the siding is this Thermo-ply (cardboard with a metallic looking layer) 'thingie' and under this cardboard is the framing and fg insulation. That's it. There is no OSB or plywood sheating. This is based on what I saw when I replaced some of the rake boards. Yes, the house was built in 1979.My plan is to remove (contractor or myself) the alum siding and put on Hardie. According to the Hardie instructions, because of the way my house was built, the siding will have to nailed/screwed to the framing studs.Based on my observations from when I replaced the carpeting with hardwood flooring, I did not noticed any kind of water infiltration in the areas where the subfloor met the exterior walls. I was looking for signs of water damage, stains and/or mold but did not see any. So, I am hoping that there are no surprises behind the 'cardboard thingies' but I guess you never know.What would you do to improve the exterior walls? Cover the cardboard with a layer of plywood and 1" styrofoam? How about the depth of the windows and rake boards? Maybe just cover the cardboard with roof paper or Tyvek before putting on the Hardie boards.Opinions? I am in left field?Thanks again.
I'd do something. If the stuff doesn't add much thickness, and you have no concerns about damage behind it, you can leave it there, but I'd want at least 3/8" OSB/plywood over it. (1/2" would be better, but trying to minimize added thickness.) And a housewrap over that.The housewrap is going to do you more good than added insulation, if you do a good job of taping it around windows/doors and at the seams.Keep in mind that you don't want to add too much thickness or you'll run into trouble at windows and doors, with the siding sticking out more than the window frame. This is something you should check (several places, since not all windows/doors may be alike), to decide what you can get away with in terms of added thickness. Basically, you need room (after any OSB/whatever) for two thicknesses of the Hardi, plus a small fudge factor.Don't forget to recycle the aluminum. It's worth a non-trivial amount of $$ -- worth the effort.Your profile says northern VA. How cold does it tend to get there in the winter?
DanH is right on with his reply.
I have never installed Hardie siding, but did do alum. siding years ago.
We often ran into the window/door trim and rake board issue when installing alum. siding over older wood lap siding. On most jobs we would wrap all the doors, windows, and exterior trim with brake metal coil stock. To maintain the correct thickness and profile we would either add addtional layers to build up the trin, or remove it and add layers under the it, if the profile was not easy to match.
Not being a Hardie installer, my guess would be to do something similar with your exterior trim components. Remove all that you can and add a solid shim layer beneath it, and then reinstall. A little more work, but it would also give you a chance to examine all the window flashing details, and correct any defects you find. We use to find a lot of damage in those areas durring siding installs on 40 and 50s era homes.
BTW the aluminize cardboard you mentioned has no structural value. Be sure to check all your corners for let in diagonal bracing. That is another good reason to add the layer of 3/8" OSB to the exterior of the house.
DanH or some of the other Hardie users may have some better suggestions, and be able to tell you if the siding adds anything structurally to the house.
Dave
Hardie will add some structural strength overall, but won't substantially add to diagonal bracing, so it is a good idea to check for adequate diagonal bracing while the siding is off. If bracing isn't there (check both sides of the insulation), you can buy a metal brace that has a T cross-section that can be installed fairly easily from the outside.
Winter temperatures around DC get as low as mid teens every now and then. Most of the time it is in the 30's and 20's. My memory is kind of fuzzy on the exact winter numbers but I know for sure that summers are just disgustingly sticky and hot.Can I assume that my house and every other house built in our development is crappily built? I knew it was crap but it did not know that the crap factor was higher.When you are in the garage, it is very obvious to see the (lack of) structural bracing. The only thing that is bracing the garage walls are two 2 inch metal strips that run diagonal, accross the 2x4 framing. Behind the frame is the alum cardboard and then the siding.Was this is an accepted construction technique back in the late 70's? I have noticed that all of the current houses built in the northern VA area are sheated with OSB or plywood.I guess I should have asked this question way before but... How do you know when it is time to replace the alum siding? If the paint is chalky, can it re-painted and be set for another, say 10 - 15 years?
Those metal strips are (at least in theory) adequate bracing, if properly installed. They should be bent into the T cross-section I mentioned (not just simple strips of metal), and the leg of the T should be set into notches cut in the studs. Ideally there should be two on each wall at each corner, one on the outside and one on the inside, forming an X.As to when it's time to replace Al siding, I'd say the day after it's installed, but the three primary criteria are:1) Is it badly dented?
2) Are there installation errors or storm damage problems that are causing water to get behind the siding and cause damage?
3) Is it so badly corroded/eroded/wind fatigued that it's becoming structurally unsound?It can certainly be painted, with the proper prep (bare metal will require extra steps) and it generally **will** need painting after 15-25 years."Permanent siding" is an incredible oxymoron.
PS: One of the reasons why you now see OSB on most homes is that they're using vinyl siding, and it needs a solid surface to nail to. It ain't because builders suddenly got on a quality jag.(In fact, I predict that in another 5 years or so someone will come up with a nailable foam panel or some such to replace OSB and further "cost reduce" things.)
Edited 5/13/2005 11:30 am ET by DanH
While we are on the topic, what sort of windows are installed, and how are they trimmed out?
If it's just a return bead around the windows (since it sounds like the AL siding is original to the building), you will need to work out how you want the windows trimmed out. You wll also want to decide how you are going to trim the building corners, inside and out. Don't forget to look closely at the siding/soffit/eave/rake joints--these will need trimming too. Also, look for "floating" gable ends--these are easy to ignore, and thus miss.
Since it sounds like the house has only ever had AL siding, I'd be very inclined to approach the project as a strip one wall at a time to bare studs and build 'right' from the studs out. That's partially to minimise the exposure of the house, but also to keep the parts a bit smaller if you are going to DIY this.
(Oh yeah, start in the back, on the least seen part of the house, if you DIY--you will learn from experience, and as you get better you will want to fix mistakes, not making them on the front of the house will interupt the process less.)
So, I'd sheath the house, then flash & felt the windows properly, then felt the sheathing, and then do the trim, and finish with the hardi.Occupational hazard of my occupation not being around (sorry Bubba)
Just to let ya know, here in Mobile, AL (where Ivan struck last summer), Thermo-Ply is still sold and used as a structural panel "when nailed according to manufacturer's instructions." Yeah right! One house with trusses and Thermo-Ply I saw in the framing stage the week after Ivan had racked completely over, trusses, walls, and everything. And that's with the temp. wall bracing still installed. At least go with 3/8" ply nailed to code; Hardi makes both 3/4" and full 1" trim (the 1" is called "HLD") to solve the window and door trim issue.
Eug,
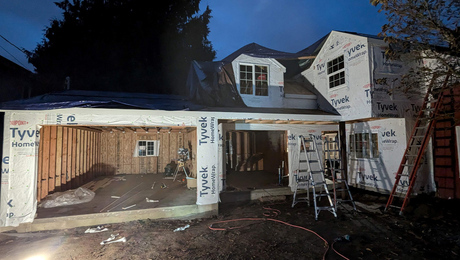
Here are some pics of My house that I sided last winter. Hopefully they will give you some ideas. 5-1/4" Hardie Plank (4" exposure)
http://forums.prospero.com/tp-breaktime/messages/?msg=58122.1
Chris
Whatever you do, make sure you know where the studs are when your ready for siding, you need to nail the hardie into the studs.