Help !
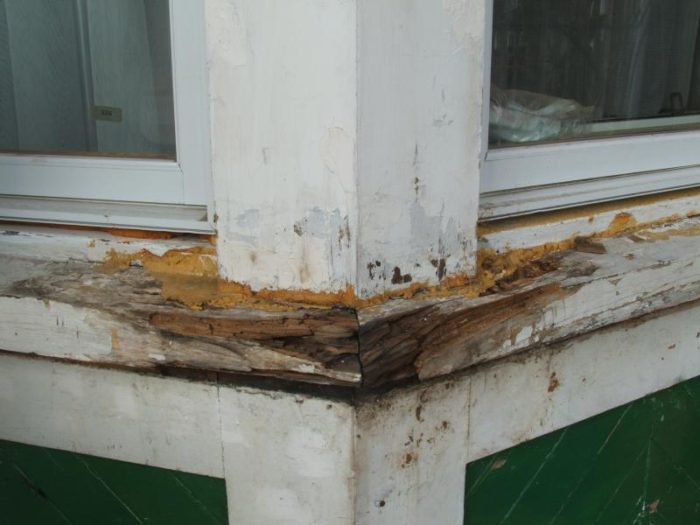
I’m Restoring an 1890 home in Ontario, and upon peeling the ugly aluminum siding someone put on in the 60s (?) discovered some beautiful workmanship underneath, but also this rotten section of sill in a bay window.
Having replaced the windows previously, and having completed a lot of work on the inside, however ideal, replacing both of these pieces of the sill is simply not an option. So I need to restore / repair it.
The wood is a single large piece of pine – very clear – and the rest of it is very clear. The previous porch roof drained here in some weather, and I think caused the issue when the water got behind the aluminum. I have since extended the porch roof to extend the entire width of the home and provide ample overhang, so the amount of water this will sustain going forward is substantially minimized. I am restoring the rest of the bay as well as the matching one and will be sanding / filling / painting in the spring, but right now need to manage this before it gets worse.
The wood on either side is sound.
I was thinking of building a cast underneath and across the front (lined with 6 mil plastic) , removing the rot and then drilling some holes into the good wood, and then filling the entire thing with multiple lifts of West system epoxy and fairing compound, removing the cast and sanding to match.
But I’m willing to wager a lot of folks here will have better ideas and I’d really appreciate hearing them.
Anyone ?
Many thanks,
Gavin
Gavin Pitchford
“Sail fast – live slow” (build even slower)


Replies
You can either cut it out and install dutchmen or do the epoxy buildup. I'd do the former, but most here seem to prefer the latter. In either case it would appear to be a reasonably straight-forward fix, just a bit tedious.
Edited 11/14/2009 2:04 pm by DanH
I vote for cutting out and replacing the sill also.
Guys I appreciate the cut it out thought - It was certainly my first thought but the sill extends well under the window itself, and any patch job I attempted would be incredibly rough as I would have to cut the sides and then do 0 clearance against the window - turning the corner - keeping the wood cut all on the same plane I think is beyond my skill. Without destroying the window, and the interior, as best I can tell this was initially a 4x6 cut in an "L" shape to allow the window to fit in. My guess the window was early 30s (certainly post 1890) but all the wood dimensions are almost timber like in proportion.If there was a way to remove a couple of pieces from the front i would do that but impossible - or at east not in any way I could then craft the 2 replacement pieces. The rot does not extend under the window itself, so appears to be non structural.Any other thoughts on alternatives to west system epoxy ? Also: "Dutchmen" ?? Thanks again ! (and for resizing the pic - thank you!) g
Gavin Pitchford
"Sail fast - live slow" (build even slower)
If not structural, dig it out as best you can and thoroughly dry it out. Hit what is left with wood hardener (Minwax brand works well for me). Fill much, but not all, of the resulting voids with blocks of wood to minimize the amount of epoxy/filler necessary to fill the openings. Pack remaining voids and skim coat with bondo or any one of half a dozen epoxy produts. Sand flush, prime and paint.Over the years, I've done dozens of similar "rot jobs" this way (MOL). Most jobs are done to buy a few more years of service until the owners can afford to replace windows/doors or whatever. I try to check on them whenever I can and am not aware of any failures Every job is different, but basically they're all the same.Anything that is structural, or true "restoration" work may require a bit more thought.
"Wood Hardener" I take it is a preservative of some sort - not a filler?Thanks for the idea of filling some of it with solid wood - should make life easier.gGavin Pitchford
"Sail fast - live slow" (build even slower)
Wood hardener is like thinned laquer, or thin epoxy. Some "systems" refer to it as a "wood consolidator". I mostly use Minwax brand straight out of the can. For other brands, I think the wood consolidator may be a two part mix.It's not a preservative, but rather a liquid that penetrates and hardens the wood that you leave behind (after you scrape out the really punky stuff). When the adjacent wood is properly "hardened", the epoxy or bondo had a better chance to adhere and do its job over time. It also helps to properly shape the cavity (slightly wider at the back of the hole) for a good mechanical bond.
A "dutchman" is a piece of wood that is used to replace, eg, a rotten section of a larger piece of wood. If I were repairing it I'd probably cut away the exposed wood from the corner to about 2" beyond the edge of the window on each side and fashion dutchmen to fit. Dig out any rot behind what was cut away and use West or whatever to repair that, then fasten the dutchmen in place.
A strong nation, like a strong person, can afford to be gentle, firm, thoughtful, and restrained. It can afford to extend a helping hand to others. It's a weak nation, like a weak person, that must behave with bluster and boasting and rashness and other signs of insecurity. --Jimmy Carter
I looked at the photo carefully and I would use:http://advancedrepairtechnology.com/architectural_epoxy/architectural_epoxy.htm
Watch the testimonial video on the site.
View Image
Today Flex-Tec HV and Prim-A-Trate are the new standard for wood repair and restoration. Used together with proper surface preparation, Flex-Tec HV and Prim-A-Trate offer a flexible long-term solution to retain the original old-growth lumber in America’s historic buildings. Now used exclusively by America’s finest restoration and repair contractors as well as historic museums like Colonial Williamsburg and The Adirondack Museum. New York State Parks, The National Park Service, Maryland and California Parks all use ART.
View Image View Image View Image
This is a perfect application for this system, particularly since the finished application will have the same exposure. Don't bother with the helical mixing tubes - gun it out onto a piece of plexiglas and mix.
Abatron does not hold up under these circumstances and we gave up even considering it years ago.
Jeff
Edited 11/15/2009 9:14 am ET by Jeff_Clarke
I can't open your photo; it's 2 meg and I'm on dialup at 26kbps. If you could shrink it down to 50kb, I'll take a look.
However, from what you say, the best solution would be to cut out the rotted area and splice in a new piece of stock. Use polyurethane glue.
Failing that, grind/chisel out all the rot, and pack the void with Abatron's Woodepox epoxy wood filler putty. It is specifically designed for this type of application.
Dinosaur
How now, Mighty Sauron, that thou art not brought
low by this? For thine evil pales before that which
foolish men call Justice....
Resized
sorry sent to the wrong poster.
this is a perfect job for the harbor freight mm [40.00]. use the blade to cut out all the rot, get a new board and start fitting it in. when you r done ,it's done right.
or just dig it out,run some screws into it for bondo to grab and start filling and grinding.paint it and no one will know for 10 yrs.
the older i get ,
the more people tick me off
Edited 11/14/2009 9:17 pm by alwaysoverbudget
Thanks.
View Image
Yuck. That is a mess. I'd probably cut the whole damned thing out and build a new one, but failing that, the Abatron putty is the way to go.
Betcha there's rot in that vertical piece, too.
Dinosaur
How now, Mighty Sauron, that thou art not broughtlow by this? For thine evil pales before that whichfoolish men call Justice....
I have used this stuff for years with good success.
http://www.abatron.com/cms/buildingandrestorationproducts/woodrestorationmaintenance/woodrestorationkit.html
I've heard good things about this product. In fact, I have wanted to try some to see if it is really worth 10x the cost of Bondo.
Bondo is not made specifically for wood, Abatron is.
I have used Abatron liquid epoxy in similar situations numerous times. It works. Based on your situation where the rot appears not to be through the entire depth of the sill, I think it will work for you. Follow the directions carefully. Be sure to treat all of the punky areas. Follow up with the two part epoxy wood filler to bring the sill back to its original form. While it is expensive, it is a permanent repair and a lot simpler than a dutchman or replacing the entire sill. The only issue I have with the Abatron system is that it does not cure very well in cool or cold temperatures. I think it has to be at least 70 degrees to fully cure. You can check their information on line. I have also used the Minwax hardner and I don't think it works as well.
In one situation where I was trying to get some resorcinol glue to set outdoors in coolish weather I ended up tenting the area with plastic and putting a milkhouse heater (sort of industrial electric space heater) under the tent. Check the temp every so often to make sure it doesn't get too warm.Worked like a champ in my situation.
A strong nation, like a strong person, can afford to be gentle, firm, thoughtful, and restrained. It can afford to extend a helping hand to others. It's a weak nation, like a weak person, that must behave with bluster and boasting and rashness and other signs of insecurity. --Jimmy Carter
Thanks for the sugggestions - this has been great guys. Been watching and researching in the background.Two points to clarify: There is no rot detectable in the upright - I have tapped al the way down, particularly at the bottom and it sounds fine. Will drill from one side where trim will cover the hole, just to confirm, but it certainly doesn't appear to have any. The whole thing was wrapped in aluminum for 40 years (as well as the green herringbone patterned wood you can see below) and this apprears to be the only point of failure. The rot in the horizontal pieces seems to be exclusively outside the plane of the upright although once I start digging, it may undercut the smallest amount if I get aggressive. Which raises the question of how aggressive do I want to get? Do I keep going until I get hard solid original timber?Second: The exposure going forward is subtantially reduced - whereas this area previously got a direct hit from rain / snow etc. plus some drainage off the old porch roof above, at this point it will only be exposed to precip that has been blown under the new porch at a ~30-45 degree angle. So certainly some, but maybe 10% of what it saw before, and virtually no direct sun to break the paint / filler down as the new porch roof extends far enough out it might only see direct sun at noon, from Thanksgiving to Presidents Day, if at all.The idea of the heater and tenting much appreciated as well.Thanks very much.
g
Gavin Pitchford
"Sail fast - live slow" (build even slower)
The glory of Abatron (and similar two part liquid epoxies) is that you don't remove the punky wood and don't have to worry about how far to go. Drill holes (quarter inch or so, about a 3/4 inches on center in the punky stuff and continue into the good wood for a few inches. The liquid epoxy will travel through all of the punky wood and make it as hard as a rock. Keep adding the liquid until there is no more absorption. If the wood is solid, it will fill the holes and there will not be much absorption. The tenting idea is a good one if you work in cold weather. If you go ahead with this idea, get some of the thinner made by the manufacturer. If the liquid epoxy is too thick it may not penetrate all of the soft areas. Add a small amount of thinner to make it flow better. But, follow the manufacturers instructions.
Definately Abitron products or ART, (see Jeff Clark's post) I've used both and they are fairly equal in my book. I would stay away from Bondo for any kind of deep exterior applications, it wasn't formulated for that and it doesn't have a penetrant rot-consolidator and over time will separate.
Repeat: Abatron does not hold up in full-exposure examples such as the one illustrated. It's not a comparable product to FlexTec.
However, do whatever you like ;o)
My experience with the Abatron has been in the direct exposure and it has held fine so far without any separation or break down for the last three years.
That being said, I like the other (FlexTec) better because of the workability and it sands out easier. But...
You don't get as much product for your money with it and it's not cheap.