Hello,
I am new to this forum.
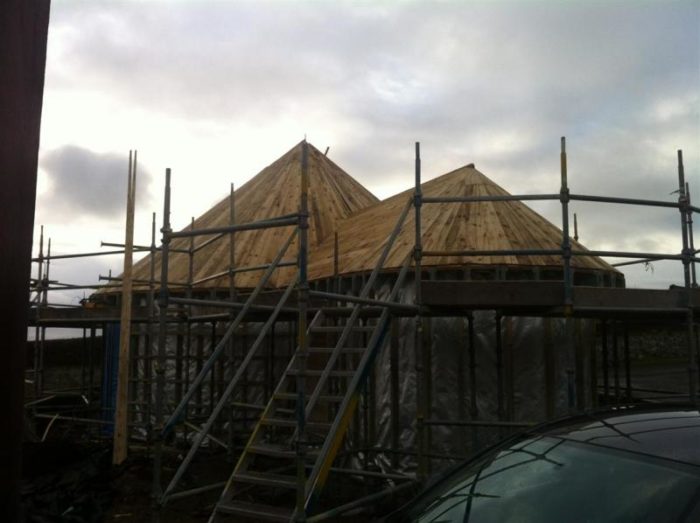
We are currently building a new office for our small architectural practice, in the form of a round house with conical roof.
Dare I say it, drawing it was one thing, building it is another.
This is a self designed and self build project, being done in my own spare time by my own bare hand with the help of a few friends.
I hope you like it and I will do my best to post regular updates.
Currently, I am fitting 22mm thick treated timber sarking boards over the roof structure, ready for slating with second hand Welsh slate, which should be fun.


Replies
...treated timber sarking boards...
That is a new swear word I've never heard before... "Hey, get of your sarking arse and hand me those sarking boards!"
Good luck, be sure and post pick os how you fit everything together!
Roundhouse
Hello Paul,
"Sarking" is quite possibly a Scottish Term.
We use natural timber boards (Sarking) which is 22mm thick by 150mm wide. The boards are pre-treated with a preservative to prevent rot.
This is a traditional method of fixing natural slates to a pitched roof and there is always a felt or roofing membrane between the slates and timber to help run any moisture off the roof and into a gutter.
I have posted more photo's showing the work as we progressed
Thanks for your interest.
Round
How about some photo's of what you've done already?
thanks.
Roundhouse
Hi Calvin,
I have posted some photo's of teh work in progress.
Hopefully you will be able to see these.
Thanks for your interest.
Norman
Norm
I noticed no sill sealer between the bottom plate and the foundation.
Is the bottom plate a treated plywood?
Where is this construction?
Roundhouse
Hi Calvin,
There is a Damp Proof Course under the plywood, done with bituminous felt. In addition to that, the damp proof membrane which is under the concrete slab, is dressed up the inside of the base course and lapped under the plywood. The walls are also clad with thin plywood (3 layers 6mm) with staggered joints and again I have taken a bituminous felt down the outer face and lapped across the top of the base course, which has yet to be finished off with a sand stone permiter so keeping all moisture out from all sides.
The walls will be finished with vertical larch boards in a board over board fashion which will come down over the face of the sand stone slightly, to form a water run-off into a stone chip margin round the base. The stone chip margin having underground drianage to divert any surface water away from the building.
I think the photo you are looking at was when I was laying out the plywood as a template, before dpc was then fittted as I used the bottom plywwod template (4 layers of 12mm plywood glued and screwed together with staggered joints) as a template to form the wall kit head ring binder, giving me hopefully a round roof. time will tell if I got that right when it comes to fitting the gutter !
Norm
Could you show the rafter connections in the round structure and also what you did with the rectangular wing?
Thanks for the photo's and explanations.
Again, where is this being built?
Hi Mate
I dunno quite how you managed to post and upload, I tried with the pics I sent you of developed roof and can see none of my posts
Stu
Roundhouse
Hi Stuart,
I am not sure, It worked ok for me using jpeg format files, have to load one at a time, but easy enough.
Maybe check your file type and size of files, I reduced the size of my photo's to take up less memory space and they have loaded okay.
Good luck
Norman
cad roof developement
Anyone need coned and ply sections devleoped. will it for free
cad roof developement
Anyone need coned and ply sections devleoped. will it for free
I have no idea how these pics turn out thisaway
can email if needed