Sealoflex install, and tips and tricks
Thanks to someone on this board, I have done both my garage roof and just finished the back 1/3 of my house roof with Sealoflex (probably about 500 sq ft of roof), and I’d like to relay my experiences, tips and tricks with it, and get others tips and tricks as well.
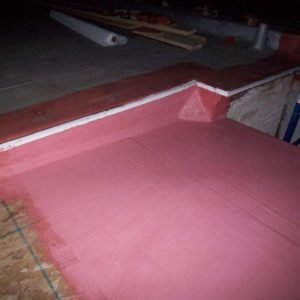
For those of you who’ve not seen this stuff before, it’s a three part roofing system consisting of base (pink) and top coat (white) liquids and a reinforcing fabric. http://www.sealoflex.com
First, I’ve only used the acrylic product, not the rubber CT variety. Next, they’ve changed their product lines recently (or sometime since 11/06 when I did my garage), so if you’ve used it before, I’d recommend looking at their website again. They now have multiple types of fabric, and the main ‘deck fabric’ as they call it, can be applied with a single coat of pink, instead of having to sandwich the fabric between coats. I can’t remember if I had tried to do this before with the old fabric, but with the new fabric it works great and is definitely an improvement.
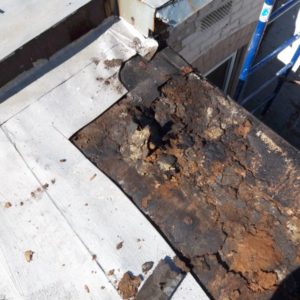
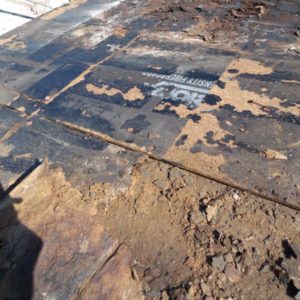
What started off as a simple gutter repair/replacement, ended up becoming a complete roof tear off and six days of my time. The roof was a torch applied product over the old seamed tin roof. They used Celotex to fill the valleys between the seams, then placed another layer over it, before putting down the torch app. This might have been okay if they’d 1) flashed anything correctly 2) hit rafters with the roofing nails and 3) actually gave a damn about the job. “Flashing? We don’t need no stinkin’ flashing!” The roof was hammocking and had nail heads popping through in at least a dozen places
The roof had been leaking for some time, but it wasn’t bad, and I was hoping to make it through the winter and replace it in the spring. Unfortunately the torrential rains we got a couple of weeks ago clearly demonstrated that the roof wasn’t going to survive. When I looked at the gutters, they weren’t mounted correctly, and were barely hanging on to the side of the building. The rafter tails were totally rotten and definitely were not going to survive me putting new gutters on it. So I decided to bit the bullet and hope that I had enough time to replace the roof. Underneath the torch app I found a complete mess. The roof had clearly been leaking for awhile as 90% of the roofing nails were rusted, and the Celotex had completely degraded into a mush.
Anyhow, after stripping off both roofs, cutting a ton of tin and flashing off, replacing a rafter, and resheathing, I was ready to Sealoflex the sucker.
I’ve found the following tools to work really well with Sealoflex:
*wallpaper brush – wide and holds the pink well, as well as work the pink into the fabric
*plaster mixer – the pink is so heavy and thick that it clogs up the small squirrel cage type mixer, and those type are impossible to clean. This one is metal with two metal wings, and works much better with the pink
*bucket with water – the pink sets up fast enough that I clean my tools as soon as I’m done using them, or else by the time I’m finished setting up the next layer of fabric, it’s started to turn the brush into a solid block of rubber.
Tips and Tricks:
*If you can, leave the fabric on the roll and roll it ahead of you as you work. It’s far easier to keep wrinkles out of the fabric this way.
*Trim after it’s dried, sometimes it’s better to cut the fabric long, coat it, then trim it once it’s dried. I think it’s easier to cut the fabric after it’s dried
*Watch for boogers. The pink skins up quick, and if you open your bucket of pink and see that it’s got a skin on it, DO NOT mix the skin into the bucket. Pick as much of it off as possible before you mix as those will cause you grief once you start coating the fabric. Also, try to minimize the amount of pink left on the insides of your bucket after mixing or pouring, as this will boogerize in the bucket and you’ll have a hard time not mixing it into the good stuff.
*Work on the straight parts first. If you’re running a piece along the roof then up and over a parapet, start first by coating the portion of the fabric on the roof, then work your way up and over the parapet. If you don’t, you’ll find that the fabric will get skewed and wrinkled if you try to coat you way down the roof/parapet in sections.
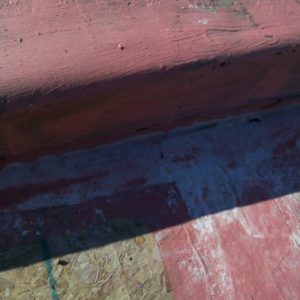
*Prime all metal or other roofing with pink. This works best if you let it dry before you attempt to coat it again. I had a hell of a time getting the fabric to adhere to metal drip edge on my garage, the fabric would just curl away, but this time on my house, I primed the drip edge with pink, and I had no adhesion problems at all.
*Temporarily pin the fabric in place with pushpins, so it doesn’t blow around, or get out of whack as you’re coat it.
*Don’t don’t don’t don’t touch it or step on it or try to fix it while it is drying. It skins up first, and if you touch it, you pull off that skin and make boogers and possibly pull the fabric off the substrate.
*Don’t forgot to account for all the flashing over any joints that you need to do before coating the entire surface when you order your materials. For example, the roof I just did was ~170sqft, and I used up ~7 gals of pink (they say 40sqft/gal coverage), and about 2/3 of a 5’x100′ roll of fabric because of the all the joints and flashing I did before I actually coated the roof.
Pros:
*easy to do, requires nothing more than a paint brush
*flashing is easy to do
*fully bonded to the substrate
*thin, flexible fabric allows an arbitrary number of laps without a significant height build up. Allows you to seal complex shapes, angles and areas without a problem.
*repairs are easy
Cons:
*the fabric will drive you crazy if you’ve got any funky surfaces. It’s made to stretch in all directions which allows it wrinkle in the oddest places
*The fabric is also super lightweight, making it something of a handful if it’s windy out. This isn’t a huge problem if you can keep it on the roll while you work, but if you had to cut a piece, it helps to tack it in place.
*If you’ve hairy arms, the pink is pain to get off your arms, as you will forget that it’s wet and you lean on your arm into it.
*Labor intensive.
*Thin, so it shows off any aberrations in the substrate and since it has no body, you have to do good surface preparation. Not really an issue in my case, but it might bother some.
*The acrylic Sealoflex is extremely sensitive to rain. Don’t let it get wet before it has cured!
*expensive (???) My local distributor sells 5 gal buckets for ~$125 (200 sqft coverage) and 5’x100′ rolls of cloth for ~$75. I guess this is relative…
Some pictures of the fanastic 6-year old roof! 🙂
http://forums.taunton.com/n/mb/at.asp?webtag=tp-breaktime&guid=2872DA5E-3934-4954-83FF-E367243C3C82&frames=no
http://forums.taunton.com/n/mb/at.asp?webtag=tp-breaktime&guid=B4966DBC-C9D4-4555-8DE3-2AFF00FEA06A&frames=no
What happens if it rains before the Pink cures:
http://forums.taunton.com/n/mb/at.asp?webtag=tp-breaktime&guid=947AEF04-5C57-44F0-B608-A9004667E964&frames=no
Integrated flashing:
http://forums.taunton.com/n/mb/at.asp?webtag=tp-breaktime&guid=B3107485-5391-4D87-9514-06DA48BF42E1&frames=no
What are others experiences with Sealoflex?
Z


Replies
Looks like it would have been a good place to plant some tomatos untill you messed it up with that pink stuff.;-)
Hooray for Seal-O-Flex! I finally get a convert!
Seriously, I'm glad you like it - it's been a great product for me.
Forrest