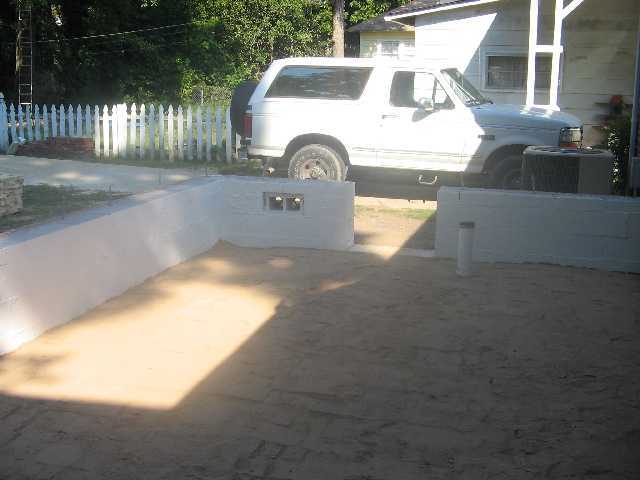
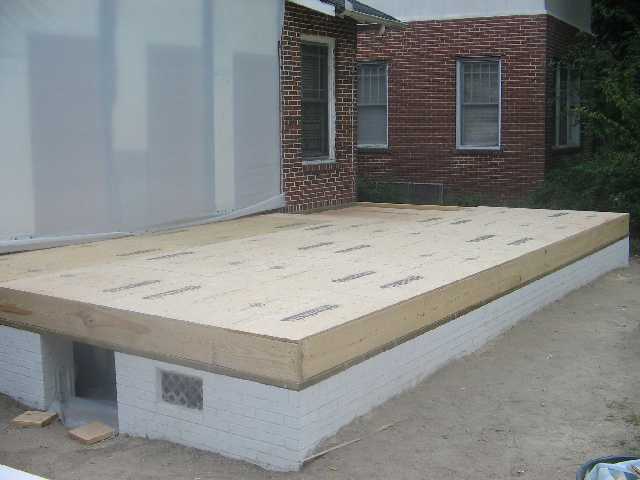
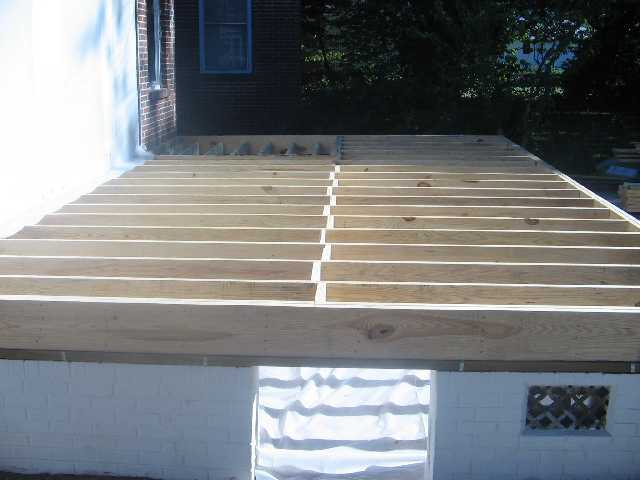
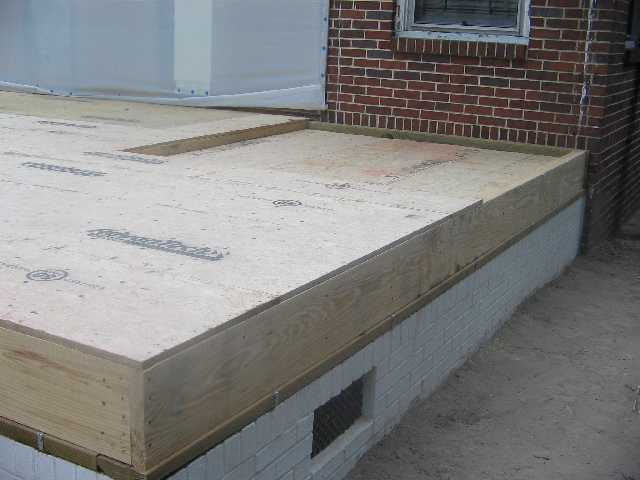
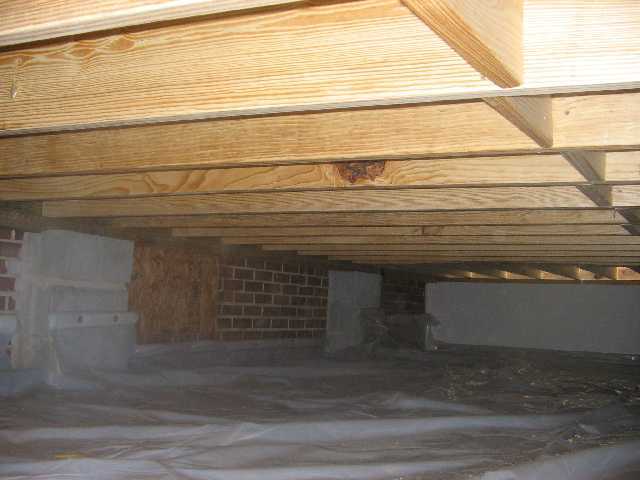
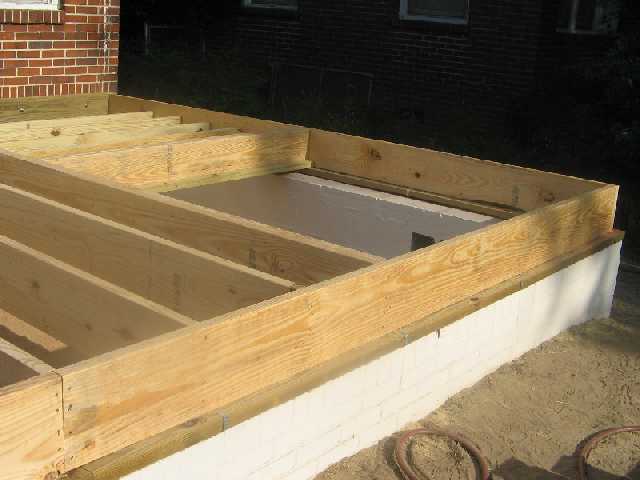
Finaly started framing a 13’8″ x 24′ on the back of my house. master bath/closet addition on Thursday. It is over a crawl space, about 30″ clear. Friday another carpenter and I framed the joists. Yesterday we put six mill plastic on the compacted sand and ran the decking. 3/4″ Advantec
Crawl space. Two coats of Dry-Lok. 4 yards of compacted ‘Brown # 1″
6 mill on the crawl after framing joists
The top left area is the curbless walk-in shower
We used polyeuratane adhesive on the 3/4″ Advantech.
live, work, build, …better with wood
Edited 10/8/2006 3:18 pm ET by stevent1
Edited 11/3/2006 9:55 pm ET by stevent1
Edited 11/3/2006 9:59 pm ET by stevent1
Edited 2/3/2007 7:27 pm ET by stevent1


Replies
Looks good.
One question. Why are the perimeters doubled?
Is it me or is that a large setback for the rim on the sill plates? Maybe it's for a certain siding?
Headstrong, I'll take on anyone!
>>Is it me or is that a large setback for the rim on the sill plates? Maybe it's for a certain siding?<<No it's not a setback. He used a double rim joist all the way around.Look at the FRAMINMG picture he has and you'll see the double rims.I asked him why he did that. I'm just curious. I use double rim joists over all window openings but that it.Joe Carola
>> I use double rim joists over all window openings but that it. <<
Does that mean you don't put headers over first floor windows? It would be redundant wouldn't it?
Re the joist hanger thing, I guess he is using ledger strips. They are still allowed here, but not as much as they used to be. Personally, I don't see ledger strips as inferior construction just so it is done properly.
Any of the remodelers around here seen floor system failures due to ledger strips?
Regarding the double rim joist, I see it every once in a while around here. On the end parallel to the regular joists it gives you something more to nail your walls down to. Causes little problems for trades if they want to run a wire or pipe down through the sole plate into the crawl though.
>> Does that mean you don't put headers over first floor windows? It would be redundant wouldn't it? <<Matt,I'm talking about doubling up the rim just over window openings in the foundation.What are you talking about? Did you think that I meant I install double rim joist for headers on the first floor instead of putting headers over the openings?Why would I do something like that unless I had to because of a tall window with a circle top or transom and a header wouldn't fit under the plates?>> Any of the remodelers around here seen floor system failures due to ledger strips? <<I've installed 2x4 ledgers many times on houses and never seen a problem but never a 1-1/2"x2" before like he did.>> Regarding the double rim joist, I see it every once in a while around here. On the end parallel to the regular joists it gives you something more to nail your walls down to. <<I never see it even if you use 2x6 walls. You just don't need it. There's no need for doubling up rim joist unless there's a reason. Just for extra nailing or over building is no reason.
Joe Carola
I thought you ment doubling the rim on a second floor floor system above the first floor windows...
I have used that technique if the HO said they might want to add a window later.
Anyway, we too have to double the 1st flr rim above the vents and CS door unless these have steel lintles and a row of masonry above them.
The way he lets the mudsills protrude so that they are flush with the masonry is different too. We always let the sheathing come down over the mudsill.
Matt,The mudsill to the masonry edge is so the OSB has no contact with the masonry. The sheathing sits on top of the mud sill and is easier for me.The addition will be hardie smooth plank, we will start with 1 X 12 hardies that will extend below the mudsill 1/2".When run the sheathing on a slab we hold it up 1/2" and use a sealant to prevent wicking.Chuck Slive, work, build, ...better with wood
Joe,The best scenario would have been the joists resting on a girder. That would have coverd the access for the ductwork, gas line and water lines.Chuck Slive, work, build, ...better with wood
Matt,"Regarding the double rim joist, I see it every once in a while around here. On the end parallel to the regular joists it gives you something more to nail your walls down to. Causes little problems for trades if they want to run a wire or pipe down through the sole plate into the crawl though."You are right about the double rim causing difficulty for the mechanical trades. These are 2 X 6 walls so that will leave
2 1/2" inches to drill.If it was 2 X 4 walls a single rim would be used.Chuck Slive, work, build, ...better with wood
>>If it was 2 X 4 walls a single rim would be used.
2x4, 2x6 or 2x8 for that matter makes no difference. the same amount of weight is carried thru the stud and bearing on the rim joist. not that I want to nit-pic, better to over build than under build
I have been a millwork contracor for 30 years. Got my start in residential framing. Mostly inststutional and commercial millwork. Had a stretch of 8 years with one hospital with no punch list.Matt and Framer have valid points about mechanical contractor needing to drill throgh rim plates. I would never put water lines in an exterior wall but some times it happens. Building over a crawl space good subs drop every thing from the ceiling in most cases.Chuck Slive, work, build, ...better with wood
Edited 10/23/2006 9:55 pm ET by stevent1
Jemcon
Small world.My Dad's family is from Beverly.
The Set back is 7/16" for the continuous OSB sheathing. We live in termite country An Historic district in Columbus GA and had to go through a BHAR to get our building permit. BHAR initially wanted us to use diagonal 1 X 6 sheathing, to match original construction. Had to convince the Blue hairs. Our plans prevailed.
The setback on the mudsill is for the OSB ( continuous sheathing) to have no contact with masonry.
View Image
Chuck S
Live, work, build,...Better with wood
Edited 11/3/2006 10:02 pm ET by stevent1
Framer, Going with 2 x 6 exterior walls. Being in West Central GA we have AC issues. If i was doing this from VA North I would do a 'Moony Wall' like Mike Smith did in "Adverse Conditions"The double rim joist is the way I learned 30 years ago.Heck, I still use a Lufkin X46 Flive, work, build, ...better with wood
Edited 10/9/2006 7:25 am ET by stevent1
>>Going with 2 x 6 exterior walls. The double rim joist is the way I learned 30 years ago.<<Never seen that before. I thought you were doing it for some structural reasons. You can do it with single rim joist. What is the reason for double?What if you had a second story addition and used 2x4 walls, what would you do for rim joists? What did you do when you framed on top of 2x4 30 years ago?I'm just curious and don't want to take away from your thread, it's just that I've never seen double rim joists before and wonder what the reason for it is.Joe Carola
Joe, You are correct. CABO 1 & 2 sez a single is OK.
I'm kinda' into over build. Especially for my owm houise. Extra 40 bucks.Chuck Slive, work, build, ...better with wood
Hooray for realtime / story posts!
Keep 'em coming.
Forrest
Forrest,
My DW finally acquiesced to let me download 'Infranview'on her laptop. I have a G4 Mac OS X. and I can not submit resized pics. (Its a Gates / Jobs thing) I would like to post pics like you and Mike Smith dioin the body of the text. I go to preview. Open jbegs, Copy, try to paste. I must have missed something from a previous link that I can not find
How 'bout that clear SYP. Ordered 2 & better. Must be a Georgia thing.
View Image
Shower
View Image
Sorry for the double pics.
live, work, build, ...better with wood
Edited 10/8/2006 10:08 pm ET by stevent1
Edited 10/8/2006 11:54 pm ET by stevent1
Edited 11/3/2006 9:35 pm ET by stevent1
Ah. after you hit "copy", hit "back", then scroll to the bottom and hit "revise" - THEN paste the pic wherever you want it. then go to "preview" again, open and copy the next pic, and so on.
I think you're misssing the "revise" step.
Forrest
Thanx Forrest.I'm still not doing something right.live, work, build, ...better with wood
Steven,I noticed that you don't have hangers on your joists that are nailed into the ledger and they're just sitting on a plate. What kind of hanger will you use? Will you cut the plate out and use regular hangers or will you use inside corner hangers?Joe Carola
Edited 10/9/2006 8:16 am ET by Framer
Joe,No hangers. The bond timber, 1 1/2" x 2", is nailed into the double 2 x 12 treated with 20D hot dipped galvanized nails. These were predrilled. i nail blow the joist.1 on either side about 3" or so and staggered to not split the wood.Chuck Slive, work, build, ...better with wood
>>No hangers. The bond timber, 1 1/2" x 2", is nailed into the double 2 x 12 treated with 20D hot dipped galvanized nails. These were predrilled. i nail blow the joist.1 on either side about 3" or so and staggered to not split the wood.<<Chuck,What's a "Bond Timber" 1-1/2" x 2"?Is it the single plate I was talking about nailed to the bottom of the double treated 2x12 ledger?If so, you can pass inspection with just the joists nailed into the ledger and sitting a that single plate without hangers?That would never pass inspection here without hangers.Years ago we were able to nail a 2x4 flat on a girder for a sunk in room and then sit the joists on top of the without hangers, but they stopped that.Joe Carola
Edited 10/9/2006 1:03 pm ET by Framer
Framed about 40 LF of 2 X 6 10' Walls today. Built the 24' wall on the deck and raised it in 2 sections, no headers, jacks or crips.
View Image
Double Top plate
View Image
Had to stick build a side wall that conects to the original structure because it goes in a 'pocket' that was cut into the original roof system.
View Image
Roof pocket
View Image
Existing roof should still be water tight. Got rid of a bunch of used jab saw blades.
Used 'Red Head' STD anchors for attaching PT deadwood studs to the masonry.
View Image
Additions to an existing homes or structures are additionally challenging because you don't know what you've got till you open it up. Ed, my bud the carpenter, and I would rather be doing new work, Ed frames, I do cabinets and millwork, but tearing into an old structure lets us know how craftsmen built things without all of the specialized tools we have today. Can't you just picture the days of saw pits? How 'bout cutting cripple jack rafters with a 8 pt hand saw?
Chuck S
live, work, build, ...better with wood
Edited 11/25/2006 12:54 pm ET by stevent1
Coming along.
View Image_______________________________________________________________
tagline free since 2006
Thanx Heck
I make my pics as small as possible, But cannot imbed them.live, work, build, ...better with wood
Your welcome. Must be the mac? Keep the photos coming._______________________________________________________________
tagline free since 2006
OK, you've had 12 hours, where's our next batch of pics?
jt8
"Most of the shadows of this life are caused by our standing in our own sunshine." -- Ralph Waldo Emerson
JohnWaiting on Harvey Lumber to replace 24 2X6 10' SPF. They promised AM delivery so who knows.Did you end up using the LVL's?Chuck Slive, work, build, ...better with wood
John,
Lumber redilevery did not get here until noon.Finished the exterior wall and openings.
Did you getView Image my email?
Chuck S
live, work, build, ...better with wood
Edited 11/25/2006 12:56 pm ET by stevent1
Yup, I got it. How'd those ramsets do with the block? Were your blocks filled or empty?
Framing looks good. What are you going to do with the roof?jt8
"All the knowledge I possess everyone else can acquire, but my heart is all my own." -- Goethe
6/12 hip to match the existing. Ed and i talked about a 6 into 7 to match the future pool house (pool house is built,pool is in future)
No big deal. Ed and i built a house (I was saw man) That had 19 different roof planes. 18 into 12. 14 to 10 etc 10 into 8 etc,Shot the ramset into bed joints. red shot 2 1/2" with washer. PIns HDG for PT.Are you still using the adjustable lally columns?Chuck Slive, work, build, ...better with woodEdited 10/10/2006 8:35 pm ET by stevent1
Edited 10/10/2006 8:35 pm ET by stevent1
Forrest,
Hijacked DW's laptop. Thanx for your help in posting pics.
Chuck S
View Imagelive, work, build, ...better with wood
Ed and i built a house (I was saw man) That had 19 different roof planes.
Wheew, better you than me. I'd rather not have a complicated roof.
Are you still using the adjustable lally columns?
They were about 1-1.5" too tall to use on the sub beams (if only I'd found them sooner I could have sunk the new pads deeper), so I'm making pillars (2 standard blocks with a solid 4" block on top). I DID use 4 of the baby lally's on the main beam though. Where they'd had flimsy jack posts in to cut the spans, I replaced the flimsy jackposts with those beefy baby lally (the receipt called 'em "solid jackposts") posts.
I tell ya, it is the little things in life that make me happy. After 10 months of renovation, the 2nd bedroom door now closes without grinding on the frame. Thanks to a baby lally that removed about 1/2" deflection in the beam below. Makes me feel warm and fuzzy all over.... especially since BR2 was one of the few doors that I'm keeping (from original).
Are you working on your addition full time, or just in the evenings/weekends?
jt8
"All the knowledge I possess everyone else can acquire, but my heart is all my own." -- Goethe
John,Ed, my bud the carp and I, decided to keep the roof matching the house, 6 / 12. The exposed rafter talls are lower in steeper part of a compound roof.How old is your house? Ours was built in 1920. We are the 3rd owners.<<Are you working on your addition full time, or just in the evenings/weekends?>>Working mostly afternoons and weekends, Never on Sunday. Check a couple projects I advise/consult on in the mornings,
Do some cuts. Ed gets here after work.Not bad for two 50 something guys.live, work, build, ...better with wood
Adressed 2 X 4 wall connecting to house. Had to cut the old rafter tails off.
View Image
View Image
Tails cut. Had to rework the double 6 mil poly. Ed loves that jab saw with a new embedded nail blade.
View Image
Johnt8's contol pic.
View Image
Ready for ceiling joists.
View Image
Ceiling joist layout.
View Image
Miller time.
View Image
I know this project is nothing like Adverse Conditions, Forrest, Riverman,The Slate Man, Stan Foster, The Gyrocopter Stair builder, etc. But I felt BT has a lot of lurkers that like to see how simple projects are done.
BTW Thanx for the coments and imput. Whats the deal with using neoprene around penetrations after felt on sheathing?
Chuck S.
live, work, build, ...better with wood
Edited 10/11/2006 10:01 pm ET by stevent1
Rain out Thursday.
Ceiling joists today.
View Image
Cut and primed rafter tails
View Image
Chuck S.live, work, build, ...better with wood
Got the ridge, king commons and hips set.
View Image
rafters on addition done.
View Image
Chuck S.live, work, build, ...better with wood
Wow what are the lenghts on those hips? It looks like a 2x8 hip with 2x6 rafters.
Butcha,
The over all lengths of the hip is just shy of 21'. Over hang run is 19". You are correct. 2X8 hip with 2X6 rafter.
Finished the false hip today. sheathed the right side. A lot of work getting the roof planes to match. Old roof system, built in 1921 (We are the third owners), was under built. Finished the right side 1X4 T&G SYP overhang and sheathing.
View Image
Ed and I are trying to beat the rain forecast for PM Monday and dry in the roof tie-in to the existing structure.
Chuck S
live, work, build, ...better with wood
Braced the hips and ridge.
View Image
Decked and felted right side to dry the roof in. Beat the rain by a few hours.
View Image
Chuck S
live, work, build, ...better with wood
Rainout tuesday. Framed tie in to left side existing roof Wednesday. Valley plate had to be string lined and shimmed, up to 1 3/8" in some spots. 30D HDG pre drilled did the trick.
The valley is in plane.
View Image
View Image
Today Ed and I finished the front of the addition.
1X4 primed T&G SYP
View Image
Ready for OSB
View Image
Deckcing complete. For JohnT8
View Image
Chuck S
live, work, build, ...better with wood
Edited 10/20/2006 7:36 am ET by stevent1
Edited 10/20/2006 7:45 am ET by stevent1
Sheathed the small addition Friday with 7/16 osb.
Left side.
View Image
Ordered shingles from Harvey Lumber at 8. Delivered 1 PM.
Try that from a big box.
View Image
Tight driveway.
View Image
For JohnT8
View Image
Chuck Slive, work, build, ...better with wood
Got a 'before' picture from that angle? Is there a decking and framing (the two floor pics) from that angle?
OK, its been a couple days, what's done now?jt8
"All the knowledge I possess everyone else can acquire, but my heart is all my own." -- Goethe
John,I have taken a pic from that same spot since OPWhere you been lately? The islands?Chuck S.live, work, build, ...better with wood
Man, looks like you got a deal on tarpaper!
Where you been lately? The islands?
I wish. Took last week off to work on the project house. Worked late most nights. Only got about 1/3 done of what I wanted to do. Temps got down to 25F last night. I ain't ready for cold yet. Don't have it sealed up well enough for the kerosene heaters to keep it very warm...which doesn't bother me, but a lot of that adhesive and misc likes to be over 50 or more.
jt8
"All the knowledge I possess everyone else can acquire, but my heart is all my own." -- Goethe
John,
No before pics from that spot. But here is a head on of the 1950's addition.
View Image
Side view.
View Image
The 1950's garage that was torn down for shop/pool house. Had to go to a hearing at BHAR to tear down a non-contributing stucture. (2004)
View Image
Arbor I built in 1998, sold to a landscaper designer in 2004.
View Image
Chuck S
live, work, build, ...better with wood
Edited 10/25/2006 9:25 pm ET by stevent1
Jesse and Red started the roof yesterday. Jesse's shingle lift makes it easy. With 10' between my house and the neighbors, a conveyor delivery is out of the question.
View Image
After layout and snapping lines, Red got right to it.
View Image
Jesse tore off all of the old roof and existing hip cap to the left of the new valley and placed the vally metal.
View Image
The right side 'planes' in with the existing roof. Ed and I spent many hours shimming the false hip to match the 80 year old existing roof. Most roofs of this era in the south were under built. No snow load, but not up to todays codes and specs. Jesse and Red finished up this morning. Hauled all debris and ran a magnet over entire site.
View Image
For JohnT8
View Image
Chuck S
live, work, build, ...better with wood
Rain-out Thursday and Friday. DW picked out tile. How can 300SF floor and wall tile (plus CBU, thin set, grout, etc.) cost as much as framing matls. for a 300SF addition felted in, less windows? Entry level tile to boot.
Set windows and started interior partitions on Saturday. We used polyeurathane adhesive caulk on the fins. That stuff is a mess.
View Image
We corner tack after level and plum then caulk the bottom fin.
View Image
Top and bottoms are nailed first.
View Image
Ed shims interior.
View Image
We hit every hole on the fins. Over kill? Maybe, but it insures a good seal to the felt.
View Image
For JohnT8.
View Image
Can any one explain the distorted reflections in these pics?
View Image
Disregard the extra icons below. They are just dupes of the resized pics.
Chuck S.live, work, build, ...better with wood
Lookin' good!
Forrest
How are you's going to flash the head of the window. With an overhang like that I doubt you would have any trouble.
I'll usually put a slit in the paper and shove the upper flange behind the felt.
BTW, look great. I love doing the little additions. Alot less stress and things move along quickly.
Heres the one I'm doing now. That last pic is (2) 5/8'' x 9'' x 18' flitch plates sandwiched by LVLS. Now that was a fun day! :)
View Image
View Image
View Image
View Image
Nice beam. I t looks like the addition is about 11' X 30 ' Is it a kitchen/greatroom? I aggree. Small additions are nice. The key is a good set of plans and few change orders.Is that a crawl space or basement? What size is the addition?Chuck Slive, work, build, ...better with wood
Started cutting exterior trim today. Slow process. Had to reconfigure DW's future pool house that was built as my shop. (We won't go there.)
View Image
View Image
Milled corners. 5/4 SYP C & Btr. tread, ripped to size.
View Image
Ran a saw curf on the false sills.
View Image
Exhaust fan had a workout.
View Image
Is it me, or does work on an existing structure take longer than new work?
Chuck Slive, work, build, ...better with wood
<or does work on an existing structure take longer than new work?>
YES! I always tell clients rework is slower and harder to bid.
Looking fine in there - kinda' woody
Forrest
< Kinda' woody >
Yes. 1 x 6 Cyprus. Cut, sanded, sealed, sealed edges and ends. Acclimated two weeks. Crown yet to be finished.
Cut and primed more exterior trim today. It takes longer to prep trim than install it. Took the clamps off the corners and spackled.
View Image
Sanded corners before priming. The SYP treads had a lot of planer 'chatter' that had to be belt sanded and then finish sanded with a random orbital.
View Image
20 year old crosscut sled. Starting cuts on the 1 X 12 Hardie. Dust masks are a must!
View Image
Chuck S live, work, build, ...better with wood
Started 1 X 12 Hardie Installation today. Started cuts yesterday using a crosscut sled.
View Image
2 1/2 Galv. screws on corners of Hardie. Adhesive caulk at joints.
View Image
This is the first time using PVC trim. The drip cap was the same price as FJ.
Started SYP trim. Had to run saw backwards to make this cut.
View Image
DO NOT TRY THIS AT HOME !
This was the cut for the false hip. All cuts were reprimed before installing.
View Image
False hip corner set.
View Image
Previous owner paid for a bad paint job.
View Image
Any suggestions for removing old paint from brick? "Goof Off" makes a bigger mess. Spent over an hour scraping/chipping old caulk.
Chuck S
live, work, build, ...better with wood
5 1/2 " corners were cut with skill saw, cleaned up with hand saw and jig saw.
View Image
Corners set.
View Image
Bisquits and Titebond II are used for all butt joints on window trim.
View Image
Cut false window horn from 2X clear heart redwood.
View Image
Trimmed window. The bisquits keep trim in plane and aligned.
View Image
Control pic.
View Image
Chuck Slive, work, build, ...better with wood
small siphon sand blaster thats loaded with black beauty
blasting compound. I used one a while back with a small
shop compressor to remove paint from a country club
patio --not for continuose use but good enough for 10 to
15 second bursts. I got all the stuff I needed from northern
hydralics for about $75.00. Safty glasses, full face sheild ,gloves
and resperator needed, use an easy hand on the brick and you
wont even know you had a paint stain there.
Thanx for the info dedubya. I can probably rent one and do some other problem areas around the house.
I worked with a guy from Big Stone Gap and his wife was from Dufield. That's further west than you. SW VA is some beautiful country.Chuck Slive, work, build, ...better with wood
Edited 11/4/2006 8:56 am ET by stevent1
Its a crawlspace. 12'6 x 29'5. We're reno'ing about 1/2 of the existing first floor.
Kitchen, Dining Room, Laundry room, Bedroom, and 3 peice bath. I drew the plans and had an eng. spec the steel.
Butcha,
Your framing looks good. That beam must have been a bear.
You asked earlier about the window head flashing. The over hang is about 18" finished. Started flashing this afternoon. The tacked, out of plumb trim on the right has been corrected.
View Image
I am glad I only have to flash 2 window openings. Used copper weather strip nails at the corners.
View Image
For JohnT8
View Image
Chuck Slive, work, build, ...better with wood
Didn't have a logo for you, so just used our host's logo. Hopefully they won't mind.
jt8
"Even if I knew that tomorrow the world would go to pieces, I would still plant my apple tree." -- Dr. Martin Luther King, Jr.
Nice job John.live, work, build, ...better with wood
Started cementicious siding Saturday. Caulked 5/4 trim and PVC drip cap on Friday before installing Hardie.
View Image
Shears are the only way to go and are mostly dust free.
View Image
Ends are primed before installing.
View Image
A nail is used as a second set of hands for solo installation.
View Image
A guage block is used for accurate spacing. A level check is done about every 3 courses.
View Image
This is about as much as can be done solo without ladders. The longest piece so far is about 103".
View Image
View Image
Chuck Slive, work, build, ...better with wood
Cut a bunch of F/C pieces and primed the ends. Made some returns out of the PVC drip cap. It works just like wood.
View Image
Cut and primed some wall plates.
View Image
That 14" miter saw is over 20 years old and is a rael work horse. 12 amps. The compound miters saws of today are much more versatile than this 75# beast.
Started spackling nail holes. Very tedious.
View Image
The HVAC contractor is starting today.
Is there any interest in interior pics?
Chuck S.live, work, build, ...better with wood
"Yes" to the interior pix.
Forrest - inside work on a shower today, but cutting Hardibacker outside in the rain - seems to keep the dust down!
OK, I've seen it in multiple pics, so now I'm curious... Is that a furnace fan with a licence plate on it in the crawlspace access door? Drying it out under there?
jt8
"Even if I knew that tomorrow the world would go to pieces, I would still plant my apple tree." -- Dr. Martin Luther King, Jr.
John,
You are the the first to spot or mention the fan motor. It is a from a 5 ton unit. We had a major rain last month before decking and after the 6 mill went in the crawl. Boss Hog and his farming family,(One of the best threads ever) would have called that rain a "a real turd floater" I use that squirrel cage fan a lot as an exterior fan working outside in the hot GA summers. Mostly keeps the bugs away. That's a 'Heart of Dixie' tag.
View Image
I also found a new control pic of the crawl if you want it. Did you get my e-mail. Your shockwave work is superior.
Chuck S
live, work, build, ...better with wood
That's a 'Heart of Dixie' tag.Thats a Alabama choctaw county tag.
BB,You are correct, Choctow County. You must have lived in Alabama to know the first numbers on the tag indicate the county.The tag was used to cut down on air intake. We are going to visit some friends in LA this weekend, Orange Beach.Chuck Slive, work, build, ...better with wood
looks great so far. one question: on the left side of the addition, u have a piece of vertical trim running the height of the addition, located about halfway between the window and the corner. is this just for aesthetics? or is there a function behind this? haven't worked with hardi before, so pardon me in advance if this is a newbie question. keep up the good work.
bullrider,
The vertical 5/4 trim is to break up the field of the cementicious siding. The trim eliminates butt joints in the Hardie. This addition faces a shop/pool(future) house I built in 2004. The rear wall is 36' and faces a small office building. That is why there are no windows, only an exhaust fan louvre.
View Image
View Image
I built the louvre with 7/16" slats ripped from clear heart redwood. The dimensions match four existing gable end louvres.
Side walls are 24'. I think the trim breaks up the monotomy of siding. F/C siding is 12' long. Most older siding homes in the south have trim features that are not done today.
View Image
My late Aunt lived in the Family home in Beverly NJ. Clappboard siding with stained glass transoms. Antebellum. Where abouts or what exit are you in "The Garden State?"
Chuck Slive, work, build, ...better with wood
i'm from woodbridge township...exit 131 off the good ol' garden state parkway, or exit 11 off the turnpike
Ran some F/C on the right side this afternoon.
View Image
DW has decided she wants a tankless HW heater. So much for good plans. I know there have been many threads on this subject, I did an "Advanced Search" (no luck) but I need advice. I remember seeing a thread last month about exterior units. I am thinking about an exterior unit that is flush mounted between the stud bays.
Chuck Slive, work, build, ...better with wood
Found it - my first install of a tankless
http://forums.taunton.com/tp-breaktime/messages?msg=70698.1
Forrest
Forrest,Thanx for the info / link.
Spent too much time on the web researching tankless HWH's today. Decided on Rinnai.
Met with my plumber yesterday and he said tankless (in our juristiction) cannot be set in bathroom,bedroom, or closet. The fear is lack of combustion air..I know the energy types are not following this thread, but as a tradesman I will appreciate any input.live, work, build, ...better with wood
Yeah, but did you see how mine breathed outside air?
Forrest
Forrest,I like the way you used that louvre to get cumbustion air. My plumber told me that you can put it in a sealed closet.I wanted to put it in the comode room with dirct vent and exhaust to the outside. The exterior unit I ordered will keep all of the pipes inside the walls.Those doors look good. Are they 13/4"?Chuck Slive, work, build, ...better with wood
Edited 11/10/2006 8:21 am ET by stevent1
tut, tut, all you southern folks who don't have to worry about frozen pipes.jt8
"Even if I knew that tomorrow the world would go to pieces, I would still plant my apple tree." -- Dr. Martin Luther King, Jr.
JT8,Sometimes we do. That is my concern for mounting the recessed tankless water heater on an outside wall. Chuck Slive, work, build, ...better with wood
Edited 11/30/2006 8:30 pm ET by stevent1
I can remember seeing old mobile homes that had the water heater access via a little door on the outside, but usually hereabouts if I have a choice I keep the plumbing out of the exterior walls. The occasional winter cold snap can get down well below zero and it aint' no fun waking up to a frozen water line. LOL, especially when you don't realize its frozen until someone flushes the toilet and the tank doesn't refill ;)
jt8
"Even if I knew that tomorrow the world would go to pieces, I would still plant my apple tree." -- Dr. Martin Luther King, Jr.
John,
ANY plumbing on an outside wall sacares me. Rinnai claims -30'F as long as no electrical or NG intruption. Started the millwork for the rough-in box.
View Image
Used ext. glue and galv. screws.
View Image
Chuck Slive, work, build, ...better with wood
Finished F/C siding on right side and front.
View Image
Nailed 3/8" spacers (not Jerry Garcia or Lowell George fans) to pad out for the facia or frieze board. The 2X4 blocks were installed before the roof sheathing 7/16 beyond the plate line.
View Image
Started on facia. All cuts were reprimed before installing.
View Image
I have a big problem with exposed rafters. Short of installing a screen and holding the Bed/Crown shy of the roof deck ventilation is not possible. Oh well. our house has been here for 80 + years and will probably last longer than me.live, work, build, ...better with wood
Rainout today,
Finished rough-in enclosure unit for the tankless HWH. Used bisquits and exterior glue for attatching the trim to the box extension. Used 2 1/2" screws not the 2" shown
View Image
I like auto body filler for the first coat of spackle on the rough-in box extension.. Some here at BT say it will fail. Been using it for 30 some years and no call backs.
View Image
The unit was clamped using exterior glue with 2 1/2 galvanized scews. (other pic shows 2")
View Image
After glue set the unit was unclamped and trimmed, spot puttied, and sanded. All parts were backprimed before assembly.
View Image
View Image
Wish I knew a good tinsmith to do the top of the HWH enclosure.
Chuck S
live, work, build, ...better with wood
This afternoon I was able to do more exterior millwork. We are under a tornado watch. Ripped some stiles and rails for the window plinths.
View Image
1/4" rabbets were cut 9/16" deep with an 8" stacked dado head. Tennons were cut with no adjustment to the fence. Height was adjusted to 1/2"
View Image
The second tennon cut the dado was reduced to 1/4"
View Image
The panels were done on 3 HP variable speed router. The end grain was cut first to avoid tearout.
View Image
The stiles and rails are dryfitted before assembly. This is a good time to confirm panel sizes.
View Image
View Image
Each panel is checked with the rebates
View Image
Glue up in the AM.
Chuck S
live, work, build, ...better with wood
Glued up the window plinths today. Also removed F/C siding for the HWH box. The rough in box fits in a stud bay. and is attached with 12, 1 1/4" pan head screws. Sure wish I had known about this when framing and the R.O. would have been centered.
View Image
Still looking for a solution to roof the HWH box.
View Image
Chuck S
live, work, build, ...better with wood
Edited 11/16/2006 8:31 pm ET by stevent1
Still looking for a solution to roof the HWBox.... How about Copper?
EDIT: Should have read further before posting. Nice work, all around.
Edited 11/19/2006 10:35 pm ET by estacado
E I was suprised that the copper was affordable. I was planning on shingles, DW said "tacky". I was also thinking aluminium coil stock. DW said "tacky" Priming and painting window plants today.Chuck Slive, work, build, ...better with wood
Finished installing 1X8 FJ RW frieze board today. Also instlled shop built window plinths. This panel is below the comode room window.
View Image
This panel is below the garden tub window. DW thought i was building another 5 panel door for the house.
View Image
Building these frame and panel window plinths is challenging and work intensive.
View Image
Chuck Slive, work, build, ...better with wood
ISP dumped last night and I could not finish posting.
I used clamp blocks when glueing up the panels with bar clamps. I am not a big fan of pipe clamps, they do have their place but sometimes they slip.
View Image
The bottom rail and center stile are glued with exterior glue first.
View Image
The stiles are not glued yet. The top panel is inserted.
View Image
The stiles and top rail are glued and clamped.
View Image
The panel edges are primed before assembly.
View Image
Winess marks aid in glueing and clamping
View Image
The larger panel is glued up in the same manner. The stiles are glued and clamped last using handscrews and pony clamps.
View Image
Chuck S
live, work, build, ...better with wood
The backs of the panels were primed before they were trimmed out.
View Image
The beaded panel trim was sized, numbered and backprimed before installing.
View Image
A caulk bed was applied before pinning on trim
View Image
Pin holes were spackled using a homemade putty knife.
View Image
Next I caulked in the trim.
View Image
Caulk is cleaned up with a damp sponge.
View Image
The panels are ready to be sanded, primed and painted.
View Image
I have found stretch tape keeps caulk air tight and ready for the next use. Much better than nails or wire nuts.
View Image
Chuck Slive, work, build, ...better with wood
The window plants were primed, sanded with 120 through 180 sterated paper then a 220 sponge. The panels were the painted with 100% acrylic semi.
View Image
I thought about using a Duration type product but I read in an archived thread that someone had a problem with mold and the OP claimed that S/W changed the formula about 5 years ago.
This is the panel detail.
View Image
Any thoughts? I have yet to buy my exterior paint and would like some input. Other threads claim Duration is the way to go.
Chuck Slive, work, build, ...better with wood
Mighty nice work. Thanks for posting. I'm learning a lot. Two questions, though.I think the frame and panel inserts are very attractive. However, it seems you're obviously counting on sealing the frame and panel inserts sufficiently to keep expansion/contraction of the panel, and water seepage in the panel stile joint from becoming an issue. That would seem risky in an outdoor environment. Have you had enough experience with those kind of features to know how they hold up through the years?I've noticed in some of the other fiber cememt siding oriented threads that some people think all ends should be primed & others think that priming is not needed. What is the issue with the siding that causes that discussion?
bd,
The panels are not glued or pinned so they 'float'. The stiles and rails are glued with type two exterior glue. I will keep them painted. Having closed a thirty year cabinet and millwork business in 2004, I have built exterior doors and windows. The windows were always cope and stick construction. When I build an exterior door I use 3 1/2" tennons and always use resorcinal type glue. Some of the doors and windows are over 25 years old.
I have followed those f/c threads as well. James Hardie's web site says prime the cut ends. We prime both ends and leave a 1/8" caulk joints The f/c siding will probably expand and contract differently. I think not priming the cut ends is cutting corners. A lot of subs working new construction bid jobs with a very tight margin.
Here is a pic of the shop/future pool house built in 2004 that has the same details.
View Image
Do you have any thoughts on Duration type paint or the exterior paints that you have had success with?
Chuck Slive, work, build, ...better with wood
Again, beautiful work. Thanks for the info. No, no experience here w/ the Duration type paint. I'm just a diy'er that has tried to avoid any experiences at all with exterior paints by using cedar or pressure treated woods. I hate painting. I have a couple of pinched nerves in my arms & painting irritates the heck out of them. That said, I'm in the process of finishing a 24 x 32 workshop/storage shed where I decided to use the Hardie siding because of costs.
You can't beat f/c siding for the price. Think about installing vertical 1 X or 5/4 trim to cut back on butt joints and eliminating having to stagger the joints. Hardie makes 1X trim. Long lengths of f/c has a bit of a learning curve but you will like the results.Your workshop/shed sounds like a nice project. Post some pics and fill out your your user info (at least what state) so readers can know where you are at.Chuck Slive, work, build, ...better with wood
Excellent work and thread. !!!!
If your area has a Porter Paint store ( like us in KY) they have what they call Permanizer. I purchased a gallon for my fascia and trim that is way high up. It supposedly has a lifetime warranty ( we'll see).
I did like it a lot, self priming as claimed, even tho I used it on preprimed WRC. Very good handling and coverage. Adhesion is strong and the gloss or lack of is consistant.
Brush, spray or roller about 400 sq ft a gallon. BUT..49.00 a gallon. YIKES.
Again, excellent work.
I like your copper cover but I would have used a CU drip edge and folded the cover and clenched it tight, and used SS or copper nails up high. And not for 26 bucks...LOL
Carry on, Happy TG.
Spheramid Enterprises Architectural Woodworks
I have irriatable Vowel syndrome.
Sphere,Would you have incororated the drip edge into the CU cover?
Fabricator let the front edge extend past the wood about 1/4" and he felt this would serve as a drip edge.I use a Porter store here in Columbus GA and I will check Permanizer out.How is the traction coming along? I hope it is improving your comfort level.Chuck Slive, work, build, ...better with wood
Heck, the neck is fine now except a bit of tenderness when I wake up. I only had teh traction device on and off for a day and a half..I heal quick. Good thing, too.
We nail on the DE seperately, lay the copper with a 3/4" overhang,, fold around the DE and hand tong it tite, no soldering and a nice 1'' or so overhang, and a fascia drip of an inch down.
I love working with Grant, we hit a job and find we need something custom, a beep on the nextel, and boom we have it. Usually the same or next day.
I am sure your cover is fine, we just pretty much stick with certain methods that we use frequently to avoid unforseen pitfalls.
Spheramid Enterprises Architectural Woodworks
I have irriatable Vowel syndrome.
Oh yeah, get the paperwork with the Permanizer, really it is a good product from what I gather.
Spheramid Enterprises Architectural Woodworks
I have irriatable Vowel syndrome.
Sphere,
Glad you are healed up. Thanx for the heads up on the paperworkChuck S.live, work, build, ...better with wood
You on vacation or something? We haven't seen an update in a while.
jt8
"Even if I knew that tomorrow the world would go to pieces, I would still plant my apple tree." -- Dr. Martin Luther King, Jr.
John,
Went to LA. Orange Beach. Back at it on Wednesday. Bunch of interior deadwood and finished exterior trim. Plummer and electrician to start next week.
Crown moulding
View Image
All trim was primed, back primed and end primed before installing.
View Image
Chuck S.
live, work, build, ...better with wood
I'll try that stretch tape idea!
That's a pretty slick enclosure.
Wish I knew a good tinsmith to do the top of the HWH enclosure.
seeyou does wonders with copper.
jt8
"Even if I knew that tomorrow the world would go to pieces, I would still plant my apple tree." -- Dr. Martin Luther King, Jr.
John,
The rough in box worked out ok.
View Image
Your right about 'seeyou'. Great copper work and website. I decided to go with a simple CU cover/flashing. It was secured with HDG roof tacks and polyeurathane mastic.
View Image
View Image
I went to the tinsmith this morning and placed my order (a deep sea drinking buddy, I mean deep sea fishing buddy) and picked it up at 2 PM. Jamie did a good job with great customer service. I was shocked by the cost of copper. If anyone can guess how much I paid for the copper work within 48 hours I will send a donation in that same amount to a charity of the first correct responders choice.
View Image
Finished F/C siding left side. Exterior trim up next.
View Image
Chuck S
live, work, build, ...better with wood
Edited 11/19/2006 8:25 pm ET by stevent1
$26
Jon Blakemore RappahannockINC.com Fredericksburg, VA
Jon, 3.75 SF of 20 ga copper soldered corners, burnished, plus labor?Chuck Slive, work, build, ...better with wood
$126
Bryan"Objects in mirror appear closer than they are."
Klakamp Construction, Findlay, Ohio
I was operating on a hunch that the labor is free. How many ounces is 20 ga.?
Jon Blakemore RappahannockINC.com Fredericksburg, VA
Jon,Not sure how many ounces. The cap was fabricated by a local sheetmetal shop.Chuck Slive, work, build, ...better with wood
Jon,
The copper was 24 OZ. (21 ga)
You Win! Only two responses. You were $0.75 off.
View Image
The reason I said I was shocked is copper has gone through the roof. Builders here have had plumbing ripped out in the middle of the night. One builder had the wiring stolen as well. Jamie had a scap and only charged me labor, about 20 minutes.
Let me know what charity you want the check sent to.
We have friends at Lake Anna N. Where are you?
Nice web site.
Chuck S
live, work, build, ...better with wood
Steve,We're about 30 minutes to the closest part of Lake Anna, probably not too far from your friends.I last bought copper in the summer of 2004, 16 oz. was $3.99/SF and I know it wasn't that bad then (compared to now).As far as the charity, just take your pick. I'm sure you will choose as well as I would.
Jon Blakemore RappahannockINC.com Fredericksburg, VA
Cor-A-Vent S-400 strip is what we use for venting bays when doing exposed tails. Google it and go to their section details.
Gene,Googled the S 400 by Cor A Vent. I could not find the section detail for exposed rafter tails. The issue I have is mud daubers and other types of wasps and bees. I may have gone to the wrong page.Your pantry and powder room job look great.Chuck Slive, work, build, ...better with wood
Forrest,
Picked up the rough-in box for the tankless HWH. It will project from the wall about 3 1/2". Working on a detail to deal with water runoff. I figure abot a 9' slope on the top of surround will work but what is the best way to flash it to the wall? I would appreciate some input for a solution.
The rough in Rinnai box will be in the right section of the left side.
View Image
Don't you love ripping out ?
Vera was a trip.
Chuck S
live, work, build, ...better with wood
View Image
Is that a 16 ga. finish nailer? I would be nervous about the heads pulling through the FC siding.
Jon Blakemore RappahannockINC.com Fredericksburg, VA
Jon,
You are correct. 16 ga galv. T nails. The depth was set just below flush. Face nailed 8-10" OC. Blind nailed to snapped stud lines. Continuous osb sheathing.
View Image
By pulling through do you mean wind lift? Expansion? Should I use SS ring shank 8s? What type of fastener do you suggest?
Chuck Slive, work, build, ...better with wood
Steve,I wouldn't expect problems from expansion or wind, it's just I have not seen those type of nails used before on FC siding. I have always used hot dipped siding nails, but that doesn't mean it's any better.I do like your vertical trim boards in the field, they add a nice touch.
Jon Blakemore RappahannockINC.com Fredericksburg, VA
HVAC was done yesterday. A 7 X 12 trunk line came up from the crawl space.
View Image
One of two 7" supply lines.
View Image
A 4" was run to the toilet room. Micky and his son did a great job and took about half a day. Mickey put a damper at the plenum so I can adjust airflow as necessary.
I started some more trim in the shop. Glud up a panel using bisquits and exterior glue.
View Image
Checking for flatness.
View Image
The laminate bench top makes for easy clean-up.
View Image
Chuck S.
live, work, build, ...better with wood
Edited 11/8/2006 9:18 pm ET by stevent1
Finnaly stopped raining. Installed some wall backers this afternoon. My grand neice siad they look like an old man in a hat.
View Image
Caulked the drip cap before siding.
View Image
Started cutting some more trim. Used a straight line ripping jig to take the wane out of boards. A jointer could also be used but may cause more waste.
View Image
The jig is a 10' piece of rock maple that was joined. It has a cleat screwd on the end.
View Image
Chuck Slive, work, build, ...better with wood
Finished all the blocking before the plumber and electrician started. I added a row of 2x6 centered at 36" AFF in the curbless shower in case grab bars are ever needed.
Shower bench.
View Image
The top of the bench is pitched 1/4" per foot.
View Image
The tub deck was framed using glue to attatch a layer 3/4" Advantech and a layer of 1/2" ply.
View Image
View Image
View Image
The medicine cab openings.
View Image
The comode cab opening.
View Image
The plumber will finish the gas line to the tankless heater next week.
Chuck Slive, work, build, ...better with wood
Lookin' good! Lookin' thorough.
Cut through the wall in my attic project before lunch. Client's kid think it's cool to have a new room with French doors opening up through a former blank wall.
Forrest - headed to the dump
Forrest,Can't wait to see your interior pics. You should post that leek recipe at Cook's Talk. I posted 'Christmas Eve Seafood Lasagna' and 'Salted Tuscan Bread' There is a link to 'Cook's Talk' at the top right of BTChuck S
live, work, build, ...better with wood
All inspections were done last week. Started this job Oct 5 '06 and got the bulding close-in Jan 5 '07. Three months. The plumber put me behind by one month.
Did some fire draft protection at the wall that connects to the house.
View Image
Here's the rough-in for the double vanity.
View Image
This is the blocking for the closet system in the 2 walk-in closets.
View Image
The can lights above the vanity.
View Image
The shower ceiling.
View Image
Does any one have any thoughts or recommendations for "rain" shower heads? Single or dual function. I am also looking for an 18" straight shower arm in ORB.
The two exhaust fans are connected to the ridge vent.
View Image
Here is the pump for the garden tub. There is also a 1500 watt in-line heater.
View Image
The tub is warped.
View Image
The supplier said "Caulk it". No way. The manufacturer was very helpful. A couple of e-mails with pics and a replacement tub will be made.
Try that at Low-Depot!
Insulation and sheetrock to start next week.
Chuck S.
live, work, build, ...better with wood
That light you are seeing is the light at the end of the tunnel!
;)
jt8
"Holding on to anger is like grasping a hot coal with the intent of throwing it at someone else; you are the one getting burned."-- Buddha
John,I hope. There is still much to be done.Chuck Slive, work, build, ...better with wood
steven.. looks great !..
tell me some more about the exhaust fan set upMike Smith Rhode Island : Design / Build / Repair / Restore
Mike,I leave the sheathing 1" from the ridge, and use a 3-3/4" hole saw for 4" flex and drill 1" from the edge of the sheathing before felt. Cut the felt and then coax it in. Two less penetrations in the building envelope. Someone that could make a collar for this application could make a mint.I remember the days when some people vented to the attic.Chuck Slive, work, build, ...better with wood
"I remember the days when some people vented to the attic."
Chuck S
Believe it or not I purchased a house this year in Illinois, after spending most of my life in Florida. The 2 main bathrooms upstairs were vented into the attic and the attic had no scuttle hole. So I cut a hole after the inspection and you can imagine what it looked like.
I sure didn't know this was a common practice in the past. The pics are excellent BTW!
Ernie,
I bet that was a moldy mess up there. I guess inspectors have an 'unaccessable area' clause in their reports.
As a tin smith, you can probably make a collar to attach the vent lines to the ridge vent.
Chuck S.live, work, build, ...better with wood
Chuck - couldn't help but notice that that 10-2 Romex is just laid against the double stud - you gonna at least staple it before the rock? ;-)
View Image
Forrest - pointing out everyone's mistakes
Forrest,
Keen eye. That is not 10-2.
View Image
It's a drop light.
Chuck Slive, work, build, ...better with wood
LOL! My favorite line in Out of Africa - Meryl Streep asks her new houseboy as he serves dinner, "what is wrong with this fish?"
He responds in pidgeon, "she is not a feesh - she iss a cheeken!"
Forrest - making broad references
Forrest,Great movie. Great line
We gotta keep each other on our toes.Chuck Slive, work, build, ...better with wood
Recommendation for you, per request.
Hansgrohe "Rain" showerhead. Expensive, but in trendy plumbingware, what isn't?
Gene,
Thanx for the info. I googled them and they are pricey.
Chuck Slive, work, build, ...better with wood
Chuck,First of all, thanks for this thread. It's been a great source of inspiration and information as I work on my bathroom. It's one thing to read something and quite another to see it in practice.Here's the little info I can offer on your showerhead question. I've used both Grohe and Hansgrohe in past bath renovations and really liked them. We have a dual head Hansgrohe now (one fixed and one hand-held that is mounted on a slider) and love it. No rain shower heads yet, but I'm seriously considering one for the next bath. I've used them only in hotels and they are pretty cool.This might help with some ideas. The Kohler one looked interesting. http://www.trendir.com/archives/000483.html#head2Question for you...I see you have light cans above the vanity. I was considering this as well, but read that the light from above was harsher than that from sconces. Do you have an opinion on this?Thanks, and congrats again on some very nice work.SteveTua res agitur, paries cum proximus ardet ~ Horace
Edited 1/8/2007 3:36 pm ET by FatRoman
Steve,
I think I saw a shower head that had a lever to adjust from rain mode to shower mode. Where in Alexandria are you? I used to live in Park Fairfax, then Cheverly, MD. Now in GA.
Thanx for the link. I will look at Danze as well.
Chuck S.
live, work, build, ...better with wood
Edited 1/8/2007 4:36 pm ET by stevent1
Hi Chuck,I'm in Del Ray now, a block off of Russell Road if you recall where that is. Park Fairfax is close enough that it's on my running loop a couple of mornings each week. My dad grew up not far from Cheverly. Small world.Best,
SteveTua res agitur, paries cum proximus ardet ~ Horace
Steve,
Small world. Many small incorporated towns near Cheverly. Bladensburg, Colmar Manor,Rogers Heights, Edmonston, Riverdale,Tuxedo,... the list goes on and on. Each with it's own Police and Fire Department. I used to deal with Mitch at Del Ray Glass.
l have a sconce on either side of the med cabs.
View Image
I did not order thy FH DVD but am glad they are trying to make it right.
I am 1/2 Genoese. 2 Years Latin in HS. No clue to the translation to your tag line. What is your Roman lineage? Sicilean?
Chuck S.live, work, build, ...better with wood
Chuck,Yep, I know those towns well. My dad was in the fire dept over at Cottage City as a kid, and I think I've been in most of the police and fire dept buildings in that area.I believe Del Ray Glass has moved as of now. They were trying to relocate farther down Route 1 as Alexandria and Arlington county tried to revitalize that stretch of Route 1 in Del Ray. I want to say that they were looking at a spot around Hybla Valley (around Mt. Vernon). But, since I really need to get some replacement glass for an oculus, I'll see what's up and let you know.Thanks for the info on the sconces. Maybe I'll shoot for both types of lighting. It's a small room, though, so the can lights might be overkill.Even with the goofy interface on the DVD, I'd recommend it. I've only been subscribing since 2000, so there's a ton of info on the DVD that I wouldn't otherwise have. Plus it's easier to search on that, than to try to flip through a dozen issues to find what you want.Sorry, I'm not the least bit Italian :) Fat Roman is the name of my web development business. I can at least claim to love Italy, the food, the wine, and um, Sophia Loren. The Horace quotation reads "For it is your business when the wall next door catches fire". I ran across it years ago and thought it was a good motto for a forum like this.Best,
Steve
Tua res agitur, paries cum proximus ardet ~ Horace
Insulation was finished yesterday and I'm still itching.
View Image
Harvey Lumber Company delivereded the drywall today in a truck that would not fit in the driveway all the way to the back. When I ordered it yesterday, my salesman, Bubba, knows the driveway and said he would send it on a creeper truck. The driver of the flatbed, Leroy, said ' Oh well. We'll hump it'.
View Image
Courtesy of Chicks on Parade, ColGa
Anthony, Leroy's jumper, got on his two-way and got a truck with a teledyne that was on the way back to the yard. Germaine was here in 10 minutes.
View Image
Germaine operates, Leroy directs and Anthony watches,
View Image
I built a temporary platform to protect the window horn when the garden tub was delivered. It will be used throughout the project. My DW has asthma and I will not cut through to the house until after the drywall is primed, holidayed and one coated.
View Image
Leroy grabs 2 pieces.
View Image
Anthony slides it through the window as Germaine is ready to flip the next one up.
View Image
It's all Leroy's.
View Image
This temporary brace keeps the drywall stack safely away from the plumbing rough-in.
View Image
View Image
These guys did a great job and each got a Lincoln.
View Image
As Leroy was climbing out of the small addition, I said "Thanks for the great job" He said "Oh Well! This was 8'. You usually order 12' stretch on your other jobs" Leroy weny on to say 'all the drivers want your tickets'.
View Image
I am lucky to have a local lumber company that has great employees and customer service. I always tip the delivery guys and tip the dispatcher and yard boss a couple times a year. I try to spread business with all of the local lumber yards.
I had sticker shock that 1/2" 4X8 sheet rock was $8.85 ea. The $6.50 fuel sur charge is the delivery charge. I try to deal with local suppliers to keep the money local. I cannot imagine Low Depot sending 2 trucks, a creeper, three men, inside next day delivery for $6.50. They would probably drop it at the end of the driveway, or the wrong jobsite many days after your order, and charge you $20.00.
Chuck S
live, work, build, ...better with wood
Edited 1/15/2007 7:31 pm ET by stevent1
I had sticker shock that 1/2" 4X8 sheet rock was $8.85 ea. The $6.50 fuel sur charge is the delivery charge. I try to deal with local suppliers to keep the money local. I cannot imagine Low Depot sending 2 trucks, a creeper, three men, inside next day delivery for $6.50. They would probably drop it at the end of the driveway, or the wrong jobsite many days after your order, and charge you $20.00.
My local lumberyard doesn't always have the best price, and I don't always get great looking lumber from them, but they usually make up for it with great service. If I'm not happy with a load, they'll exchange it or take back the bad stuff without question. And for stuff like drywall, there isn't the quality issue that you have with lumber.
Are you putting up the drywall yourself? And if so, have you started..jt8
"Holding on to anger is like grasping a hot coal with the intent of throwing it at someone else; you are the one getting burned."-- Buddha
John,
Found out today that Low Depot sheetrock is close to a sawbuck. I locked in price for drywall in September 2006, good for Small Addition and any more I need because I prepaid.
Looking for an update to the SWF. Have shared with family and prospective customers.
How is you project going?
Chuck S
live, work, build, ...better with wood
Edited 1/15/2007 7:34 pm ET by stevent1
How is you project going?
Too darn slow! December was a a dismal month for getting anything accomplished. Just too much misc stuff going on that pulls you away from the project.
Been trying for about 3 weeks now to get a chimney guy in to install the pipe for the wood stove. Gonna start getting cold again next week. And I don't want to have to stop the 50 things I'm working on to start thing 51 (ie doing the chimney myself) :)
jt8
"Holding on to anger is like grasping a hot coal with the intent of throwing it at someone else; you are the one getting burned."-- Buddha
Looking good! I'm contemplating getting one of those HF drywall lifts to do this attic I'm in by myself. You "team hang", or do it yourself?
Forrest
Forrest,
Solo sheetrock. Will pick up sheetrock jack in morning from rental center. Every piece in the ceiling has a can, fan, vent or chandelier.
Chuck S.
live, work, build, ...better with wood
I did a little meds cab project that your pic made me recall.
The finished look was a triplet of mirrors, one frame around the whole thing, with a 1/8" perimeter reveal between mirror and frame, and the same 1/8" between the flanking and center mirrors.
The center mirror was fixed, but the flankers were mirror-glued to the flush doors of the meds cabs.
I got the idea from a product line of Kohler's called Robern. You probably have seen them. Very pricey mirrored meds cabs, with and without lighting.
My little knockoff used the same kind of tube strip lights, mounted adjacent each side and full height, as Robern cabs have.
Gene,
Sounds good. Can you post a pic?
Chuck S.live, work, build, ...better with wood
Unfortunately, I lost all my pics in a hard drive crash. But look at this.
View Image
That is a Robern. Mine had the mirrors scaled about the same, but the cabs were set into the wall so the doors mirrored surfaces were flush to the 3/4 x 3 1/2 white painted surround trim I used.
At the top head, my trim had a 1/8 reveal away from the mirror tops. At the sides, my trim was 1-1/2" away, allowing for 3/4" thick bases for the strip lights I installed up each side. Google for Alcko Lighting, their "Lincandescent" and you will see the various models and finishes.
Along the bottom side, the cabs sat down to 1/8" off the white Corian "backsplash" I used for the countertop, the backsplash 3/4" thick like the surround trim. Machined into the backsplash under the "latch" side of each door was a 1/2"R. cove, 1.5" long, so you can get a finger in to grab and open the door.
Gene,
Good looking work.
Chuck Slive, work, build, ...better with wood
We have been using the hansgrohe thermobalance three for our rainhead applications. It has three positions:
1. Wall Shower
2. Rain Shower
3. Wall Shower & Rain Shower at 50%.
Easy install and nice looking and not too expensive.
W
Thanx for the input.
Many options for shower heads. I cannot go wrong if i let DW make the choice.
Eh?
Chuck S.live, work, build, ...better with wood
Started hanging 1/2" sheetrock using a rented lift. This is a lot safer than using a series of props for solo hanging.
View Image
Crank it to the ceiling.
View Image
View Image
The lift is designed to let you fasten the drywall as required.
View Image
I used mastic and 1-1/4" course thread square drive screws. This 9.6V cordless is well over 20 years old and is much lighter to use over-head than some of those monster cordless drills on the market now.
View Image
View Image
Chuck S
live, work, build, ...better with wood
Edited 1/14/2007 9:52 am ET by stevent1
Tell us how your can cutouts are done so precisely. My rockers slap it up uncut, fix it with some screws, enough to hold it, then rotozip the holes.
Sometimes they are not so precise.
Gene,
I am a Cabinetmaker, over 30 years, but got my start as a naildriver, then saw man, then layout in Potomac MD. I cut the holes 1/4" larger than the cans. This BR/Closet has 16 cans, 3 HVAC supplies, 2 vent fans, a ceiling fan and a chandelier. Roto-zip is much faster, and can be quite accurate if you know what you are doing or care about your work.
I will post pics later on accurate cut-outs. It's basically knowing how to read a ruler.
I use a Lufkin X46F. Some times called a bench rule.
Chuck S.
live, work, build, ...better with wood
Edited 1/14/2007 8:04 pm ET by stevent1
Looks good - I think you have inspired me to use a lift - never done it solo.
Forrest
Forrest,
It rents for about a buck-twenty for the week and this one is three pieces that fit like a glove and no tools required to assemble.
Chuck S.live, work, build, ...better with wood
My isssue will be a 10/12 cathedral ceiling with about 12'6 at the high side. Will it do that?
Forrest
Here is you with your new hard hat, operating your new Telpro 15.
All the reach you need, and it will lift them sloped, with the flipouts that are on the arms to grab the bottom edge.
View Image
Gene,
You asked about ceiling cutouts. Roto-zip is the most cost effective, used almost exclusively in commercial work. I do it old school. I use a stick rule, a drywall square, a compass made from sheet rock edge tape and a jab saw.
View Image
For cuts from the edge of the panel:
I want an 8" X 8" cut, 3" from edge. Hook rule @11", scribe @ 8". Then hook rule @11", scribe @ 0"
View Image
View Image
For cuts from the end hook the stick rule greater than your measurement. In this case I want 21-3/8. I hook 23, then mark 1-5/8.
View Image
View Image
Use the drywall square to mark 11-7/8". This is the center of the can light. Scribe the cut-out.
View Image
View Image
View Image
Square cuts are done similiarly.
View Image
Snap the cuts back, score and remove.
View Image
A speed square is used to layout octagonal boxes.
View Image
View Image
After all cuts are made, mark the joist layout on the front and back of the panel.
View Image
View Image
The lift is tilted. (This position is for hanging walls and cathedrals)
Apply a 3/8" bead of mastic. It is much easier than running a bead on the ceiling joists. ( Ran out of mastic here, took pic, started new tube)
View Image
A bead of mastic is also applied to the HVAC supplies.
View Image
This ceiling has many penetrations. I will use "Durabond 20" to tape and block.
View Image
Butt joints are offset.
View Image
When a radius occurs at the edge of a panel, the radius is centered from the next panel.
View Image
My lovely wife, Sweet Georgia Brown inspects the work.
View Image
Chuck S
live, work, build, ...better with wood
Edited 1/20/2007 7:39 pm ET by stevent1
SGB bought me a drywall saw. My DW got it from Capitol Materiels. Seen them before. Never owned one before. Always used the jab saw.
View Image
This saw cuts on the push stroke so it does not tear up the sheet rock.
View Image
Heck, I used a jab saw or a reciprocating saw blade with about 22 layers of duct tape for a handle for years.
Chuck S.
live, work, build, ...better with wood
Edited 1/15/2007 7:59 pm ET by stevent1
nice series... gyp board 101 !
Mike Smith Rhode Island : Design / Build / Repair / Restore
Edited 1/20/2007 6:14 pm ET by MikeSmith
i bought the imported ebay lift that is a knockoff of the telpro for less than $200. it works like a charm for hanging 12'rock on 9' ceiling AND the wall, working alone. it saved my back and let me work when i wanted, not when i could get help. the install was neater than i ever did before, plus, at the end i keep a tool.
Decided to add a slight radius (82") to one end of the shower bench. The plywood is off fall from the tub deck.
View Image
View Image
It is covered with 2 layers of 3/8" ply that is glued. Then sheetrock. The screws are left proud of the paper until the mastic sets.
View Image
This will all be covered with Kerdie. I have never used Kerdie before but have looked into it at John Bridge. They say it is a better system than CBU and 100% waterproof.
Chuck Slive, work, build, ...better with wood
Morning Chuck,Things are looking very nice in there!Question for you on your blocking above the bench. What's the reason for staggering it like that? Fire prevention? Structural rigidity? Did you find a showerhead you liked?Look forward to your thoughts on the Kerdi. I'm headed down that path on my other bath in the next couple of months. Former owner thought tiling right over DW in a standing shower without a vapor barrier was a fine idea. Hmmm. Kerdi looks like a good option on that front.Best,
SteveTua res agitur, paries cum proximus ardet ~ Horace
Steve,
I stagger the blocking to avoid haveing to toe nail except at the corners.
Still no shower head. Gonna let DW make that call. Still can't find a 18" straight shower arm in ORB.
Also looking for "no hole" let-in "Bisquit" vitrous china basins. Sorta like a vessel sink, but only rises above the counter about 3" Found some Mexican let-in vessels, but they are very trendy right now.
Chuck S.
live, work, build, ...better with wood
Edited 1/28/2007 6:33 am ET by stevent1
Finished taping and blocking with Durabond 20.
View Image
Started first coat of three skim coats with all purpose joint compound.
View Image
Chuck Slive, work, build, ...better with wood
You on vacation or something?
jt8
"One of the fondest expressions around is that we can't be the world's policeman. But guess who gets called when suddenly someone needs a cop." -- Colin Powell
John,
No vacation. Designed a kitchen/butler's pantry for a client.
Will finish point-up, then prime. No pics required. Skimming all of the sheet rock requires little or no sanding.
Chuck S.live, work, build, ...better with wood
Chuck's addition exterior view as of the end of Nov.
Sorry dial-uppers, that file is getting large.jt8
"One of the fondest expressions around is that we can't be the world's policeman. But guess who gets called when suddenly someone needs a cop." -- Colin Powell
Hmm, not sure that file uploaded clean. I'll take a look at it later.
jt8
"One of the fondest expressions around is that we can't be the world's policeman. But guess who gets called when suddenly someone needs a cop." -- Colin Powell
It worked great John....Well done
Nice as always - wasn't sure what was gonna' happen with the "T" at the end!
Forrest
Steve,
Ordered the showerhead this morning. It is a 2 function showerhead. I could not do a flushmont rain head because a rinse feature was not available in my price range.
View Image
I will buy a 24" piece of 1/2" black pipe and take it to a powder coat company for the stem.
Here is a link to an internet plumbing supply that was about 35% cheaper than my local supply house. http://www.faucetdepot.com
Chuck S.live, work, build, ...better with wood
Watching paint dry is no fun, so I built a curved front for the garden tub using off-fall from the floor deck. It will be installed as the tilework is done.
Used a trammwel to swing an 82" radius. The first pass is 3/16" deep.
View Image
The second pass is 3/8"
View Image
The radius is then jig sawed, flush routed and a duplicate is made. The 2-3/8 ribs for the eyebrow are 3" OC and a flat at the ends.
View Image
I hope to start the Kerdie next week in the shower.
Chuck Slive, work, build, ...better with wood
We haven't gotten any pics this week.
jt8
"The flower that follows the sun does so even on cloudy days."--Robert Leighton
John,
Getting ready to start the Kerdi install. I got a hit and run job for 68 LF of P-Lam counters for a Docter's Office/Clinic. 31.00 LF. Started yesterday. Install tomorrow and Thursday. Nothig special, but pays the bills.
Kerdi is a 'fleeced' lined waterproofing membrane shipped in a roll all over the world. This will be my first use. It was a tough decision over CBU and Laticrete because it is installed over standard sheetrock. They have a test with a cardboard box lined with Kerdi, and after many years they have to add more water for evaporation. They claim it is 100% water proof with proper installation.
View Image
Chuck S
live, work, build, ...better with wood
Edited 2/27/2007 9:37 pm ET by stevent1
I absolutely love curved work, both doing it, and seeing it done as you are showing.
That is a helpful hint you gave, the jigsaw cut followed by the flush trim, but I gotta ask, why even do the second pass to 3/8" depth?
Gene,
There is about 1/8" between the bearing and carbide flutes on a non pilot flush bit.
The second pass allows the bearing of a flush bit to ride completely on the materiel.
Chuck Slive, work, build, ...better with wood
Started installing the Kerdi. I find my plaster/mortar hawk works well. The dryset is mixed thin but will hold a ridge when combed.
View Image
View Image
After it is trowelled on and combed out the membrane is applied like wall covering. First it is smoothed by hand working out from the center. It is then imbedded into the unmodified thinset using a variety of tools.
View Image
I use the D-handled laminate roller last but is not required if you do a good job burnishing in the Kerdi with a flat trowel. Inside corners are done similar to drywall.
View Image
From what I have researched about this product you need to avoid build up in overlaps and corners. The Kerdi band is 5" wide and 1/2 the thickness of the Kerdi membrane.
View Image
When you do a niche the whole sheet is applid then slit in the center and dry set to the sheetrock in the same manner.
View Image
Chuck Slive, work, build, ...better with wood
These products are all completely new to me. Thanks for the schooling.Live in the solution, not the problem.
Hi Chuck,It's looking great in there. Thanks for posting this part of the project.How fussy is the Kerdi to hang square? Is it light enough that the first pass with the hand secures it in place?Best,
SteveTua res agitur, paries cum proximus ardet ~ Horace
Steve,
It is not hard to hang square. I am doing it solo, a third hand would be nice. I start at the top, then allign the edge. Kinda like wallcovering except you will never see it.
Check out Mongo's 'Kerdi-shower w niche' thread. It is really good. I think his thread should be put in a special 'How to...' folder in BT.
Has Prospero changed notification when someone replies to a post? I have not had e-mail notification in several days. Tried to find the checkbox in 'Update Profile', no luck.(Edit: I found it, under "My Prefs", but the box was checked.)
Chuck S
live, work, build, ...better with wood
Edited 3/6/2007 8:39 am ET by stevent1
Edited 3/6/2007 12:58 pm ET by stevent1
Edited 3/10/2007 7:47 pm ET by stevent1
Finished the Kerdi today. Mongo's epic thread, (should be in 'BT Classics', if such an animal existed), saved me from posting many pics. One detail was not covered. I have a bench that has a concave curve on one end.
First, you need a heavy duty 1/2" drill to mix the thinset and later on, the grout. I have a 30 year old B&D industrial (US Made) that I did not want to burn up on this project. I found a $30.00 HF drill (What is the over under on this drill burning out?) and $13.00 mixing paddle. $53.00 total included freight.
View Image
The shaft on the paddle was 5/8" so I used a right angle grinder to make it a 1/2" hex. The mixing paddle is for medium viscosity.
The bench goes wall to wall and is 74" wide. Thin set is trowelled and combed out and the Kerdi is applied.
View Image
The pencil line on the left is the overlap. 2" is the minimum. This will be about 5".The curved portion of the bench is next.
View Image
The Kerdi is snipped about 3/16" shy of the edge
View Image
The cuts should be 3-4" apart depending on your radius. The membrane is pulled as it is imbedded and trowelled.
View Image
The top of the bench is next. The Kerdi is held about 3" up on the wall and held in place with hawk and other tools. It is then scribed from underneath and cut with scissors.
View Image
The witness marks show the cuts of the vertical piece. You must offset the cuts.
View Image
The top layer is positioned, hand pressed, trowelled, rolled, and burnished with a flat trowel.
View Image
Witness marks are then pencilled in for the third and final layer at the radius edge.
View Image
But first the corners. The rear corner is cut from Kerdi band. Kerdi is 8mil and the band (Keri) is 4 mil and is shipped in a nifty dispenser. Only basic tools are needed to cut Kerdi products.
View Image
The rear corner is a square cut of band that is snipped and folded. A second layer of thinset is required at the overlap.
View Image
The vertical bench front to wall corner is next.
View Image
Then the wall to bench top connection.
View Image
A third and final layer is next. An 8" band of Kerdi is first applied to the front of the bench. More relief cuts.
View Image
The Kerdie is fully imbedded into the unmodified thinset.
View Image
Anyone planning on a Kerdi shower should read Mongo's thread. 86714.1
"Kerdi shower w niche"
Chuck S
live, work, build, ...better with wood
Edited 3/10/2007 11:04 pm ET by stevent1
Chuck,Thanks for the info. Yes, I think something funny is going on with notification. I am receiving notices now, but I never saw one regarding this post to me. Maybe they have it figured out by now.I saw Mongo's thread and you are right, there should be a special section for that. It'll be a very good reference point.Question for you on your latest post here, when you are laying the Kerdi over the front edge of the shower bench, why is the third layer required? Does that cover up the corner pieces, too?Thanks,
Steve"anyhoo ... to any of the girls here who can't hit a nail with their purse .... ever think of actually trying ... and practicing ... instead of looking to see which screws match yer shoes?" ~ Jeff Buck 3/13/07
Steve,
Glad you found Mongo's thread. Classic. I put that 3rd layer of Kerdi on from advice from the John Bridege Tile Forum. "No Curb Walk-in Shower". Here is a link. They are the Kerdi Gurus. You may have to Join/Sign-in. It is free. Excellent resource for tile info.
http://www.johnbridge.com/vbulletin/showthread.php?t=39688
Here is my outside corner tile.
View Image
Made in Italy!
View Image
Chuck S
live, work, build, ...better with wood
Edited 3/13/2007 8:48 pm ET by stevent1
Hi Chuck,
Glad to hear you were able to find a showerhead that fit the bill. Looking forward to seeing how the powdercoating and the Kerdi turn out.
Thanks for the link, too. I'll keep that in mind for a tub set I need to order.
By the way, I really appreciate the level of thoughtfulness that you put into your work. Little things that maybe only you would notice are what make the difference.
Did you find a vessel sink? And are we going to see some of the butler's pantry that you wrote about above? :)
Best,
SteveTua res agitur, paries cum proximus ardet ~ Horace
Steve,
No Pics of the Butler's pantry. It was a design only job for a decorator who lives on 120 acres just off route 50 in Annapolis. They wanted a home office. I prefer the traditional butler's pantry.
Here are similar pics from a neighbor's house.
Left side.
View Image
Right side.
View Image
Work station.
View Image
Kitchen
View Image
View Image
View Image
This home was built in 1917 and the center hall beyond the foyer is 8' x 40'.
View Image
Here's Izzy in the 8'X 14' foyer.
View Image
Chuck S
live, work, build, ...better with wood
Hi Chuck,Well, I had an inkling that you could build some nice cabinets, but that is really gorgeous. Count me in as impressed.Did you build Izzy, too? :)Best,
SteveTua res agitur, paries cum proximus ardet ~ Horace
With quality like that, "paying the bills" shouldn't be too much of a problem. Very nice indeed.
Hey, can you build me something to cover up the FHB header on my screen? Preferably w/o glass.Live in the solution, not the problem.
David,
I'm with you about that Header. Since the redsign it seams smaler.
Chuck S.live, work, build, ...better with wood
From:
TomW <!----><!---->
Feb-26 8:47 pm
To:
Rebeccah <!----><!---->
(3 of 22)
86347.3 in reply to 86347.1
I didn't have any trouble sliding the masthead up. ust grab the line between blue and white uth the curser and drag it up. It doesn't give any indication when the curser is in the correct spot, but it can be moved. It covered up the buttons to go to the other forms etc.. but I have more space for reading messages now than I did before.
This worked GREAT--Shoulda done it months ago. Why do I need half my screen taken up with something to let me know where I am? Do they think I got here by mistake?
Sorry, I'll get off the stump now.Live in the solution, not the problem.
David,
Thanx for the tip on the Header. I seem to remember it from a while back, but forgot.
Chuck S.live, work, build, ...better with wood
What browser are you using? I dont get a handle to hide the blue header.
Rav
Plain old IE I guess. There's no visible handle--you gotta fish around. You might try checking the forum feedback threads--tons of other suggestions that would probably be useful to someone with more computer savvy that I.
Good LuckLive in the solution, not the problem.
Forrest,
The model I rented has an 11' lift that tilts to 45'. I figure 13'6" @12/12.
Chuck S.
Rode hard and put up wet. live, work, build, ...better with wood
Thanks - does this mean you got finished? How many sheets / how much time?
Forrest
Forrest,
Finished ceilings, less 3 9-1/4'' rips. 19 cut outs, 3 posts. Walls next. I usully do not work on Sunday but this is a rental tool. 46 sheets total. 26 hung.
Chuck S.live, work, build, ...better with wood
you have no idea what you missing. a panel lift is a god send
Those lifts look like handy tools, but I'd still rather sub the drywall out :)
jt8
"Holding on to anger is like grasping a hot coal with the intent of throwing it at someone else; you are the one getting burned."-- Buddha
John,
I will never hang sheetrock again without a lift. Even if I had help. The lift keeps drywall tight to the ceiling until all of the fasteners are in. Much safer too. Wish I could afford to sub it out.
Chuck Slive, work, build, ...better with wood
2x now... there have been pics of the house next door..
it has some interesting column details... keep catching my eye
View Image
anything else of note on that house ? not to detract from your fine work.. just curiousMike Smith Rhode Island : Design / Build / Repair / Restore
Mike,
We live on Cedar Ave and is one block long. It is the former lane for the house at the end of the street, "The Cedars". Built in 1836 as the winter home for the Banks family of Maine. It is still in the family.
The house next door was also built in the 20's. It needs a lot of work and the new owner has plans.
The corners of the port cochere are pretty simple. 3-4X4's with 3X3 brackets 4X4's notched in about 2/3 up and
View Image
View Image
The windows are 8 over 1. The roof lookouts are 6X6 with champhored ends.
View Image
Front porch window.
View Image
The house had many, poorly done additions over the years, but has good bones.
Chuck Slive, work, build, ...better with wood
lot's of interesting stuff packed into that one..
thanks for the nickel tour
these look like classical columns at the entry
View Image
Mike Smith Rhode Island : Design / Build / Repair / Restore
The columns at the front were probably tapered box columns at one time.
Here are some pics of the Cedars. These owners summer on the coast of Maine.
The lead roof was removed and retinned about 3 years ago. It took about 6 months and tens of thousands of dollars. The walls are 18" limestone.
View Image
The owners have a painter and gardener as part of their staff.
View Image
This house was featured on HGTV several years ago but I cannot recall what show.
Chuck Slive, work, build, ...better with wood
Built shower niches from scrap 1/2" BC ply. Dadoed and glued with type II glue.
View Image
Insulated the bench with three layers of unfaced R-19 and one layer of R-11.
View Image
Installed the niches and insulated the supply lines.
View Image
Here is the back of the 2 position, temperature and pressure control valve.
View Image
I have been looking into 'hammer arrest' or 'shock arrest' valves. Are they needed at each device, or at just a termination point?
Chuck S.
live, work, build, ...better with wood
Edited 1/20/2007 10:34 pm ET by stevent1
Chuck,
Nice looking work!
"Hammer arrest valves", AKA, air chambers, shock absorbers are usually put onto the whole system near the water entry point from the street. Some people install near the laundry in both hot and cold lines - I personally like this arrangement.
They provide an air cushion to help absorb the compressive forces caused by a rapid interruption of flow - examples - toilet, washing machine and dishwasher fill valves slamming closed.
There are numerous commercially made models but can be easily made up and incorporated into an existing system - both work. All will eventually cease to function due to the trapped air being absorbed into the water in the pipes, draining the pipes will restore the air into the trap and provide proper cushioning. It usually takes several years for the air to be absorbed and the cushioning effect to cease. Don't know about you, but my house pipes are usually drained for some reason or other about every 18 to 24mo so the waterlogging of the air traps becomes a non-issue.
Mine are homemade, on both hot and cold, just a T with a vertical run of 3/4" copper about 18" long with a cap on top - all soldered in place.
Jim
Never underestimate the value of a sharp pencil or good light.
JTC1
Thanx for the info.
The plumber has a T at each hot and cold, and a line about 12" to 15" above. The BO wanted the hammer arrest or shock chambers. The plumber said he includes them as part of the trim-out. We plan on relocating the laundry in the future but will have to have the shock chambers to get the final.
Chuck Slive, work, build, ...better with wood
John,
Nice work.
Thanx
Chuck Slive, work, build, ...better with wood
Finished skimming and sanding sheetrock(120 grit). Walls and ceiling are ready to prime.
View Image
Commode room.
View Image
Recycled a dog treat container for a work pot. Buster and Bandit wanted to know what was going on when I walked outside with a treat bucket and no treats. The roller screen fits purrfect.
View Image
The corners are primed first.
View Image
It took longer to cut-in than roll the field. I had Porter add a mildewcide and tint the primer to match the finish paint (eggshell).
View Image
Two finish coats will follow.
Chuck S
live, work, build, ...better with wood
Looking great Chuck. Never gotten the tinted primer but it seems like a very smart call. Doesn't that all but eliminate the need for two finish coats?Live in the solution, not the problem.
David,
I'll still go with two coats.
Longer life between paint jobs and easier to do now with no drop cloths required.
Chuck S
live, work, build, ...better with wood
Was wondering if you'd given up the project and moved to New Zealand or something.
You're gonna have that room usable in no time at all.
jt8
"The early bird gets the worm, but the second mouse gets the cheese." --Dave Barry
Looks good. We would slit the paper and tuck it under the felt, but with that overhang it'll never leak.
Just 2 of us set that beam. Peice by peice. About 4 hours start to finish. I definately slept good that night :)
Are those doubled up steel plates between the LVL's? Man, we just sandwiched one between three LVL's and it took us all day to combine two beams with all the carriage bolts (SO HEAVY). Addition looks great though....
Yes sir. (2) 5/8 x 9 x 18 footers, sandwiched in LVLS. Just me and my brother put em up. Heavy aint the word!! We drill and bolt em peice by peice, in the air. We also do have a pretty prehistoric way of doing it but it works for us. Nothin but 2x4's and 10d's to help get her up there. I ate my wheaties that day :)
Edited 11/25/2006 5:04 pm ET by TheButcha
Yeah, c'mon! Times a'wastin'!
Forrest - supposed to be grouting, but stuff interfered today.
Forrest,
Stuff happens to everyone. Looking forward to your new project.
Painted first coat on primed rafter tails and T&G.
View Image
Felted in today. Fun in 30 mph gusts. The lean to ladder was blown over. No one near or hurt.
View Image
Window RO felt. Many cuts, tucks and folds.
View Image
For JohnT8
View Image
First pic from this spot. The 24 X 36 shop with loft I built in 2004 when I closed my 30 year cabinet shop is DW's future pool house. Split 400 amp service.
View Image
Chuck S
live, work, build, ...better with wood
we always install osb horizontally.
I know how you feel Chuck. I was quickly humbled as I began to peruse posts such as "Quarter Deck" and "Adverse Conditions". We both know however (suspect anyway), that a big portion of BTers just need to see some simple stuff done to the best of our abilities.
Halfway through your project so far (with my reading that is). Very thorough, clean, and seemingly well thought out.
Keep up the good work.
Edited 1/20/2007 5:31 pm ET by davidhawks
Did you end up using the LVL's?
No, opted for 2x12's. Makes the pillars more work, but I just couldn't justify the additional LVL expense (especially when these sub-beams are overkill to begin with). Going to try and get the pillars finished this week and maybe get the beams up over the weekend.
jt8
"All the knowledge I possess everyone else can acquire, but my heart is all my own." -- Goethe
I've been reading your posts and some of your comments are bringing some flashbacks of some fellows I knew up in Maryland a long time ago - they had an old school shop with some out buildings and a fine selection of hardwood lumber & assorted cabinet grade plywood. I recall seeing a piece of oak about 2 feet wide, think it was 5/4. This shop was near the Rockville Crushed Stone outfit - is this the same Chuck that was there? It is all coming back to me - you had a few brothers there, too? And I could never forget Mr Timmy - he was your right hand man.
Anyway, your work looks very sharp and looking forward to seeing the rest of your project.
Mortise N Tenon
Mortise N Tenon,
Small world. A Washington Star distributor used to stop by the shop and his handle was 'Bink'. All he wanted to talk about was how to do a blind mortise, Grass hinges, 'give a boy a break' and our CIP programs. Still got that 5/4 x 24" rift sawn red oak plank. My brother John and I had a shop from 1977- 1983 on Travilah Road in Rockville, MD about 1 mile from the Stone Quarry. Accros from Rockville Crushed Stone was J B Withers' Saw Mill. Joe's Market was also in the area.
The shop was called 'Stevenson Brothers' and we also had 'Stevenson Brother's Lumber Company'. We sold hardwoods from Morgan Weigan, J Gibb and T Baird McIllvain. Brady Plywood and Anderson Windows' from CE. Boy, has Anderson gone downhill. We used to do Historic Restorations in Georgetown and Capital Hill,(D.C.) and Old Town Alexandria (VA). Here is a pic of our job site sign and some 30 year old job pics. We had a similar sign in front of the shop.If you ever stoped by the shop we always had a pot of coffee on the wood stove and Carling's out back.
View Image
View Image
The front of the same house.
View Image
Mr. Timmy was a fine man. We were doing a row house accross from 'Blackie's House of Beef' in March of '77 and he walked into the house, picked up a broom and worked for John and I until his passing in 1981. Mr Timmy was 94 and would only take $20.00 a day. He used to say. 'I am an old collert man and you school boys need help. (We did), $20.00 is all I need for Pall Malls, spirits, and buy groceries for Ms. Bessie.' We used to bring Mr. Timmy out to the shop and he would trim up the drainage ditch out front with a scythe. I still have a sickle he gave me as well as a margin trowell and point up trowell.
Chuck S
live, work, build, ...better with wood
Edited 3/13/2007 11:18 pm ET by stevent1
Finally started tile work. Been coordinating tornado repair/recovery work. Carpenters start at 28.00 and need we need more.
A ledger is attached for the second course of tile and also serves as a screed guide for the mud deck. The screw holes will be patched with 'Kerdi Fix' and are located away from tile joints.
View Image
View Image
Center lines and level lines are established.
View Image
The level line is from the bench.
View Image
The niche was floated out because of the overlap build-up of Kerdi. It will eventually be skimmed to the corner.
View Image
The first 2 courses are set on top of the ledger using tile spikes. (sorry for the lo rez pics, they start out 640)
View Image
Tile spikes are the best. They are 1/16", 1/8", 3/16" and 1/4". They can be turned sideways for micro adjustments.
View Image
These boxes were built from scrap.
View Image
The layout and tile cuts are done in advance.
View Image
Chuck Slive, work, build, ...better with wood
Looks great Chuck. You've had a busy weekend.
BTW, are you sick of seeing that 48 in victory lane yet? If not, I fear you soon will be.Live in the solution, not the problem.
Thanx David,
If the Lowe's car wins in Atlanta, does that mean the 20 wins in Charlotte?
Chuck Slive, work, build, ...better with wood
David,
A very busy weekend. Started Friday afternoon making a triangular cut for a shower valve in PEI 5 porcelain tile. (Hard as a woodpeckers beak) First the layout is done using the supplied guard.
View Image
Then made a dam using plumbers putty. (It is best to use play-dough for marble or other pourus tiles to avoid staining) Fill the dam with water to cool the cutter.
View Image
View Image
Three holes were drilled at very low RPM using a $17.00 carbide holesaw rather than the recommended $168.00 diamond hole saw. Next plunge cuts were made on the tile saw.
View Image
A grinder was used for the radius.
View Image
The cut is ugly but fits well. It is good to keep tile joints away from the shower valve.
View Image
A torpedo level is used for accuracy.
View Image
Saturday got started on the wall above the bench.
View Image
Chuck Slive, work, build, ...better with wood
Yea, long weekend. Sometimes being a perfectionist sux. Now I strive for progress rather than perfection.
BTW, love the pattern.
Live in the solution, not the problem.
Edited 3/18/2007 11:26 pm ET by davidhawks
I worked out the patern flat on plywood and used a story stick to keep the dimension exact.
View Image
The wall above the bench is tiled.
View Image
Working on a patern for the shower valve wall.
View Image
Tape and props are used at the shampoo niches.
View Image
The centerpieces of the sides are backbeveled to remove the bullnose
View Image
View Image
The thin set is mixed stiff for the trim around the niches
View Image
Can anyone share some grout tips?
Chuck S
live, work, build, ...better with wood
Edited 3/21/2007 8:01 pm ET by stevent1
Pretty - pretty!
Forrest
Would be nice, but that's been Jimmie's & Chad's house for several years now. They're tough to do much with up there.
Digging footings in AM. See if you can keep the t'storms down your way for me. After all, you're inside.Live in the solution, not the problem.
Chuck
You hit it the nail square with hammer on the name - way back folks used to call me "The Bink" - at the old Wash Star newspaper we all had handles - War-Ba, The Reverend, Pineapple, Starzan, Mel, Spanky, Fat Daddy, Jay-Time, Dirtball - I still hustling newspapers but find time to do some wood butchering now & again. Good pics, especially those ovals in that porch.
And I do rightly remember those cold Carling Black Labels you guys would share with us boys when we'd visit. Mighty fine for sure. Heck, where that shop of your alls was is some big houses - wonder if they got water in their basements from that ol' spring/well that was there.............and down the road a piece, near the Rockville Crushed Stone is nothing but houses and them folks complain about the noise - duh......no doubt they knows the stone operation was there when they bought the house!
Again, your work is mighty fine. I am planning to build a cabin in upstate NY soon, perhaps you might be able to ease up north here & lend some pointers, etc, and do me & the mrs some fine cabinetry. And bring some of those cold Carlings, too!
Mortise N Tenon
M & T,
Hey Bink!
I think you worked part time for us when you were between jobs.We were doing a hair salon on GA Ave. in NW DC and you delivered the lumber out of your newspaper van. The salon was called 'Natural Motion' and you and 'Big Dave' told Patrick Ewing (Then at Georgetown back in the early 80's) to move his legs so you could bring the lumber through the door. The Balusters were dovtailed. Most modern stairs are dowelled. (and fall apart )
View Image
Here is another set of steps I think you may have picked up and delivered lumber for. I sure miss building stairs. Check out Stan Foster on this Forum. Stan is a "Stair Master". You will have to click on the Lewes DE icon to open.
Chuck Slive, work, build, ...better with wood
Part of the 'Small Addition' plan was a paint job on our modest home. We have the smallest home on the block. We are the third owner of a 1921 built house. We bought this home over the phone for 75K in '97. We were lucky.
View Image
Got 4 bids and wound up with a great crew that started with 4 days of prep that started last Saturday with bleach and pressure wash. They finally openned a 5 gallon bucket of 'Gripper'(mildewcide added) today. They scraped and sanded. Very tedious work.
View Image
Many wasps and yellow-jackets nearby.
View Image
This sign from late 60's will remain.
View Image
The small addition is fully caulked and puttied. The bottom of the laps are also caulked.
View Image
View Image
I pressure washed the 9 X 30 front porch.
View Image
Any suggestions to seal this tile porch floor?
View Image
A neighbor mentioned 'Thompson's' but I think it always leaves a sticky residue.
Chuck S
live, work, build, ...better with wood
So now that you're warmed up, you gonna leave the relative comfort of your shop and do some turnkey jobs for paying clients? Other than cabinetry that is. Sounds like your area is hopping these days.Live in the solution, not the problem.
Hey, I was thinking. If y'all both come to Road Atlanta with your cameras, we can all photo-thread eachother - in line for hotdogs, driving at the Lotus / Tire Rack area, standing elbows on the fence; you know, just to instruct, like we love to do.
Think about it!
Forrest
Hey, what are you doing posting from this thread??? Aha!!! Forrest and Chuck are one in the same.Live in the solution, not the problem.
Forrest,
Checked out your 'Free lodging thread'. Is it at/near Chateau Elan? This could be a regional mini fest!
Chuck Slive, work, build, ...better with wood
Road Atlanta is at the next exit off I-85 from Elan. He owns it (the nicotine patch guy).
I'm 45 minutes south via GA-81
Forrest - FastFest?
This is the end of April? We are planning a trip to DC to visit my 91 year old Mom. Sounds like a fit. E-mail me.
Chuck Slive, work, build, ...better with wood
David,
I held a GC license for over 30 years. Kinda picken an' choosing right now. We are hopping with the recent tornado. Did some estimating. No contracting.
Chuck Slive, work, build, ...better with wood
Steve,
The niche was completed the other day.
View Image
The center stile is 3 1/2" and double bull nosed. It was cut from a 12 X 12, through color porcelain tile. A grinder was used first.
View Image
I then sanded with 40 through 400 grit with a random orbital sander.
View Image
The corners were touched-up with a tile file. The edge was wet sanded with 500.
View Image
Here is the shower valve wall.
View Image
This wall was tiled today and is to the right of the bench.
View Image
I hope someone chimes in with tips on tile grout. I plan on using sanded grout but some tile forums suggest "Spectra Lok" (epoxy grout). Seems pricey.
Chuck Slive, work, build, ...better with wood
511 penatrating sealer for your porch. Good stuff
__________________________
Judo Chop!
Thanx for the info.
A friend recommended "Frog Skin" I think Miracle 511 is available at LODEPOT.
Chuck Slive, work, build, ...better with wood
you'd have to skin a lotta frogs.....he, he.__________________________
Judo Chop!
Chuck,Looking great as usual. I REALLY like that keystone design above the niche!Never used Spectra Lok on any past tile work, so I can't be of much help there. Best,
Steve
You shouldn't use sanded grout for joints less than about 1/4" wide.George Patterson, Patterson Handyman Service
Edited 4/7/2007 10:35 pm ET by grpphoto
Are you concerned about water getting trapped behind the FC siding since you caulked the bottom laps?That would be something that I would consider a problem, but I've never done it and have never heard of any specific problems with that before so maybe I'm wrong.
Jon Blakemore RappahannockINC.com Fredericksburg, VA
Jon
Never thought about it but it is a valid concern. Where would the moisture come from? I have been dealing with cementitious siding a liitle over ten years. I had built and installed cabinets in a home and asked the GC when I field measured the cabs what was that rattle when the side garage door was closed. He said the FC had not been caulked in yet. When we delivered the cabs. No rattle. The laps were caulked.
Last year I responded to one of your threads about tile color variation and I said there was a code. I finally found it.
Shade & Texture Index
V1 = Uniform Appearance: Differences among pieces from the same production run are minimal.
V2 = Slight Variation: Clearly distinguishable texture and/or pattern withinsimilar colors.
V3 = Moderate Variation: While the colors present on a single piece of tile will be indicative of the colors to be expected on the other tiles,the amount of colors on each piece may vary significantly.
V4 = Substantial Variation:Random color differences from tile to tile, so that one tilemay have totally different colors from that on other tiles.Thus, the final installation will be unique.
Chuck Slive, work, build, ...better with wood
Chuck,I'm not sure where the moisture would come from, but I know some consider it "best practices" to not caulk the bottom of areas where water could be trapped. Shower faucets, window & door sills, and other areas are what comes to mind.We don't get to work with cementitious siding very often so, like I said, it may be a standard practice that I'm not aware of.Thanks for the tile variance sheet. I will save it for use the next time we have an issue. The most important thing I learned is to make sure that when a client selects a special order tile that we prepare them for the potential problems that may result.Just so you know, we ended up taking back the tile and getting an in-stock tile to install for that client.
Jon Blakemore RappahannockINC.com Fredericksburg, VA
stevent1,
I have been following your thread and would like to add my compliments to your work.
You have shared a lot of good information and I have especially enjoyed watching the shower progress.
I have two questions.
1. You mention tile spikes and the fact that they have micro-adjustment by turning them sideways. Are these spikes different/better than the basic "+" available, and do you know who mfg's them?
2. I copied and pasted the color variation standard for tile. Do you have a source for this info? I recently had a job where this would have been very useful, esp. for natural stone/etc. I would like to do some more research and be able to site the source for future projects.
Thanks in advance and keep up the good work.
V1,
Kudos on the Masters win for Zack Johnson. He beat Tiger Woods!
Tile Spikes are the best spacer I have ever used. I no longer use toothpicks, wooden matches, toungue depressors etc. Here is the link. When you call ask for David Taylor. Tell him Chuck from Columbus GA sent ya.
http://www.tile-experts.com/products.asp?id=64
The source for the Variation Index is from Crossville Ceramics. It is a locked pdf so I could not compress. Let me know if this is what you need.
If you are into tile check out http://www.johnbridge.com Click on forums
Chuck Slive, work, build, ...better with wood
John,
The painters finally got a dry day and were able to spray the tinted primer. I use ICI "Gripper"
View Image
Chuck Slive, work, build, ...better with wood
So from the neighbors' point of view, you're just a couple light fixtures from having the outside done?
Looks good.
Remember when it looked like this:
View Image
You've come a ways since then :)jt8
"We ourselves feel that what we are doing is just a drop in the ocean. But the ocean would be less because of that missing drop."-- Mother Teresa
John,
Thanx
I remember it well. It has been a long haul. Work in the mornings. (Design/Consult). One of my best friends wife died in 5 weeks from diagnisis of cancer. We also had a tornado. One Doctor's office and two kitchens were designed buit and installed. If this had been a contract, 18-22 weeks.
Chuck S
live, work, build, ...better with wood
V 1
Here is where tile spikes come in handy. Doing layout work. everything is laid out from the center.
View Image
Repetitive cuts are mad with a simple stop.
View Image
The patern wraps around the inside corners.
View Image
View Image
View Image
Chuck S
live, work, build, ...better with wood
Looking good there mr.-i.m back to the world of const. I didn't last long selling auto parts,plus the younguns missed me.
You kill me man! That's some of the best tile work I've ever seen. Think maybe you missed your calling.Live in the solution, not the problem.
Grouting is one tedious task. This is a dry grouting method that tile guru Dave Gobis uses.
Grout is applied in the usual messy way. This is sanded Polyblend.
View Image
The 3' wide roll of burlap is cut into 12" squares.
View Image
The strikes are off fall from when I made the 5/4 YP corner boards. I ease the ends of the strikes with a sanding block.
View Image
After the grout hazes over start wiping with the folded burlap.
View Image
Chuck Slive, work, build, ...better with wood
When the grout starts to set I strike the joints.
View Image
The radius of the wood gives a consistent grout line.
View Image
A third and final pass with the burlap. I use a new piece for this pass.
View Image
Not using water and sponges speeds the grouting process.
View Image
Chuck Slive, work, build, ...better with wood
Hey Boy -you use one of the secrets of of cleaning river rock,slate walks and any closed stone--burlap--proud of ya,I am. Another little trick that you might try sometime ,although the wooden strikers are good, try a set of pexiglass or tempered glass strikers they are used by masons when we are useing white mortar and cement and don't want rust/blue steel/or dark tool smudges when we strike the mortar joints on brick and block they smooth and compress the joints tighter than wood allthough what you just posted is one of the neatest jobs I have ever seen.Oh by the way my little girl was complaining to her brother about stinkey bubbles in the tub.DW
DW,
Thanx. I am letting more grout slack right now. I have some 1" plexi rod I will try. I carried the hod one summer and one of my jobs was to shine the brick after striking. They put me on the line after about 6 weeks and then corners one day when one of the masons broke his ankle.
Stinky bubbles are no fun.
Got any tips on grout sealers?
Chuck S
live, work, build, ...better with wood
Edited 4/12/2007 9:12 am ET by stevent1
Edited 4/13/2007 6:06 am ET by stevent1
Dedubya is on the money about using a plexi or poly strike. Less tear-out than with wood. This 1" rod is perfect for striking joints.
View Image
Don't forget to mist your grout intermittently for three days.
View Image
Chuck Slive, work, build, ...better with wood
Ol deedubya is good for something. That must be an old Fancy Gap trick.Live in the solution, not the problem.
The close-up looks good. How about taking a couple steps back and taking another picture now that you've got it grouted?
jt8
"We ourselves feel that what we are doing is just a drop in the ocean. But the ocean would be less because of that missing drop."-- Mother Teresa
have been following the thread with interest.well conceived, well excecuted project. not to mention well documented!it's nice to see an addition that is a compliment to the existing house, instead of some monster slapped on to the back.i've only been tiling for about a year, always avoided it before. when the friend who showed me started slopping buckets of water around to clean the grout, i figured there had to be a better way. so i invented (insert ironic emoticon here) the dry method you use. but instead of burlap, i use one of those metal kitchen scrubbies. i don't strike the joints, just try to be consistent in the scrubbing."Rome wasn't burnt in a day."
Thanx drozer,
This addition has been planned and re-planned for several years. As a cabinetmaker I am in many homes and institutions and see what works and what does not work. Many current materbaths have the closets on a 45' off the tub. This MB is asymmetrical.
The reason I strike the tile joints is they are similar to masonry joints, that is, to compress the grout because it shrinks as it cures.
Chuck S
live, work, build, ...better with wood
Edited 4/17/2007 9:30 pm ET by stevent1
JT
Sorry about the blotchy pics. Here is the wall above the bench.
View Image
The shampoo niche.
View Image
The shower valve.
View Image
The cornice
View Image
View Image
View Image
This wall is to the right of the bench.
View Image
I would go re-shoot but we are under another Tornado watch
Chuck Slive, work, build, ...better with wood
Tile looks great. What's going on with that wall right of the tile bench (it doesn't go to the ceiling)?
Think you've got some dust or water spots on your camera lens though :)
jt8
"We ourselves feel that what we are doing is just a drop in the ocean. But the ocean would be less because of that missing drop."-- Mother Teresa
Yeah, my digital camera does that on flash pix (only) - what is that? Don't see any dust.
Forrest
Your could be 'dust halos'. Especially if you're cooped up in a dusty attic.
I've got them on some of the pics I took in my current crawl space.
Dust halos
View ImageIf white, ghost-looking round spots appear in inside flash photos, it's caused by dust.
Dust particles floating in the air when taking flash photos with a digital camera may be captured in pictures. Often referred to as dust halos, the particles are randomly spaced throughout an image. There may be just a couple of spots, or the problem can be so bad that you hardly see the picture.
Compact cameras are particularly prone to dust halos because the flash is so close to the lens. The light from the flash catches the dust and bounces back into the lens.
Preventing dust spots
When dust is present, there is really not much that can be done to avoid the problem. If you use an external flash, the phenomenon can be minimized or prevented.
Sometimes zooming in a bit and using a wide aperture will help. But realize that the more you zoom in when using a built-in flash, the more red-eye can be expected when photographing people.
This same phenomenon occurs taking outside flash photos when it rains or snows.
jt8
"We ourselves feel that what we are doing is just a drop in the ocean. But the ocean would be less because of that missing drop."-- Mother Teresa
Edited 4/16/2007 2:04 pm by JohnT8
Forrest,
Me too. I Keep the 6.0 Samsung in a leather case and faithfully use dustwipe/lenscleaners.
Somtimes the orbs just happen.
Chuck Slive, work, build, ...better with wood
JT,
Thanx John.
The wall to the right of the bench does not go to the ceiling because I want to have the steam/moisture of the shower have a chance to escape. The HVAC supply is in the closet. This short-wall will allow airflow into the shower. (4-way register). We use CABO 1 & 2 and vent fans are not allowed in the shower. Heck, I cannot put a ceiling fan within 5' of the tub.
Chuck Slive, work, build, ...better with wood
Getting redy to start the mud bed for the floor. The Kerdi system is unique because no pre-slope is required under the membrane. One less step.
I relocated and covered the brick sand when the masons were done.
View Image
I then started moving it inside through a window. I have yet to cut through to the house. This keeps the dust etc. out of the house.
View Image
The floor was scraped and got a layer of 6 mil poly.
View Image
This is not a vapor barrier but helps the dry pack to cure rather than the moisture being absorbed by the subfloor.
View Image
1/2" Galvanized hardware clothe is next. Metal plaster lathe would have been better. Chicken wire can we used in a pinch.
View Image
The job is now stocked.
View Image
Chuck Slive, work, build, ...better with wood
I've been watching this thread with interest, and appreciate the thoroughness with which you have been accomplishing the various steps.
Just a concern with this last post. You mention that no preslope is required under the Kerdi. Perhaps I misunderstand your comment. From what I understand, you will still need to put a preslope in the mudbed installation, and then the Kerdi on top along with the drain fitting.
Please correct me if I'm wrong in my understanding of your procedure.
Thanks,
Bryan"Objects in mirror appear closer than they are."
Klakamp Construction, Findlay, Ohio - just south of the Glass City
Bryan,
You are correct. That was a misleading statement I made. There will be a sloped bed under the Kerdi. What I should have said it is done in one step, rather than preslope, membrane, mud deck.
Chuck Slive, work, build, ...better with wood
The Kerdi drain is 4 parts.
View Image
A. Bonding flange B. Latteral adjustment collar. C. Vertical adjustment ring D. Removable drain grate
Screws are placed at 1 1/4 inch above the wire mesh. This will give 1/4" per LF slope. The screed guides on the wall are 2 1/8 inch above the wire from the long corners to the center of the drain. I rested the 2nd course of tile on the top of the screed ledger.
View Image
The screws are adjusted 'till level at all points.
View Image
Chuck Slive, work, build, ...better with wood
One formula for deck mud is an 80# bag of sand/topping mix and 50# of brick or sharp sand. Play sand can be used but is pricey. If you are using a 94# bag of Portland Type 1 or 2, the ratio is 5 to 1. This is a half batch. Dry mix it first so the sand granulars are coated with the cement. I am using 60# bags so 37.5 pounds of sand are used.
View Image
Add water about 1 1/2 L. at a time depending on how wet/dry your sand is. This is a dry pack, sort of like sand castle sand. Good deck mud will compact in your hand.
View Image
I throw shovels full of deck mud at the ledgers with an ancient 'Razer Back' spade. It is packed against the Kerdi covered walls and trowelled smooth.
View Image
The perimeter height has been established and loose deck mud is placed at the drain opening. Use the tops of the screws to gauge the screed.
View Image
Chuck Slive, work, build, ...better with wood
Steve,
The most important part of the Kerdi system is the drain. I am fortunate that I can set the drain and the the plumber will work to it. The drain flange is fuly imbedded into a loose mix.
View Image
The drains is checked for level in all directions.
View Image
After the drain is set the floor field is done in quadrants. Small showers can probably be done in halves or all at once.
View Image
The sandy nature of the deck mud is not pretty but should get to 2800 - 3200 PSI.
View Image
I used 2 of 4 screed boards to make sure no one (me) walks on the fresh pre-slope.
View Image
Chuck Slive, work, build, ...better with wood
Thanks Chuck,A very informative post. Never having done my own work with deck mud, I may have some follow up questions in the future if you don't mind.How did you like the 'Tile Your World' book? Worth getting?Best,
Steve
Thanx Steve,
A mud bed is not that difficult. You must have everything you need ready to go.
The book is worth every penny. This is my first Kerdi shower and the book is step by step. Learned much more than just the Kerdie system. There is also a $10.00 e-book (pdf) that is exclusively Kerdi. Follow up questions and suggestions are sought and welcome. Here is a link for the book
Tile Your World http://www.johnbridge.com
Chuck Slive, work, build, ...better with wood
Chuck-
Your job is AWESOME, I just joined finehomebuilding, and your thread is one I subscribed to. Keep up the good work!
Paul
Paul,
Thanx. Welcome to BT
Check out "Adverse Conditions" by Mike Smith. A classic and informative thread. One of the best on the net.
Chuck S
live, work, build, ...better with wood
Bink,
Been cutting alot of porcelain tile for the shower floor from 13 X 13. Each edge has to be hit with a carborundum stone.
View Image
When cutting porcelain it is good to dress the diamond blade after about 60-70 cuts.
View Image
Chuck S live, work, build, ...better with wood
Mr Chuck - very fine tile work progressing as well as the other recent pics I've checked out. Another flashback to when y'all had a shop in Rockville I remember a guy out there that drove a red Caddy, think his name was Big Dave and we was always talking about running a gig, the vulcan death grip, and the CIP program. The first two were rather obvious - going out drinking & him talking about hand shakes, respectively, but what exactly is a "CIP" program - something for peoples on work release/community service?
If you ever come up north here give me a shout out and we can hook up for a beer & maybe go over my sketches of an A-Frame I hope to be building soon.
Out
Mortise N Tenon
Bink,
Thanx. Big Dave drove his Dad's 66 Cady rag top. "CIP" meant cash incentive program. (Cash in pocket for John and me). John Bro and I had a framing crew, trim crew and cabinet shop and when bad weather or a slow down some guys would come to the shop and we would make things for crafts fairs and share the proceeds after cost. We would rip all scraps that were stored in the abandonded greenhouses that were to good to go into the woodstoves and build picture frames and shaving mirrors. Our most popular item was bathroom stools for kids that we would nail together at the fairs. One Saturday at the Boyd's School we helped restore years ago, we took in $600 on a $10 table.
http://www.cvbmontco.com/hiscul.htm#boyds
Here is a pic of a $5.00 shaving mirror that is in an ante room.
View Image
Chuck S
live, work, build, ...better with wood
Edited 4/24/2007 9:16 pm ET by stevent1
Edited 4/25/2007 5:46 am ET by stevent1
DW,
The painters finished last week.
Before
View Image
After
View Image
They were able to get most of that old paint off the brick.
Before.
View Image
After
View Image
Ended up using Aquamix, Flat sheen on the porch. 3 coats from a tank sprayer.
View Image
View Image
Buddha is next for paint.
View Image
Chuck Slive, work, build, ...better with wood
Steve,
Finished the Kerdi on the floor. It is first dry-fit
View Image
The drain is cut using the template.
View Image
8" bands of Kerdi are cut for the wall/floor connection. The curved part of the bench will get 2 layers with offset relief cuts.
View Image
The first layer.
View Image
The second layer.
View Image
Outside corners also get two layers. These precut pieces (inside and outside pieces are identical) and are included in the Kerdi drain kit. The wall piece overlaps the floor by abou 1/4".
View Image
The floor piece overlaps the wall piece by a 1/4"
View Image
Kerdi-Fix is daubbed on all corners, relief cuts and used to fill the screw holes from the ledger boards.
View Image
The floor is then faired out. The overlapped layers of Kerdi build up so thin-set is used to skim it out.
View Image
Chuck Slive, work, build, ...better with wood
Mr Stevent - sounds you boys sold the same piece of lumber several times - like the rips from making some hi-end uppers ended up in some $5.00 picture frames!
I know some folks up in Boyds.
How is that tile work progressing?
Mortise
Mortise,
We did in fact sell the same board many times. We had a policy that any board that was cut the customer had to buy the entire board and they could keep the off fall. Most salesperson types did not want the rest of the board. We had one flooring contractor, Nash Floors in Rockville MD that ordered thresholds and reducing strips on a regular basis. We would sell them a 7/4 X 10 X 10' rift sawn white oak, and keep the scrap the salesperson did not want. Then sell Nash a 7/4 X 10 X 6' so on and so on. And take in $200.00 for a $40.00 board and that is plus shop time to mill the board.
Don't know about upstate NY, but Gene Davis, a regular here at BT might be interested.
Chuck S
live, work, build, ...better with wood
Edited 5/27/2007 11:39 am ET by stevent1
All,
Started the shower floor. A framing square, straight edge and 45` drafting square were used for the first course. All 300+ tiles were cut from 13" through body porcelain.
View Image
View Image
The Kerdi drain is 4" and works well with many sized tiles.
View Image
I used a template to cut the curved tiles. It was off fall from building the curved front.
View Image
View Image
Straight edges and tile spikes are a big help.
View Image
Chuck Slive, work, build, ...better with wood
The curved tile is cut on the wet saw. Slow process.
View Image
Solid surface fabricators use CNC equipment.
View Image
The pieces are cut.
View Image
Then laid.
View Image
Ready for grout.
View Image
Sometimes there is an offending piece of tile. Crack it with a center punch and scrape out the thin set.
View Image
Plane it with a short straight edge.
View Image
I replaced 3 out of 300 some tiles.
View Image
Chuck Slive, work, build, ...better with wood
Big WOW!
Forrest - gonna do some tile work this job; better rise to the occasion
Forrest,
Thanx for the big WOW!. Tile is like wood. Once you learn it's propeties, you know what you can and cannot do.
The more I learn, the more I realize how much I do not know.
Sorry for the low rez pics and wavey edges. Everything is very crisp at 850. I try to get pics below 50 for dail-up readers.
I set the coping and the bench trim.
View Image
The coping was cut using a bevel guage and a block. An attachment is available for this saw.
View Image
Here is the curved end. The cuts are made on the wet saw and 'kissed' with a rt. angle grinder.
View Image
Here is the straight end.
View Image
I will fill in the field when I do tile the front of the bench.
View Image
BTW. I am planning on a BBQ for a friend tomorrow. Would there be any interest in a real-time thread? We are talking the real deal. 10 Hours of low and slow smoking. I have a bud in Strassburg VA that owns a BBQ joint and his slogan is "We smoke anything". Some of us can relate to that.
Chuck Slive, work, build, ...better with wood
Mr Stevent 1
Sounds like the good deal on getting the most out of the materials. Thought I saw on another discussion you were doing up some bbq smoker action......do you ship that stuff? Like to get me some good brisket and use the scraps to make some fine red chile......
Thanks & look forward to seeing your completed project.
Bink aka the wood butcher!
Bink,
Don't ship any. We brought some to Bethesda Md to visit my 91 year young Mom for Mother's Day. She still lives in her 6 bedroom house with my younger brother. I am tapped into a neighbor's wireless to make this post.
Got the tile on the bench finished. All pieces had to be cut.
View Image
More dust halos or orbs. (Sorry JohnT8)
View Image
Here is the curved part. (ungrouted)
View Image
When we get back to Georgia, I will relocate the wet saw to one of the closets and install the 1/2" underlayment and "Ditra". Like "Kerdi" this will be the first time I have used Ditra. It is an uncoupleing/isolation membrane that can be used interior or exterior.
Chuck Slive, work, build, ...better with wood
Started a floor medallion for the commode room. This is an 11" square and I need an octagon. First I draw centerlines.
View Image
The octagon scale or eight scale is found on the face of the tounge of a framing square. I used to precut gazebos in the shop and this scale is dead on. Each dot on the scale equals 1".
View Image
This is transferred to either side of the centerlines on the 11" square.
View Image
I double check the layout.
View Image
View Image
The four corners are clipped using the wet saw.
View Image
The first layers are done.
View Image
Now the next layer.
View Image
I will have something to ponder while throne sitting.
Chuck S live, work, build, ...better with wood
I will have something to ponder while throne sitting.
Or find an Italian to put some tile in.
View Imagejt8
"One of the true tests of leadership is the ability to recognize a problem before it becomes an emergency." -- Arnold H. Glasgow
JT,
As you can see in my profile, I am 1/2 Italian.
Finally had to remove the 6 mil doubled poly from the bedroom door. Far right in the pic.
View Image
Here is the temporary door that was also removed.
View Image
The 1/2" AC Fir plywood subfloor was installed. Here in Georgia the 1/2" SYP plywood that is produced here is rated as a wall sheathing only. Many problems as a subfloor, too many voids in the interior plys. The 3/4" Advanteck was scraped, vacuumed and damp mopped.
View Image
Vacuumed again, then damp sponged.
View Image
It took a lot of time to get the floor sheething "free of dust, oil, foriegn debris and other contaniments". The gray haze is from the wet saw debris/ thinset dust that has been ground in. I first sanded the sheething with 40 grit on a random orbital sander. I think a lot of adhesive failures are due to not following manuf. instructions. Tite Bond II is troweled out.
View Image
The 1/2" Fir was attached with 1-1/4", 18ga., gum coated, galvanized 1/4" crown staples 4" +/- OC
View Image
Looking South
View Image
The ply at the commode drain was put in in 2 pieces and is slipped under the flange.
View Image
The transition from the addition to the house was done in 3 steps with Henry floor patch. First coat fills the top of the original brick exterior wall.
View Image
The second coat coat between the old and the new.
View Image
Skim coat.
View Image
Chuck S
live, work, build, ...better with wood
Installed the "Ditra" yesterday. It is a Schluter product and is shipped in a roll. It has a bonding fleece on one side and a dovetailed waffle like surface that the tile is installed on.
View Image
Ditra is easily cut.
View Image
Loose modified thin set is applied.
View Image
The thinset is combed out using a a 1/4" X 3/16" V notched trowell.
View Image
Ditra is positioned and rolled out.
View Image
The uncoupleing membrane is imbedded with a wood float.
View Image
Here is the floor transition to the walk-in shower.
View Image
5" Kerdi band is dispensed and cut. The seams can be covered with the band for a waterproof installation.
View Image
The band and corner are installed.
View Image
Looking north.
View Image
Looking south.
View Image
Ditra installs a lot faster than Kerdi. It is also an exterior product.
Chuck S
live, work, build, ...better with wood
Edited 5/25/2007 6:56 am ET by stevent1
looks good, keep 'em coming.
jt8
"One of the true tests of leadership is the ability to recognize a problem before it becomes an emergency." -- Arnold H. Glasgow
JT,
I seamed the Ditra with 5" Kerdi band or "Keba" It looks a lot like orange toilet paper.
View Image
The band is rolled out and cut with scissors.
View Image
Unmodified thin set is spread and combed with a 1/4" X 3/16" v-notched trowell.
View Image
The Keba is imbedded with a 6" taping knife.
View Image
The seams are overlapped a minimum of 2" to be waterproof.
View Image
Looking North.
View Image
The seams are cleaned up with a damp sponge.
Looking south.
View Image
The floor is ready for tile. I am thinking of doing a modified 'Hop Scotch' pattern.
View Image
Does anyone know if the layout is best from the center or to the side of the center-lines?
Chuck Slive, work, build, ...better with wood
Edited 5/27/2007 1:07 pm ET by stevent1
Edited 5/27/2007 1:20 pm ET by stevent1
Started setting the tile on the main floor of our MBR addition after dry fitting the tiles less wall cuts.
View Image
View Image
Thin set is slapped and spread on the 'Ditra'
View Image
The unmodified thin set is burned in to inverted dovetail like waffle grid.
View Image
The voids are filled in when another layer of mud is applied.
View Image
I comb it out with a 1/4" X 1/4" square notched trowel.
View Image
Chuck Slive, work, build, ...better with wood
All pieces of this PE 5 Porcelain tile are back buttered. A guaging trowel works well.
View Image
A damp sponge is used to clean up wayward thin set. I clean all of the edges after back buttering before placing the tiles.
View Image
A straight edge is used to plane the tiles in all directions to eliminate lippage.
View Image
'Tile Spikes' are used to ensure consistent spacing.
View Image
Chuck Slive, work, build, ...better with wood
When I planned the interior walls for this addition I kept the main part of the MBR dimensions divisible by 6" + 2". This works well for the hopscotch pattern leaving 1/2" at the walls that will be covered by the base. The only cuts are at the corners and under the vanities. The porcelain tiles are 5-13/16", 11-13/16" and 17-13/16" so with the 3/16" Tilespikes, this modular pattern works out really well. The Ditra uses almost double the amount of thinset compared to CBU but the open time is much longer. Whole tiles were used at the closet entrances, shower entrance and commode room.
The vanity area.
View Image
The front of the tub.
View Image
I pulled a chaulk line to show that the grout lines do not wander in this hopscotch pattern.
View Image
View Image
View Image
A whole tile worked out at the front of the column.
View Image
I will wait 2 days before grouting.
Chuck S live, work, build, ...better with wood
I started installing the tile in the 3'-6" X 6'-4" commode room. First center-lines are established.
View Image
I burned in thinset to fill the waffles in the Ditra the day before. The octagon is installed first.
View Image
View Image
The first course is done.
View Image
The second course.
View Image
I block the doorway to keep my self off of the freashly laid tile. I have been using the commode room window to get the gardenhose in and out. I let this set overnight.
View Image
Chuck Slive, work, build, ...better with wood
Yep, may have to copy that!
Forrest
Straightedges are used to align a 2" band. This brings the overall size to 26-1/8" which is the size of 2 tiles.
View Image
The medallian is centered in the doorway. The tile transition is centered under the 2/10-6/10 pocket door.
View Image
The cuts around the flange are not pretty but will work.
View Image
This medallian took a lot of time to cut and install.
View Image
Grout is next.
Chuck Slive, work, build, ...better with wood
From:
stevent1 <!----><!---->
4:37 am
What you doing up at 4 AM?! Prime time to be soundly sleeeeeping.
(oh, and the tile looks good)
jt8
"One of the true tests of leadership is the ability to recognize a problem before it becomes an emergency." -- Arnold H. Glasgow
JT8,
Thanx John. I am going to start building the vanities. Should I post Pics?
You are on CDT. We are now on EDT. I awake at 5:00AM without alarm. Do some Yoga and check BT. DW sez 'You get up early because you think you are going to miss something' I used to get to my shop at 6:30 (We opened at 7:00AM) to write work orders and schedule shop work.
Chuck Slive, work, build, ...better with wood
Morning Chuck,Looking great in there! You've done a fine job with that tile.Yes, I'd love to see some photos on building your vanities. And that brings up a casework question for you. Why is it that the front shelf edges are rarely eased? I'm thinking of cabinets in the kitchen or bath where after dragging dishes, boxes, and what have you over the front edge, it gets nicked up pretty easily. I thought that maybe a pass with a roundover bit would work nicely there, but I've not seen much of that in practice. Hope that's not a terribly foolish question.Thanks,
Steve
Thanx Steve,
You are right about shelf edges. I hit solid edges with a 80 grit sanding block or a 3/32" round over bit if I have a lot of them and then finish sand. If you are dealing with a veneer edge shelf there is not a whole lot you can do.
These shelves have 1/2" oak edges glued and clamped to 3/4" palin sliced red oak ply. The edges are the flush routed and eased over.
View Image
Chuck S
live, work, build, ...better with wood
Edited 6/10/2007 10:59 am ET by stevent1
Thanks Chuck,I knew you'd be the right person to ask!Look forward to the vanity building.Best,
Steve
GACK! A morning person! So you're the neighbor out mowing his lawn at 7AM on Saturday? Somebody just need to slip something into your tea. Saturdays shouldn't start before 9AM.
And yes, keep the pics coming.
jt8
"One of the true tests of leadership is the ability to recognize a problem before it becomes an emergency." -- Arnold H. Glasgow
Edited 6/7/2007 10:12 am by JohnT8
<awake at 5:00AM without alarm. Do some Yoga>
Zat whut y'all call it?
Forrest
Some call it that... or use it "during". ;-)
Some of us wake at 3-4 am 'cause there ain't enough "yoga". )-:Troy Sprout
"A free people ought not only to be armed and disciplined, but they should also have sufficient arms and ammunition to maintain a status of independence from any who might attempt to abuse them, which would include their own government." -- George Washington
Troy, Forrest,
You'll looked at the pictures on the shelf, not the shelf edge. ;-)
Chuck S.live, work, build, ...better with wood
Gene,
Finished up the eyebrow for the front of the Garden tub. That procedure can be found at 79773.212
I skinned the elipse with 2 layers of 1/4" China birch. A bevelled piece is at each end.
View Image
I layout the 3" OC by marking the centerline and use the framing square by holding it at one, strike a line and step it off to the ends. Quicker than using a rule or a tape.
View Image
This is the first of 2 layers that are attached with Tite Bond II and 1-1/4" galvanized staples.
View Image
This will sit overnight, the Kerdi will be applied.
Chuck S live, work, build, ...better with wood
I need to apply Kerdi to the eyebrow and Schluter does not recommend Kerdi to plywood with thinset. I decided to use Tite Bond II. The glue is trowelled out.
View Image
I have about a 7" overlap and a j-roller is used to imbed the fleece.
View Image
The next day I flush cut the edges.
View Image
The eyebrow is installed and kerdi fix is applied at the floor and the screw holes.
View Image
I start at the center and trowell the thinset with a 1/4" X 3/16" V- notch.
View Image
I use a pont-up trowell to rake the unmodified thinset from the edges of the tile. This eliminates most of the squeeze-out.
View Image
Tile spikes are the greatest spacer I have ever used.
View Image
The eyebrow is complete, less grout.
View Image
Chuck S
live, work, build, ...better with wood
Mr Stevent1
You are just cruising right along - the tile medallion looks Stabila! That is a serious tub you got worked up there. Got to give you another flashback to when you all boys were up in the Maryland - do you remember a guy named the "The Rooster" - he drove a red Ford pickem' up and could talk a leg off a chair & was also known to drink large quantities of everyone else's barley beverages.
Again, you do very fine work. When I break ground on my camp in upstate NY I seriously want your assistance - probably start out with like a Ted Kazinsky type cabin with a couple of bunks, wood stove, and chemical commode, then get into the main cabin with some kind of 2 car size garage for model trains.
Might be making a roadie down to Dothan, AL - heck, I might just show up with a cooler full of cold ones just watch you work hard!
out
mortise n tenon
Mortis N Tenon,Thanx for your kind words about the tile. I do remember a strange dude named Rooster. I think he lost an eye and wore a black eye patch. I also think he was a volunteer fireman. He did like to drink a beer or 12.Your Upstate NY project sounds great. My sister has lived in Montreal for almost 30 years, she is a dually. Most folks think of NYC when they think of New York, but if you drive to Canada on 81 or 83 the sites are amazing. I think upstate NY is one of the most senic areas of our country.Are you building near Lake George? I think I would pick the Adirondacs, maybe near one of the many lakes. I do offer design/build services, specializing in institutional and commercial millwork. I piddle in residential and might be interested, but that is a long haul from Georgia. You might want to look into green timber framing.Chuck Slive, work, build, ...better with woodEdited 6/15/2007 8:25 am ET by stevent1
Edited 6/15/2007 8:28 am ET by stevent1
Decided to fabricate the trim before the vanities. I started milling some swamp Cyprus for the trim work. This trap door is used to lower stock from the loft.
View Image
The trap door is opened and the wood is slid out.
View Image
Then tilted.
View Image
This should be enough to get started. I buy it from a mill in LA and order it kiln dried, 4/4 SEL. & BTR, 8 and wider, 12 and longer, S2S1E, 7/8"
View Image
The Cyprus is planed to 13/16". 1/32" is removed from both sides.
View Image
The shop is rearranged to handle these 14'ers
View Image
View Image
Chuck Slive, work, build, ...better with wood
The planed Cyprus was used to mill some false columns. An auxiliary fence and featherboard is used with a stack dado head to cut 3/8" X 3/8" rabbets and dados for the corners of the columns.
View Image
A block plane is used to chamfer the edges to aid in alignment for assembly.
View Image
View Image
The pieces are glued using Tite Bond II, the glue is spread with a China bristle brush.
View Image
Then clamped.
View Image
This joinery makes for a very strong corner. It has 1-1/2"glued surface. The face of the column overhangs the sides 1/32" and will be flushed after the glue sets.
View Image
Chuck S
live, work, build, ...better with wood
Edited 7/1/2007 8:58 pm ET by stevent1
The column is first scraped.
View Image
The 1/32" overhang is flush routed.
View Image
The fourth side of these false columns is only 24" long. The rebates are cut 9/64" deep.
View Image
The piece is dry fit and sanded flush.
View Image
Everything is sanded to 180 and all edges are eased. sanding sealer thinned 3-1 with laquer thinner is applied with a china bristle brush as a wash coat. This 30 year old brush is held together with pan head screws.
View Image
The fronts, backs, edges, and ends are sealed with two coats. Light sanding between coats.
View Image
I am sealing many pieces that need to dry for 30 minutes before I can do another batch. I suspend the brush in laquer thinner using a piece of wire with a 1/4" hole in the handle. The brush keeps it's shape.
View Image
Chuck Slive, work, build, ...better with wood
The column is dry fit.
View Image
The fourth side of the column is glued and clamped.
View Image
The 1 x 6 T&G Cyprus bead board is acclimated for 72 hours.
View Image
A 3/8" X 3/8" rabbet was cut on the top of the 13/16" x 7-1/4" base.
View Image
The same cut is made on the ends of the scant 3/4" bead board..
View Image
A scrap is used to snug the cyprus.
View Image
A 2006 and 2007 penny is placed in the wall.
View Image
The base sits proud of the T&G by 3/32" or so. This system avoids a major dust catch.
View Image
Chuck S
live, work, build, ...better with wood
Edited 7/2/2007 6:35 pm ET by stevent1
This is the most anal retentive project I have ever witnessed. That is a compliment. :-)
Thanx Jesse,
Something about working on your own house.
Chuck Slive, work, build, ...better with wood
The four false columns are installed. These two are at a closet entrance.
View Image
The transition of tile to closet floor worked out well with the corners of the columns. The Swamp Cyprus in the shower column got 4 coats of Marine Spar varnish and the end grain at the bottom got 2 shmears of 100% silicone. It was installed 1/8" above the tile for a bead of silicone.
View Image
The T & G bead board is complete at the tub surround.
View Image
I found these Yard lights at Governor's Antiques in Richmond VA. One of them had a sticker 'Property of American Tobacco Company'
View Image
The antique dealer thought these lights were from a 1920's warehouse. All connections are bronze.
View Image
The fixtures are white porcelain over steel with baked on green enamel. It took a while to clean them up. 1/2" rigid conduit was threaded then bent for the arms. Galvanized primer and hammered spray paint finished them up.
View Image
#12 THHN was used to rewire the yard lights.
View Image
Chuck S
live, work, build, ...better with wood
That place looks amazing Chuck. Can't wait to see it all.
BTW, where are the lights going?Live in the solution, not the problem.
Thanx David,
Those lights go on the 2 corners. I have 4 of them on the shop. I am still looking for the wire 'cage' to protect the bulbs. I have also seen 'globes'. Don't even know where to begin to look. Hopefully one of the electricians around here knows.
View Image
View Image
Chuck Slive, work, build, ...better with wood
That building is gonna make a sweet pool-house for SGB.
Be Happy!Live in the solution, not the problem.
Where exactly in Home Despot do they have that swamp cypress?
Edward,
Not from lowdepot. The cyprus is from Ruston LA, via Santa Rosa Beach FL.
View Image
Chuck S
live, work, build, ...better with wood
Edited 7/22/2007 7:59 am ET by stevent1
I cut all of the cyprus molding on a 3 HP VS router bolted through a work table. A finger board is used to keep the stock tight to the fence.
View Image
I profile both edges of a wider board and then rip it to width.
View Image
These pieces are glued up and will go at the tops of the windows.
View Image
The 1-5/8" bed mold will be sanded to 180, then 2 coats of sanding sealer.
View Image
Chuck S.
live, work, build, ...better with wood
Edited 8/17/2007 4:27 pm ET by stevent1
Hey - you're back at it! Thought you wandered off.
Forrest
Damm Skippy that is lookin good! I love makin moulding that way, esp with a good milling wood like Cypress ( er.. CAN be).
Glad I stumbled on these pics. before ya fell of the list again.
I guess after a whole case of Seagrams, I'd need a break too. (G)
Duane,
Thanx. The Seagram's box is for short scraps. I'm a Ezra Brooks man. Ezra has a cork instead of a screw cap. No sippen when tools are used.
The sills are glued up 4/4 then planed to 1-1/4". The back-out cuts are done on the table saw.
View Image
The notches are laid out and cut.
View Image
View Image
All the cuts are sealed and a second coat is put on the sills.
View Image
The header and apron are cut to length. The 5/8" x 1-1/4" bull nose is cut 1-1/8" longer and is returned by simply rounding over with a rasp and a sanding block.
View Image
The 13/16" cove and the 1-5/8" bed mold are dry fit.
View Image
Then glued and pinned.
View Image
The cove and bed mold are left loose.
View Image
Chuck S
live, work, build, ...better with wood
The sill is set first.
View Image
The jacks and mullion are next.
View Image
Honky Cat likes the 5-1/2" sill.
View Image
The apron is positioned and propped in place.
View Image
View Image
The 3/8" x 3-1/16" stop bead is cut a red one long so it can spring into place.
View Image
View Image
The stop bead gets pinned with my 25 year old Senco. No plastic parts like some of the new pinners. The in-line swivel is great for getting into tight spots.
View Image
The header is next.
View Image
The 1-5/8" bed mold and 13/16" cove can now be pinned on.
View Image
Here's the apron detail.
View Image
The header detail.
View Image
These windows are trimmed similar to the rest of the house.
View Image
Shnelly takes her turn.
View Image
Chuck Slive, work, build, ...better with wood
Real sweet.
It is refreshing to see someone actually pay attention to the cathedral grain and get it all pointed the right way..(G)
That looks great!
Will be building my own place soon and can definetly see a few ideas I can "borrow" for my own place.
I love trim work when its done right, I'm terrible for visiting friends new houses, looking at all the trim work and doors, casings, some of it is absolutely terrible but I tell them its ok so as not to offend them! It doesn't matter if you use the best of material for trim work , if its not done right it looks terrible.
Emmet,I aggree. good trim work, in the right prportions and style, make or brake a house. I was in a new, $850,000 home last week and the trim was awful. Bad miters, chair rail was thicker than the casing, running joints in crown that did not meet up. I could go on and on. I have seen better trim in tract homes.Hope you do a thread when you build your house. Will it be masonry or frame? From the looks of the work you have posted, it will be a well built home.Chuck Slive, work, build, ...better with wood
I'm going to build a timber frame house, it's not all that common here, i think only 27% of houses built in Ireland are timber frame, most houses here are block built.
I dont do a huge amount of timber frame myself but I am looking forward to it. I will do all the work apart from the electric & the plumbing. Its good timing for doing timber frame because the price of lumber has just come down, building has quietened down in the last 6 months and there is an over supply on lumber.
I'm sure I will have lots of questions to ask all the geniuses on this forum!
Its good timing for doing timber frame because the price of lumber has just come down, building has quietened down in the last 6 months and there is an over supply on lumber.
Around here that can change very nearly overnight. All it takes is one good hurricane or other natural disaster. The initial spike seems to be caused by all the folks in a hurry to get their supplies BEFORE the hurricane damaged folks buy theirs (which is typically why the price goes up even before the winds stop blowing).
Terminology: I know some folks on that side of the pond say 'timber' whereas we just say 'lumber'... so when you say "timber frame" do you mean constructed of 2x4/2x6's (which we would probably call 'stick built') or constructed from large timbers? I need to go find a pic of what comes to mind when I hear 'timber frame'.
[edit to add]
OK, here we go. From the web, here is what I picture with 'timber frame'
View Image
jt8
"Democracy is two wolves and a lamb deciding what to have for dinner, liberty is a well armed lamb protesting the vote." -- Benjamin Franklin
Edited 8/22/2007 10:27 am by JohnT8
Edited 8/22/2007 10:41 am by JohnT8
You forgot the Amish guys.
Forrest
As requested.
View Image
jt8
"Democracy is two wolves and a lamb deciding what to have for dinner, liberty is a well armed lamb protesting the vote." -- Benjamin Franklin
Edited 8/22/2007 12:50 pm by JohnT8
Nice pic.
I was working in Deleware one summer and the Amish would raise a 40 X 60 barn in 2-3 days.
Chuck Slive, work, build, ...better with wood
It's a puzzle I bought Ma last year.
View Image
http://ohioamish.com/puzzles/p_puzzles_bottom.htm
Not to interupt all the thread hijacks, but HOW's the trimwork coming?
jt8
"Democracy is two wolves and a lamb deciding what to have for dinner, liberty is a well armed lamb protesting the vote." -- Benjamin Franklin
This is indeed a great thread with a lot of great info!How did you finish the crawl space access opening? None of the pictures show this detail. I ask because I have a similar situation with the added complication that 2/3 of the opening is below the finished grade.Thanks.
Brad
Brad,Thanx for the kind words. I had my sheet metal man brake me a piece of 20ga galvanized. I haven't installed it yet. How are you going to finish your opening and keep the rain out? I have seen openings at grade level and the crawl space below grade. Chuck Slive, work, build, ...better with wood
Chuck, man everything looks great ,I wish I was a quarter of the craftsman you have demonstrated that you are. D.W.
Thanx Dw,Here is a link to your picture posting questions. If that does not help , call me.http://forums.taunton.com/tp-breaktime/messages?msg=94176.1Everyone have a safe, and happy Labor Day.Chuck Slive, work, build, ...better with wood
Did your camera break, or you just been too busy to work on your 'project'? We haven't had any in-progress photos in quite a while.
jt8
"It is difficult to get a man to understand something when his salary depends on his not understanding it." --Upton Sinclair
Been busy with some income producing work. Here are some pics of the pocket door trim. The jamb is first. The pocket side trim is predrilled to hit the slots. PL premium is used then nailed with 8D HDG finish nails.
View Image
View Image
The strike side is nailed and shimmed to meet the door. No door stop will be used for a cleaner look.
View Image
View Image
The header trim is checked for level and the removable side is predrilled for screws.
View Image
View Image
Chuck S
live, work, build, ...better with wood
The Plinths are 1-1/4" x 5-1/2" x 11" and match the rest of the house. The base is 7-1/4". The trim is kerfed on the back for the adhesive to grab.
View Image
The Cyprus base is cut on the variety saw with a cross cut sled.
View Image
PL adhesive is used on the base and plinth
View Image
View Image
The plinth is set, then the base. (The pencil line is off)
View Image
The 4-1/2" casing is installed next. 1-1/2" gum coat galvanized staples are used on the pocket door side.
View Image
View Image
View Image
The header trim is nailed next
View Image
View Image
The 1/2" bead is sprung into place and pinned.
View Image
The bed mold is then applied.
View Image
View Image
View Image
Screw caps are installed on the removable head jamb.
View Image
Chuck S
live, work, build, ...better with wood
I see a Johnson kit buried under that trim. Nice to see some REAL trim work!
Looks good, keep 'em coming.
jt8
"It is difficult to get a man to understand something when his salary depends on his not understanding it." --Upton Sinclair
The vanities are started by sizing the 3/4"(18mm) Virola plywood to get 2 panels or stretchers from each piece. 1/2" x 13/16" Alder edges are glued and clamped.
View Image
View Image
A 1/2" x 1-1/4" rip is glued on one edge for an integral wall scribe.
View Image
The panels are clamped overnight and then flush routed.
View Image
The edges are eased and sanded to 180.
View Image
The panels next get a wash coat of sanding sealer.
View Image
Chuck Slive, work, build, ...better with wood
You told me the other day that you had over 300 pics of this project yet to post...
Better get busy.
Thanks for the catch-up.
Whaddya think, another backflip in Hot-lanta this weekend?The best reward for a job well done is the opportunity to do another.
David,
It may not be a back flip but it could be a double digit.
The panels are cut to length before being ripped to depth. The dadoes are next.
View Image
3/4" x 3/8" rabbets are cut on the top, bottom, and backs of the sides.
View Image
The sides are glued and stapled to the bottom then the divider is glued, stapled and screwed using 1-5/8" Galvanized deck screws. (pre-drilled and countersunk).
View Image
The rear stretcher is installed.
View Image
The front streatcher is installed next and the box is checked for square.
View Image
View Image
Chuck S.live, work, build, ...better with wood
The backs are installed without glue and tacked in place to hold the unit square. 1/2" x 3" plywood screw strips are glued, stapled and screwed.
View Image
1/2" x 1" ply retainer strips are glued and stapled
View Image
View Image
The basic cabinet box is done.
View Image
Chuck Slive, work, build, ...better with wood
Steve,
Thank you for the kind words.
As per your email response earlier today, I formed a new LLC and acquired a new business liscence effective (01 01 08) as CMS (Construction Management Services). I have been quite busy but want to complete the Small Addition.
The numbers on the R/O sanders are the month and date they were purchased/put in use. I have replaced the hook and loop pads at least twice.
The door and drawer faces are next. 1/4" RC white maple plywood has been sanded, washcoated and two coats of finish have been applied, then labled for grain orientation.
View Image
The stiles and rails are 25/32" x 2-1/4" Select & Btr. Alder and are dadoed 1/4" x 3/8" The set up is checked.
View Image
Some rails are double dadoed or ploughed.
View Image
The stiles and rails are cut to length.
View Image
A stop block is clamped to the miter saw fence and is 1/4" above the fixture to prevent saw dust build-up
View Image
3/8" x 1/4" tennons are cut on the table saw. It is not a safe practice to use the mitre guage and the fence, but accuracy is a must for true fabrication.
View Image
Chuck S
live, work, build, ...better with wood
The stiles and rails are checked. You want the joints snug but not tight.
View Image
All of the edges are eased.
View Image
Easing the edges gives a slight bevel at the joints.
View Image
These three drawer faces are built as one panel and then cut to size. This method gives a perfect grain match for the stiles and rails.
View Image
This is a dry fit.
View Image
The fronts are then glued and clamped.
View Image
Chuck S.live, work, build, ...better with wood
Very fine workmanship.
I guess I never saw this thread before. Guess I'll have to backtrack this afternoon.
Walter
As the door and drawer fronts dry, 1/2"(12.5mm) 9 ply Baltic Birch plywood is sanded and sealed to be used for the drawer parts. Sorry 'bout the dust orbs.
View Image
The dados for the drawer sides are cut on the table saw.
View Image
View Image
The pieces are ripped to size and another dado is cut for the 1/4" white melamine drawer bottoms.
View Image
A bead of glue is applied on the side dados
View Image
The bottom is inserted.
View Image
The front and back are set in place
View Image
The other side is glued and pinned.
View Image
The drawer box is carefully flipped over and the first side is pinned.
Chuck Slive, work, build, ...better with wood
Walter,
Thanx, glad you found it. I enjoy your fine work as well.
The pin holes are spot puttied.
View Image
The top edges are routed with a 1/4" round over bit.
View Image
The drawer edges are sanded.
View Image
The corners are "squared" with a rasp and sanded with 120.
View Image
View Image
The edges are sealed.
View Image
The drawers get sanded to 220 and a final coat of finish is applied.
View Image
Chuck Slive, work, build, ...better with wood
Kraft backed Maple veneer is cut for the center vanity, it is 3" deeper and 7" taller than the outside vanities.
View Image
Contact cement is applied to the veneer and and the cabinet. Dowels are used to position the veneer after the glue dries.
View Image
View Image
A J-roller is used to get good contact.
View Image
The veneer is flushrouted.
View Image
The edges are eased.
View Image
Both sides of the cab are veneered at the exposed area.
View Image
Chuck Slive, work, build, ...better with wood
The vanities, doors and drawer fronts got 3 coats of 2# amber shellac on the alder. The maple panels were finished before assembly. The drawers are cut to size and the edges wil be shellacked.
View Image
View Image
The door/drawer for the sink compartment is scored 3/16" deep.
View Image
Aniline dye is brushed in the kerf to give the illusion of a door and a drawer front. This is easier and faster than attaching a false front. A tilt tray is another option.
View Image
Chuck Slive, work, build, ...better with wood
The vanities are joined using sex bolts.
View Image
A jig is used to locate the 5/16" holes.
View Image
The vanities are clamped off.
View Image
A piece of scrap 3/4" ply is used to prevent blow-out.
View Image
The drawer slides are propped in place with plywood.
View Image
The middle slides are next.
View Image
Finally the bottom slides.
View Image
The vanities are ready for door and drawer fronts.
View Image
Chuck Slive, work, build, ...better with wood
The hinge plates are located using a jig.
View Image
35 mm holes are bored on a drill press.
View Image
The hinges are aligned and the screws are pre drilled.
View Image
View Image
Chuck Slive, work, build, ...better with wood
The drawer boxes are predrilled and counter sunk to attach the fronts.
View Image
A pattern jig is made for the bail holes.
View Image
View Image
The jig provides clean accurate holes.
View Image
1/8" hardboard is used as a spacer between the drawer fronts. A 1/4" spacer is between the door and drawer fronts. 1" wood screws attach the front to the drawer boxes.
View Image
View Image
The drawers are opened and the drawer boxes are screwed to the fronts. the screws in the bail holes can now be removed.
View Image
Chuck Slive, work, build, ...better with wood
I made an eyebrow front tub deck a while back with an 84" radius with a 1-1/4" wide by 1-1/2" thick Cyprus bullnose. The first run is made with the trammel set at 82-3/4" to the inside of a 3/4"straight router bit. I made 2 3/16" passes to get 3/8" deep in a 18" rip of 3/4"(18mm) ply.
View Image
A second run is made with the trammel set to 84" to the outside of the bit.
View Image
A jig saw is used to cut within 1/8" or so of the radii.
View Image
The pieces are then flush routed with a flush bearing bit.
View Image
The inside and outside radies pieces are then screwed to another 18" rip of 3/4" ply to make a second set of identical pieces. The inside radius piece will become the template for the tub deck.
View Image
Cyprus was ripped to 1-3/4" and then resawn to 8 5/32" pieces. Witnes marks are made to keep the pieces in order.
View Image
The rips are glued between the two radii jigs. the rips are about 16" longer than needed.
View Image
2 pieces of 1-1/2" x 3/4" cyprus were also glued up for the returns.
View Image
The lamination dries overnight and ripped first to 1-5/8" then flipped and ripped to 1-1/2". 2 pieces of 3/4" ply(actually 18mm) plus horizontal grade plastic laminate add up to a scant 1-1/2". The returns were ripped to 1-1/4"
View Image
The eyebrow is then screwed to the inside radius jig and routed with a 3/4" roundover bit in 4 passes.
View Image
The screws are placed at the ends. This is the reason for the extra length rips.
View Image
Chuck Slive, work, build, ...better with wood
The tub deck is made with 2 layers of 3/4"(18mm) exterior glue plywood. The inside radius jig was used to template the front. The plywood and p.lam are coated with contact cement.
View Image
Dowells are used to position the laminate when the glue is dry to the touch, about 5-8 minutes.
View Image
The P-Lam is then rolled.
View Image
A file is used to create a hole for the solid carbide 1/4" flush pilot bit.
View Image
The tub deck is ready for the bullnose.
View Image
Chuck Slive, work, build, ...better with wood
A plate joiner is used to attach the bullnose.
View Image
The ends of the bullnose are mitered and the outside radius jig is used to glue and clamp the eyebrow to the tubdeck.
View Image
A scraper is used to fine tune the bullnose. The Cyprus is then sanded to 180.
View Image
The bullnose gets sealed and later marine varnished.
View Image
The tub deck was set in place before the Cyprus bead board was installed.
View Image
The tub was then set.
View Image
The bullnose returns were cut to length and glued in place.
View Image
View Image
The tub area is done less the crown mold.
View Image
Chuck S.live, work, build, ...better with wood
Chuck,
Very, very nice workmanship.
My hat is off to you for the thoroughness of the process and pictures.
This is what makes Breaktime special for me -- seeing all the fine work that folks are completing. All my thumbs up !!!
Walter
Walter,
Thank you for the kind words. This small addition has been a slow process. I have been building this out of pocket(no loans or 2nds) and have a little under 20K in it. My labor is free but I have other income producing work in progress.
The vanity counters are next. A template was mad for the inset vessel sinks. The rim is tapered from 3/4" to 1-1/4". The sink is posititioned, inverted and scribed.
View Image
View Image
The offsets are measured every 3" or so around the bowl.
View Image
Nails are then drive at the marks.
View Image
A thin rip is used to mark the template
View Image
View Image
The sink holes are then cut and the p-lam is applied in the usual manner.
Chuck Slive, work, build, ...better with wood
Wow..."Research is what I'm doing when I don't know what I'm doing..."
The center vanity counter has a radius bullnosed front that matches the tub eyebrow but is shorter. The eyebrow templates are used but cut down to 50".
View Image
The deck is scribed, jig sawed, then flush routed.
View Image
The counter is battened out shy of the wall edge. This will make it easier to scribe to the wall rather than a 1-1/2" thick counter.
View Image
P-lam is applied next in the usual manner.
8 5/32" rips of 1-3/4" Cyprus are glued up to make a 1-1/4" wide bullnose.
View Image
View Image
The lamination cures overnight and is once again ripped to size.
View Image
The glue up is once again screwed to the jig and bullnosed.
View Image
View Image
Chuck S
live, work, build, ...better with wood
Edited 3/9/2008 6:54 pm ET by stevent1
Thanx for the Wow.
A 90' radius bullnose is also needed. 2 pieces of 3/4" Cyprus are glued overnight to fabricate a 1-1/4"w x 1-1/2"t 9-1/4"radius bullnose for the left vanity top.
View Image
The glued up stock is ripped to 3-7/16" and mitered to 14-9/32" at the long points. The blank is bisquited to a sacrifice board that is an 8" rip of 3/4" MDF that is screwed to a 20" rip of MDF. All dimensions are referenced from the centerlines.
View Image
View Image
This set-up cures overnight. A first pass is routed using a 1/2" staight bit set on a trammel at 9-1/4" to the inside cutting edge.
View Image
Each pass is about 3/16", so 8 passes are required. This is the sixth pass. Shallow passes are taken as not to tear out the edge/end grain.
View Image
The final pass for the outside radius.
View Image
Chuck Slive, work, build, ...better with wood
The next step is to size and glue 45' blocks to the MDF at both returns. The returns are cut to size and glued to the MDF only
View Image
View Image
This sets over night and the outside radius is routed with a 3/4" RO bit in 4 passes.
View Image
The outside of the bullnose is complete.
View Image
The inside radius is cut next. The inside radius of the trammel is set at 8" to the outside edge of the router bit and matches the left hand vanity top radius.
View Image
1" relief holes are drilled into the bottom layer of MDF to start the lower passes of the router.
View Image
Once again 8 passes are required. This is the 6th pass.
View Image
The 90' Bullnose is complete.
View Image
Chuck S.
live, work, build, ...better with wood
Chuck, good to see this thread revived.
jt8
"A single rose can be my garden...a single friend, my world." --Leo Buscaglia
The bullnose is now attached to the counters. The eyebrow is mitered, plate joined and glued.
View Image
View Image
It is clamped using the outside radius jig.
View Image
A 45' block is screwed on the back of the curved counter.
View Image
The 90' bullnose is glued and clamped. A rubber pad is used on the clamp to protect the Cyprus.
View Image
The rest of the bullnose is bisquited, glued and clamped to the counters in the usual manner. The bullnose is scraped, sanded to 180, sealed and 2 coats of Marine spar varnish (satin) are applied.
Pilot holes are drilled in the countertops for the backsplash.
View Image
A bead of clear silicone is applied.
View Image
The backsplash is clamped in place and is predrilled for the 2-1/2" galvanized deck screws.
View Image
Any silicone that oozes out is best left to dry and cleaned up with a razor blade.One thing I always do on sink tops is put a schmeer of silicone on the sink cut outs. This is especially true for SS drop in sinks.
View Image
Chuck S.live, work, build, ...better with wood
John,
I finally found/made time to get almost caught up. I am now fabricating the Medicine Cabinets.
The vanities are installed next but first the jamb extensions and right side plinth and casing must be installed. The 11-1/4", 3/4" MDF jamb is glued and screwed together on the floor.
View Image
Bisquits and glue are used to attach the jamb.
View Image
The jamb is then nailed off.
View Image
There is a 3/16" reveal between the existing jamb and the jamb extensions.
View Image
A 1/2" rip of Cyprus was glued and clamped to the edge of the MDF. This will give a good transition from the painted jamb to the Cyprus trim.
View Image
Chuck S
live, work, build, ...better with wood
Edited 3/10/2008 2:30 pm ET by stevent1
The 5" plywood toekick is covered with the same p-lam as the counters. The kick is screwed to the wall studs.
View Image
The plumbing holes are laid out in the backs of the cabinets. The pilot bit of a hole saw is used from the back side then the hole is drilled from the inside of the cabinet.
View Image
The counters are screwed through pre-drilled holes in the stretchers.
View Image
A major bead of silicone holds the let in vessel sinks in place after they are hooked up.
View Image
Here is the transition between the vanity tops and the door trim.
View Image
Honkey inspected the job and leaves in a huff.
View Image
Chuck Slive, work, build, ...better with wood
The drawers and doors are reinstalled on the vanities. Here is the left side.
View Image
The center cabinet.
View Image
Here is a shot of the eyebrow front on the center vanity top.
View Image
The right vanity.
View Image
Silencers were placed on all of the drawers and doors.
View Image
The vanities are done.
View Image
Chuck Slive, work, build, ...better with wood
Chuck
Great job! Not the biggest fan of those sinks but I like what you did, and how you did it.
Doug
Doug,
Thank you for the kind words.
I know these sinks are trendy. Vessel sinks and let in vessel sinks like I used can be problematic if they do not have overflow holes. The let in vessels I used do have overflow holes.
View Image
Here is a close-up.
View Image
They missed a litle paint on the left hole, but the price was right for these Tavalera sinks.
Chuck Slive, work, build, ...better with wood
Nice work, as always - nice descriptive thread!
Forrest - not a cabinetmaker
Forrest,
Thank you. You do great work as well.
Show David Hawks that front portico you built using brackets from Walter(theslateman). I tried doing a search for the thread to send him a link but came up with the famous copper pipes.
The sides are rabbeted, glued and stapled.
View Image
The top is glued and stapled. I used some leftover bead board in this unit.
View Image
The back is offall and is laid out to match the paneling below the unit.
View Image
The back is attached with one staple at the center of the edges so the t&g can expand and contract. The pic shows a glue bottle but none was used on the back. I left 1/16" at either end to ward off tenting.
View Image
Chuck S
live, work, build, ...better with wood
Morning Chuck,Thanks for the updates. Beautiful work as always.That house in Lewes...where did you get the idea for that Chinese railing on the stairs? That's absolutely fabulous craftsmanship. How's that held together? Dovetails?And for a hat-full of questions about your recent work...you favor staples over brads for a reason? Maybe they hold better in cypress?"The back is attached with one staple at the center of the edges so the t&g can expand and contract"...do you mean you put one staple top and bottom of each plank?Best,
Steve'Man who say it cannot be done should not interrupt man doing it' ~ Chinese proverb
Steve,
Thank you for following along. I wonder sometimes if my posts are to long winded.
"That house in Lewes...where did you get the idea for that Chinese railing on the stairs? That's absolutely fabulous craftsmanship. How's that held together? Dovetails?"
The owners lived in Georgetown(DC) and had a book on Lewes Houses. I milled the rail and newell from Honduran Mahogony and the balustrade was glued and nailed w/4d HDG finish nails. It was all preddrilled.
"And for a hat-full of questions about your recent work...you favor staples over brads for a reason? Maybe they hold better in cypress?"
I think the gum coated staples hold better than a 16g finish nail.
"The back is attached with one staple at the center of the edges so the t&g can expand and contract"...do you mean you put one staple top and bottom of each plank?
You are correct. I should have said the top and bottom edges of each plank.
Thanx for finding the link to Forrest's epic thread.
Chuck S
live, work, build, ...better with wood
Edited 4/12/2008 8:16 am ET by stevent1
Chuck,No, they're not long-winded at all. Until you release "Stevensons' Secrets to Fine Cabinetmaking" on dvd, this is my best source, so please keep it coming.Thanks for the info on that stairwork. Got to say, I've seen some really nice stuff here, but that's at the top of my list. Perhaps because it's something you don't see everyday. My hat's off to you.Best,
Steve'Man who say it cannot be done should not interrupt man doing it' ~ Chinese proverb
Steve,
Once again, thanks for the kind words. As I told Walter in his Timberframe thread, The more I learn, the more I realize how much I don't know. The Slatemans' thread is one of the best ever IMHO.
I do enjoy building steps. Stan Foster's work is excellent
I hope eveyone can someday visit Williamsburg VA. and see the shops where everything is done by hand. The North Bennet Street School is also traditional.
http://www.nbss.org/Programs/index.asp?pageaction=ViewSinglePublic&LinkID=79&ModuleID=17
Chuck Slive, work, build, ...better with wood
Steve,
I'll second that twice !!
Chuck makes it appear so effortless with his set ups, when you just know how tough it really is.
It's been a treat and almost makes me feel I could attempt some of these processes on some of my own jobs.
Walter
Walter, I know, isn't it gorgeous. We need to convince Chuck to do a cabinetmaking demo at a fest, wouldn't you say?Hope things are well for you in ME. Just getting caught up on your thread today, too.Best wishes,
Steve'Man who say it cannot be done should not interrupt man doing it' ~ Chinese proverb
Steve,
Yes I think that would be wonderful if he is willing !!
I won't be able to attend since my wife will be away at that time.
We're winding down on the Crane thread.
Walter
Walter,
Thank you. I love to teach and almost took a job last year at the local technical college teaching cabinetmaking.
Chuck Slive, work, build, ...better with wood
Cyprus stock is milled for the face frames for the medicine cabinets. The stiles and rails are 2-1/4" x 3/4".
View Image
The frame stock is cut on a miter saw equiped with an auxiliary fence.
View Image
A stop block is clamped to the fence. It is about 3/8" clear of the fence plate so saw dust will not build up and I can slide the block above the bench rule which is held against a carbide tooth with the blade in a locked down position.
View Image
The edges and ends are eased.
View Image
Chuck S
live, work, build, ...better with wood
Edited 4/20/2008 11:58 am ET by stevent1
A plate joiner is used for the face frames and bisquited in the usual manner.
View Image
The face frames are glued and checked for flatness.
View Image
Any glue squeeze out is cleaned up at this time. I am using TiteBond III. The frames are checked for square.
View Image
The frames dry over night. sanded to 180 and a get wash coat of sealer.
Chuck Slive, work, build, ...better with wood
The doors are next and are dado and tenon construction. The stiles and top rail are 2-1/4" x 3/4" and the bottom rail is 4-1/2" x 3/4". The Cyprus is culled for grain and color.
View Image
The joinery will be similar to the Alder vanity doors. The 3/8" x 1/4" tenon will yield 1-1/2" glue surface. A full scale drawing is referenced.
View Image
The doors are glued, clamped and dry over night. They are sanded and washcoated. They are ready to have a back-out cut done.The 45" tall doors are for the medicin cabinets.
View Image
The 33-1/2" tall door is for the commode room cabinet.
View Image
Chuck S
live, work, build, ...better with wood
Edited 4/12/2008 6:49 pm ET by stevent1
A rabbet has to be formed on the backs of the doors. A variable rabbet bit is used to remove part of the milled dado. A stepped tenon joint would have eliminated this step and eliminate the awkward inside corner on the backs of the doors.
View Image
A 1/2" x 3/8" rabbet is created for the double strength mirror (+ or - 1/8"), the 1/4" (6mm) white maple rotary cut plywood, and the stepped stop bead. I cut the back dados out on the top and bottom rails before the doors are glued.
View Image
The corners are cleaned out using a Mayhew chisel. A Mayhew chisel can lay flat, unlike a wood chisel. I also like them because the are all steel and not steel into a plastic or wood handle. I do keep a yellow handled "beater chisel" with my carpentry tools for rough work.
View Image
View Image
Chuck S
live, work, build, ...better with wood
oooh,oooh..I want one of them there Mayhews..I recently had a slew of the same rabbet clean outs, between 4 bifold doors ( two panels ea) and a pair of screen doors in process. 3 screen panels in them.
I do have a corner chisel , but it was in my shop fire and the temper is kaput..I also had a dog leg Marples but some SOB swiped it.
Where'd ya get that nifty tool addition?Spheramid Enterprises Architectural Woodworks
"Welcome to Poo-ville, can I have your socks?Seriously Folks, I need a home for 3 lovers of your life.
Duane,
To make a short story long, I got a full set of Mayhew's ( 1/8" through 1-3/4" incremented by the /16") back in the early '70s when I was the assistant manager of the wood shop at Community Paint and Hardware Co. in Bethesda MD. We built simple things such as radiator covers, lattice panels, corner cabinets, and ping-pong tables. The store was owned by the 5 Broadhurst brothers. Harold, the oldest (a philatelist), Roscoe, Ralph, Harold, and Alfred the youngest (a bee keeper). The original store was a former toll house to cross the B&O railroad gorge that was a coal line to the steam plants that heated the US Capitol and most Federal buildings. Community was a traditional Hardware store with wood floors, nail barrels and grain bins. They had a horshoe pit along the tracks that was used after work. If a customer needed 6, 5/8" #7 Brass oval head wood screws, we would count them out and make a $.20 sale. They had one cash register that had 12 drawers, one for each clerk. Many sales were added up on the brown paper bag we used for the purchase. It was manual with a crank. They had personal and commercial accounts that were written out on old triplicate invoice machines. When we were busy, Harold had made numbers out of old P-lam sample chips and the customers had to take a number. On a good Saturday we would turn the 125 numbers 6 times. The store had 2 buildings. The original 1845 toll house with a 3 story 1940's addition on the rear and a 3 story accessory building that housed the wood shop, lower level, the lawnmower/small engine and equipment shop and tool storage on the third floor. Both buildings had a lift.
Community cut glass and keys, mixed paint, threaded pipe and all of the things 'lodepot' cannot do. When Harold, the manager of the wood shop retired in '76 the wood shop closed about 6 months later. He gave me a stack of 3x5 cards with his customer contact information. I had saved enough money working at 4.05 an hour to buy a new 1977 F 100 351 3 speed w/Granny gear for $2800.00 tags, tax and title. That is barely a downpayment nowadays. ( I only buy used vehicles now and let someone else take the off the lot depreciation) My brother John and I Incorporated Stevenson Brothers Inc in 1977 in exchange for a bookcase to a Lawyer. At any rate the surviving brothers sold the property in '86 but the historical society made the new owners preserve the original toll house that is now a vintage knit and purl shop. The store had a Grand Closing party that I was invited to that was hosted by David Brinkley, the news anchor, whom was a hobbiest woodworker.
BTW here is a link to Mayhew. http://www.mayhew.com/
This pic shows a couple of Mayhews. The 1" and 7/16" blue chisels are Blue Grass Brand (Mayhew type) from Lexington KY. The one on the left is a Belknap 1-1/8" mortise lock chisel. I bet only a handfull of BT'ers have ever installed a mortise lock, tough to do in a 6/4 (1-3/8") door. I still have a Blugrass 18 oz. trim hammer with a 16" octagonal second growth ash handle. Once you find the first stud you use the hammer's length to find the next one.
View Image
The rest of my Mayhew's are in my site box.
Chuck S
live, work, build, ...better with wood
Edited 4/12/2008 11:08 pm ET by stevent1
Edited 4/12/2008 11:42 pm ET by stevent1
Edited 4/13/2008 12:17 am ET by stevent1
Edited 4/13/2008 6:45 am ET by stevent1
Edited 4/20/2008 12:07 pm ET by stevent1
Hey, no fair! You left out the tool #### warning! Looks like they've gotten out of the wood chisel business. Lots of other good stuff though!
Great story about where those chisels came from.
I've really been enjoying this thread. I realize it's a lot of work; as one of your eager students - thanks, teach! Learning a lot here, and getting inspired as well!
W,
Thank you. I also wonder why they stopped forging them.
Chuck Slive, work, build, ...better with wood
Hardwaring the doors are next. I got a PM asking what brand and type of hinges I use. This could be an entire thread. I prefer Grass and have been using them since 1979 and have not looked back. The original hinge had a plastic cup. Many brands of 32mm hinges are available. Besides Grass there are Mepla, Blum, Hettich, Salice, Hafele and a host of others. They can be zinc die cast or stamped steel. I mostly use the 3803, 120', 3-dimensional, half overlay hinge. I used to buy them 300 at a time to get a price break. They come 50 to a box, 6 boxes to a case. I only use snap hinges. Twist lock and cam lock hinges are also out there. I order specialty hinges as needed.
View Image
The plates vary from 3mm to 12mm. Left to right they are:
Face frame with rear screw (back plate) reinforcement
Face frame
Frameless 3mm full overlay
Frameless 9mm 1/2 overlay
Some hinge plates are adjustable. (None shown)
View Image
Inset hinges use a 12mm plate and an inset hinge.
View Image
The two basic hinges I use are120' half overlay(left) and 165' inset(right)
View Image
Chuck S
live, work, build, ...better with wood
Edited 4/13/2008 7:13 pm ET by stevent1
Edited 4/20/2008 12:11 pm ET by stevent1
The 35mm holes a bored on a Sprunger Bros. radial arm drill press that has an 18" x 61" table. An 8" rip from a staved core 1-3/4" flush door supports its length.
View Image
The bit is carbide tipped. Kind of like a chain saw, the larger the shreds, the sharper the bit.
View Image
The plates are located on the face frames with a jig. I am hardware-ing the doors before the face frames are attached and before the mirors are installed because of the shallowness of the casework and the weight of the finished doors.
View Image
Chuck S
live, work, build, ...better with wood
Chuck,Where in Bethesda was Community Paint? That sounds very familiar.Was it down by the intersection of Bradley Blvd and Wisconsin? Or up closer to the Tastee Diner?Neat chisel for the mortise locks. Does the flare of that handle provide an advantage somehow?Best,
Steve'Man who say it cannot be done should not interrupt man doing it' ~ Chinese proverb
Steve,
Community was between Bethesda Avenue and Elm Street, across from the Air Rights Building. John Kilbane bought the "Air" above a portion of the RR right of way and owned property on either side, hence the name of the building.
The flare on the chisel is for a better hand hold when striking and aids in hand paring. All of my chisels are hollow ground as well. I keep a whetstone handy as I work.
Chuck Slive, work, build, ...better with wood
Well ain't that sumptin!
We still have a similar hardware store like that up in Lex. Not quite as quaint and old timey, but close.
Being from the Philly and north wards area when I got started, I hit every antique shop, flea market, yard sale, estate auction I could, to aquire some of my favorites. When I signed on to spend a summer in Colonial Williamsburg, I REALLY went on a tool buying jag..a lot of the planes I found were from the heyday of Phila. Cabinetmakers's. Some worn beyond use, some negelected beyond belief, and some, very serviceable.
Then I got into whacking hot steel into what I wanted, not very good at the craft using a homemade forge ( brake drum and a blowdrier) and an anvil that is a foot long hunk of RR Track and a few ballpeen and crosspeen hammers.
I know well the process of the full box locks, I have a gooseneck cranked 3/8th or 1/2" chisel for scraping out the bottom of the mortice, remember Pipeorgans had access doors to the wind chamber and often they had common door hardware installed.
You mentioned the house I am working at being a thread, I'd love to, but the way things are panning out, I am about to have one of the busiest seasons ever..MUCHO work coming from every direction. I doubt I could document a thread effectively.
I'll be finding a helper I hope, I am just so limited as to how much I can get done with some of teh painstakingly slow restoration job..I mean, it took me a solid 7 hours to remove the brickmould, and heat gun strip to bare wood, the entire opening for a french 4'x7' door. I've a customer who says "damm the torpedos" slow it down and I want it "Perfect"..so I do. It's hourly + supplies+20% markup on supplies..so what the heck..steady, site is not cluttered with subs, small shop on site..I can dig it.
Then the shop at home has constant projects ( screen doors and a farm table, and a 9' tall x 5' wide book case at the moment)..for paying work, and then MY work for my house as well ( kitchen Island and a few cases for the same, I don't/won't make "cabinets" I make kitchen Furniture for us (G).
Oh, hell, I 'm on a coffee ramble. Sorry.
Thanks for the chisel story.Spheramid Enterprises Architectural Woodworks
"Welcome to Poo-ville, can I have your socks?Seriously Folks, I need a home for 3 lovers of your life.
Duane,
Good for you being booked. Many folks are hurting now with the economy but I think times like these separate the good from the folks who should not be in business anyway. Since I got my license back the first of the of the year I have been quite busy as well. Take pics of your work as you go and save them in an unresized file. When you have time post them.
Interesting about your forge. I have a friend, Marvin, who is a blacksmith. I posted a couple of pics on Walter's Crane thread. Marvin worked for years doing special effects for Hollywood and Orlando. He worked on "Jurassic Park" and many others. Articulation was his specialty. Marvin uses a hand cranked bellows for his coal fire. He has many tools, many self made.
View Image
View Image
View Image
His anvil is Colonial.
View Image
His layout table was built in place. The brick floor covers a 1' thick slab.
View Image
He moved his tools across the country in this F650. 460 motor, split rear and dump bed. Runs great.
View Image
He used to do a lot of handrails when he became semi-retired a few years ago to a town of 150 in the foothills of west Georgia.
View Image
He has a great wood stove where his jongleur nature comes out. His stories can burn off both of your ears.
View Image
Mavin makes a lot of fireplace sets and candle sticks.
View Image
View Image
Marvin is a true artisan and renaissance man. Here is a copper grave marker he made. He won't install it till the verdigris is complete. It is close.
View Image
His shop and home are one. The front.
View Image
The rear.
View Image
Talk about a coffee rant.
Chuck S
live, work, build, ...better with wood
Wow! My kinda buddy!
I'll do as you advise on the pics, the camera has been staying at home ( wife shooting puppy pics) but my fone has a decent camera, and I figured how to get them out, by emailing myself from it.
Rainy Sunday , second pot brewing..wood stove getting up to speed in the shop area..( thought we were done with that nasty chore, but chilly damp is tuff on the bones) Milling a 2'' oak cove moulding and bullnose when the spirit and coffee move me.
Might hog with the tablesaw and hand plane out the cove..prolly get afew pics for ya, just a 6' length is all I need to crown the built in bookcase.
Yeah, while some are dragging work wise, I am screaming along..lucky.
More later..DSpheramid Enterprises Architectural Woodworks
"Welcome to Poo-ville, can I have your socks?Seriously Folks, I need a home for 3 lovers of your life.
Cutting cove on a table saw is a great way to do it.
My brother and I had a shop heated with a woodstove. We kept a percolator going in all but the hot months. It was a shame to burn scraps that Dudabug would relish, but you can only save so much. I wonder why Black Walnut burns to a snow white ash.
Chuck Slive, work, build, ...better with wood
The face frames are glued, clamped and stapled. Blind fastening using bisquits could have been done.
View Image
I have a sample stick of different wood fillers, mostly Famowood. The stick is MDF with 3 coats of finish.
View Image
View Image
The 4 staple holes are puttied.
View Image
The face frames were sanded to 180 and got 2 coats of sealer, then knocked down with synthetic steel wool for a satin finish.
Chuck Slive, work, build, ...better with wood
Installing the mirrors in the Cyprus doors is next. I milled 1/2" 1/2 round for the stop bead. I routed a piece of 1/2" x 1-1/4" Cyprus on both sides of both edges with a 1/4" round over bit. The pieces are then ripped to size on the table saw.
View Image
A sacrifice board is clamped to the saw fence. A 1/8" x 3/16" rabbet is cut on one edge.
View Image
Here is the profile of the rabbet on the stop bead.
View Image
Chuck Slive, work, build, ...better with wood
The mirrors are cleaned with lint free wipes. The face of the doors have recieved the final coat of finish and a purple scuff pad was used for a satin finish. The inside of the rebated door edges was also finished and sanded so the reflection around the edges are consistent. A clean moving quilt is used to protect the face.
View Image
The double strength mirror is inserted.
View Image
The 1/4"(6mm) rotary cut white maple is placed. The backs have been sanded to 180, sealed and a coat of finish, then sanded with 220 stearated paper.
View Image
Chuck S
live, work, build, ...better with wood
Edited 4/13/2008 9:32 pm ET by stevent1
A dedicated mitre fence is clamped to the saw. A freshly sharpend 64 tooth ATB, 6' hook blade is put in this 25 year old tool. The fresh blade insures clean cuts. I have to replace the brushes about twice a year when the saw stops to brake.
View Image
All of the right hand mitres are cut first.
View Image
One left mitre is marked and cut and the oversized pieces are pinwheeled around the door frame and marked. I always creep up on the mark when cutting to get the mitre joints tight.
View Image
The stop bead is pinned at a 30' or so angle into the stiles and rails.
View Image
Chuck S
live, work, build, ...better with wood
Edited 4/13/2008 9:35 pm ET by stevent1
Edited 4/14/2008 9:05 pm ET by stevent1
Promise not to hog your thread..LOL
Wanna see my 20 minit moulding?
I'll post a thread to you in photo gallry.Spheramid Enterprises Architectural Woodworks
"Welcome to Poo-ville, can I have your socks?Seriously Folks, I need a home for 3 lovers of your life.
Duane,
I look forward to seeing any of your work.
View Image
Chuck Slive, work, build, ...better with wood
A 1/2"x 3/4" bead was milled, then glued and pinned to the stiles and rail above the lower shelf on the commode cab. The upper corners are marked and mitred as the unit lays flat.
View Image
This bead matches the door jack's bead.
View Image
The commode cab is complete less door.
View Image
Chuck Slive, work, build, ...better with wood
Four pilot holes are drilled to install the commode cabinet. One hole at the top and bottom of each side.
View Image
Screw caps are placed on the flush mounted 2-1/2" galvanized deck screws.
View Image
The commode cab is installed, less trim.
View Image
This is a good time to show the commode below. The TOTO was ordered online yet took 12 weeks to be delivered. I was fumed. The dealer's item description had an icon claiming it was an in stock item, took my debit card and I got an e-mail a couple of days later stating the white toilet is on back order.
C'est la vie. This toilet has a dual flush, push button valve.
View Image
.9 gallon on the left. 1.6 gallon on the right. Push both butons when you pass the Chalupa Grande with a side order of Beef Wellington and sausage pudding.
Chuck Slive, work, build, ...better with wood
I BOW BEFORE YOU, THE GREAT O'GRAND POOBA OF MASTER WOODSMITH'S-- Second that on the Chalupa--very nice work, Chuck, see if you can teach anything to our wormey little redheaded stepchild in a few weeks . :)
Dwaine,
Thank you. I enjoy woodwork and joinery.
I am postponing my 1st Monday in May BBQ till when David Hawks gets here.
View Image
Makes me hungry thinking about it. We will have a bunch of test pieces.
View Image
I am going to smoke 20# or so of pork butt.
View Image
Why don't you just jump in the truck with him and come on down to Columbus and bring Forrest from Oxford.
View Image
Chuck S
live, work, build, ...better with wood
Appreciate the invite chuck, but my wifes 40th birthday coincides with mothers day again this year so I am saving my pennies to get her a new tattoo," sheeech man that ought to be something jeff foxeworthy would say but it is the truth." I am havivg a big ole blowout for her on mothers day, and I think she is going to add to her ink collection on that Fri " a big set of Fairy Wings" between her shoulder blades".plus she just showed me some perfume she wants, that I have got to try to find so there goes all my traveling change, for a few months.
come to think about it getting her a new tattoo isn't as bad as the time I gave a set of false teeth for a bday pres. to a female ironworker I was shacked up with, she sure was pruddee after that!
D.W. a conessewer of fine wimmen & wine
Am I gonna beable to nab you to build me my wood burner before next year heating time? Huh , huh huh?
I gots the rocks, and the foundation is done.Spheramid Enterprises Architectural Woodworks
"Welcome to Poo-ville, can I have your socks?Seriously Folks, I need a home for 3 lovers of your life.
Duane I offered before to build that thing for you, and the offer still stands although DonK wants me to come down to his place and look at his fireplaces in a few weeks as soon as I finish up with the BoyScout reservation here next week , ---who would have ever thought that they would have picked me to practice my craft on some of their camps--o'well must be a shortage of ignorant, hillbilly masons-- Do you have some kind of specific plan you want to use? or is that up in the air. I better quit hijacking chucks thread or he will stop talking to me .
D.W. have trowel, will travel.
I lost your email when my AOL went kafluey.
I don't have a rock solid plan, but I know kinda sorta how we need to begin (G).
The doggone fire box is still something I can't picture..steel door, lots of mass..that kinda thing.
Yeah, lets us get outta Chucks hair..LOL
Spheramid AT AOL.comSpheramid Enterprises Architectural Woodworks
"Welcome to Poo-ville, can I have your socks?Seriously Folks, I need a home for 3 lovers of your life.
DW and Duane,
No problem. Some times I wonder if the minutia I present is like this. Let me know.
View Image
Chuck S
live, work, build, ...better with wood
No in fact your detail is very informative.
You can find general instructions anywhere, But a birds eye
view of a craftsman is rare indeed. Thanks for sharing.
Henley,
Thank you.
Sometimes that bird's eye view is a bit out of focus. I am using a cheap camera.
Chuck Slive, work, build, ...better with wood
No, we all love seeing the good works and appreaciate it, but I keep crossin paths with DW, and we hadda strike while the iron was hot..LOL.
I gotta say, man your shop space is way too clean..(G)
Did I miss what you use for finish on the cabs? I've been partial to a wash coat/sealer of shellac or seal cote, and then Nitro Cell. Maybe for a bath or steamy location a poly, but generally I stay away from urethane. I like repairabilty and urethanes always show witness marks.Spheramid Enterprises Architectural Woodworks
"Welcome to Poo-ville, can I have your socks?Seriously Folks, I need a home for 3 lovers of your life.
Duane,
I prefer clear or amber. Some restoration work requires garnet shellac. 2-1/2# is easy to sand and builds good body. The sanding sealer I have used on this project is an ICI product. 12.50 per gallon. I cut it with flash dry laquer thinner.
http://forums.taunton.com/n/mb/message.asp?webtag=tp-breaktime&msg=79773.320#a338
Chuck S
live, work, build, ...better with wood
Edited 4/14/2008 11:25 pm ET by stevent1
I gotta say, man your shop space is way too clean..(G)
Probably like Norm, he's got a cleaning crew that follows him around allowing him to create his art without being hassled by cleaning up. ;)
jt8
So what was that like?It was like coming THIS close to your dreams. And then watch them brush past you like a stranger in a crowd. At the time you don’t think much of it. You know we just don’t recognize the most significant moments of our lives while they’re happening. Back then I thought, “well, there’ll be other days.†I didn’t realize that that was the only day. --FoD
John,
Can you add the control pic to that slide show?
BTW I don's take pics of the floor.
View Image
Chuck S
live, work, build, ...better with wood
Edited 4/15/2008 5:14 pm ET by stevent1
Can you add the control pic to that slide show?
Already got it added.
[edit to add] Did you ever give me a logo? I can replace that Taunton one with your own logo if you've got one.
jt8
So what was that like?It was like coming THIS close to your dreams. And then watch them brush past you like a stranger in a crowd. At the time you don’t think much of it. You know we just don’t recognize the most significant moments of our lives while they’re happening. Back then I thought, “well, there’ll be other days.†I didn’t realize that that was the only day. --FoD
Edited 4/15/2008 5:20 pm by JohnT8
The FC coursing worked out well at the twin windows by laying out the elevation section on a 12' story pole.
View Image
View Image
The Clear Heart Redwood sill and Hardie line up well. There is a saw kerf on the bottom of the sill to creat a drip edge.
View Image
The FC above the window starts above the drip cap.
View Image
The sconce plate is 5/4 x 7" SYP is 2 courses tall. It also has a drip cap and inverted redwood scotia.
Chuck Slive, work, build, ...better with wood
I was outside and my wife just did that. Vacuumed the shop and cleaned up.
I came in and told her "I don't know why ya did that, cus in two minutes I need to joint and rip these" I went out for some lumber in the shed..LOL
So I jointed and ripped ( and just for fun left the dust collector unhooked to the jointer) and made a brand new mess..LOL
I prefer a major clean up just after a big project is done, thet way the scraps are still handy and the mess on the floor is from just one species mostly..some crud I can compost outta the dust collector bag, but some like walnut gets burnt.
Oh well.Spheramid Enterprises Architectural Woodworks
"Welcome to Poo-ville, can I have your socks?Seriously Folks, I need a home for 3 lovers of your life.
I came in and told her "I don't know why ya did that, cus in two minutes I need to joint and rip these" I went out for some lumber in the shed..LOL
You're supposed to say, "wow dear, that looks really great! Wish I didn't have to mess it up again."
Encouraging someone else to do the cleaning is always a good thing.
jt8
So what was that like?It was like coming THIS close to your dreams. And then watch them brush past you like a stranger in a crowd. At the time you don’t think much of it. You know we just don’t recognize the most significant moments of our lives while they’re happening. Back then I thought, “well, there’ll be other days.†I didn’t realize that that was the only day. --FoD
Chuck,
Nothing could be further from the truth ! Lots of folks are learning lots of techniques from watching your work here.
You should think about doing DVD's of these processes and making some money from them.
Walter
Thank you Walter.
I enjoy your attention to detail as well. It seems many tradespeople today are part of the no deposit/no return, got to have a gimmick pepsi generation.
I have only met 5 Carpenters in my life. Most so called carpenters today are glorified installers. My favorite was Waldo Picket. I worked for Waldo for a brief time before he took sick. He laid out all of his work with a 8'stick rule. and stepped off with a framing square. He made me wear Carpenter's whites. I still have a couple of pairs of the many pocketed coveralls with a four pocket pouch that could be removed when they needed bleached and washed.
I have only known one Slater. Peter had a boom truck with a platform and did a lot of work on Historic properties on Capitol Hill and Georgetown in Washington DC. He also worked in Old Town Alexandria VA. with 6-8 months worked booked. This was during the Carter years. He had a large brake similar to yours mounted on the truck as well and also did standing seam roofs. He fired his irons with a small gasoline unit that had a hand pump on the side to pressurize the tank. Scarey, but it worked. Peter came from a long line of Steeplejacks, had a ZZ Top beard and alway wore a bandanna.
I am looking forward to see the other side of your roof.
Chuck S.live, work, build, ...better with wood
Chuck,
Just got back from the Big City to pick up a Velux VS 304.
I had a recycled Anderson I was going to use , but after looking at it this morning I decided to get a new one.
I'll be plugging away here for a week or so before I head out to Vinalhaven for a stint.
Walter
John,
Here is a control pic of the completed exterior.
View Image
The left side.
View Image
The right side.
View Image
Here ar the dock lights that will illuminate the future concrete ramp.
View Image
Chuck Slive, work, build, ...better with wood
The Rinnai is now functional.
View Image
The cover is easily removed.
View Image
The system was installed with backflush valves.
View Image
This unit comes with a remote control located just outside the shower.
View Image
Chuck Slive, work, build, ...better with wood
The exterior work looks good, but we really gotta hook you up with someone at Taunton Press to do a book on woodwork, trim, and cabinet making.
I still had the Flash in my archive, so added the current shot. But #1, we didn't know when we started that flash that the real gold would be inside. And #2, the dial-up folks aren't going to love me for that file size. oh well, so it goes. Keep the pics coming.
jt8
So what was that like?It was like coming THIS close to your dreams. And then watch them brush past you like a stranger in a crowd. At the time you don’t think much of it. You know we just don’t recognize the most significant moments of our lives while they’re happening. Back then I thought, “well, there’ll be other days.†I didn’t realize that that was the only day. --FoD
John,
Good job. I started the submission process to FH on a garden shed I built next to our pool in 1992 at our Maryland house, but never finished it.
Chuck Slive, work, build, ...better with wood
Chuck,
Seems like they have a favorite bunch -- and it might be difficult to break thru with them.
Mike Maines spoke with Dan Morrison about my latest project -- way back in the Winter -- and it held no interest with them he said.
Your work is most worthy , but I wonder if someone new can break thru the glass ceiling !!
Walter
Walter,
I doubt it. I have the utmost respect for Taunton Press. The shelves are full of Home Improvement and trades magazines as well as websites.
We are all fortunate that Taunton subsidizes BT. I have enjoyed BT, Knots and Fine Cooking as a resource for a lot longer than my profile shows because of new computers, and I think, at one point everyone had to reregister because of a system failure.
I know you explained it in 'Timber' and I have seen Peter do it and undestand how it is done, but I feel a tutorial on strapping and removing the bracket for the stocked slate could be of great use to Tradesfolks, WW's and a whole bunch of wannabees that want to slate or reroof their 12/12 house. (Just kidding 'bout the slate, they would not even know how to obtain or stock the job) http://forums.taunton.com/tp-breaktime/messages?msg=99268.684
I stand in awe of your craftmenship and expertise.
BTW Have you been Keeping up with "Adams" on HBO? Tom Hanks is the producer. I am a History buff and think this is as good as TV gets. Ken Burns wishes he could do a good as presentation of our Heritage.
Chuck S
live, work, build, ...better with wood
Edited 4/15/2008 8:38 pm ET by stevent1
Edited 4/15/2008 8:46 pm ET by stevent1
Here are some more exterior pics. The hose bibb has a backflow prevention device. The convenience outlet is a 20 amp ground fault.
View Image
The galvanized crawlspace cover.
View Image
All of the waterlines are insulated under the house. A 10" flex supply line is about a 16' run from the plenum to the 8"x12" insulated hard duct that goes into the attic for heat and air supply. The low voltage wire is for the Rinnai remote. The other is the data/cable line. I have to get in there and fasten them to the bottoms of the joists. The 3/4" gas line is tapped from under the kitchen.
View Image
Some more insulated water lines near the Rinnai. The one at an angle is for the hose bibb.
View Image
Chuck Slive, work, build, ...better with wood
The exposed rafter tails were all primed and painted before the roof was built. The 1x4 SYP center matched T&G flooring ran 7 courses to get above the plateline. The tails had a 5/16" notch ripped so the 3/4" would be in plane with the 7/16" OSB sheathing. The flooring was primed and one coated as well. All end cuts to length were primed before installation.
View Image
Here is the false valley tail.
View Image
The 1920's yard lights line up with the hip rafters.
View Image
The accessory building and the addition line up.
View Image
Chuck Slive, work, build, ...better with wood
This thread has been Oh so Great!
Things like "The 1920's yard lights line up with the hip rafters." are details that most if not told would just think, Oh isn't that nice.
You are a impressive man of Details.
Thanks much
Clay
Thanx Clay,
Glad you are following along.
Chuck Slive, work, build, ...better with wood
Originally 2 sconses were planned. One for either side of the 2 medicine cabinets
View Image
DW decided after the electrical final that they did not look proper so I had the electrician remove them and cut in a switched GFI recepticle. I ballooned patched the sheetrock using 20 minute hot mud. I removed the PT rips that were holding the 6 mil poly and slit the poly so I would not create a moisture sandwich.
View Image
The shop built units were set in the openings and are levelled using V-32 and standard grade HPPL .
View Image
Four 2-1/2" galavanized FH screws and #8 SS finish washers are used to secure medicine cabinets.Two screws on each side, above and below the line bore.
View Image
The doors are then snapped back on.
View Image
Chuck S
live, work, build, ...better with wood
Edited 8/7/2008 5:10 pm ET by stevent1
Chuck,
I'm really glad you're continuing with this fine thread of your great project.
Keep 'em coming please.
Best regards, Walter
Walter,
Thank you for the kind words. I have been slammed lately and am very thankful. I have enjoyed your Boston Gutter thread.
David (I Passed !!!!!!) Hawks visited Columbas GA a while back after a visit in Oxford GA with Forrest (McDesign). David was a big help. He sanded some slightly oversized, 11 ply 3/4" (18mm) Miranti panels that were sanded to 180 and coated with a tinted primer.
View Image
As David sanded I fired up the smoker.
View Image
The sides are cut to length before being ripped to size. The back is cut to length at the same time. It is best to make all cuts that are the same dimension at that time.
View Image
The first pass for the top and bottom rabbet or rebate is cut.
View Image
Chuck Slive, work, build, ...better with wood
The first cut for the rabbet for the back is cut next. Same saw setting.
View Image
A scrap test piece of the same plywood is used to set the second cut, or back-out cut for the rebates.
View Image
I gave David copies of generic upper and lower shop drawing submittals.
View Image
View Image
By now the smoker is doing it's job on about 16#s of pork butt.
View Image
Chuck Slive, work, build, ...better with wood
Chuck,Thanks again, for taking the time to post the details of your great work. For us amateurs, there's an awful lot of lessons to be learned in this thread.
bd,
Thanx for following along.
David uses a jig and a corded drill with a carbide tipped 1/4" bit with stop collars to drill holes for the removable, not adjustable shelves.
View Image
The jig is aligned with the top dado and held 1" in from the edge. The 1/4" line bore is 1" OC.
View Image
The unit was assembled in the usual manner.
View Image
Chuck Slive, work, build, ...better with wood
Loving it!
Glad ya got back up to speed here..I was fixin to ask ya what was up.Spheramid Enterprises Architectural Woodworks
Repairs, Remodeling, Restorations
You gonna play that thing?
http://www.youtube.com/watch?v=32Ln-SpJsy0
Duane,
Glad you are still tuned. I have been slammed lately and am very thankful. COLGA is a beneficiary of BRAC. We expect 30K new residents at FT Benning in the next couple of years.
I will build a face frame for the towell shelf after David Hawks visit and install it later.
David wired a shop built light fixture. A 3/8" x 2" dado was ploughed in a 5-1/4" x 24" rip of 3/4"(18mm) plywood. This will be the top of the fixture.
View Image
1-1/4" # 10 zinc plated PH screws were pre-drilled and secure the lamp holders.
View Image
David parallel wired the 4 ceremic lamp holders.
View Image
The fixture is wired using solid 12 ga THHN. The spacing was corrected before installation.
View Image
We decided to have some test pieces of the pork butt.
View Image
Chuck S
live, work, build, ...better with wood
Beautiful work. Question though, appears as though the med. cab. doors (in my mind) should have been hinged on the opposite sides??????? Based on the position of your knobs.
Pelipeth,
Thanx for the kind words.
Future posts will hopefully explain the bass ackwards hinging.
BTW, Fill in your profile. You have been a good contributor to BT.
View Image
Chuck Slive, work, build, ...better with wood
The dado gets a bead of Tite Bond III.
View Image
The fixture is complete, ready to install.
View Image
We need another test piece of pork Butt.
View Image
David starts by removing the switched GFI.
View Image
Next, David goes fishing.
View Image
Chuck Slive, work, build, ...better with wood
Hey David - kid's wanna know if that's really Winnie the Pooh inside your left forearm.
Kinda' hot.
Forrest
David pulls wire back to the box.
View Image
The former switched GFI becomes a recptacle and serves as a junction box for the shop built light fixture.
View Image
The grounds are properly crimped.
View Image
The light fixture is wired, switched, and screwed to the studs using 2-1/2" galvanized deck screws.
View Image
The pork butts are done. About 10 hours of smoke and low heat.
View Image
Chuck Slive, work, build, ...better with wood
The fixture will throw a lot of light.
View Image
The pork butts are cut. From top to bottom: chipped, chopped and bite sized. Dedubya and Forrest (McDesign) were invited as well but unable to make it. We could of had a mini-fest.
View Image
David and I were outnumbered 3-2. Yada yada yada.
View Image
I thank David Hawks for all his great help.
Chuck S.live, work, build, ...better with wood
So, do you cover the light fixture with the shredded meat? Doesn't it slide off?
Forrest - confused
Yea, he's all over the map today. There's like 3 different projects going on here.
A good time was had by all however.
The best reward for a job well done is the opportunity to do another.
David helped me with some other electrical work as well. He swapped out a ceiling fan, hung a light fixture and hung a chandelier in the hall bath.
View Image
The shelves for the towell cab were coated with a tinted primer. a first coat of satin that matches the walls is sanded with 220.
View Image
The face frames were fabricated using 2-1/4" cypress and bisquited together. The frame is attached to the unit. The shelves are cut to size and are inserted.
View Image
The shelf edges are 25/32" x 1-3/8". They are glued and stapled. The edges are cut 1/16" less than the stile opening.
View Image
Chuck Slive, work, build, ...better with wood
Forrest,
Your right, that meat just wants to slide off.
The towell shelf sits in a chase for the HVAC duct and will provide access for the shower valve.
View Image
View Image
A 2008 penny is set on some blocking.
View Image
Four 1-5/8" galvanized deck screws hold the unit in place. The screws attach to the 2x4s at the rough opening. The screw heads will be concealed by the shelves.
View Image
Chuck Slive, work, build, ...better with wood
The 5/8" x 1-1/4" beaded fillet is profiled using a 5/16" roundover bit. It is attached to the 7-1/4" cypress header that is the same length as the width of the stiles. The header is then nailed on.
View Image
The returns on the bed molding are glued and pinned. They got puttied, sanded and 2 coats of finish.
View Image
The bed mold is then pinned on and conceals the nail holes at the top of the header.
View Image
The towell shelf trim matches the doors and windows.
View Image
Chuck Slive, work, build, ...better with wood
The shelves are set in place and conceal the screw heads.
View Image
The shelf edges mimic rails in stile and rail construction. The edges and ends are eased
View Image
Chuck Slive, work, build, ...better with wood
Hey Chuck,Good to see this thread back in action.Love the towel box and the way the shelves mimic the rails. Very clever way to make an access panel. Glad to hear BRAC is keeping you busy.Do you always put your guests to work? :)Best,
Steve'Man who say it cannot be done should not interrupt man doing it' ~ Chinese proverb
Do you always put your guests to work? :)
Considering how excellent that pork-butt was, I think I got the better end of the deal!The best reward for a job well done is the opportunity to do another.
Steve,
I probably won't get any FT Benning work directly but BRAC has, and will have a good impact for the area. I did do several millwork and casework projects at FT benning before I closed the shop in 2004. In 2002 we built cabinets, counters,pantries and vanities for a 72 unit VOQ rehab project. The job was not complicated. The VOQ units were identical- right or left handed. 12 units were ADA compliant but identical. The GC picked the millwork up and installed it because I did not want to take a chance of bringing a box truck onto the base. They pretty much inspected all deliveries, unloaded and reloaded some trucks. We were concerned with damage to the Plam/MCP units. We ended up doing repairs on 20 or so that got damaged in inspections and or mishandled
I do not always put my guests to work, only the ones that know what they are doing. ;-)
The trim for the light fixture is next. A 25/32" thick length of cypress was culled and long enough. It is ripped to 7-1/4"
View Image
This piece fits the bill. It is dead straight and flat.
View Image
The blade is tilted to 45' and a cut is checked with an ancient combination square that has a stainless steel blade. It still has the scribe.
View Image
The 45' bevel is good so the first cut is made using a cross cut sled on the variety saw. a scrap of 18mm ply that is the same thickness as the sled is under the offal.
View Image
Chuck Slive, work, build, ...better with wood
Shoot Fire, there Chuck, your work looks good as always. thanks for an update on the progress you've made . Helps me from gettin upset about the "poke " that I MISSED--{ thanks David }!!!! ;}.
DW,
You can get some pork butt when you visit your son.
Is he still living in GA?
Chuck Slive, work, build, ...better with wood
I rekon I'll get down there again one of these days , Right now I.m just trying to hold on to the pot we pee into, but if I do, I will surly pay you a visit.#1 son Travis bought a house in Byron Ga. and moved his Ga. peach in with him, he proposed to her the other day, and they set a wedding date of May 2/09 to be held at St. Simons Island. Which they come up with because its kind of centraly located for her family" Red Level, Ala." and us up here in S.W. Va., and his Mom from Wilmington N.C., -- that sounds like some kind of travel brouchure dosn't it.
Dwayne,
A wedding on $t. $imon'$ I$land?........ $weet.
You will have to get a new set of "Church, Court and going to meetin' clothes"
The trim and bed mold was cut, returned, pinned, puttied, sanded and got two coats of finish.
View Image
This stir stick started out as a 1-5/8"x5/16" piece of Redwood VG lattice. David Hawks dared me to post it because Frenchy would have some sort of medieval shellac mace to post. I guess my sealer stir stick is seasoned by now but not medieval.
View Image
Chuck Slive, work, build, ...better with wood
The doors are snapped off of the medicine cabinets.
View Image
The prefinished trim is installed next. The bridge rail is nailed first and was plate joined to the med cab headers. The #0 bisquits were clipped about 5/16".
View Image
The light valence was drilled and countersunk.
View Image
The light valence is installed using 1-1/4" yellow chromate high thead screws that are predrilled. The right side.
View Image
The valence can be removed if necessary. The left side.
View Image
Chuck slive, work, build, ...better with wood
So you really are going to use those keyless lampholders without boxes and THHN without a raceway or cable jacket.
I assume you are not getting anything inspected.
I'll take my chances. I know it is not code. I already got all of the finals.
I could have used pancake boxes and greenfield.
Chuck S
live, work, build, ...better with wood
Edited 8/5/2008 1:18 pm ET by stevent1
A 1/2"x13/16" notch was cut on the ends of the 5/8"x1-1/4" beaded filet to overlap the bridge rail. The parting board is pinned into the top of the face frame rail. Next, the left header is nailed.
View Image
No glue is used on the bisquits between the bridge rail and the headers. The bisquits are for alignment only. The right header is nailed.
View Image
11/16" cypress cleats are attached to the inside top edge of the bed mold trim for the light valence. Four 1-5/8" screws hold the trim in place and conceal the screws on the light valence.
View Image
The right and left bedmold is pinned on.
View Image
View Image
The trim was pre cut and got two more coats of finish. A maroon scuff pad was used to knock the gloss down to satin.
View Image
Chuck Slive, work, build, ...better with wood
5/8"x1-3/4" cypress was rounded over on 3 edges using a 5/16" RO bit.
View Image
The corners are mitered, plate joined and glued.
View Image
The glue up is checked with a square.
View Image
The trim is dry-fit.
View Image
Two coats of sealer is applied. I cut the sealer with a flash dry laquer thinner 50-50. I can put mutiple coats on in one day.
View Image
Chuck Slive, work, build, ...better with wood
The beaded trim is ready to be pinned on.
View Image
The 3 piece trim is pinned to the bottom of the light valence.
View Image
The 1/2" rip of trim is pinned to the bridge rail.
View Image
Chuck Slive, work, build, ...better with wood
I went to a salvage yard and picked up this diffuser from the "FREE" section.
View Image
The prism panel was cut on the table saw with a 80 tooth -6' hook blade. The diffuser rests on the 1/2" ledge created by the beaded trim.
View Image
Chuck Slive, work, build, ...better with wood
Chuck, is that going to give DW enough light at the mirror? Won't she need something on the other side of her mirror to balance it out?
jt8
"A little 'enthusiasm' and all problems seems small!"
jt8,
My thoughts as well. Please revisit post 514.
Has your area of the breadbasket dried out yet?
Chuck S
live, work, build, ...better with wood
Edited 8/6/2008 7:18 am ET by stevent1
My thoughts as well. Please revisit post 514.
Seems to me you might be blaming DW if the light isn't perfect. After all, YOU wanted to put them on either side, but it was HER idea not to ;)
Has your area of the breadbasket dried out yet?
Pretty much. We're still getting pretty regular rain for this time of year (rained last night...and Sunday). Been a real nice summer. Things are still green like it was June-July rather than August. The harvest is going to be behind last year's, but last summer was freaking hot. I'll take this milder summer any day!
jt8
"A little 'enthusiasm' and all problems seems small!"
It's beautiful!
How does the heat escape?A La Carte Government funding... the real democracy.
Thanx, glad you like it.
As far as the heat, good question. Should I drill some holes in the wall for heat to go to the ridge vent?
That fixture should be lit for 10-15 minutes at a time.
Chuck slive, work, build, ...better with wood
I would have some serious concerns about the heat being generated, ever try holding a buld thats been on for just 1 minute? I also feel that plexi will be brown/burnt real quick.
Would CFLs give off less heat?
Chuck Slive, work, build, ...better with wood
Chuck,
Yes, the CFLs are much cooler.
Just did some looking for a figure and the best I could come up with was that incandescents run around 300 deg for surface temperature, while CFLs are about 100 deg.
You'll also have to consider that with CFLs you won't have the excess heat generated which would normally help to warm the room. And that in a fixture like yours, with the ballast at the top, you may see a decreased lifespan in the bulb.
Hope that's helpful.
Steve
'Man who say it cannot be done should not interrupt man doing it' ~ Chinese proverb
Edited 8/6/2008 9:12 am ET by FatRoman
Steve,
Thank you for the pdf. That is one of the great things about BT, folks sharing knowledge, ideas and information. I will swap out the 60W bulbs with some 20 CFLs.
A cypress frame was made using the same details as the medicine cab doors.
View Image
A brass 3-way ball catch is used to attach the frame. The ball and spring are SS.
View Image
Sorry for the bad focus.
View Image
The female part of the catch is screwed to the edge of the stile of the medicine cabs.
View Image
The male is screwed to the stiles of the cypress frame.
View Image
Chuck Slive, work, build, ...better with wood
Would CFLs give off less heat?
Usually. They get warm, but not hot like a regular bulb. And if you hunt around, you can find various colors... warm, cool, daylight, whatever.
I try to avoid the Feit brand. In my experience, they don't last very long. One interesting thing though... I bought one of their 'daylight' CFL's a year or so back. When I turned it on, I thought, "man, that is waaay too blue." but then in the next month, it fooled me 2 or 3 times. I'd come around the corner thinking I'd left the blinds open. So I guess north light must have a lot of blue to it. I just never noticed.
jt8
"A little 'enthusiasm' and all problems seems small!"
It is hot here today. 'Spose to get close to 100. We are a little behind on rain, but not like last year. The state lifted the outdoor water use ban. We are on an odd even deal now.
Thanx for the info on the color of the CFLs and avoiding the Feit brand. I've got CFLs in a couple of ceiling fans and they seem to need to 'warm up' till they get bright.
The female catches are mounted at the tops and bottoms of the med cab's face frame.
View Image
The frame is mounted for a tension test. The frame has to be removable because it is covering an unused receptacle.
View Image
The tension of the ball catch is easily adjusted.
View Image
I give each of the 8 adjusting screws a 3/4 turn.
View Image
Chuck S
'live, work, build, ...better with wood
The medicine cabinet doors are snapped back on.
View Image
The removable mirror panel is installed.
View Image
The unit is complete.
View Image
The Lovely Sweet Georgia Brown has a 3-way vanity mirror.
View Image
Chuck Slive, work, build, ...better with wood
All comes together nicely doesn't it.The best reward for a job well done is the opportunity to do another.
Thanks David. You were a big help.
78 pieces of wood and plastic in the medicine cabinets including 22 in the headers. The door into the MBR got trimmed next.
View Image
The plinth was ripped to 1-5/8".
View Image
The baseboard was glued with PL Premium to the pocket door wall.
View Image
There are a lot of different levels of trim.
View Image
Chuck S
live, work, build, ...better with wood
I knew you wouldn't leave us hangin. It all looks great. Thanks for sharin it.
<The Lovely Sweet Georgia Brown has a 3-way . . .>
Haven't got a three-way with DW since college.
Forrest
Very nice. how does DW like it?
jt8
"A little 'enthusiasm' and all problems seems small!"
SGB likes it a lot. You aren't going to the fest? Sounds like those folks will have a blast.
I decide to go with 15w CFLs
View Image
I know that side lighting is better for mirrors. Hopefully the can lights and the ceiling fan light helps.
View Image
A couple of more shots. A view from the left.
View Image
A view from the right.
View Image
Chuck S.live, work, build, ...better with wood
Thanks for all the great details.
Thanks for the great project.
I have followed off and on and keep coming back for more.
I am not sure if following the project alters the perception but the work is truly fine art!
I wish when I was younger that I had exposure to a treasure trove of wood that is you.
Again thanks for all the time and effort just to get the information/art to us.
Clay
Clay,
Thank you for the kind words. I try to show that woodworking and trim can be done with basic tools. Nothing laser guided here.
Chuck Slive, work, build, ...better with wood
>I try to show that woodworking and trim can be done with basic tools. HA!........just awful big dose of skill & talent!Your work is inspirational & beautiful. I've got to go back & redo the bath remodel I finished about a year ago. All your fault.
Edited 8/10/2008 4:07 pm ET by bd
Thanx bd,
Your work is inspirational & beautiful. I've not got to go back & redo the bath remodel I finished about a year ago. All your fault.
View Image
Chuck Slive, work, build, ...better with wood
oops, >I've not got to go back.........senior moment there. Obviously, the "not" doesn't belong.......
I try to show that woodworking and trim can be done with basic tools. Nothing laser guided here
The laster guided stuff is easier to obtain than the skills required to not only to do that work, but to make it look so casual ... just a walk around the block for you. Lotta head scratching for me.
jt8
"A little 'enthusiasm' and all problems seems small!"
Edited 8/11/2008 2:15 am by JohnT8
Steve,
Thank you for the help in imbedding and hosting the pics. I deleted .590 because I tried to edit it and lost the pics and paragraphs. So I am still learning how to do it.
I am working on an inlay floor medalion for the 2 walk-in closets. I got the idea from FHB issue 189, September 2007, p 126. "Making a French knot" by Howard Brickman in the Master Carpenter series. Mine is different in that no flooring has to me notched.
Here is the floorplan.
View Image
I am using 1x4 sel.& btr. cherry for the field. I had the cherry left over from a cherry kitchen job I did years ago.
View Image
The feature strip will be fiddleback maple.
View Image
If there is any interest, I will show the steps and procedures.
I lost the paragraphs again. That may be why Huck puts one photo per post.
Chuck Slive, work, build, ...better with wood
Chuck,
You just need to use the tag I mentioned in the previous post. That puts the text on a new line.
Like so...
I am working on an inlay floor medalion for the 2 walk-in closets. I got the idea from FHB issue 189, September 2007, p 126. "Making a French knot" by Howard Brickman in the Master Carpenter series. Mine is different in that no flooring has to me notched. Here is the floorplan.
View Image
I am using 1x4 sel.& btr. cherry for the field. I had the cherry left over from a cherry kitchen job I did years ago.
View Image
The feature strip will be fiddleback maple.
View Image
If there is any interest, I will show the steps and procedures.
You bet there's interest in seeing how this was done!
'Man who say it cannot be done should not interrupt man doing it' ~ Chinese proverb
View Image
Steve,
Thanx again for the help. I think I have it now.
The chop saw is set up with an auxilliary fencce
View Image
A stop is clamped to the fence. The stop is held about 3/8" above the base to prevent saw dust build-up against the stop
View Image
Chuck S
live, work, build, ...better with wood
Wow! I can't wait to see the finished product, not to mention the steps in between.
The maple was culled
View Image
Then planed and ripped to 1-1/16". Sorry bout the halos.
View Image
A stacked dado head is installed to cut a 1/4"x1/4" groove to match the flooring. A finger board is used to hold the maple tight to the fence. I used a push stick as well.
View Image
Chuck S
live, work, build, ...better with wood
looks great so far!!
Definitely interested in seeing this. Your photo threads are the cats pajamas.
Your threads are always a great read, I'm very interested in this one.
The dado set up is unchanged. A tennon jig is used to grove both ends of the cherry flooring.
View Image
The longer pieces are also grooved at both ends.
View Image
It would be unsafe to groove end grain on the table saw or router table without some sort of jig to hold the workpiece.
Chuck S
live, work, build, ...better with wood
Steve,
Thanks, once again, for all of your help.
I tried to edit .600 and lost the pics.
More maple is planed to 1/4" to make "slips" or "loose tongues". These are sometimes used on flooring installations that run down a hallway and in to a room. The slip alows you to reverse the direction of the tongues so it can be installed in both directions.
View Image
The pieces start at 3-1/2" wide. The top and bottom of both edges are rounded over.
View Image
A 3/32" bit is used.
View Image
The slips are ripped to 15/32" and the other 2 edges are routed. The router is clamped in a hand screw that is clamped to the bench.
View Image
The slips are tested with the grooved maple and the T&G cherry.
View Image
Chuck S
live, work, build, ...better with wood
Chuck,
You are most welcome. Happy to help get this thread back on track.
Now, can you explain how this works? Any of my guesses seem to end with a missing finger or two. You don't freehand this the way it looks in the pic, do you??
View Image
Thanks,
Steve'Man who say it cannot be done should not interrupt man doing it' ~ Chinese proverb
View Image
I am eagerly awaiting his reply to your question as well, I'm pretty sure he does freehand it. I worked with a cabinetmaker who would clamp his Porter Cable 690 router(the same one it appears Chuck has) with a handscrew and freehand things as well. I never got to watch closely enough to see exactly how he did it.
I do it, with experience and a healthy respect for the possible outcome, it's really no more dangerous than using a skill saw or any other power tool.
Steve and DC,As Zach said:"I do it, with experience and a healthy respect for the possible outcome, it's really no more dangerous than using a skill saw or any other power tool."I do it freehand as well. There is enough spring in those slips to keep it tight to the bearing. Thankfully I can still count to 10.Chuck Slive, work, build, ...better with wood
Here is a pic with a 690 on the left a 691 d-handle on the right. The laminate trimmer is what I used for the 3/32" round-over bit. It is model #3091.
View Image
These routers are all made in the USA. Newer Porter Cables are imported and IMHO are not as good as they used to be. Back in the day lodepot and the like did not sell professional quality tools. I got most of mine from Jenks Hardware in DC or Standard Supplies in Gaithersburg MD.
View Image
Chuck S
live, work, build, ...better with wood
The cuts on the maple are next. Once again a fence is clamped to the miter saw.
View Image
The saw is set to a dead on 45'.
View Image
All the cuts are made at this one set up and are rough cut to length.
View Image
A 90' end is made from 3/4" mdf and plywood rips.
View Image
MDF is used for jigs and fixtures because it is dead flat.
Chuck S
live, work, build, ...better with wood
I believe alot less heat, and I have found they LITE up faster than one might think. You get used to them.
Lucky you! Your wife turns off lights after 10-15min.
I have a 3 bulb 100watt halogen fixture that my wife never turns off.
This thing can heat a room.Those bulbs could be 40 watt and still put off a lot of light.Pete
I looked and looked at that assembly and did not see a UL label on it anyplace..
.
A-holes. Hey every group has to have one. And I have been elected to be the one. I should make that my tagline.
I hope that "fixture" (4 keyless screwed to wood) is a joke
Not a joke. What's wrong with it?
View Image
Chuck Slive, work, build, ...better with wood
oh nothing. it matches just fine.<g> come on don't leave us hangin like that! I know you've got some great idea.
Mike,
I post some more later this morning.
Thanx for following along.
Chuck Slive, work, build, ...better with wood
OK I guess you would like my old PS/2 mod 70 PC
That is an old unit.
The other end of the cypress is marked with a tri-square.
View Image
The mark is aligned to the blade using a cabinet square. I will leave the line and check the length.
View Image
The return bevels are cut next. I cut along the other bevel to only lose 1 saw kerf, about 7/64"
View Image
The returns are then marked and cut to length.
View Image
Chuck Slive, work, build, ...better with wood
I check the corners with a tri-square. They are good. The reason for using one piece of cypress was for the grain to wrap around the corners. I lost 1 saw kerf at each end.
View Image
Titebond III glue and Collins clamps are used.
View Image
The corners are then pinned.
View Image
Chuck Slive, work, build, ...better with wood
While the mitered unit dries I need to make some more bed mold, same as what I have been using. I routed some 13/16" cypress that was wide enough to route both edges and then ripped to size. Much safer routing wider pieces than thin ones.
View Image
The coves are ripped to 13/16"x13/16" and a 1/2" cove router bit was used. The rounded over pieces are ripped to 13/16"x1-5/8". A 3/4" RO bit was used.
View Image
The 1-5/8"x1-5/8" bed mold was glued and clamped. I let it dry overnight and is ready to be sanded to 180 and sealed.
View Image
Chuck Slive, work, build, ...better with wood
I also milled some 13/16"x7-1/4" tall baseboard to match the rest of the 1920's house. I use a 1/2" core box bit and a 3/8" round over bit. A 3/8" rabbet is cut on the edge so the router will have less wood to hog.
View Image
A scrap of 5/8" MDF is used to set the core box bit's edge.
View Image
A featherboard is used to hold the cypress against the fence.
View Image
The core box cut lines up.
View Image
The 3/8" RO bit is adjusted and is the final pass. The profile matches pretty well.
View Image
Chuck Slive, work, build, ...better with wood
Chuck,
Very nice workmanship and attention to detail !!
You're a very patient , talented gentleman .
Walter
Walter,
Thank you for staying tuned. Your work is timeless.
Patient Yes. SGB and I have been married over 20 years.
Talented I got lucky learning from some great mentors and a bunch of TBE
Gentleman I try.
View Image
Chuck Slive, work, build, ...better with wood
I made a 'bridge' rail that fits between the previously installed medicine cabinets. The ends of the piece were notched on the table saw by raising the blade.
View Image
The bridge rail sits below the sanded light valence and is the same length. The two flanking pieces of cypress will be the headers for the medicine cabinets.
View Image
A rabett at the top of the valence needs to be about 1/16" deeper. I used a Stanley #75 Bullnose Rabbet plane that was made in Sheffield, England.
View Image
It is a nifty tool.
View Image
A 5/8" Mayhew chisel cleans up the rebate.
View Image
Chuck S.
live, work, build, ...better with wood
Told ya somebody'd have something slick to say about it!
What-the-!#$%-ever!!!
I had blast with you and SGB. Can't wait to go again.The best reward for a job well done is the opportunity to do another.
David,
You are welcome back anytime.
Chuck S.live, work, build, ...better with wood
Winnie the Rebel.The best reward for a job well done is the opportunity to do another.
You get a raincheck DW.
J Giles had a song about that. something like 'Take out you false teethe mama, I want to suck on your gums'
Chuck Slive, work, build, ...better with wood
Whoa! I had no idea that majestic BBQ was in the offing!
Forrest
Ohhh nooo chuck I am amazed at what you can do, with what time you got, I am sorry if you think I was bored withyour posts ---"I was just talking to the mean kid that sat beside me in 2nd grade " named sphere, eh, But alas ,I know it takes two to tango. continue on there, Teach.
The pinholes are spot puttied and sanded.
View Image
A final coat of finish is applied to the backs of the doors. The fronts and edges are done. This pic was taken moments after the finish was applied with a Chinese bristle brush.
View Image
The backs of the doors are scuffed with a maroon pad, I have mispoken several times earlier calling the Micron pads purple. The doors are ready for the hinges to be reinstalled.
View Image
The 120' hinges are reinstalled. The stop molding clears the hinges by 3/32"
View Image
Chuck S
live, work, build, ...better with wood
Back to my mere mortal mission. A tri square is used to align the 120' hinge.
View Image
A vix bit is used for the piolt hole.
View Image
If you don't have a vix bit, get one. This bit is the best for centering any hole when installing hardware of all types.
View Image
Vix bits come in a couple of sizes.
Chuck Slive, work, build, ...better with wood
The hinges and plates are installed and the backplate screws are predrilled. The back of the face frame has no finish on it yet so the glue will grab when it is installed.
View Image
This is the open position.
View Image
All of the tools are on mobiles'. The radial arm drill press is swung 90' to cut it's 5'-1"x5' footprint to 27" x 61". The 20" planer is tucked under the right end.
View Image
Chuck S
live, work, build, ...better with wood
You can find various Mayhew tools on eBay.
View Image View Image View Image View Image
jt8
So what was that like?It was like coming THIS close to your dreams. And then watch them brush past you like a stranger in a crowd. At the time you don’t think much of it. You know we just don’t recognize the most significant moments of our lives while they’re happening. Back then I thought, “well, there’ll be other days.†I didn’t realize that that was the only day. --FoD
Steve,
Thank you for your confidence.
Chuck Slive, work, build, ...better with wood
Thanks for the link Steve. Chuck's been after me to look at that thread for a while now.
How cool is it that he knows me well enough from BT to know that that's exactly the type of job that would give me a chubby.
Or scary?The best reward for a job well done is the opportunity to do another.
Hey bud,
I won't be ordering any of those sinks anytime soon either, but the craftsmanship in your cabinetry is awesome. About what we've come to expect from you.
Thanks for the tutorials--especially on the bullnose details.The best reward for a job well done is the opportunity to do another.
I've been quietly following also. Great work and nice pictures and descriptions.
Jalden,Thanx. It is nice to be able to take the time required to do quality work on your own house. Most of the income producing work I do is time sensitive. I used to do a lot of fast track commercial millwork. I try to stay away from that now.Chuck S.live, work, build, ...better with wood
Chuck,Thanks again for taking the time to photo & post. A real education on doing things right!
Thanx BD,
I'll be posting the med cabs soon.
Chuck S
live, work, build, ...better with wood
Mr Stevent1
Long time no post too busy to surf net to check out fine small addition. Shop & woodwork is mas fina.
Does big Dave who drove a red Caddy still work for you?
Mortise
Mr Stevent
Very fine work for sure! Do you ever take your show on the road, like back to Maryland?
Mortise
M-n-T,
No plans on 'Merlan', unless it is for blue crabs. As Michener called them, based on William W. Warner's book, "Beautiful Swimmers". Any crab lovers out there ?
http://www.skipjack.net/le_shore/crab/history.htm
This reminds me of a story. Back in the late '50's and early '60's Mom and Dad used to take us to Ocean City MD for a week in the summer, we( I was 8 or so, and my brother John, a year younger) had some chicken necks tied to a string, and about a half a dozen keepers in a pail. Someone with a badge, either a sherrif or a game warden pulled up, got out of his vehicle, looked at our bounty, and said "Can't you school boys read the sign? It says "NO FISHING"! John started to pick up the pail to throw 'em back and I caught his arm in time to say to the gendarme 'We ain't fishin, we's crabbin'!
He got back in his Galaxi 500 and spit gravel at us.
At any rate, we have had Springtime in Georgia. Here are some daffodils (Narcissus), about 10,000 or so, that are planted on a hillside in section of town I am working in.
View Image
I am not working on this house, but on a house nearby.
View Image
Notice the life sized statuary near the top of the hill.
BTW: I should have posted this on the McMansion thread but this home took over 3 years to build, Typical McMansions around here take 4-6 months or so.
Chuck Slive, work, build, ...better with wood
Mr StevenT
Yes, the O.C. still there on the right coast of MD. Ain't been there for about 15 year now. I think from the southern tip of OC all the way to Fenwick Isle and north to Rehobeth, Del is pretty well developed. No more submarine spotting towers.............
MD keeps pumping money into dredging sand to keep the beach in place. OC is a barrier island, as is Chincateague & Assateague to the south. The latter two are natuarally moving moving south/west as the ocean moves the sand; at one time OC & the two islands to the south East coasts lined up; now the West coast of OC lines up with the East coasts of C & A. Chincateague & Assateague are much nicer to visit, the former has wild ponies and is a national park; the latter is a pretty laid back family place to go to. Still pretty rural as opposed to the OC.
Thrasher's French Fries, Fischer pop corn, and some of the other places are still there on the pier. That one amusement park was going to shut down but I think they got a tax deal from MD. Some good flashbacks you described; some of mine include the Alaska Stand & hanging at the Admiral motel on the 9th or hanging with my peeps at the Belmont near the pier.
Mortise
Walter,
I got started on the medicine cabinets. I will try to follow Mike Smith's rule of no more than 4 pics per post. I sure have enjoyed your excellent Timberframe thread.
3/4" white 2 sided melamine is cut to size using a 0' TCG blade on the table saw. The rabbets on the top bottom and back of the panels are 3/8" x 25/32".
View Image
A layout made for the 1/4" line bore. The holes are 1" OC. 1/4" one sided melamine is used for the jig.
View Image
The holes are punched with an awl.
View Image
A carbide tipped 1/4" CNC drill bit with stop collars are chucked into a corded drill.
View Image
Chuck Slive, work, build, ...better with wood
Chuck,
You must have the patience of Job !! Your set ups and procedures are just fantastic.
Keep 'em coming when you have time.
Walter
Walter,
Thank you for the kind words. I know there are many ways to build things. I am just trying to show that basic tools and procedures can turn out acceptable work.
3" cuts of 1/2" plywood screwstrips are glued and tacked.
View Image
1" x 1/2" playwood retainer strips are glued and stapled
View Image
Galvanized deck screws are predrilled and are the final step.
View Image
Chuck S
live, work, build, ...better with wood
The inside of the med cabs are virtually chip free.
View Image
The basic box is done.
View Image
Chuck Slive, work, build, ...better with wood
Steve,
A commode cab was also built. The bottom shelf was 1-1/4" glued up Cyprus, plate joined, glued and clamped to 3/4" stock and dried over night. The top is sanded with 60 grit on a ROS.
View Image
View Image
Centerlines are used to locate the pattern.
View Image
The same radius pattern was used for the eyebrow vanity top. The pattern is screwed to the shelf.
View Image
Chuck S
live, work, build, ...better with wood
The bottom shelf radius is cut with a bayonete saw.
View Image
I try to stay within 1/16" or so to the outside of the line.
View Image
The pattern is then screwed back onto the bottom of the shelf and flushrouted with a 1-1/2" x 1/2" straight bearing bit.
View Image
View Image
Chuck slive, work, build, ...better with wood
The next step is to Bullnose the front and return ends of the shelf. 1-1/4" x 3/4" MDF are predrilled and screwed to the backs of the shelf returns. This is done to prevent tear-out and give the guide bearing a surface to bear on.
View Image
The edges are rounded over in 3 passes.
View Image
The bottom shelf is sanded to 180 starting with 80 grit. The edges are hand sanded.
View Image
Chuck S live, work, build, ...better with wood
Looking great Chuck.
Ain't that Cypress sweet to work with? Naturally lubricious, even if somewhat splintry.
I'll be needing a boat load this summer, still checking sources here.
Yrs ago I ran a line borer, seems I was the only one who could resharpen the brad point bits for it, so it became my baby, stacks and stacks of MCP and Vinyl store displays..boring and boring ( as in not exciting) LOL.Spheramid Enterprises Architectural Woodworks
"Welcome to Poo-ville, can I have your socks?Seriously Folks, I need a home for 3 lovers of your life.
I've got a bunch of cypress 2x, 6x, and 8x just from the mill beside my driveway; smells great just to walk past.
Forrest
Thanx Duane,
I bet many folks don't realize that those bits are right and left handed.
Here is wher I get my Cypress.http://hoganhardwoods.com/hogan/Default.htm
They have 4/4 - 12/4 rough or S2S1E. I typically get the Select and Btr.
Chuck Slive, work, build, ...better with wood
Looks like Little rock is the closest to here.
Funny thing, one of the local Lum Yards family was the original contractor on the 1915 house house I am working on, I was joshing the owner ( the grandson of the Builder) that I think the repairs I am doing should be covered under the home warranty..it's not even 100 yrs old yet. LOL
Did you know that in 1915 they used beeswax for ext. caulk around windows and trim? Have ya ever tried to REMOVE that stuff? Not my ideer of fun, at all. 9000sqft house w/150 windows and doors, pulling all the trim, stripping paint and foaming behind, reinstall, recaulk to brick. I'll be there awhile.
Oh,and reglaze all the sash and door lites while I am at it.Spheramid Enterprises Architectural Woodworks
"Welcome to Poo-ville, can I have your socks?Seriously Folks, I need a home for 3 lovers of your life.
Duane,
You need to do a thread on that house. I have seen beeswax caulk that was backed up with oakum.
My neighbors are probably suprised when Hogans 53' truck pulls up.
View Image
I used to buy a lot from them when I had my shop and they could stradle the bay doors.
Chuck Slive, work, build, ...better with wood
The Lower unit is complete.
View Image
The upper MCP unit and the Cyprus shelf unit are clamped.
View Image
View Image
Chuck Slive, work, build, ...better with wood
A right angle cordless drill is used for the 1-1/4" pilot holes.
View Image
The units are then screwed together with eight screws.
View Image
The Cyprus bottom shelf is married to the melamine unit.
View Image
Chuck Slive, work, build, ...better with wood
You're a true craftsman sir. I'll bet that old shop of yours turned out some gorgeous work.
Very much looking forward to attending cabinet school (albeit a crash course) in May.
Talk to ya Sun. AM and critique the race @ Phoenix.The best reward for a job well done is the opportunity to do another.
David,
Thanx. Should be a good race under the lights.
Chuck Slive, work, build, ...better with wood
David,I think this is Forrest's bracket thread Chuck was talking abouthttp://forums.taunton.com/tp-breaktime/messages?msg=73188.114Best,
Steve'Man who say it cannot be done should not interrupt man doing it' ~ Chinese proverb
The jig is clamped to the sides and the holes are drilled. I sure miss my 13 spindle, 5mm, line bore machine but I donated it and many other tools and hardware it to a local Vocational High School in 2004 when I closed my near thirty year shop.
View Image
The right and left pairs are ready for assembly.
View Image
The tops and bottoms are glued and stapled using 1-1/4", 18 ga., galvanized gum coated staples.
View Image
The boxes are checked on the diagonals for square and the 1/4" white melamine backs are tacked on all sides.Witness marks are placed so I don't staple into a staple. This may cause a blow-out on the melamine. BTDT
View Image
Chuck S
live, work, build, ...better with wood
Edited 4/11/2008 9:28 pm ET by stevent1
Came late to this thread. I grew up in Delaware and remember playing at Fenwick Island, they had all the teeny 3 room cottages and a great sand bar for body surfing. We' visit my Aunt and Uncle and eat p-nuts and crabs. When I moved my Aunt gave me a big can of Old Bay. Bethany had the more upscale houses on stilts. You could see where OC started because all of a sudden it was buildings. Up at Cape Henelopen was where all the horseshoes hung out. Somewhere on the DE side there was 3 Yard Beach, totally uninhabited and lovely, wonderful swimming. As a teenager, though, the boardwalk (and under it) was more enticing.
I almost don't ever want to go back, I don't want to see what they've done with the place.
I remember Fenwick as well. Libby's Pancake House was on the Mason Dixon Line. They had a wishing well, complete with bucket and hoist on the side lot.
I did some interior trim on a house in Lewes DE years ago. The house was built in 1740 and was 2 doors from a home owned by George Read. This house is accross from Shipcarpenter's Square.
View Image
I basically moved there for several months and built everything on site with a helper.here is some paneling.
View Image
Some arches.
View Image
View Image
A small library/study
View Image
And some steps.
View Image
I really doubt the original house would have had that type of woodwork in it.
Chuck Slive, work, build, ...better with wood
Mr Chuck
You all talking Fenwick Island & Libby's Pancake house is some serious flashback action. I was telling my lady about the Submarine Towers, the endless dunes, etc. There was a fire a week or two again down near the OC pier - the old Dough Roller pizza had some serious damage.
Some fine woodwork there from your Lewes project there Mr Chuck. Did you ever take that ferry to Cape May NJ?
Keep up the good posts - it is a treat to see your handywork. Do you have an instuctional DVD yet?
Mortise
M-n-T,
I did in fact take the ferry to Cape May NJ. Some great houses that have been very well preserved.
No DVD.
Chuck Slive, work, build, ...better with wood
Wow, gorgeous!
Thank you. It is kind of fun to work on your own house.
The trim on the pocket-door was 27 pieces of Cyprus that I milled. Not to many customers can afford that type of work.
Chuck Slive, work, build, ...better with wood
like that rail very cool
MFoutnier,
Thankyou.
Cyprus trim was milled for the commode cab and has 2coats of finish. The final coat will be applied when all the trim has been installed. From top to bottom. The 7-1/4" x 13/16" head w/the 5/8" x 1-1/4" bead attached, 1-5/8" bedmould, 4-1/2" apron with the same bead attached and the 13/16" cove.
View Image
The apron is installed.
View Image
The cove is pinned on next.
View Image
The head is installed.
View Image
Finally the bedmould.
View Image
Chuck S
live, work, build, ...better with wood
The door is then snapped on. The unit is deep enough for a roll of TP.
View Image
The lower section of the commode cab.
View Image
The upper section.
View Image
It is hard to get a pic of the entire cab in the 42" x 76" commode room without a wide angle lens.
View Image
The commode room is complete less the HVAC register and the cyprus plate rail.
Chuck Slive, work, build, ...better with wood
Hey! My favorite thread is back!What's the story with the numbers on your sanders? You have each of them set up with a different grit?'Man who say it cannot be done should not interrupt man doing it' ~ Chinese proverb
Chuck,I'm not sure how I'm going to finish mine yet. I think I will pour a concrete well around the opening that comes slightly above grade level. Then make some sort of sloped doors reminiscent of a storm cellar opening. I seem to remember an article in American Woodworker or FHB about building such doors. I will probably use that for inspiration.Brad
Edited 8/28/2007 2:52 pm ET by bciraulo
Hi JohnT8,
Sorry about the terminology, it can be a little confusing at times! I will be stick building my house with 2x6 timbers as opposed t a post & beam house.
timber framed houses are build defferently over here. we build the walls with 2 x 6 timber then we keep a cavity of 50mm then build a masonary wall all around the house, you cant tell from the outside of the house if it is timber frame or not.
When I was traveling around doing millwright type work I had a fairly big cement pump rebuild job at a cement terminal in Richmond, next door to American tobacco those type of lights were used on the outside of the building, since we only could work at night and this not being the greatest part of Richmond, my crew and I were treated to some great shows and conversation put on by the Girly Man community of that part of the town--man that must be a hard life--the closest light was "manned"by a huge Black fellow named george that wore a red sequinned ball gown slit up the sides, I reckon He was doing a pretty good buisness cause he had to, to afford the shoes he had on , they had to be hand made because this guy was about 6'8" --and if he didn't take a size 14 mans size shoe, in a matching red sequinned highheeled pump --I'll kiss my own azz-- he had hands bigger than bear paws but I'm here to tell ya that fellow could sing---we all bought him dinner one night , and invited him to come sit with us , needless to say we had some interesting conversation, then when morning would break he would kick off his higheels and put on some tennis shoes and walk up though an old confederate cementary on to his way home.It takes all kinds to round out ones life I suppose.
Cool! You can regale your non-builder friends with tales of how you "wove" the tile together.
Forrest
Hmm - haven't seen that grout technique - looks cool. Michael Byrne doesn't mention it; he's been my guru. I believe I'll try that on the McBathrooms project - got 3-4 wall and floor tile areas to do. Probably not Kerdi, tho'.
Forrest
Kerdi is used (you know this, right?) as a waterproofing membrane, thus its place in doing showers and baths. We wouldn't use it outside those situations.
Schluter's Ditra is used for floors, and we use it under all of them, inside or out.
Stevent1,
Thanks for the info. I have often had small variations in grout joints that drive me crazy. These spikes look like just the thing to try.
I also need to spend some time on that John Bridge site.
BTW, it is pretty big news around here today, Zach Johnson on the front page of the Gazette, leading story on the morning news, even heard about it on NPR this AM. I'm not a big golf fan, but it was fun to see the local guy beat Tiger.
Thanks again
Joe,Yes it is a 1 1/2 X 2 that is nailed to the double PT 2 X 12. We used 2 X 10 SYP joists.We use CABO 1 & 2 and it sez OK. Went over it with BO at foundation inspection. I would not build a deck without joist hangers. The 1 1/2" ledger is still accaptable in our juristiction. It seems to me that toe nailing the joist with 1 1/2" bearing would be as stong as Teco nails going straight in.Joe, you aked earlier about second floors on 2 X 4 walls, you are corrrect, we did a single rim.Chuck Slive, work, build, ...better with wood
You dont have Termites there ? Dont see any shield ????
Termites are a big problem in SOWEGA. The footings were pretreated by Arrow before the pour, then treated after final grading.Chuck Slive, work, build, ...better with wood
Testing
View Image
I don't know - maybe you're not holding your mouth right?
Forrest
Forrest,Mouth not right. Need periodontistI have tried opening pics in new window, revise, copy, back, edit, paste. Must be a MAC thing. I can embed jpegs at John Bridge (Tile Forum) no problem.I have to convince DW, 'Sweet Gergia Brown', to give me access to her pc lap top.How is that Travertine coming.Chuck S
.live, work, build, ...better with wood
Edited 10/23/2006 9:49 pm ET by stevent1
Hey with regard to postin the pics inline. (I am also on mac x os so i'm curious) Didnt someone say the pictures must already be uploaded? I'm not really sure what that means. http://www.thesmallbuildingcompany.com
Isn't that OJ's White Ford Bronco?
Have a good day
Cliffy
How bout it.96 Bronco. Got it for 10 large in '98. Nobody wanted a White Bronco. This is my third Bronco. #2 '89, Black 351 Cleavland. #1 Jellow, early 70's 428, Caught 4th gear.live, work, build, ...better with wood
Edited 10/8/2006 11:29 pm ET by stevent1
With three Broncos you must have had great luck with them. The first Ford I bought was a 92 Explorer in 95. My wife mostly drives it. It is still a daily ride with 460,000kms on it(almost 290,000 miles). We bought another Ford in July.
Have a good day
Cliffy
Chuck,
You beat me to the bump for this thread.
Glad the photos are going well. Happy to help share your work.
You'll want to use a <p> tag in front of your text, too, so that gets started on its own line.
The French Knot idea looks great.
And I still want to see some more photos of that column in your shop when you have a chance.
Best,
Steve
View Image
Steve,
You asked about the column in my shop. It is non-structural but could have been. I got it off a job because the owner did not want a column with checks in it so it wound up in a dumpster. Almost all wood columns eventually check. This one is fingerjointed pine. I ripped 3-5/8" off the back to fit over a 2x4 wall. The cypress paneling was coped to fit the column.
View Image
The column will get a capital and then I will install crown mould throughout.
View Image
Chuck S
live, work, build, ...better with wood
Chuck,Thanks for the extra photos. SGB must be awfully nice to let you make dust in her pool house. (Nice looking cabinets by the way. Really like how you continued the rails around the side. What are the panels made from?)How come columns are susceptible to checking?Best,
Steve'Man who say it cannot be done should not interrupt man doing it' ~ Chinese proverb
View Image
Steve,The cabinets are bird's eye maple and cherry. I put a pic in the post above (combination square)SGB tolerates the dust. I have a clean drop over the furniture. No pool yet.Staved wood columns tend to check because of shrinkage.Chuck Slive, work, build, ...better with wood
The cherry has been machined and ready to go. The seven stacks on the left are being used.
View Image
The maple is cut to length.
View Image
The 90' cuts are next.
View Image
Chuck S
live, work, build, ...better with wood
The pieces are next dry fit.
View Image
This next shot is one of four ends that will be glued up.
View Image
These pieces will be installed when the floor goes in.
View Image
Another view.
View Image
Chuck S
live, work, build, ...better with wood
looking good there Chuck! still lurking. DW
I love the feeling of depth that is achieved by the grain changing direction!
Zach,
The French knot is glued up. Start with a little glue on the slip.
View Image
The mitres are glued as well
View Image
The splines are precut to length.
View Image
Glue squeeze out is cleaned as required.
View Image
Moving along.
View Image
View Image
The glue up is complete
View Image
Chuck S
Steve,
The glue up is quickly slid from the square corner. Collins clamps are used on the corners. That is an old 13oz. Stanley.
View Image
Poney clamps are also used.
View Image
Light pressure is used on the clamps to ensure flatness.
View Image
Once again, thank you for your posting help.
Chuck S
live, work, build, ...better with wood
The clamps are removed after the glue dries.
View Image
The inlays are dead flat
View Image
The field is then dry fit.
View Image
The second French knot is dry fit as well.
View Image
The flooring and the inlays will acclimate in the house before installation.
Chuck S
live, work, build, ...better with wood
Very nice Chuck, I like the deliberate approach obviously take , I strive to be as organized. I did a similar project once pre-making several Walnut and White Oak greek keys as a border for a white oak floor it was fun but time consuming.
Thanks DC,It does take time. I could not afford to pay someone to do this for me.A while back you posted some very nice work on a house. Was that the house with the floor border?Chuck Slive, work, build, ...better with wood
Chuck,The house from the previous thread did not have the border, I actually have about 50 new photos from that project to post when I get them re-sized. I ended up milling all of the trim on site including 30 4 layer pediments and 7 pediments over 7 feet long with the same 4 layers and a keystone.The floors with the border were for a law firm in NYC, I built a curved reception desk over the existing carpeted floor...then they switched to wood flooring meaning I then had to cut all of the wood planks into the curve of the desk , doh!
DC,Gotta first name?Resize my friend. Check out Irfanview. A free download.http://www.irfanview.com/You can resize pics to the web standard of 640 x 480 in a batch format.I would be thrilled to see the pics to learn of yours/others techniques. The more I learn, the more I relize how much I do not know.Chuck Slive, work, build, ...better with wood
Chuck,The first name is Ray. The DC is for District of Columbia, my hometown born and raised.I posted a poor imitation of your tutorials in another thread, I was using my cellphone camera but wanted to show how I built some curved pediments.
Ray,I just replied to your thread. Click on your name, then 'change profile'. It is best when viewers can see what part of this great nation and world you are from.Your Pediment thread is very good.Chuck Slive, work, build, ...better with wood
Truly beautiful work any H/O is lucky to have guys like you to create details like this that can be cherished for years to come!
Chuck,Looks just as great as I've come to anticipate from your work. Awaiting the next installment (pardon the pun)How long do you allow this to acclimate to the new room? Longer than you would for a regular floor job?Thanks,
Steve'Man who say it cannot be done should not interrupt man doing it' ~ Chinese proverb
View Image
Steve,I like to let things acclimate for a week. My shop (SGBs future pool house is conditioned space but I keep it at 85' in summer ((unless I am working)) and 55 in winter (((unless I am working))) )) ). (Punctuation ????????)I have tried to time the install(ment). We wil be out of town TG week so I will start the install upon return. I have some loose ends to tie up before our sojourn.ChuckSlive, work, build, ...better with wood
All that nice work ... then you used flex duct? hmmm
We have very mild winters here.The longest 5-ply flex duct is less than 10'. I don't see a problem. All the connections are wrapped and sealed.Chuck Slive, work, build, ...better with wood
Has nothing to do with winter. In fact in your case it has more to do with summer. In cooling you want to maximize air flow and flex just doesn't cut it. You did do a pretty tidy job ... but ... IMO if you can install flex very neatly and straight ... you should use rigid. Many specs I've seen limit flex to 2 feet max.
Love your floor inlay work pics ... looks very nice!
I though I would update this thread before it gets lost in the new and improved er..twilight zone.
The 2 closet floors are scraped for sheetrock mud and paint blobs.
View Image
The lovely Sweet Georgia Brown vacuums.
View Image
The floor is damp mopped. Almost all adhesives say 'surface must be free of dust, oil,other contaminants' or something similar. I have always wondered why some gunned adhesives say 'will stick to wet or frozen lumber'
View Image
Chuck S
The end of the world as we know it for my BT. What a long strange trip it's been. I am old and in the way. I shall become a fat man in the bathtub with the blues.
live, work, build, ...better with wood
DW,
The 15/32" underlayment is installed in the usual manner. Some buy unrated plywood at lodepot and use it. This is BC from a lumberyard. The innerplies can make the difference in the grade and rating.
View Image
A floor template was laid out and cut on the tablesaw.
View Image
The template will be used to align the inlay.
View Image
Chuck SThe end of the world as we know it for my BT. What a long strange trip it's been. I am old and in the way. I shall become a fat man in the bathtub with the blues.live, work, build, ...better with wood
Walter,
I don't know if you are still following along. I used felt as a slip sheet instead of red rosin paper because the small addition is built over a crawl space.
View Image
The template is screwed to the subfloor.
View Image
The two ends are installed first.
View Image
Splines are installed at the perimeter of the glued up ends.
View Image
Moving along
View Image
Chuck SThe end of the world as we know it for my BT. What a long strange trip it's been. I am old and in the way. I shall become a fat man in the bathtub with the blues.live, work, build, ...better with wood
Steve,
The tongue has to be removed from one of the center pieces of cherry
View Image
A groove is then cut
View Image
A hatchet is used to bevel the bottoms of the grooves on the 2 adjoining pieces.
View Image
ChuckThe end of the world as we know it for my BT. What a long strange trip it's been. I am old and in the way. I shall become a fat man in the bathtub with the blues.live, work, build, ...better with wood
Steve.
The install continues.
The cherry is then "tented" to install the last 2 pieces of the inlay.
View Image
View Image
The pieces were carefully aligned and coaxed flat.
View Image
View Image
The inlay is installed. SGB's closet.
View Image
My closet. (I mean SGB's other closet)
View Image
Chuck SThe end of the world as we know it for my BT. What a long strange trip it's been. I am old and in the way. I shall become a fat man in the bathtub with the blues.live, work, build, ...better with wood
Nice work Chuck, I would never have thought to use a hatchet for that task(or for anything short of bludgeoning some brush). I use felt paper as my flooring underlayment as well.
Chuck ,
I had fallen behind and theres a big delay in the e mail notifications now .Got both the notification and your mail this morning .
I certainly hope that you'll not be frozen out when the change happens , as this thread is better than buying a book to learn about skilled woodworking .
You're very generous with your time to take and embed this sequence from beginning to now .
I hope Taunton realizes the value of some of these photo essays .
Lets hope for the best .
Happy Holidays , Walter
Walter,Thank you for the kind words. Steve entered the vanities for me in the cabinet contest in the "Gallery" section (above the orange line in the banner). I was unable to enter because of the new format. I think my entry is one of few, maybe the only entry, that is linked to a "how to" thread and shows the process.I doubt I will win. There are some great project entries. If I did win I would donate the tools because I don't need them and new tools don't feel right in my hands. Something about old tools that know how to what you want them to. Does that make sense?Your photo essays are some of the best.I stll need your e-mail address.Thaks again. Happy Festivus.Chuck SThe end of the world as we know it for my BT. What a long strange trip it's been. I am old and in the way. I shall become a fat man in the bathtub with the blues.live, work, build, ...better with woodEdited 12/6/2009 8:38 am ET by stevent1 <!-- STEVENT17 -->
Edited 12/6/2009 5:34 pm ET by stevent1
Here is an update before the deep end went Edsel.
My wife's closet.
View Image
My closet (DW's other closet)
View Image
More can be found at BTC
http://forums.delphiforums.com/breaktimeclass/messages/?start=Start+Reading+%3E%3E
Chuck S