Small copper roof — Should I try it?
I know there are some “tin wizards” out there (Sphere & Grant Logan come to mind), so maybe someone can help me out.
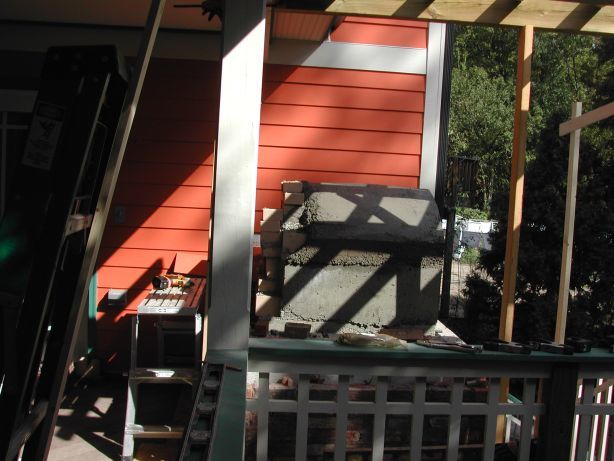
As part of an addition I’m currently finishing up, I have built a wood-fired brick oven. The enclosure is about 5′ wide and 4′ deep. I need to roof it with non-flamable construction — I’m thinking copper standing seam, over a steel stud frame covered with Hardi or cement board. Screw the mounting clips down to the framing members.
I’ve done some copper work in the past, but mostly relining built-in gutters — never did standing seam before. I’ll rent a brake, and I have some sheet metal bending tools & soldering equipment. Is there anything else I need to form/roll the seams? (I recall seeing in some ancient article some sort of “anvil” that is used to hammer the seams.)
Should I give this a go, or look for someone to do it. Steel studs/cement board the way to go, or is there a better way?
Attach pic is the oven, side view, prior to finishing up the exterior walls which are now done — brick on the sides and stone on the front. The new roof would begin under the porch overhang, and slope down to the right in the photo, dropping about 4″ in 3′.
Mike Hennessy
Pittsburgh, PA


Replies
I'm thinking copper standing seam, over a steel stud frame covered with Hardi or cement board. Screw the mounting clips down to the framing members.
So you'd need to lay your framing out so the roof seams correspond with a rafter.
I'll rent a brake,
Any brake you can rent is going to produce humongus seams. Might be a little overpowering on that small of a roof.
I have some sheet metal bending tools & soldering equipment.
Shouldn't be anything to solder.
(I recall seeing in some ancient article some sort of "anvil" that is used to hammer the seams.)
If you can get your hands on a "hanvil" as we call them, you can form and lock your seams with it. They're slow and take patience, but a small job like this would be perfect for one. Two pieces of steel or even oak (one 1 1/4" thick and one 1" thick) would work.
Bend "U" shaped pans with one leg 1 1/2" tall and the other 1 1/4" tall. When you install them, butt a tall leg against a short one. Put your 1 1/4" block against the legs on the short side. Tap the longer leg over the shorter 90 degrees. after you get the whole seam tapped over, knock it down to less than 90d and use your hand tongs to squeeze it tight. Repeat the process with the shorter block and you've got a double rolled seam.
I've got to do a mock up for an architect this evening or in the morning and I'll take some pics to show you how to form the tops and bottoms of the seams.
I'm unsure about the sheathing, but I don't have any better suggestions.
http://grantlogan.net/
It takes a big man to cry, but it takes a bigger man to laugh at that man. - J. Handey
Grant:
Yep, I'll fit the rafters to correspond to seams. Do I need to worry about what screws to use? Not sure I can get anything that'll tap the steel studs except steel screws.
I was thinking of the brake just to form the pans with the legs first and get everything straight and square -- 1-1/4" or less on a bend won't be a problem. As for soldering, I was holding back a bit -- the roof will dump into a small integral gutter (otherwise it would dump onto the steps.) Also,dunno why, but I always thought standing seams were soldered. Skipping that will speed things up a bit.
As for the anvil, John Stortz sells them via the web for $100, plus $8 shipping (which is a heck of a deal on shipping, since these things must weigh a few pounds). Might get one just 'cause they look cool.
I found a more recent photo of the oven to give a better idea of what I'm dealing with. Just needs the chimney pipe and roof, and it's pizza time!
Thanks for your help.
Mike HennessyPittsburgh, PA
Mike and Grant,
How about a flat lock seam, cleated?
I did a small 5x8 porch roof last year like this. Very easy. It is almost flat and a valley dumps on it. No leaks.
http://www.copper.org/applications/architecture/arch_dhb/basic_details/joints_and_seams1.html
KK
This is also an option. There was an article on these recently in FHB, IIRC. I kind of like the look of standing seam, though. So if it's not crazy hard, I think I'll give it a go.
Thanks for the idea.
Mike HennessyPittsburgh, PA
Edited 10/29/2007 8:08 pm ET by MikeHennessy
Here's some pics of the mock up I had to do out of terne II.
I'm too tired to document it. I'll answer any questions you have tomorrow when I get time.
View Image
View Image
View Image
View Image
View Image
View Image
View Image
View Image
View Image
View Imagehttp://grantlogan.net/
It takes a big man to cry, but it takes a bigger man to laugh at that man. - J. Handey
PERFECT! No need to document -- pics were great.
Thanks!
Mike HennessyPittsburgh, PA
PS: Man, timing is everything, ain't it? I mean, what are the odds that I'd ask a question about doing standing seam the very day that Grant Logan is doing a mock-up? Way too spooky. It must be Halloween or somethin'!
Edited 10/30/2007 8:18 am ET by MikeHennessy
Is this a great forum, or what?!
Forrest - continually amazed
Hey, Grant -- another huge THANKS! for your "How-To" on standing seam roofing.
I tried my hand at it this weekend and would have finished, except I ran out of copper. Made a few dumb beginner's mistakes, like not leaving enough tail to make a locking seam for flashing where the gutter apron connects in, but nothing I couldn't kludge.
Crimping a seam between the first pan and the gutter apron:
Rolling a standing seam with the "hanvil" -- cool tool.
My Lovely Assistant putting the final crimp on the first standing seam:
Here's the as far as we got before running out of metal.
The major PIA was I couldn't find my soldering tip for my torch, and I couldn't find one in any store that was open today, so I had to do all the soldering with just the flame. Worked, but I'm gonna either find mine or pick one up before I do any more soldering on this.
I'll pick up another sheet of cu this week and polish this baby off! (DOH! I just got your nick!)
First fire:
Thanks again man. Always wanted to try that.
Mike HennessyPittsburgh, PA
I'm seeing text, but no pics.
Glad it worked out for you.http://grantlogan.net/
It takes a big man to cry, but it takes a bigger man to laugh at that man. - J. Handey
Don't know why that happened. Looked OK when I posted it.
Here's the pics.
Mike HennessyPittsburgh, PA
Looks good. Where does the little gutter drain to?http://grantlogan.net/
It takes a big man to cry, but it takes a bigger man to laugh at that man. - J. Handey
Ah, the "hidden downspout".
I left a 2" void inside the brick. Used 1-1'2" copper pipe for a "downspout". It goes down through the wall and comes out underneath the stairs. Then into a leader.
That was a bee-atch to make. I took a regular tee, split it on the long side, flattened it out and soldered it to the underside of the gutter. Then fit the whole shootin' match down over the in-place pipe.
Didn't want a pipe sticking out into the stairway, and had nowhere else to go with the water.
Mike HennessyPittsburgh, PA
Excellent. I see ya even got a real tinners hammer!
Thats a neat oven, I'd rather my wife not see the pics, if ya know what I mean..LOLSpheramid Enterprises Architectural Woodworks
"If you want something you've never had, do something you've never done"
Hey, you could bang one of these out in a weekend, I betcha. Think of the pizza partys!
Personally, I'm planning on making some killer bread, smoked veggies, etc.
Mike HennessyPittsburgh, PA
The chimney is going that clost to the red building the background?
To the extent "that close" is over 2' away, yes. I'm using 1,200° stainless pipe for the flue, which will extend up from the oven to 2' above the house roofline. The pipe is rated for 2" clearance.
Mike HennessyPittsburgh, PA
That looks great and we all learned something. Inspiration for playing around with copper sheets. I'll be looking at my place with renewed interest where I could use some of these techniques.
I have one question though. Isn't there some reaction between copper and cement based products or is that aluminum?
Well, as I find out, this can get to be pretty expensive "playing around"! I had a couple of sheets of copper around for years -- I'd gotten them about 20 yrs ago to reline a gutter & sold the house before I got around to it. I thought this would be a good use for them, so I didn't have to keep tripping over them for another 20 yrs.
Problem is that I ran out -- 1/2 sheet short. So I gotta get another sheet. I just got a price on that -- $160! And, to make matters worse, I'll end up with an extra 1/2 sheet that I'll end up keeping around for another 20 yrs since it's so expensive. ;-)
The roof structure has to be non-combustible, so it's steel studs and 1/2" hardibacker. Since it'll be dry, I don't expect any reaction, but who knows? Couldn't come up with any other solution.
Mike HennessyPittsburgh, PA
I did the same thing. I made a counter top with copper and a sink surround in the mud room, and I have some left overs that I want to play with. When I bought them ~six years ago they were 83 dollars for 3' x 5'.