FHB Logo Facebook LinkedIn Email Pinterest Twitter X Instagram Tiktok YouTube Plus Icon Close Icon Navigation Search Icon Navigation Search Icon Arrow Down Icon Video Guide Icon Article Guide Icon Modal Close Icon Guide Search Icon Skip to content
Subscribe
Log In
  • How-To
  • Design
  • Tools & Materials
  • Restoration
  • Videos
  • Blogs
  • Forum
  • Magazine
  • Members
  • FHB House
  • Podcast
Log In

Discussion Forum

Discussion Forum

stairway/hardwood floor pictures

Danbuilt | Posted in Photo Gallery on April 7, 2005 02:18am

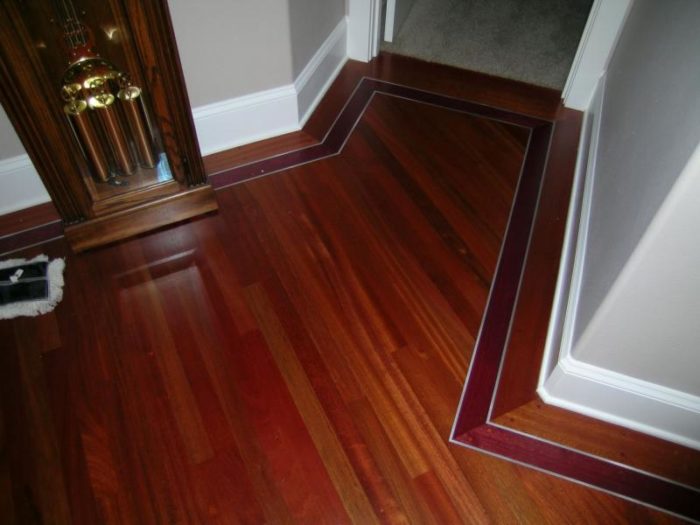
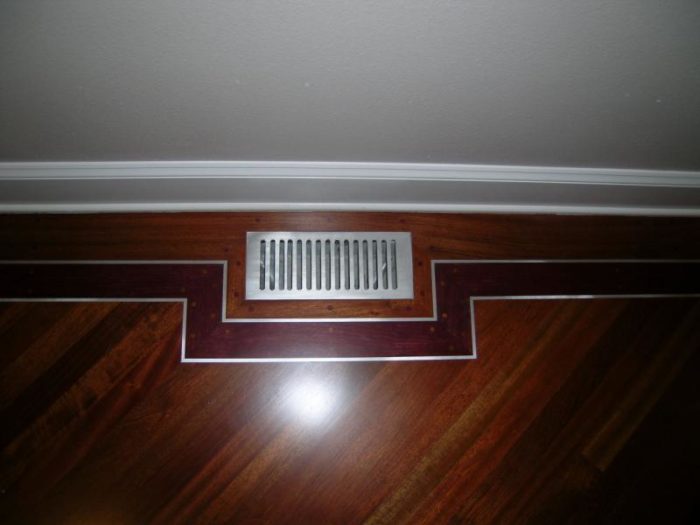
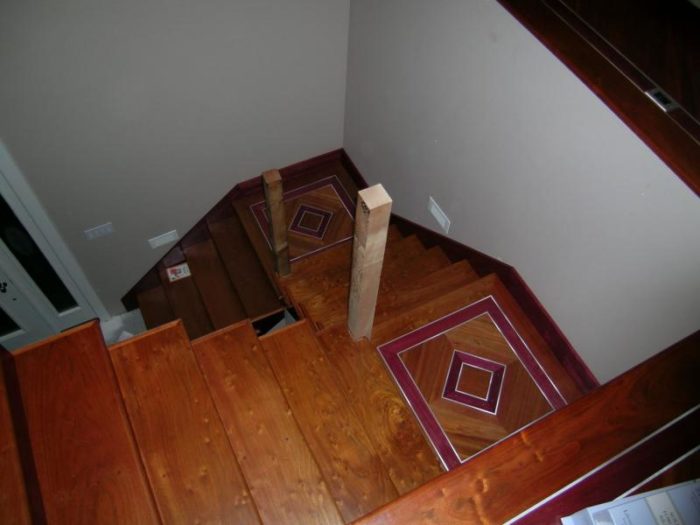
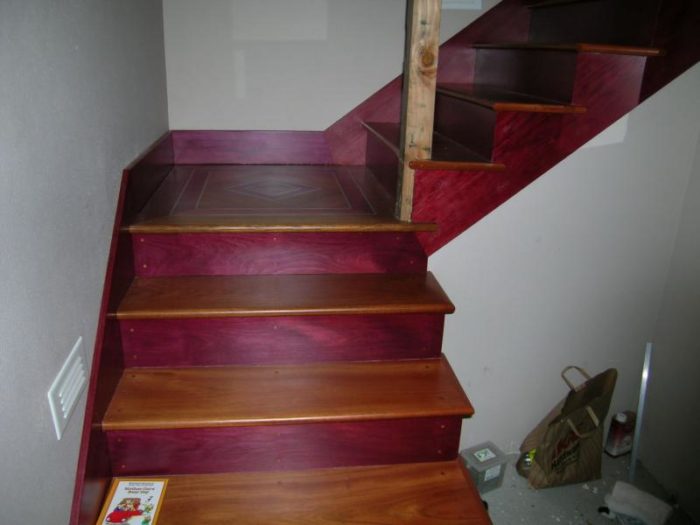
I just thought I’d post some pictures of the stairway I’m working on. I finished the floor a while ago. I’m working on this in my spare time—pro bono for the parents. The stairway is brazilian cherry treads with purpleheart risers and skirtboards. The center of the landing is lacewood and the borders you see are purple heart surrounded by two pieces of 1/4 aluminum. I also inlaid the aluminum in the posts in place of flutes–just trying to do something a little different.

Reply

Replies

  1. DustinThomps | Apr 07, 2005 02:26pm | #1

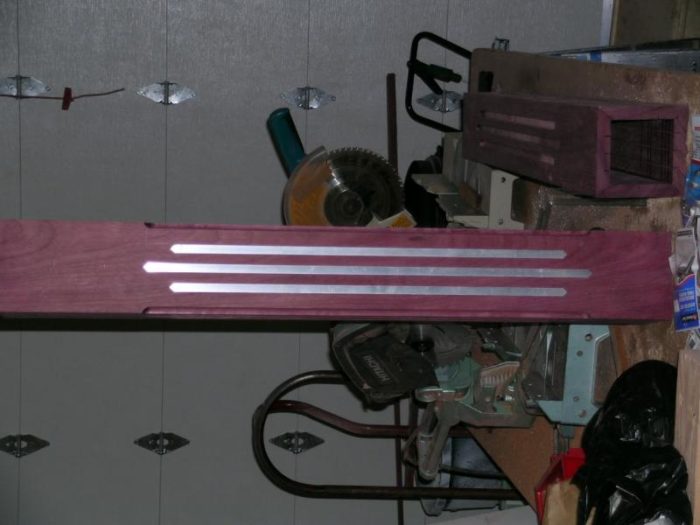
    Holy purpleheart!  What are those stair treads made out of?  Things are looking good,nice work.

    Dustin

    1. Danbuilt | Apr 07, 2005 10:51pm | #9

      The stair treads are brazilian cherry--just happened to have a few with some figure to them--I wish  I would have used those as the first few steps. They turned out real nice with the finish.

  2. donpapenburg | Apr 07, 2005 03:41pm | #2

    WOW

  3. JohnT8 | Apr 07, 2005 04:54pm | #3

    Dan, that turned out really nice.  Must have taken a lot of time, and I hate to think what the materials cost on that one!

    I've reduced the pic size so that the slow dial-up'ers can enjoy the pics too.


    jt8

    Don't accept your dog's admiration as conclusive evidence that you are wonderful. -- Ann Landers

  4. ravz | Apr 07, 2005 06:51pm | #4

    Love the aluminum!! is that just flat stock, or is it an inverted T?  what happens if the floors need to be sanded eventually? can aluminum be sanded?  will the refinshers freak?

    any pics of the work in progress?  is the alumnum glued or screwed in any way?

    1. Danbuilt | Apr 07, 2005 09:30pm | #5

      The aluminum is 1/4 x 3/4 flatstock on the border. I nailed it every 6 inches to the purpleheart--very monotonous--but you risk it popping with epoxy--nails allow for different expansion rates--especially when sanding--it gets a little warm. The posts have 1/4 x 1/2 flatstock aluminum inlaid. On the posts I just used a structual epoxy--T88. It worked great--you just have to allow enough room for the epoxy and don't leave the aluminum proud otherwise it's hard to sand flat. It's much easier to sand the wood down to the aluminum--and yes the aluminum does sand--I just went from 50 grit to 80 grit to 100 grit and used an acid cure urethane for the finish--same as on floor.

      1. User avater
        Sphere | Apr 07, 2005 09:53pm | #6

        Very cool looking.

        Your response about the Al. reminds me of a shop I worked in YRS ago.  We routed a slew of stairtreads with a celtic knot type pattern. Oak treads. The metal guy was to pour molten pewter in the grooves, we would finish the surfaces.

        Well, you have to over pour the pewter so when it cools it wont shrink too much. Metal guy had a flash of lightbulb...over pour and then plane it off...WRONG.

        We had finish nail anchors in the grooves, but his planer knives picked up the stringing and wadded up in the cutter head...destroyed the tread and his planer.

        What we did in the shop , was we used really good Japanese hand planes to level the pewter ( easy actually) and scrapers for the final polish.  Came out looking sweet with no scratches.

          Edit for crappy typeing ( numb hand)

        Spheramid Enterprises Architectural Woodworks

        "Success, is not pleasing others, it is pleasing yourself"

        Edited 4/7/2005 2:55 pm ET by SPHERE

        1. FastEddie1 | Apr 09, 2005 01:05am | #14

          Do you have a picture of the celtic knot pattern?

           I'm sorry, I thought you wanted it done the right way.

          1. HARDWOODGUY | Apr 09, 2005 02:38am | #15

            Aluminum! Looks better than brass. Very sharp looking and a class job.Ken Fisher

          2. Danbuilt | Apr 09, 2005 09:15am | #16

            nope

          3. User avater
            Sphere | Apr 12, 2005 01:13am | #17

            Nope, this was almost 20 yrs ago I think..mirror image on each end of the tread. Pretty cool looking.

            Maybe Ellis Walentine still has a pic. Oh, wait.his shop burnt a few yrs ago too.

            Anyway, I worked in his shop for a spell, and it was his baby to do that job for a client. 

            Spheramid Enterprises Architectural Woodworks

            "Success, is not pleasing others, it is pleasing yourself"

          4. StanFoster | Apr 12, 2005 03:58am | #18

            Dan:    Nice work......I have been gone on vacation.  Good job

      2. ravz | Apr 07, 2005 10:25pm | #7

        amazing thanks!  did you happen to use a mini hammer or something to make the nailing easier?  would a 18G brad nailer fire through aluminum? as soon as I saw your idea, wheels started turning in my head :)


        1. Danbuilt | Apr 07, 2005 10:48pm | #8

          No easy way to attach the aluminum--I had to drill a pilot hole every 6 inches and nail it by hand. I did this all by hand about 200 ft of border or so and had to screw and plug it to install the border as 1 unit. If I had a shop or drill press I would stack a few pieces and drill them all at once. I put my dad to work on drilling the holes :)  You may try to rebate the edges of your border to receive 1/4 x 1/4 aluminum and attach via epoxy. Then you've got to clean up the mess  before you can install it but it would allow you to attach the border with a  loose tennon and not have to mess with screws and plugs--but I like the look anyway. the project was a little bit of an experiment for me---I was just too scared of it coming loose in the sanding stage or in years to come with seasonal movement. The posts I'm not worried about--they're just 30 inch runs and the epoxy worked great for that.

  5. DougU | Apr 08, 2005 04:12am | #10

    Dan

    Cool work!

    I worked for a guy that got a deal on some purple heart, we trimmed out his master suit with the stuff.

    Never seen it used for much more than a cute little jewlery box before, you incorporated it nicely.

    Doug

    1. MikeSmith | Apr 08, 2005 05:20am | #11

      dan... really nice... the purple risers ... are they stained ?

      and i really like the floor.. also the baseboard detail at the round plaster corners..

      View ImageMike Smith Rhode Island : Design / Build / Repair / Restore

      1. Danbuilt | Apr 08, 2005 07:36am | #12

        Hey, thanks for the reply. The risers are purple heart. When you cut or sand the wood it's brown, but it oxidizes to that purple color you see--as purple as purple can be--it'll actually brown out over time. You can slow it down with a uv protector or you can resand and it will oxidize to that purple again. The floor has been down for close to a year now.

      2. Danbuilt | Apr 08, 2005 07:47am | #13

        Hey, I forgot to mention the baseboard detail. the drywallers were actually suppose to square off the radius corners at the base. I just use 30 degree mitres with a center piece of base about 5/8 of an inch glued and pinned to the other pieces of base. It's a little slower than 90 degree corners but it beats putting a  large bead of caulking or using a transition piece that never quuite matches.

  6. User avater
    Bluegillman | May 18, 2005 06:36am | #19

    Wow, very nicely done... I got a question on how u did the finishing on the aluminum and woods. Aluminum seems to put too much grayish dust when sanded and that seems to sounds like it (sanded dust from the aluminum) would fall in to the pores of the wood... How do u manage to keep it free from that dust?

    1. Danbuilt | May 18, 2005 11:12am | #20

      I noticed the dust too when I was hand sanding the posts--I was a little worried. When I used a belt sander hooked up to my vaccum I had no problem with that--but I did a final block sanding by hand and it put a gray dust on everything--I just vacuumed and used a tack rag and the finish went on just fine. However I didn't sand and finish the floor--I had someone else do that, but there was no problem there either.


Log in or create an account to post a comment.

Sign up Log in

Become a member and get full access to FineHomebuilding.com

Video Shorts

Categories

  • Business
  • Code Questions
  • Construction Techniques
  • Energy, Heating & Insulation
  • General Discussion
  • Help/Work Wanted
  • Photo Gallery
  • Reader Classified
  • Tools for Home Building

Discussion Forum

Recent Posts and Replies

  • |
  • |
  • |
  • |
  • |
  • |
View More Create Post

Up Next

Video Shorts

Featured Story

FHB Podcast Segment: Hand Tool Sharpening Tips

Learn how the pros keep their hand tools sharp without breaking the bank.

Featured Video

SawStop's Portable Tablesaw is Bigger and Better Than Before

The 10-in. Jobsite Saw PRO has a wider table, a new dust-control port, and a more versatile fence, along with the same reliable safety mechanism included in all SawStop tablesaws.

Related Stories

  • Podcast Episode 690: Sharpening, Wires Behind Baseboard, and Fixing Shingle Panels
  • FHB Podcast Segment: Hand Tool Sharpening Tips
  • Old House Air-Sealing Basics
  • A Drip-Free, Through-Window Heat Pump

Highlights

Fine Homebuilding All Access
Fine Homebuilding Podcast
Tool Tech
Plus, get an extra 20% off with code GIFT20

"I have learned so much thanks to the searchable articles on the FHB website. I can confidently say that I expect to be a life-long subscriber." - M.K.

Get home building tips, offers, and expert advice in your inbox

Signing you up...

This site is protected by reCAPTCHA and the Google Privacy Policy and Terms of Service apply.
See all newsletters
See all newsletters

Fine Homebuilding Magazine

  • Issue 332 - July 2025
    • Custom Built-ins With Job-Site Tools
    • Fight House Fires Through Design
    • Making the Move to Multifamily
  • Issue 331 - June 2025
    • A More Resilient Roof
    • Tool Test: You Need a Drywall Sander
    • Ducted vs. Ductless Heat Pumps
  • Issue 330 - April/May 2025
    • Deck Details for Durability
    • FAQs on HPWHs
    • 10 Tips for a Long-Lasting Paint Job
  • Old House Journal – August 2025
    • Designing the Perfect Garden Gate
    • Old House Air-Sealing Basics
  • Issue 329 - Feb/Mar 2025
    • Smart Foundation for a Small Addition
    • A Kominka Comes West
    • Making Small Kitchens Work

Fine Home Building

Newsletter Sign-up

  • Fine Homebuilding

    Home building tips, offers, and expert advice in your inbox.

  • Green Building Advisor

    Building science and energy efficiency advice, plus special offers, in your inbox.

  • Old House Journal

    Repair, renovation, and restoration tips, plus special offers, in your inbox.

Signing you up...

This site is protected by reCAPTCHA and the Google Privacy Policy and Terms of Service apply.
See all newsletters

Follow

  • Fine Homebuilding

    Dig into cutting-edge approaches and decades of proven solutions with total access to our experts and tradespeople.

    Start Free Trial Now
    • Facebook
    • Instagram
    • X
    • LinkedIn
  • GBA Prime

    Get instant access to the latest developments in green building, research, and reports from the field.

    Start Free Trial Now
    • Facebook
    • YouTube
  • Old House Journal

    Learn how to restore, repair, update, and decorate your home.

    Subscribe Now
    • Facebook
    • Instagram
    • X

Membership & Magazine

  • Online Archive
  • Start Free Trial
  • Magazine Subscription
  • Magazine Renewal
  • Gift a Subscription
  • Customer Support
  • Privacy Preferences
  • About
  • Contact
  • Advertise
  • Careers
  • Terms of Use
  • Site Map
  • Do not sell or share my information
  • Privacy Policy
  • Accessibility
  • California Privacy Rights

© 2025 Active Interest Media. All rights reserved.

Fine Homebuilding receives a commission for items purchased through links on this site, including Amazon Associates and other affiliate advertising programs.

X
X
This is a dialog window which overlays the main content of the page. The modal window is a 'site map' of the most critical areas of the site. Pressing the Escape (ESC) button will close the modal and bring you back to where you were on the page.

Main Menu

  • How-To
  • Design
  • Tools & Materials
  • Video
  • Blogs
  • Forum
  • Project Guides
  • Reader Projects
  • Magazine
  • Members
  • FHB House

Podcasts

  • FHB Podcast
  • ProTalk

Webinars

  • Upcoming and On-Demand

Podcasts

  • FHB Podcast
  • ProTalk

Webinars

  • Upcoming and On-Demand

Popular Topics

  • Kitchens
  • Business
  • Bedrooms
  • Roofs
  • Architecture and Design
  • Green Building
  • Decks
  • Framing
  • Safety
  • Remodeling
  • Bathrooms
  • Windows
  • Tilework
  • Ceilings
  • HVAC

Magazine

  • Current Issue
  • Past Issues
  • Magazine Index
  • Subscribe
  • Online Archive
  • Author Guidelines

All Access

  • Member Home
  • Start Free Trial
  • Gift Membership

Online Learning

  • Courses
  • Project Guides
  • Reader Projects
  • Podcast

More

  • FHB Ambassadors
  • FHB House
  • Customer Support

Account

  • Log In
  • Join

Newsletter

Get home building tips, offers, and expert advice in your inbox

Signing you up...

This site is protected by reCAPTCHA and the Google Privacy Policy and Terms of Service apply.
See all newsletters
See all newsletters

Follow

  • X
  • YouTube
  • instagram
  • facebook
  • pinterest
  • Tiktok

Join All Access

Become a member and get instant access to thousands of videos, how-tos, tool reviews, and design features.

Start Your Free Trial

Subscribe

FHB Magazine

Start your subscription today and save up to 70%

Subscribe

We hope you’ve enjoyed your free articles. To keep reading, become a member today.

Get complete site access to expert advice, how-to videos, Code Check, and more, plus the print magazine.

Start your FREE trial

Already a member? Log in