I’m starting to plan on the trim for our new home, and the attached image doortrim.jpg illustrates the basics style that we’ll be using.
Given this style of door trim, what suggestions do you have for the windows? Do I try to bring the same style to the windows? or steer to something different but with straight simple lines? But first a few details:
The front of the house windows are casements that measure 5′ wide by 6’8″ tall, including the transom that begins at 6’10”.
The front door is 36″ 6 panel, with side lights with both vertical and horizontal transoms.
The rear of the house has double hung in the breakfast nook that are 5’6″, no transom. The living room has a double outswing 6′ French door flanked on each side with 2’6″X6′ double hung windows, no transom.
The house has 9′ ceilings, and 11 1/2 wall thickness. We’d like to include a stool of some sort and are shooting for the craftsman influence. Most likely window treatments will be inside the jamb extensions.
I can post more illustrations if you think it’d help, thank you!
Rip


Replies
I'm going to be interested in the replies, if there are any.
blue
me too! ;-)
That's a very common trim style and your options are limited only by your budget. You can do most of it (perhaps all) with "stock" moldings and you just need to fool around with different pieces until you get the arrangement and "look" you want.
Be ready for some sticker shock if you want stain grade work. Good finish carpenters ain't cheap - lol.
I believe I will have to mock something up for sure. And fortunately I have most of the lumber purchased and this like the rest of the house my wife and I'll be doing the work.Talk about sticker shock, I got the prices for everything from the local lumber yard...nothign that 6K won't cover! Oh yeah, not installed ;-)Rip
What spiece of wood?
Red Oak
$$$$$$$$$$$$$$$$$$$$$$$$$$$
Skippy -
How much finish carpentry experience do you have - and what kind of tools? If you're doing stain grade work, this ain't the best place to start. You'll want nice, tight, joints and that takes time, patience, and good tools. Nothing brings that sick feeling to the pit of your stomach quicker than discovering that you just mis-cut a miter on an expensive chunk of wood - lol.
Even paint-grade work can be a little spooky, 'cause caulk can only hide so much.
Hi Dave,
Finish carpentry experience, well I've never finished a house if that's what your asking and for that matter I have never built a house either ;-). I have built a fair amount of furniture, and over the past 20 years have amassed nearly all the tools needed. Here's a sample of my workmanship <http://goblin1.zool.iastate.edu/~darwin/end_table/homepage.html> and while I fully understand that trim work is much different that furniture construction, there are MANY elements that are the same i.e. fit of the joints, consistency from room to room, not to mention finishing.Again I really appreciate what your saying...and like this whole house construction process I have probably been more eager than I should be to learn and refine techniques.On the the other side....I will have few miters tho!RipEdited 12/13/2006 7:58 am by RippySkippyEdited 12/13/2006 7:59 am by RippySkippy
Edited 12/13/2006 7:59 am by RippySkippy
Rip -
If you've built furniture, you're way ahead of the game. The biggest hassle of finish carpentry is working around things that are out of square, out of plumb, or not flat. It can take a fair bit of creativity to hide those problems. I've spent an hour, or more, "prepping" a door for a casing installation that takes 10 - 15 minutes - lol.
Another thing to keep in mind is that it's all about appearance. I once did wainscoating that was almost 2" out of level across a 15' wall. When I put it in on the level, it looked goofy. When I moved it to "look right", it was ~2" out of level.
Finally, don't get too anal about your joinery. Nobody will ever see that slight imperfection in a miter seven feet above the floor. Few people really "inspect" that sort of thing and even fewer would recognize a "mistake" if they saw it. You'll know where every flaw is, but that passes after a while - lol.
Have fun
Dave
You have what a buddy and I call "IT". It refers to those of us taking the time to do things right...not for the sake of anyone else's benefit.You mention about the joinery, what do you and others think about putting a biscit in at the intersection of the casing and head? Is that over kill? My initial off-th-cuff response would be a biscit glued on one side...basically acting as a spline would keep the trim moving together.Rip
I did some doors kinda like that in our old house. My only thought having seen your sketch is that the verticals on the sides should be wider.
Here's a shot of what I did:
View Image
A: Nice belt!"
Boss,Could you grab a quick measurement of your head stock and door casing? What did you do around your windows? Did you do something similar?I don't have the measurements of the door rails yet and would like to let that help dictate the thickness of the casing, I don't want it to be too heavy vertically.Rip
I'd be happy to measure thing for ya, but I don't live in that house anymore. I may be back over there sometime this month, but it won't be for several days at best.Going from memory, I think the verticals on the sides were 4 1/2 or 4 3/4" wide. That worked out really well, as I could joint the edge of a 2X6 and then rip off the worst edge. I put a block at the bottom of the vertical pieces that sticks out a little. I ripped soem 1/4" shims to put behind the base piece so it would stick uot 1/4" and I could still use 1X stock. The top piece was a 1X6 ripped down to 5" or so. I wrapped the top with a small piece of some crown molding, so I could slide it up or down until it looked right. I think I had about 4" showing - Kinda like what you have sketched up.I wasn't trying to follow a specific style necessarilly. I did this in a kitchen that had been added onto the house. The house had similar trim everywhere, with the original finish still on it. But in the kitchen they had used 1X6 common pine and painted it white, so it didn't look remotely similar. The dimensions I used for this stuff was copied off the ~90YO stuff in the rest of the house.
An oak tree is just a nut that held its ground.
Ditto on the width. 2 1/2 inches might be ok for the doors, but the windows mentioned are quite large and a wider trim might look better.
As for the crown type molding for the doors, I have seen it done on windows many times. And I think it best to tie the door trim as much as possible into the window trim.
Q: What did the zero say to the eight? A: Nice belt!"
Took a while.
And now back to your regularly scheduled program
Back in the early 80s on my first job I was helping a guy reno a house built in 1850 and it had similar (if not same) style of trim that I stripped the paint from. IIRC the head and side casings were the same width with the crown & the bead strip at he bottom of the head making the head appear taller. In the less fancy rooms (beds, baths & inside closets) the crown was not installed & the trim painted. I found it interesting that this style looked great painted or stained & didn't look odd (paint & stain in the same house). I'm thinking it was at least a 4/4 (probably 5/4) x 4 (or so)(that didn't help much) with a tall baseboard ~8". The crown was 1" to 1 1/2". I'd use your baseboard and the method that you marry it to the side casings as a factor for determining final thickness.
john
That's good to know, I hadn't thought of using the same width and the impact of crown and bead making it appear taller.We toyed with the idea of mixing paint and stain, just as you describe. Thanks!Rip
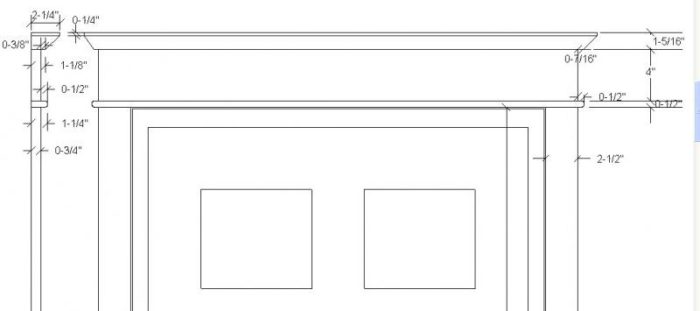
I'm attaching the window trim detail I created for my own home. ery similar to your own.
I used stock lumber and mouldings where possible to save on costs. I found proportions to work well.
I think I labeled everything clearly enough....my apologies for the font....kids have been using "paint" of late.
Oh how they pound, raising the sound,
o'er hill and dale, telling their tale,
Gaily they ring while people sing
songs of good cheer, Christmas is here....
Thank you...I like the cove detail...another thing I'll consider.Rip
..and the crown was only attached at the bottom of the crown at the highest point on the head to gain the height. Also remember to compensate for the additional trim width when locating doors & windows near corners so you don't crown the trim or have to rip and hack to get he sides & crown installed.
Good point...I'm heading to the house now, day job 5am to 10am take 3 hours of annual leave then off to the house for the rest of the day.I'll have to take a quick measurement of a couple of doors that could cause issues.
Thanks. Wife and I have very different tastes. I prefer a more ornate detail, where she prefers a more contemporary straight line look.
In an effort to saisfy both our desires, I settled on a rather traditional design. The coved edges give the look of columns supporting a pediment, without getting "fancy" (as she calls it.)
Doors were treatd the same with plinths at their bases.
Good luck....be sure to post some pics when you finish.
Oh how they pound, raising the sound, o'er hill and dale, telling their tale, Gaily they ring while people sing songs of good cheer, Christmas is here....
I think you've accomplished your goals quite nicely. Well done.I will post picts....but like everything else with this building project...it may be "a while" ;-)Rip
Rip
That style of trim is about as common as corn is here in Iowa!
I think you should consider using wider casing though, of all the old houses I've worked in I dont think I ever saw that style done in something as narrow as 2 1/2" casing, Usually its about 4 1/2 - 5" wide, the head build up is usually 1/2" wider, give or take. the casing is usually rounded over on both sides, although I like the idea that J posted with the flute on the edges.
I'd do my windows exactly the same as the doors, except of course I'd add a stool with a simple apron, cove optional.
Doug
I live just north of Doug, and he's right about the this style of casing being very common in old houses throughout this region. Typically, the side casings will be about 5" and the head casing will be 8" (which works out to 5 X 1.618). Same sizes used for both doors and windows.Not so long ago I made casings for a smaller scale bungalow, and sized the casings down: 4" for the side casings, 6.5" for the head casing (again, 4 X 1.618).If you know how to cut/fit returns (for the head casing only), this style is way easier to install than casings with mitres or backbands. ********************************************************
"It is what we learn after we think we know it all, that counts."
John Wooden 1910-
Typically, the side casings will be about 5" and the head casing will be 8" (which works out to 5 X 1.618).
Aha! The golden rectangle strikes again.
Hi Nikkiwood,Thanks for the dimensions, I'm using the same ratio (2.5 x 1.618)= 4.045...it looks like I just started out a bit on the smaller side.IF I step up the side casings to 4 and head to 6.5, wouldn't the base need be increased as well? At present I'm been playing with 4 1/4 x 3/4.And you've flushed me out...in addition to liking the style, I suspected it would be a bit less frustrating than miters and/or back bands. But then again, easy and me don't seem to get along too well, so I don't usually go that route just to go that route! ;-) Rip
Looking at that table you built, I can see you would have absolutely no problem cutting returns for head casings........ <G>If you go with this style of casing, for sure you don't want wimpy, modern baseboards. When I've done 5" side/8" head casings, I've used two piece baseboards that are about 9" overall -- a 7" flat board, and a 2" molded baseboard cap.Using 3/4" stock for the side casings and base, I make 10" plinth blocks out of 5/4 stock (5 1/4" wide), so the base will resolve nicely into the plinth.If you are going to use 4" as your width for side casings, I would think the total height of the base should be somewhere between 6-7".I would also cut a few scrap boards with the dimensions you have chosen for side/head casings/baseboard, and tack them up to see if the proportions seem right to you. Personally, this style may be ubiquitous around here, but I think it is very elegant. And the nice thing is, once you have the dimensions for each door/window, you can make everything in your shop. Installation is fast and easy, since there is nothing complicated about the way the various trim peices fit together. Don't forget the window stools and aprons.********************************************************
"It is what we learn after we think we know it all, that counts."
John Wooden 1910-
The end table was my first gift to my now wife...guess she appreciated the craftsmanship as well LOL!I snagged enough red oak to make the casings, head and crown for about $400, and you're right when I get to the point of saying this is it...production will begin. I may lean to a 2 piece base....we don't want it to get too heavy though.On the stools, I'm thining it'll match the over hang of the head crown, and the apron will match the width of the head.casing. Does that sound right to you?Rip
I would make the stool long enough so it extends base the side casings by a 1/4" on both sides. For the sake of simplicity, I use the same width on aprons as I do for the side casings. The returns (on aprons) is the only part of the whole operation that can get a little tricky, but as a furniture maker, I will not be a problem for you. As for the base, you're right that a width such as I recommended may seem too much. But if you cut a few plain scraps to lean against the wall, you'll see right away what I am talking about. But if you can build a fine table like you put up, you have a fine eye, and I would let that eye guide you to the right proportions. Good luck.********************************************************
"It is what we learn after we think we know it all, that counts."
John Wooden 1910-
For the sake of simplicity, I use the same width on aprons as I do for the side casings.
I typically rip the thickness of the stool, off of the apron.....so that the total width of the two is equal to the casing width. (i.e. If the casings are 3 1/2" wide, and the stool is 1 1/8" thick.....my apron gets ripped to about 2 3/8") This way, when viewed as a whole, they are the same width. I find it too visually "heavy" at the bottom if I don't.
May just be a personal preference.
Happy
Holidays
I can certainly see that this makes sense. I justified using the same stock for aprons and side casings not only to make it simpler, but because when I first started doing this years ago, I noticed that's the way they did it in my own house (which was built in 1903).********************************************************
"It is what we learn after we think we know it all, that counts."
John Wooden 1910-
Finally had a chance to get over there and check things out again.Looks like my guesses on the trim dimensions were pretty good. I held a tape up there and took the pictures, as I forgot to take anything to write on. (-:I included a shot of the existing trim in the original house that I was trying to match.
Is it possible to be a closet claustrophobic?
That's what I'm looking for...THANKS!What's really odd is in the picture Old_Trim, I was in southern Iowa this weekend and went to my nephews Christmas program at church. It had that exact trim w/ plinth blocks and base. Got the thumbs up from the DW...she's a "gotta see it" kinda gal.Thanks again for taking the pictures...it's appreciated.Rip
No problem.People here on BT have helped me out with dozens of things over the years. I'm just passing along the favor.Naturally, we'll expect pictures of YOUR trim once it's done.(-:
You know this really is one of the most freindly BB I've visited...and the bonus is there's some real experts online that are willing to share...what a beautiful thing!I will post pictures...it may be a while but I will post 'em!Rip
Here is an example of trim similar to yours, with 2.5" casing. This trim job was driven by using up material out in the shop (the reason for all the different colors).I was going to paint it all, but people seem to like the whimsical color scheme, so I may leave it as is.
Hi Doug,Common is as common does! That house is locate in the middle of a corn field in central Iowa. More importantly though it's a style that my wife and I really like, and that's the driving force. Our cabinets are craftsman styled as well.I'm going to spend more time on dimensions and will mock something up and test drive on the doors. I checked yesterday, and I have one door that MAY get kinda tight if I go too wide.I'm really glad to hear from you and others have mentioned that the windows should match the doors as close as possible....that makes sense to me.I can't wait to get started with the trim work...and make this come together.Rip
We are also doing our window trim etc., and like you wanted a craftman style influence. I did alot of looking through books and magazines for ideas and we ended up settling on a very simple boxy look because our home combines craftsman style furnishing combined with pretty modern stuff. It is a mix we enjoy. I opted to go quite wide (8" wide) with the trim around the windows. Like you we have 9ft ceilings and windows include a transom window.
I have never built furniture nor am I a building professional of any sort but I am happy with the results of my work. I milled all of the wood from rough sawn oak, and since I was not at all confident that I would like the results of my workmanship, the entire window casing is built as a single unit which slides out like it was never there. I had to carve out sections so that the existing window hardware would function as intended. The final clearcoat finish is not yet on the woodwork. I styled the stained glass panel in the transom window to emulate the feel of glass patterns done by Frank Lloyd Wright. It was my first stained glass project.
Obviously my details are not the same as yours but you get an idea of what wider trim looks like around the windows.
ps. the post on the left side of picture is a currnet work in progress being clad in stone and oak, and the molding at the top will be removed since the style does not match the windows.
Hi Kivi,You've done a nice job on the windows, my wood as well is rough sawn...so it'll be fun to work it down to usable material. I like your stainglass work...it looks like a nice compliment to the windows.How close do the windows match the door style?Rip
Heh...in my case the closet and front doors do not match yet. They are also on the list of things to change. Brand new house and I'm already replacing stuff.... lol *shrug*
That is a nice detail. It is a little more work but has much more appeal than the mundane modern mitered trim. I did a similar thing in my house. I added a bead on the top. All the stock was reclaimed Sugar Pine. The stock was all 7/8th" thick and I did not return any of the corners. Kind of "Carpenter Gothic" style. I'll try to post a photo. The url is an experiment.
<a href="http://photobucket.com/" target="_blank"><img src="http://i54.photobucket.com/albums/g95/mycijor/Cutthroat%20House/WindowTrim.jpg" border="0" alt="Photobucket - Video and Image Hosting"></a>