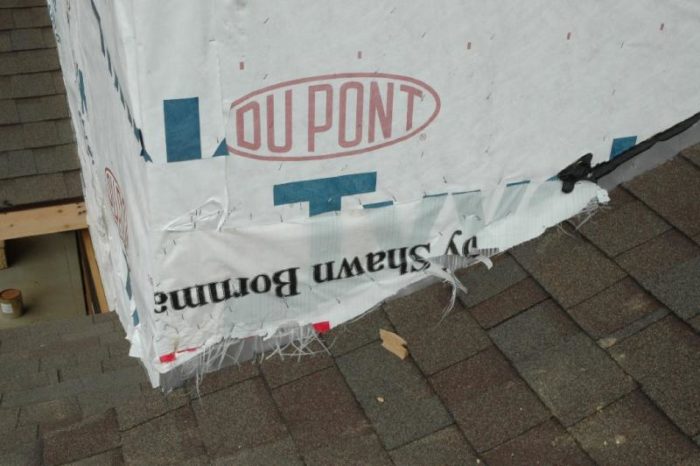
Ok, so they fixed my leaky home–for now. I take a look and see this patch they used. My first assumption was this is some “field expedient” patch job. But…what is this plastic stuff over the Tyvek? I think I know, but I need confirmation.
Ok, so they fixed my leaky home–for now. I take a look and see this patch they used. My first assumption was this is some “field expedient” patch job. But…what is this plastic stuff over the Tyvek? I think I know, but I need confirmation.

Learn how to plan, fabricate, and install a chute to conveniently send your dirty clothes from an upstairs bathroom or hallway to your laundry room below.


"I have learned so much thanks to the searchable articles on the FHB website. I can confidently say that I expect to be a life-long subscriber." - M.K.


Replies
Lumber wrap. I don't know who "they" are, but they should invest in a utility knife. It's actually much easier than tearing lumber wrappers with teeth. It looks like they slit the tyvek and lapped the patch under the top portion, which is good, but it's not the right material, of course.
zak
"so it goes"
Yeah thanks. I knew it was some type of...eh...not-right material.
I don't see that mechanical lap that you are seeing Zak. My eyes must be screwed up.
blue
Well I can't be sure, but it looks like there is a slit right in the middle of the tyvek, and all the staples about 6" above where the lumber wrap stops indicate to me that the lumber wrap is stuffed up there. Only the OP really knows though. It doesn't matter if it's lapped or not, it should be redone the right way.zak
"so it goes"
They didn't lay the Tyvek over the lumber wrap, you can see that the Tyvek lettering is behind the "repair".
"I cut this piece four times and it's still too short."
The top portion should overlap the bottom.
Looks like monkey dung at the top on the step flashing. Water that gets in behind the siding will run down the Tyvek, behind the lumber wrap and possibly behind the flashing. We now know that building wraps provide a surface for water to run down. Details like the one in your picture are not correct and may lead to a leak. A small piece of lumber wrap isn't a big issue but having it over the Tyvek is.
Beat it to fit / Paint it to match
hammer:I will avoid getting into my FUBAR house wrapping job. At a critical drainage point on the house, they really butchered the wrapping job.
Hey Tuf:
I think you found the problem for the British Columbia "Billion Dollar" Condo water damage and rot problems!! Many people that had small reserves of savings or credit had to walk away from their condo investments because the warranty program went bankrupt- only had about $35 million in reserve for the estimated $1 bilion damages.
Has really changed the way BC licenses, warrants work, etc. We should keep an eye on the way they are doing business there now...might be a lot to be learned.
Matter of fact, think I'll start a thread on BC.
Edited 5/20/2006 10:35 am ET by experienced
I liked the reply about tearing the lumber wrap with their teeth. That is what it looks like. LOL
At "A" in the pic.... The original tyvek wraps around the corner from our left to in front of us.
They started to pull the tyvek back, so they could lay their lumber wrap patch under it. Someone then got in a rush, or got frustrated, or simply didn't have a clue what they were doing, because the lumber wrap was just run around the corner and stapled over the now loose tyvek. Creating a "bunching" of the tyvek above the lumber wrap patch.
Look close there and you can see they just shoved it up against the wall and stapled it down. You now have a nice funnel sitting theregathering up any water and forcing it under the lumber wrap.
"B" The lumber wrap everywhere else, is simply laid on top of the tyvek and stapled down with a zillion staples. If you have a 50 percent chance of water going down behind the lumber wrap here, you have a 100 percent chance over there on the corner where they made a funnel.
"C" and "D".... In there areas, not only is the lumber wrap so frayed that it wouldn't be giving the sort of coverage intended anyway... But it is also cut to so that at c it has to be close to the top of the flashing, and at d it is above the top of the flashing.
This patch goes totally against all common sense.
Do NOT let them side over it !!
They spent plenty of time doing this. It seems they went to great trouble to do it exactly wrong.
It would have been cheaper, and faster if they had simply done the patch correctly in the first place.
The destination is not the point. The completion is not the point. Enjoy today. If you can't enjoy today, then what is the point ?
half of good living is staying out of bad situations
I am also concerned about the area around the left side and Dupount oval.Not sure what that area is, but it appears that two roofs will dump a lot of water down on a lower surface and I don't see flashing and protection below the tyvek.
Hell's bells, my post would have made more sense if I had included the pic with letters. LOL
View Image
(And for consistancy, the post again.)
I liked the reply about tearing the lumber wrap with their teeth. That is what it looks like. LOL
At "A" in the pic.... The original tyvek wraps around the corner from our left to in front of us.
They started to pull the tyvek back, so they could lay their lumber wrap patch under it. Someone then got in a rush, or got frustrated, or simply didn't have a clue what they were doing, because the lumber wrap was just run around the corner and stapled over the now loose tyvek. Creating a "bunching" of the tyvek above the lumber wrap patch.
(Maybe the boss started it, and then told the new guy to finish it ?)
Look close there and you can see they just shoved the bunching extra tyvek up against the wall and stapled it down. You now have a nice funnel sitting there gathering up any water and forcing it under the lumber wrap.
"B" The lumber wrap everywhere else, is simply laid on top of the tyvek and stapled down with a zillion staples. If you have a 50 percent chance of water going down behind the lumber wrap here, you have a 100 percent chance over there on the corner where they made a funnel out of the tyvek.
"C" and "D".... In those areas, not only is the lumber wrap so frayed that it wouldn't be giving the sort of coverage intended anyway... But it is also cut so short that at c it has to be close to the top of the flashing, and at d it is above the top of the flashing.
This patch goes totally against all common sense.
Do NOT let them side over it !!
They spent plenty of time doing this. It seems they went to great trouble to do it exactly wrong.
It would have been cheaper, and faster if they had simply done the patch correctly in the first place.
The destination is not the point. The completion is not the point. Enjoy today. If you can't enjoy today, then what is the point ?
Well, you still made the pic too large in that unless one has a large screen monitor they'll have to scroll a little to see the whole pic.
be proficiently efficient lest Theodora come kick yer azz
half of good living is staying out of bad situations
Edited 5/20/2006 4:25 pm ET by rez
I left it large on purpose.It's all in the details.On my screen, at 1024 by 800 resolution, the details that I pointed out cannot be seen as well, in your resized pic. As they can in the one I left the original size.Let's just take that fold for instance. Sometimes it's not enough to see a fold, you need to see evidence of how or why it was folded. In the smaller pic you can see the folding. In the bigger one, you can see how the tyvek looks like it was folded back in prep to be put back over the lumber wrap. But then the lumber wrap was just slapped over it. Like someone with a plan started the job, then someone with little to no knowledge just slapped a piece of any old thing over all of it.
The destination is not the point. The completion is not the point. Enjoy today. If you can't enjoy today, then what is the point ?
Speakin of pictures..howz our project progressing? Not pushing, just curious.
You could post it here if the spirit moves ya.
Spheramid Enterprises Architectural Woodworks
There is no cure for stupid. R. White.
This area was repaired twice. Once AFTER a shower when water entered the first time, and again DURING a long session of rain when water came in again.I keep on hearing, "It'll be OK after the siding is up...blah blah blah..."How should this be fixed correctly? The first layer of Tyvek was applied on the second story, right under the eave. The next layer was put on the ground level, with a 2-3' gap from the first layer. Then the third layer was put over this gap. I may be ignorant of house construction, but that didn't look right to me.
I can only tell you about what is right in front of us.
Pull that blasted lumber wrap off of there.
Pull the tyvek back, up to about the tyvek oval. Do so even around the corner.
Cut a piece of tyvek to fit. It should hang over the top of the step flashing by about an inch or more. You'll leave about a 3/4" to 1-1/4" gap between the siding and the roofing, so you can use that as a rough guide to shoot for on the length of the tyvek.
Now lay the original tyvek back over the patch. Lay it down in the original way. Which hopefully means if you start from the bottom, each piece higher than the first overlaps the one under. Just like your siding will do..
This is what the patch should have looked like.
View Image
The destination is not the point. The completion is not the point. Enjoy today. If you can't enjoy today, then what is the point ?
Luka, that pic should have been larger.
be calling in the police
half of good living is staying out of bad situations
=0Ð
The destination is not the point. The completion is not the point. Enjoy today. If you can't enjoy today, then what is the point ?
Thanks for going through the trouble making that pic. I wanted to hear real pros validate a repair could be done without major re-work of the Tyvek.
You are most welcome.=0)
The destination is not the point. The completion is not the point. Enjoy today. If you can't enjoy today, then what is the point ?
Geez everyone, haven't you ever seen a "tar dam"? That's to catch the excess tar from running on down the roof.
I just saw masons using what they call 're-inforced' plastic.
Feed bag not tarp type stuff. Same as what the Lum Wrap was. It is not what ya want going on there,,,,,keep a sharp eye for more ..
Spheramid Enterprises Architectural Woodworks
There is no cure for stupid. R. White.