Deep Energy Retrofit Dropout
Jon Harrod's deep dive into exterior wall retrofits taught him some expensive lessons and led him to shift his work in a different direction.
by Jon Harrod
The late 2000s and early 2010s saw a surge of interest in deep energy retrofits. Around that time, many of us in the green building community started coming to terms with the magnitude of emissions reductions needed to avoid catastrophic climate change. Inspired by the ultra-low-energy new homes of the Passive House movement and a President who assured us that “insulation is sexy stuff,” we sought ways to achieve deep energy reductions in existing buildings. Our goal was to move beyond the approximately 30% savings on space heating and cooling energy typical of conventional retrofits toward the 50% to 90% we believed was needed to achieve climate protection goals. This kind of performance improvement required us to evaluate all of a building’s surfaces to look for opportunities to reduce heat transfer.
Above-grade walls are usually the most technically challenging—and expensive—component of a deep energy retrofit. In existing homes, wall insulation is limited by the depth of the existing cavity, and the wall’s performance is further diminished by thermal bridging through studs and other framing members. To go beyond about R-20, it’s necessary to add insulation to either the inside or the outside of the wall. Most deep energy retrofits involve removing siding and adding one or more layers of foam board to the exterior of the house. Windows and doors may or may not be replaced as part of the project; in either case, close attention needs to be paid to flashing these openings. Once the foam is in place, new siding is installed, usually over furring strips. Window and door trim and sometimes roof overhangs may need to be modified to accommodate the extra wall thickness.
Some early deep energy retrofits, like those done by Paul Eldrenkamp’s team in Massachusetts, provided inspiration and proof of concept. However, the high cost ($140,000+) and long payback period (50+ years) meant that this approach was unlikely to scale beyond the most committed homeowners and the wealthiest zip codes. (See Martin Holladay’s 2010 article “A Practical Look at Deep Energy Retrofits,” in which he describes Eldrenkamp’s work and explores less expensive alternatives.)
Around that time, the New York State Energy Research and Development Authority (NYSERDA) began funding a series of pilot studies aimed at bringing costs down. The initial pilot, in Utica, retrofitted four older buildings (see “The High Cost of Deep-Energy Retrofits”). After netting out expenses due to unforeseen conditions, the cost per building for energy-related upgrades was about $91,800. Of this, about 53% was for upgrades of above-grade walls, windows, and doors.
In 2011, NYSERDA funded a follow-up study, choosing four teams to develop and test novel cost-saving approaches for walls. My company, Snug Planet, in partnership with Taitem Engineering and Dow Building Solutions, made up one of the teams. Our proposal, titled “Optimized Strategy for Scaling Up Deep Energy Retrofit,” received funding to perform time and motion studies at our shop and then to apply our findings in four houses. We sought to capture large energy savings while reducing materials waste and installation time. We recognized that some earlier projects had sought to push the envelope of best practices and, in the process, had incorporated redundant or overbuilt drainage planes, air barriers, and thermal control layers. A belt-and-suspenders approach is not necessarily a bad thing, especially when durability is concerned, but we wanted to see where we could simplify without sacrificing results. Our project took place in Ithaca, on the southern edge of Climate Zone 6A.
Our approach
For our exterior insulation, we used Dow Thermax foil-faced polyisocyanurate board. We chose polyiso over other foam boards because of its low global warming potential, high R-value per inch, and because the foil facing allowed for good adhesion of flexible flashing and construction tape. The polyiso board, properly flashed and detailed, would act not only as thermal insulation but as an air barrier and drainage plane, allowing us to eliminate the cost of a separate housewrap. While some earlier deep energy retrofits incorporated two layers of foam board over an existing wood-frame wall, a single 2-1/2-in. layer of Thermax allowed us to achieve the whole-wall R-value of 25 required by NYSERDA with a single layer of foam. (For our initial calculations, we used an R-value of 6-1/2 per in. for polyiso. We’ve since come to realize that, because it loses R-value at colder temperatures, polyiso’s overall performance is probably closer to R-5 per in. (see “Cold-Weather Performance of Polyisocyanurate”). Exterior foam insulation of R-12-1/2 is still enough to prevent condensation in our climate zone, but I suspect that our walls’ real-world R-values are likely in the low 20s.
The complete wall treatment involved:
- Removing existing siding and building paper.
- Filling empty wall cavities with high-density cellulose insulation.
- Installing window and door bucks and flashing. We originally planned to replace windows on all of our project homes. Since our drainage plane was the outer surface of the polyiso board, we planned to install the new windows as “outies,” placing their nailing flanges in line with the foam. We did this in two of our four pilot houses. The other two houses already had new double-pane windows; to reduce costs, we left these windows in place and treated them as “innies.” For trim on these innie windows, our siding contractors bent aluminum coil stock, which was installed and carefully caulked over wooden bucks.
- Installing and detailing foam insulation board. The 2-1/2-in. Thermax boards were installed over the existing sheathing. Gaps were filled with expanding foam. Vertical seams were taped, and horizontal seams and corners were detailed with peel-and-stick flashing. Window and door openings were flashed to direct all drainage toward the outer surface of the foam.
- Installing furring strips, siding, and trim. To reduce costs, we had originally proposed vinyl siding for all four houses. In one of our four study houses, we were able to reuse the existing vinyl siding, modifying corner trim to accommodate the extra wall thickness. Two homeowners opted for fiber cement, and one chose a composite wood siding. In all four houses, we installed furring strips to create a vented channel behind the siding. While we could have installed the vinyl siding directly on the foam using long screws, our siding contractor felt more comfortable with furring strips.
For attics and basements, we proposed standard retrofit techniques, meticulously applied. We would remove existing attic insulation by hand and with an insulation vacuum. All visible air leaks in the attic plane would be sealed with caulk, foam, and other air barrier materials, and the air-sealing work would be checked with a blower door, smoke puffer, and infrared scanner. Vent chutes and soffit blocking would be installed, and the attic would be insulated to R-60 with loose-fill cellulose. Unfinished basement walls would be insulated with 2-1/2-in. Thermax, which does not require a thermal barrier. Rim joists would be insulated with 3 in. of closed-cell foam. We would make extra efforts to ensure continuous pressure and thermal boundaries at the rim joist and at the junction of the frame walls and the attic plane. All atmospherically-vented heating and hot water appliances would be upgraded to sealed combustion or powered venting, and Building Performance Institute-compliant mechanical ventilation would be installed, if not already present.
Time and motion studies
Before starting on actual retrofits, we honed our treatment through a series of time and motion studies. The time and motion approach, originally used to improve efficiency in manufacturing, involves breaking down a process (e.g., an exterior wall retrofit) into a series of simple, repetitive tasks, and then testing different tools and techniques to find the optimal method for each. Our installers performed the work while an engineer from Taitem observed and kept time. We also evaluated material costs, installation quality, and installer feedback.
The tasks we examined included making rip (lengthwise) cuts and cross cuts in polyiso board, fastening board to wood-frame and concrete walls, taping seams, building window bucks, and flashing window openings. Most of the study took place in our shop, where we framed a 24-foot-long test wall and sheathed it with OSB. The studies involving concrete walls were done in the basement of Taitem Engineering.
The time and motion study led to some interesting findings:
- The AccuCutter, a non-motorized jig with a sharp, toothless cutting wheel, was the best approach for rip cuts. While the AccuCutter took slightly more time per cut than a table saw with a fine-toothed blade, it produced less dust. Both the AccuCutter and the table saw were faster and made straighter cuts than a hand saw or foam board knife. (As far as I can tell, the AccuCutter is no longer sold; an old video is available here. There are now toothless table saw blades made specifically for cutting foam boards with minimal dust).
- A PVC saw was the tool of choice for cross cuts and L-shaped cuts, while a keyhole saw was the best choice for small cut-outs like those around dryer ducts.
- For securing foam board to wood-frame walls, pre-assembled washer screws (we used Ci-lock brand) provided superior attachment at an overall cost similar to cap nails. They also caused less damage to the polyiso’s foil facing and were easier to remove if it became necessary to correct errors in foam board placement.
- For concrete walls, plastic “Christmas tree fasteners” were more cost-effective than powder-driven anchors. The .27 caliber powder-driven anchors, on the other hand, were faster (and more fun!) to install and provided more secure attachment.
- Use of a dispenser reduced the time it took to apply construction tape to seams in foam board by about 30%. The dispenser also eliminated the need for a utility knife and avoided the frustration of starting tape adhered to the roll.
The retrofits
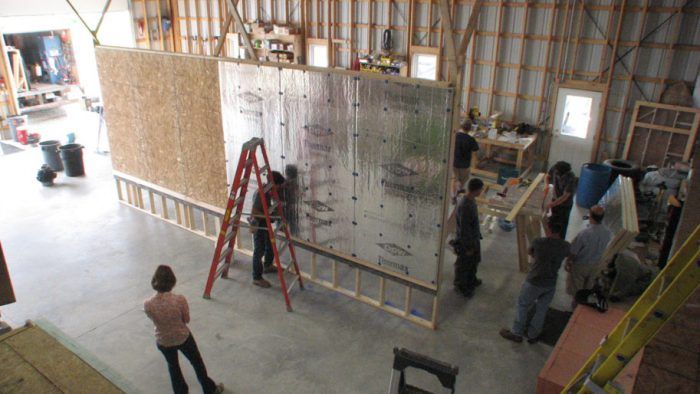
Once the time and motion studies were complete, we applied our findings in four Ithaca-area homes. Work was completed between Fall 2012 and Spring 2014. The following photo series follows the course of the wall work on one retrofit.
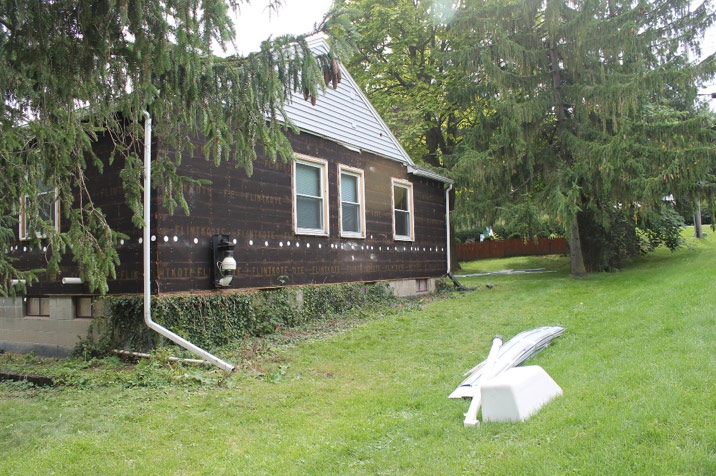
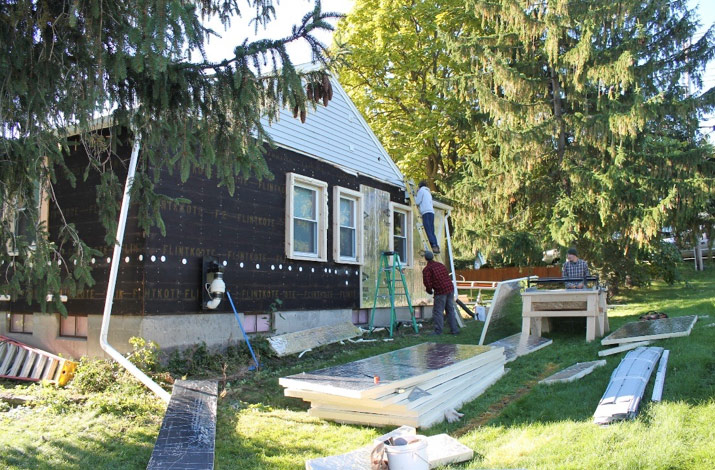
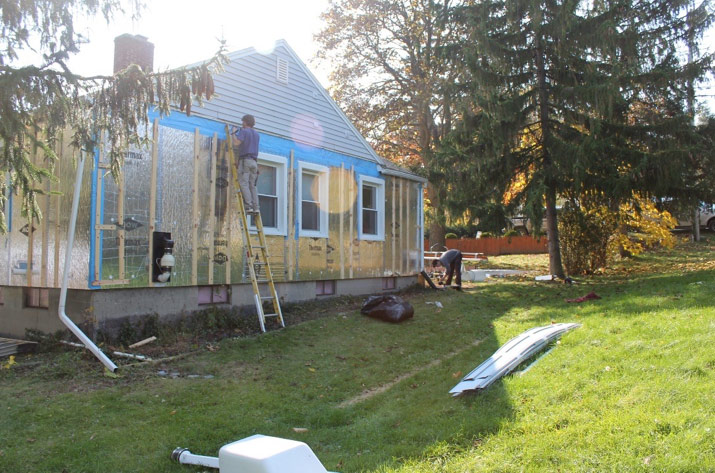
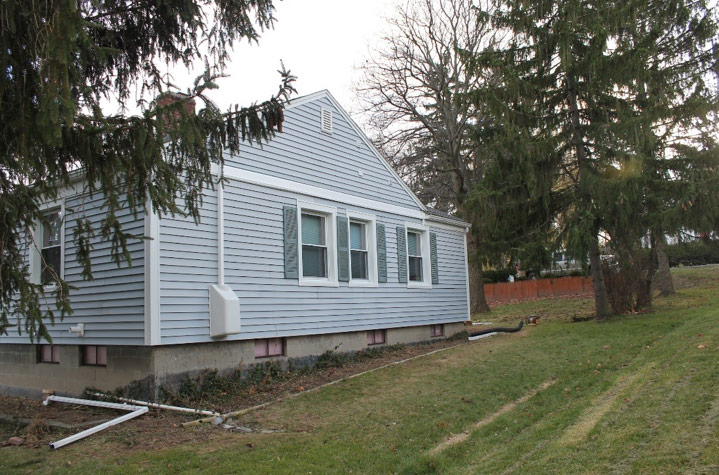
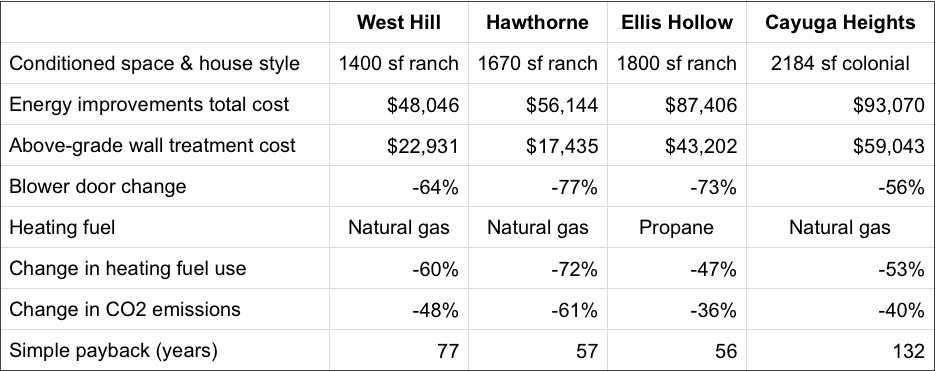
For the four retrofits, we tracked costs, blower door reductions, and changes in energy use. A summary is shown in the table below; our full findings are presented in a white paper available here.
Lessons learned
A few clear, if painful, lessons emerged from the study:
- Even with a focus on cost containment, deep energy retrofits are expensive. Despite our best efforts (even going as far as reusing the existing vinyl siding for the West Hill house), the average cost of energy improvements in our four retrofits was $71,167. The average payback period (using 2021 fuel costs) was 81 years, and the shortest was 56 years. Wall treatments (cavity insulation, exterior insulation, flashing, and siding) accounted for about 50% of total costs but a smaller portion of total savings.
- Deep energy retrofits are technically and logistically complicated for contractors and invasive for homeowners. As a home-performance and insulation contractor, I structured my busines around one-to-five-day projects that require minimal coordination with other trades. These deep-energy retrofits were all months-long projects that involved roofers, carpenters, electricians, and HVAC experts. Learning to keep my own crews productive while coordinating multiple subcontractors turned out to be a very expensive lesson. I also found that I had to spend more time than I anticipated training and overseeing both my own crews and subcontractors—none of whom were used to working with thick exterior insulation—to make sure they got the details right.
The extended timeline of the retrofits, plus their “whole-house” scope, meant that impacts on homeowners were much greater than for a typical insulation project. While all the homeowners we worked with were enthusiastic and gracious, as the projects dragged on, I became increasingly concerned about the effects of daily noise and traffic on their living space.
- Deep energy retrofits save energy—but they don’t get to net-zero. In the three homes heated by natural gas, we reduced heating use by an average of 777 therms per year. In the home heated by propane, we saved about 607 gallons per year. This equates to about a 58% reduction in heating fuel use across the four houses. While these are meaningful reductions and within the range expected from deep energy retrofits, I found the results a disappointing return on both the financial investment and my own time and energy.
The disappointment was compounded by the fact that I had ignored something really obvious. Heating and cooling energy, the focus of the deep energy retrofit, is only a part of the residential energy picture. For the U.S. as a whole, space heating and cooling account for less than half an average’s household’s energy use. Even in the Northeast, with our cold winters, the average is less than 60%. Upgrades to insulation and air tightness don’t address energy used for water heating, lighting, appliances, or electronics. As a result, reductions in household CO2 emissions were less than reductions in heating fuel use and only exceeded 50% in one of the four houses.
These three lessons, taken together, convinced me that deep energy retrofits are not a scalable solution for climate change. Around the same time, between 2014 and 2015, many others in the green building community were coming to the same conclusion (see “Deep Energy Retrofits Are Often Misguided”). Fortunately, also around this same time, I became aware of two other trends that pointed toward different—and more promising—path to deep emissions reductions.
The first is a large drop in emissions from electric generation. The decline, which began around 2005, was driven initially by replacement of coal-fired power plants by ones burning natural gas. As the costs of wind and solar generation have dropped, the growth of these renewable electricity sources has driven further reductions in carbon emissions per kilowatt hour.
The second is the maturing of efficient and affordable all-electric technologies for space and water heating, particularly cold-climate air-source heat pumps and heat-pump water heaters. These appliances—which can extract three or more units of useful heat for each unit of electricity consumed—can often be installed as direct replacements for their natural gas, oil, or propane counterparts.
In large swaths of the U.S., switching from fossil fuels to heat pumps provides an immediate and significant drop in emissions. A recent Sierra Club study claims: “For the average house, installing electric heat pumps in place of a gas furnace and gas water heater will reduce heating emissions more than 45% over the next 10 years.” In places like New York and California, where low-carbon sources already dominate the electric mix, these reductions can exceed 50% when space heating and hot water are both addressed. And, as the grid continues to decarbonize, emissions from an already-installed heat pump and heat-pump water heater will continue to drop, as will emissions from all other electric uses in the house. In this way, the “electrify everything” approach provides a path to zero emissions that deep energy retrofits do not. If homeowners want to get to net-zero faster than the grid at large, they can install solar panels or select an electric provider that offers 100% renewable electricity.
I began installing heat pumps shortly after wrapping up the deep energy retrofit study; they’ve since become the largest segment of my business. A typical whole-house heat pump project, including both heat and hot water, costs between $18,000 and $30,000—much less than even the least expensive deep energy retrofit. The projects usually take two to five days to complete, allowing us to get in and out with minimal disruption. For customers switching from oil, propane, or electric resistance, we can usually achieve simple payback in less than 20 years. If the customer qualifies for state or utility incentives, the payback will be much faster. And if the existing fossil-fuel system is nearing the end of its life span or if the customer is planning to add new central air conditioning, the payback on the incremental cost of a heat pump can look quite attractive indeed.
Electrification offers an elegant, scalable path to reduce building emissions. In this new paradigm, is there still a role for ambitious insulation and air-sealing work? Once I got past the psychological and financial setbacks of the retrofit pilot, I concluded that the answer is a solid “yes.” While heat pumps may help a home get to zero emissions, low-carbon electricity isn’t free, and commonsense improvements to the building envelope can help keep energy costs under control.
Although removing intact siding to install a layer of continuous foam is hard to justify, adding insulation board to an already-planned siding upgrade is an easier pill to swallow. And big chunks—perhaps 80%—of the heat loss reductions of a deep energy retrofit can be achieved without installing exterior foam. Attics, basements, and crawlspaces can be brought close to deep energy retrofit standards at reasonable cost. Empty wood-frame wall cavities can be filled with dense-pack cellulose insulation. If the existing windows have at least two panes of glass (one of which may be a storm window) and are in decent condition, replacing them will yield only modest savings, but may still make sense for reasons of comfort, aesthetics, and ease of use.
In many ways, I’ve found myself coming back to the “Practical Approach” Martin Holladay wrote about in 2010. This level of envelope improvement, while stopping well short of a true deep energy retrofit, prepares a house for electrification, and it offers other benefits. Sealing air leaks reduces drafts and prevents unwanted moisture migration. Raising surface temperatures through insulation also improves comfort and prevents condensation. Insulation and air-sealing together reduce the size—and thus the cost—of the heat pump system needed to keep the house comfortable. And reducing the peak output required of a heat pump will also reduce its electric demand, making it easier to achieve a stable, high-renewable grid capable of powering true zero-emissions homes.
_________________________________________________________________________
Previously published on GreenBuildingAdvisor.com. Jon Harrod is founder of Snug Planet, a contracting company in Ithaca, N.Y., whose mission is to reduce building energy use in ways that make sense for people and the planet. Jon holds multiple certifications from the Building Performance Institute and has published numerous articles on energy efficiency and green building. Photos courtesy of the author.
