The Problem
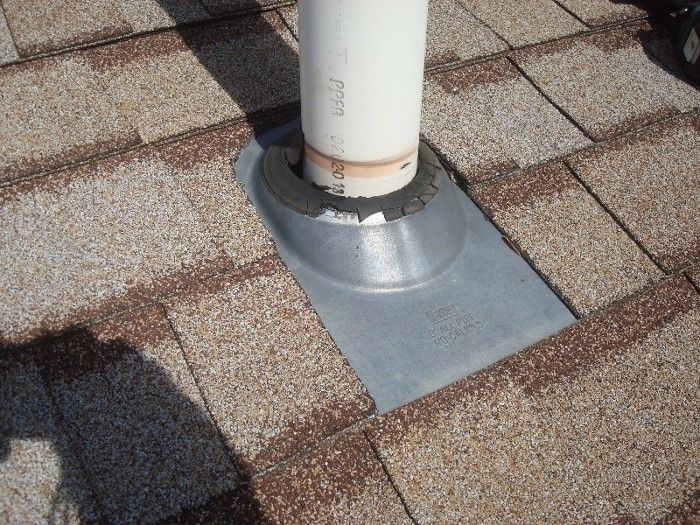
You’ve seen this before; a plumbing vent flashing that is completely deteriorated from UV damage. While such a flashing is easy to replace while laying new shingles, it is a whole different challenge with old, dry, sealed down shingles where removing the flashing will damage most or all of the surrounding shingles.
The Hard Way
In the past I’ve always spent way too much time extricating the entire flashing from the layers of existing shingles in hopes that the few extra shingles the homeowner had saved will be enough to patch and weave back into the roofing around it.
A Better Way
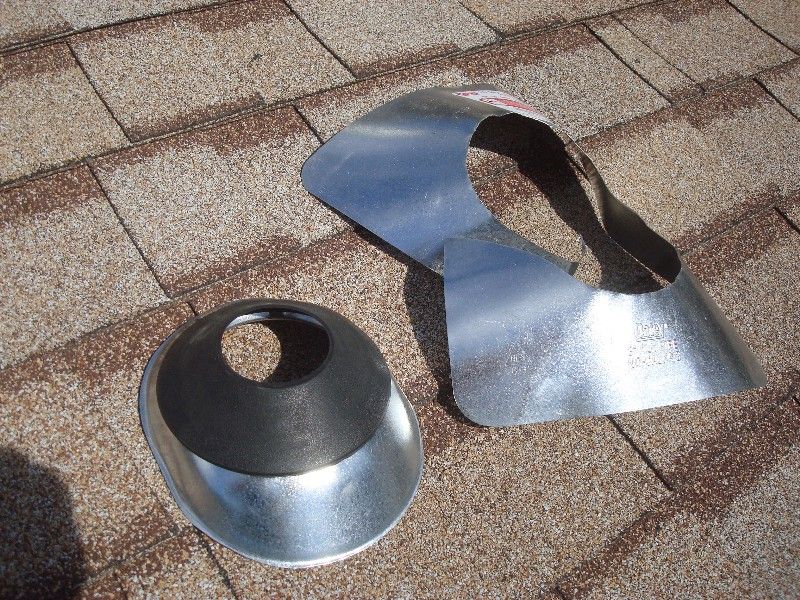
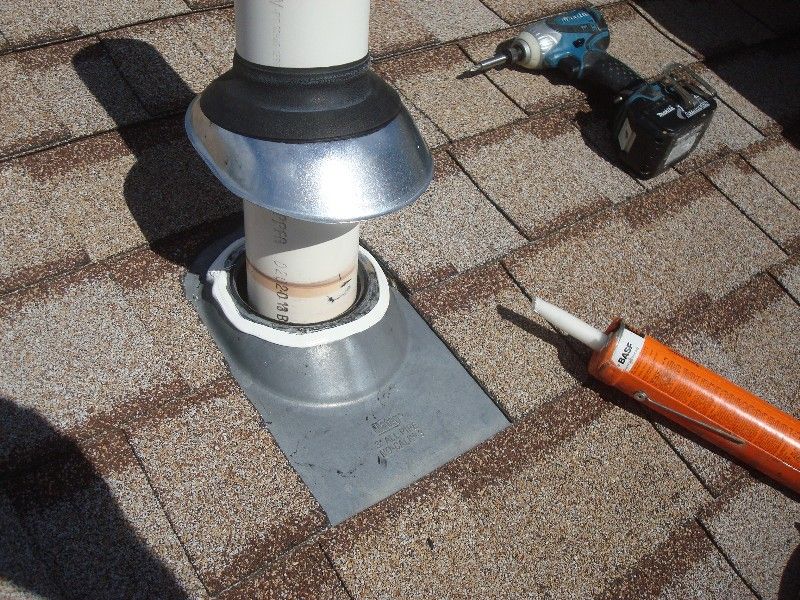
Faced with this scenario the other day, a better idea hit me: instead of removing the entire flashing, it would be much simpler to replace just the failed part: the rubber gasket. Since the rubber boot is crimped into a channel in the galvanized metal flashing it didn’t seem feasible to un-crimp the old boot out, un-crimp a new boot out of a new flashing and then re-crimp the new boot into the old flashing, so I did the next best thing. With an identical new flashing from the local home center in hand, I carefully cut out the humped center portion out of it. After cutting out the scraps of the old UV damaged boot from the existing flashing and applying a generous bead of urethane sealant, I simply slipped the new boot over the vent pipe and down onto the old flashing and secured it with a couple of galvanized self-drilling screws. It was never so easy to do a callback-free repair of what is normally a very unpleasant task.
Whaddya Think?
I’d sure like to hear from anyone else who finds this method helpful.
-
Vent flashing with serious UV damage
-
New replacement flashing with center cut out
-
New flashing ready for installation
-
Flashing repaired... in a flash


View Comments
Geocel 2315 & 2300 would have made a nice repair to the boot and stack.
I too have made this exact repair several times in the last year. I too consider it an unpleasant endeavor - how I wish this advice had been available sooner. Genius.
Pedler,
Geocel is a great product but I would not be comfortable gobbing on a big enough bead of it, or anything else, to seal up this vent pipe. It would take at least a 3/4" bead (is it still called a bead when it gets that wide?) for the gap between the pipe and metal. Nope, sounds to me just like a call back waiting to happen...
Matt
Love it! And just to point out, put those screws in below the bead of caulk.
Is the gap on the bottom small enough to dissuade bees from yet another nesting site?
-Rob
I think that is a great solution. I could have used it 2 weeks ago when I replaced one for a customer. Luckily they had a few extra shingles on hand. As for the comment about the "gap being too wide and a callback waiting to happen"....I just don't see what he is talking about.
The new rubber boot covers the pipe...the metal shell laps overtop of the old shell...you ran a bead of caulking underneath to keep water from diverting...and the screws hold everything in place......
Gee, let me think, sounds a lot like the same procedure you would do when installing a brand new boot; except the caulking is underneath the new boot and makes contact with the roof, instead of shell to shell.
Only possible way that new replacement system could leak is from the metal screw entry point...which is highly unlikely, and to take care of that, either pre-drill and than pre-fill hole with caulking before running in the screws, or use neoprene (rubber) washers with your screws. Although, I doubt you need to go to that extreme.
I might forgo the screws and opt instead for a second bead of caulk near the bottom to secure the new section.
This is exactly the type of repair we spend alot of time fixing!!!
Talk about a Rube Goldberg job.
WOW.....does it take Sooooo much more time to do it right?
Neoprene vent collars should should be outlawed to begin with. They only last 3-5 years on a roof that should last 30-50 years....talk about ensuring a repair work order. Do it right the first time, fabricate & install a lead vent collar with ice & water shield wraped around the pipe and be done with it until its time to replace the roof again.
This is a great idea, thanks, I will use it in the future.
Excellent Solution!
This trick works great. I used it on two of my roof stacks,but used the all plasic Oatey brand flashing for the repair. I cut off the flat roof portion with tin snips,slid it down over the stack and it fit perfectly. The fit was so snug that I never added caulk or screws. Two Chicago winters and so far so good. Some sealant certainly is a good idea though.
how about painting the rubber gasket with latex paint on original installation to protect it from UV?
I have done a replacement in this fashion, too. I use 1 screw on each side, hex head, self-drilling with neoprene washers.
Oatley makes a replacement rain collar I found on the internet at Aubuchon Hardware in different sizes for around $5.00.
The description says "Offers a quick, positive repair to leaking flashings. Slides easily over vent stack to act as a protective shield or storm collar. No caulking is necessary."
When we replace our roof, I round ready made lead pipe flashing and pipe cap counter flashing for sale at bestmaterials.co
Sounds like the way to go.
Why is it you can find this stuff on the internet, but the stores just carry the same crap that everyone complains about.
'nuf said
I am so happy I stumbled across this. Talk about timely! I've got our bedroom, of which one wall is also the bath's "wet" wall, torn down to the studs just about ready to install the drywall. We had a couple of days of almost constant rain this past week and I just happened to notice a little puddle of water. Tracked it to what I believe is a leaking boot although I haven't been on the roof to verify. The wet roof sheathing right around the stack is a pretty strong indicator though. This looks like a most *excellent* fix without having to tear up the shingles.
OK, next question is how to replace a deteriorated boot when it's on an electrical mast, where you can't slip the repair boot down from the top. Does Oatey make one for that?
It's ironic that I should come across this blog. I have a chance to try it out next week after the snow goes away. I'll give my thoughts then. I have confidence that this will work. Thanks for the tip.
This repair can be accomplished much easier using the All Style Industries Retro-Split Storm collar.
Just use the EPDM storm collar with the correct size hole molded into it, wrap it around the penetration, and slide it home over the bad flashing.
See these at http://www.stormcollar.com
To prevent UV damage to the new boot, why not slide a second boot over the newly installed boot and not seal or nail it. When it becomes damaged by the UV rays, slide it off and put on a new one. The bottom one will still be like new!!
The neoprene collars on "Oatey" and other similar brands of pipe penetration flashings have been renown for their failure within the first 5-10 years of installation.
This is unacceptable on a roof that is supposed to have a 20-30 year warranty and have a non-prorated warranty of at least 10 years.
I have been on all ends of the roofing industry since 1980 and I can tell you that these types of flashings with the neoprene boot are designed to fail.
Here is an excerpt from the NRCA Roofing Manual that describes these types of flashings. They actually mention this type of flashing, but it has been my experience that the majority of problems have arisen due to the breakdown of the rubber gasket from UVA and UVB rays from the sun.
http://img.photobucket.com/albums/0803/DakineH20/pipeflashingtypes_zps0f2e5b59.png
This simply will not happen on a pipe flashing with a metal sleeve that is sealed with polyurethane sealant on the inside of the flashing where no harmful rays could breakdown the sealant.
I recommend to actually remove and replace the "Oatey" brand flashing or any type of flashing which relies on neoprene or some other type of rubber as the first line of defense, with an industry standard metal sleeve conventional flashing which is sealed from underneath away from the weather.
These rubber type flashings may seem convenient, but in my opinion have unsatisfactory long-term performance, as well as insufficient side flanges, subject to the rigors of expansion-contraction cycles which breaks down the rubber.
Better to use the alternative which has been historically successful than to try and employ "tricks" and short-cuts of attempting to use this same type of unsatisfactory product.
-Roofdonkey
roofdonkey,
There is certainly wisdom from experience in your thorough comment which would be difficult to argue against.
From a quality standpoint I completely agree with your points. When I see roofs that are replaced in 10~12 years from getting thrashed in our violent hailstorms, a 20~30 year flashing is less of a necessity. Sad state of affairs to be sure. I'll be you share the same frustration as I do when I see an expensive, 40 year product, like granite countertops or cast iron bathtub, ripped out and sent to a landfill after 12 years just because someone has tired of its appearance.
With all your years in the roofing industry, I sure wish you lived where I do as there's a serious lack in quality roofing contractors here.
Work safe on those roofs, my friend.
Matt
I'm trying to determine why the sealant is used. Seems to me if/when the replacement boot fails, the sealant will allow water to collect which will spill over into the roof hole. maybe I'm seeing it wrong though? A couple of screws would be sufficient to hold it in place though.
gwtx2;
I used sealant to prevent water from getting up under the new flashing. I've seen wind-driven rain or heavy snow piled up around the vent causing water to leak in. They might be rare events but with the sealant in place I don't worry about either.
You are correct in noticing that if the rubber flashing fails and water leaks in around the pipe it will back up above the sealant and leak down through the hole. I would use that event to prompt me to re-replace the flashing to prevent further leaking.
It's been a few years since I did this repair and it's held up just as I'd hoped and expected.
Brilliant idea Matt. You get my highest kudos. Thanks for sharing your genius.
Love it. Great solution.
Ok solution till I saw the two sheet metal screws. Those will eventually fail. Remember, when it comes to roofs, the less holes the better.