Synopsis: This is a short description of three methods for installing ceiling joists beneath a hip roof where rafters near the wall line don’t provide much room to work.
If you want a simple roof, go for a gable. The angles are basic, and even the ceiling framing is a snap because it generally runs parallel to the rafters. A hip, however, is a roof to reckon with, and not just because of its angles. With rafters sloping up from all four sides of the building, how do you joist the ceiling?
“No problem,” you say. But what about the joists that run perpendicular to the rafters on opposing sides of the house? Depending on the roofs slope, it’s quite likely that you won’t have much room for the joist closest to the plate: the rafters will be in the way. In 41 years of pounding nails, I’ve seen several solutions to the problem of joisting a hip roof.
Time-honored solutions
Depending on the size of the joists, the ones closest to the plates may need to end at a header to let the hip rafter through. A similar header is sometimes required for the valley rafter. Backing for the ceiling finish is obtained by nailing 2x blocking flatwise to the plates between the rafters (behind the frieze blocking), to provide a nailing surface for the ceiling drywall.
There are times, however, when the first joist may have to be held away from the plate as much as 32 in., depending on the pitch of the roof and the size of the lumber used for the joists. The traditional method of filling the space between the outside wall and this first joist is to add stub joists at right angles to the main joists, parallel to the jack rafters. This technique often requires that the first joist be doubled to carry the extra ceiling load. The stub joists are usually clipped on one end to keep them from sticking up above the roof framing; pressure blocks at the other end help to support them.
A better solution
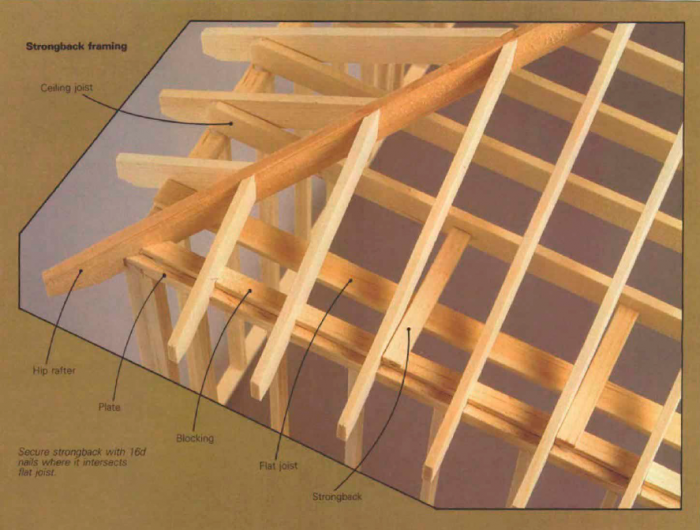
There’s another way to handle the problem, one that requires less material and labor. Set your last joist as close as possible to the plate. Then set another one—flatwise—within 16 in. of the outside wall. There will be plenty of room between it and the underside of the hips and jacks. The next step is to install the rafters and to nail frieze and backing blocks between them as described earlier. Then cut strongbacks from scrap 2x stock and run them flatwise from the plate to the first on-edge joist. You won’t need many of them; spacing them about 4 ft. on center should do.
Secure the strongbacks to the backing blocks and to the upright joist with a couple of 16d’s at each end. At the joist end the strongbacks must be held up from the bottom. Finally, pull the flat joist up to the strong back, securing it with three or four more 16d’s, angling them slightly for better holding power. The strongbacks will stiffen and support the flatwise joist. With this step complete, the ceiling is ready and you’re set to move on.
For more photos and details, click the View PDF button below:
Fine Homebuilding Recommended Products
Fine Homebuilding receives a commission for items purchased through links on this site, including Amazon Associates and other affiliate advertising programs.

Short Blade Chisel

Leather Tool Rig

Bluetooth Earmuffs


