FHB Logo Facebook LinkedIn Email Pinterest Twitter Instagram Plus Icon Close Icon Navigation Search Icon Navigation Search Icon Arrow Down Icon Video Guide Icon Article Guide Icon Modal Close Icon Guide Search Icon Skip to content
Subscribe

In every issue you'll find...

  • Expert insights on techniques and principles
  • Unbiased tool reviews
  • Step-by-step details to master the job
  • Field-tested advice and know-how
Subscribe Now!
Subscribe
  • How-To
  • Design
  • Tools & Materials
  • Videos
  • Blogs
  • Forum
  • Magazine
  • Members
  • FHB House
  • Podcast
  • Join
  • Log In
Subscribe
How-To

Building a shed-roof canopy

By Scott McBride Issue 78

Q:

How should I go about building a shed-roof overhang for a 6-ft. atrium door on my home? I’ve checked many carpentry books and dug through my Fine Homebuilding back issues, but I couldn’t find anything. Also, if I use wood brackets to support the structure, what is the maximum depth I can go with on the overhang?

Fatimah Iolonardi, New York, NY

A:

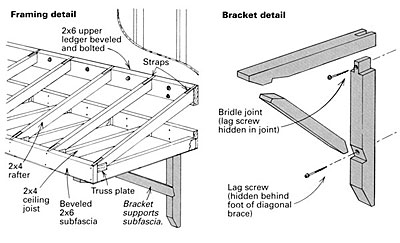
Contributing editor Scott McBride replies: Building an overhang, or entrance canopy, is fairly straightforward (see drawing). The ceiling joists and the rafters can be framed with 2x4s; use 2x6s for the upper and lower ledgers and the subfascia. First nail the lower ledger into the wall studs over the top of the door trim. Mark the locations for the ceiling joists on 16-in. centers and at each end. I think a 30-in. overhang with a 16-in. total rise against the wall works well. Cut the bottoms of the rafters so that the combined height of the ceiling joist (3-1/2 in.) plus the front edge of the rafter equals 5-1/2 in.—the height of the 2×6 subfascia. Use truss plates to connect the two members.

Bevel the upper ledger and the subfascia to match the pitch of your rafter/joist trusses. Measure the distance of the open end of the ceiling truss to find the position for the upper ledger. Bolt or screw it to the wall and toenail the rafters into it. Use joist hangers to connect the ceiling joists to the lower ledger. Nail on the subfascia, making sure the trusses are square, then add steel straps to beef up the rafter-to-subfascia and rafter-to-upper-ledger connections. Place temporary supports (a couple of 2x4s will do) at each outside corner to hold the entrance canopy level as you install the brackets. Alternatively, you can build the whole thing on the ground and lift it onto the brackets, then bolt it in place.

The brackets are usually constructed of 4x4s. Use good-quality kiln-dried lumber. Constructiongrade lumber is likely to check and twist as it dries. This would be particularly objectionable at eye level next to a main entrance.

Tightly nailed or screwed butt joints would probably be adequate to join the bracket components for a small canopy, but some simple joinery will greatly increase the brackets’ strength. At the square corner against the building, I would use a bridle joint, where one member is housed in a fork cut in the end of the other member, or at least a half-lap, where both members are notched to half their thickness to make a flush joint. The diagonal brace is traditionally seated in tapered notches at the top and the bottom to keep it from slipping under load. These joints can be easily cut with a bandsaw.

I can’t give a set figure for the maximum allowable overhang using brackets, but I can point out some factors to consider. While a post delivers the outboard weight of the roof straight down, a bracket transfers this weight to the wall. Lateral forces are created that push against the wall at the bottom of the bracket and pull away from the wall at the bracket’s top square corner. To fasten the brace at the bottom, therefore, you only need a fastener with shear strength. A lag screw or a heavy spike would normally suffice. At the top, however, where the bracket wants to pull away from the house, the fastener will be in withdrawal. Here, you are better off bolting all the way through the wall to get the full strength of the wall itself for support. A long, heavy lag screw would be my second choice after a through bolt. Hide the head of the lower fastener behind the foot of the diagonal brace. The head of the upper bolt or screw could be buried in the tongue of the bridle joint.

The stiffness of the wall is another factor to consider if you’re planning a deep overhang. A 2×6 wall handles stress from a canopy better than a 2×4 wall does. A tall wall, such as the front wall of an open two-story stair hall, will be more prone to deformation from the torquing action of a heavy canopy than will a wall that is braced by an intervening second floor.

Finally, the farther down on the wall the diagonal brace reaches, the more it acts like a post. This reduces the push and pull on the wall, and lets you extend the overhang.

Sign up for eletters today and get the latest how-to from Fine Homebuilding, plus special offers.

Signing you up...

This site is protected by reCAPTCHA and the Google Privacy Policy and Terms of Service apply.
See all newsletters
See all newsletters
×

Get home building tips, offers, and expert advice in your inbox

Signing you up...

This site is protected by reCAPTCHA and the Google Privacy Policy and Terms of Service apply.
See all newsletters
See all newsletters

New Feature

Fine Homebuilding Forums

Ask questions, offer advice, and share your work

Log in or create an account to post a comment.

Sign up Log in

Become a member and get full access to FineHomebuilding.com

Up Next

Video Shorts

Featured Story

Compact Cordless Compressor

Metabo HPT's 2-gal. cordless compressor is a useful back- and time-saver.

Featured Video

Video: Build a Fireplace, Brick by Brick

Get an overview of the process of creating a traditional-style fireplace that burns well and meets current building codes from experienced mason Mike Mehaffey.

Related Stories

  • Insulating a Roof: Getting Higher R-Value
  • Podcast 531: Member's-only Aftershow — ADUs Are a Solution
  • Balancing Design and High-Performance Construction
  • Rainwater Storage and Fence in One

Discussion Forum

Recent Posts and Replies

  • |
  • |
  • |
  • |
  • |
  • |
View More Create Post

Highlights

Fine Homebuilding All Access
Fine Homebuilding Podcast
Tool Tech
Plus, get an extra 20% off with code GIFT20

"I have learned so much thanks to the searchable articles on the FHB website. I can confidently say that I expect to be a life-long subscriber." - M.K.

Get home building tips, offers, and expert advice in your inbox

Signing you up...

This site is protected by reCAPTCHA and the Google Privacy Policy and Terms of Service apply.
See all newsletters
See all newsletters

Video

View All
  • Podcast 531: Member's-only Aftershow — ADUs Are a Solution
  • Podcast 505: Dirty Band Joists, Taping Roof Sheathing, and Affordable High-Performance Windows
  • Podcast 483: Recalled Electrical Panels, Drainage Behind Brick, and Lazy Additions
  • Squeak-Free Subfloor Installation
View All

Roofs

View All Roofs Articles
  • Black kickout flashing
    Kickout Flashing for Seamless Siding and Trim
  • ZIP System Liquid Flash applied at exposed rafter tails
    Air-Sealing Exposed Rafter Tails
  • First Aid for an Old, Sagging Roof
  • Installing a creme colored aluminum soffit
    A Vented Soffit That Blends In
View All Roofs Articles

BOOKS, DVDs, & MERCH

Shop the Store
  • Code Check Building 4th Edition
    Buy Now
  • 2022 Fine Homebuilding Archive
    Buy Now
  • 2023 Tool Guide
    Buy Now
  • Pretty Good House
    Buy Now
  • Shop the Store

Fine Homebuilding Magazine

  • Issue 313 - Feb/March 2023
    • Practical System for a Seismic Retrofit
    • Fine Homebuilding Issue #313 Online Highlights
    • Practical System for a Seismic Retrofit
  • Issue 312 - Dec 2022/Jan 2023
    • Tool Test: Cordless Tablesaws
    • Gray-Water System for a Sustainable Home
    • Insulate a Cape Roof to Avoid Ice Dams
  • Issue 311 - November 2022
    • 7 Steps to a Perfect Exterior Paint Job
    • Options for Smarter Home-Energy Tracking
    • The Fine Homebuilding Interview: James Metoyer
  • Issue 310 - October 2022
    • Choosing a Tile-Leveling System
    • Choosing Between HRVs and ERVs
    • Custom Built-in Cabinets Made Easy
  • Issue 309 - Aug/Sept 2022
    • 10 Steps to Install Crown Molding on Cabinets
    • How to Get Sturdy Walls Without OSB
    • Choosing the Right Construction Tape for the Job

Fine Homebuilding

Follow

  • twitter
  • facebook
  • instagram
  • pinterest

Newsletter

Get home building tips, offers, and expert advice in your inbox

Signing you up...

This site is protected by reCAPTCHA and the Google Privacy Policy and Terms of Service apply.
See all newsletters
See all newsletters

Membership & Magazine

  • Online Archive
  • Start Free Trial
  • Magazine Subscription
  • Magazine Renewal
  • Gift a Subscription
  • Customer Support
  • Privacy Preferences

Taunton Network

  • Green Building Advisor
  • Fine Woodworking
  • Fine Gardening
  • Threads
  • About
  • Contact
  • Advertise
  • Careers
  • Copyright
  • Terms of Use
  • Site Map
  • Do not sell or share my information
  • Privacy Policy
  • Accessibility
  • California Privacy Rights

© 2023 The Taunton Press, Inc. All rights reserved.

X
X
This is a dialog window which overlays the main content of the page. The modal window is a 'site map' of the most critical areas of the site. Pressing the Escape (ESC) button will close the modal and bring you back to where you were on the page.

Main Menu

  • How-To
  • Design
  • Tools & Materials
  • Video
  • Blogs
  • Forum
  • Reader Projects
  • Magazine
  • Members
  • FHB House

Podcasts

  • FHB Podcast
  • ProTalk

Webinars

  • Upcoming and On-Demand

Account

  • Log In
  • Join

Podcasts

  • FHB Podcast
  • ProTalk

Webinars

  • Upcoming and On-Demand

Popular Topics

  • Kitchens
  • Business
  • Bedrooms
  • Roofs
  • Architecture and Design
  • Green Building
  • Decks
  • Framing
  • Safety
  • Remodeling
  • Bathrooms
  • Windows
  • Tilework
  • Ceilings
  • HVAC

Magazine

  • Current Issue
  • Past Issues
  • Magazine Index
  • Subscribe
  • Online Archive
  • Author Guidelines

All Access

  • Member Home
  • Start Free Trial
  • Gift Membership

Shop the Store

  • Books
  • DVDs
  • Taunton Workshops

More

  • FHB Ambassadors
  • Reader Projects
  • Podcast
  • Customer Support

Account

  • Log In
  • Join

Newsletter

Get home building tips, offers, and expert advice in your inbox

Signing you up...

This site is protected by reCAPTCHA and the Google Privacy Policy and Terms of Service apply.
See all newsletters
See all newsletters

Follow

  • twitter
  • facebook
  • instagram
  • pinterest

Join All Access

Become a member and get instant access to thousands of videos, how-tos, tool reviews, and design features.

Start Your Free Trial

Subscribe

FHB Magazine

Start your subscription today and save up to 70%

Subscribe

We hope you’ve enjoyed your free articles. To keep reading, become a member today.

Get complete site access to expert advice, how-to videos, Code Check, and more, plus the print magazine.

Start your FREE trial

Already a member? Log in