Tiling a Tub Surround
Substituting backer board for the traditional mortar bed makes the job easier without sacrificing durability.
Tilesetter and author Michael Byrne tackles a tile tub surround, from rough framing to grout. Step-by-step photos in the PDF below cover the entire project.
When it comes to low cost and ease of installation, it’s hard to beat the fiberglass tub-and-shower unit. It’s simply slid into its berth and nailed through the flanges to the framing. When the job is done, everyone gets to bathe and shower in a synthetic shell.
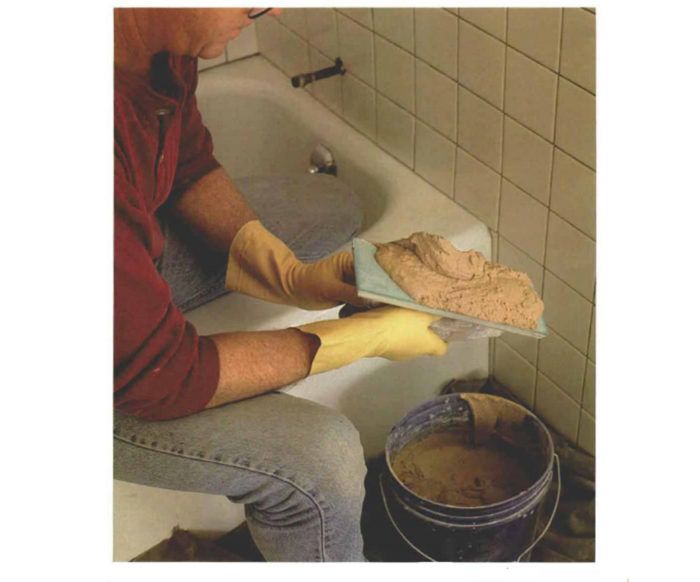
I prefer standard tubs enclosed by tiled walls. Tile is not only peerless in beauty and durability, but it also can be installed with minimal expertise. Whereas tub surrounds once were tiled over skillfully prepared beds of mortar, most tile pros now favor the thin-bed method. It substitutes various prefabricated backer boards for the mortar bed, saving time and trouble without compromising durability. In this article I’ll explain how to tile a basic tub surround using the thin-bed method. The job shown is a remodel, but the principles apply to new work. To satisfy the design of the room, I did two different edge treatments, one of which mimics the look of a traditional mortar-bed surround.
Framing and waterproofing
Bathtub bays must be framed plumb, level and square using straight stock. I add extra studs and blocking to support the edges of backer board, plus double studs to support tub enclosures, such as shower doors.
Tub surrounds need a waterproof membrane somewhere between the tile and the framing to prevent moisture infiltration. For this job, I installed economical 15-lb. asphalt felt beneath the backer board.
Before you install felt paper, it’s a good idea to mark stud locations with a crayon along the top of the tub so you’ll know where to fasten the backer board.
I staple felt to the studs or, if the framing is drywalled, I laminate the felt to the drywall with cold-patch asphalt roofing cement. Adjacent bands of felt are lapped shingle-style to shed water. For insurance, I also seal the joints with asphalt caulk and run a bead of caulk along the top edge of the tub to seal it to the paper.
If I’m working solo, I usually cut the top band of felt paper into two pieces for easier handling. If you do this, lap and seal the vertical joint to keep out water.
Preparing the backer board
I’ve used mesh reinforced cement board for more than 10 years with excellent results. It has an aggregated portland-cement core with a fiberglass mesh embedded in both sides. Panels range from 1/4-in. to 1/2-in. thick, and they come in various widths and lengths for minimal cutting and easy handling. I sometimes use 1/4- in. thick board over drywall, but I don’t use board thinner than 7/16 in. over bare studs because it’s too flimsy.
For more photos and details on tiling a tub surround, click the View PDF button below.
Fine Homebuilding Recommended Products

Tajima Chalk Rite Chalk Line
Smart String Line

Bluetooth Earmuffs
Graphic Guide to Frame Construction
Short Blade Chisel


