Bath Upgrade: Installing a New Sink and Faucet
Remodeler Leon A. Frechette details key steps in replacing a bathroom sink and faucet in this excerpt from his book Remodeling a Bathroom, from Taunton's Build Like a Pro series.
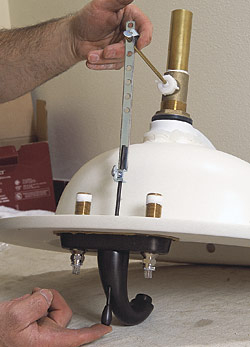
Before setting the sink in its cabinet, install the shutoff valves and the main drain because it’s easier to lean over into the cabinet than to do these installations on your back. Then assemble the faucet and the drain/stopper fitting and mount them on the sink.
Trade Secret
Completely clean supply lines before installing vanity and shutoff valves. Remove all wallboard compound and paint that may be on them. The pipes are easier to clean when you have full access to them, and it will help to guarantee that no water leaks after shutoff valves are installed. It also provides a smooth, clean surface for the tubing cutter. Measure accurately and drill the back of the cabinet to accept the supply lines and drain.
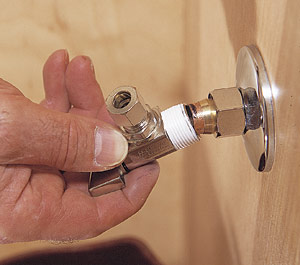
Shutoff valves
If your older home has galvanized pipes, install threaded shutoff valves. Before you begin, be sure to clean any debris or foreign material, such as wallboard compound, adhesive, or paint, from the supply lines-galvanized or copper-that extend from the wall or floor. For copper, mark the pipe about 2 in. from the wall. Close the main shutoff valve and drain the system. Put a bucket under the supply line, and position a midget tubing cutter just outside the mark (to give a little extra pipe length). Water will leak just as the pipe starts to break. Let it completely drain before finishing the cut. Now slide the flanges over the pipe, convex side out, and up against the back of the cabinet.
To install the compression valve, slide the compression nut (and compression ring) onto the pipe. Leave some space between the flange and the back of the nut. Spread pipe joint compound with Teflon® (or use Teflon tape) on the threads before you slide the shutoff valve over the pipe. Apply constant pressure to the valve as you slide the ring and nut up to the threads on the valve, and then tighten the nut manually. Position a wrench on the shutoff valve and use another wrench to tighten the nut. Take care not to mar the face of the flange with the wrench.
Flexible Hose Connectors
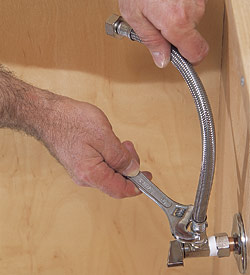
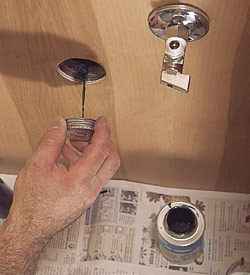
With the shutoff valves installed, take time to tighten the screws that secure the handles. Then remove the 3/8-in. compression nut and ring and look down into the supply outlet to see if the valve is in the shutoff position. If it’s not, put it into the shutoff position, and then turn the water on to check the valve for leaks. If it’s going to leak, water will show around the compression nut on the copper pipe. Just tighten the nut until the leak stops. Now attach the flexible hose connectors to the shutoff valves. Purchase hose connectors with stainless steel braided jackets and 3/8-in. female compression thread for the shutoff valve on one side, and 1/2-in. female pipe thread to connect to the threads of the faucet on the other.
Drain and P-trap
A standard washbasin drain with pop-up assembly has a 1-1/4-in. tailpiece. P-traps and trap adapters are available in 1-1/4 in. and 1-1/2 in., but the 1-1/4-in. P-trap is more readily available. A 1-1/2-in. P-trap will require a reducing slip-joint washer (1-1/4 in. to 1-1/2 in.) at the washbasin tailpiece. If you purchased a 1-1/4-in. P-trap, then locate the reducing slip-joint washer at the trap arm. From here on I will assume a 1-1/2-in. P-trap.The drainpipe is usually stubbed out through the wall, but I find it easier to put in the vanity cabinet if it isn’t. (It is also easier to work on the stubout if the countertop or washbasin has not yet been installed; that eliminates working in such a tight space.) Apply the appropriate solvent cement to the inside of the 90° drain elbow to accept the drain stubout. Next, cut the drain stubout to accept the trap adapter, and then glue the trap adapter.
Slide the trap arm into the trap adapter and loosely tighten the slip nut. Slide a slip nut and reducing washer over the tailpiece. Simultaneously slip the trap bend up and over the tailpiece and up to the trap arm. Loosely tighten the trap arm slip nut and slide the reducing washer and slip nut down to the trap bend. Support the trap bend with one hand and tighten the slip nut for a watertight fit. Tighten the remaining slip joints to secure the system and check for leaks.
Plumber’s Putty
Because plumber’s putty contains mineral and vegetable oils, it shouldn’t be used on some building materials, such as marble and some plastics. Porous materials will absorb oils from the putty and leave a stain. Contact the manufacturer of the product you plan to use it on to make sure you avoid damaging finish surfaces.
Faucets
When installing plumbing fixtures, make sure to follow the manufacturer’s instructions. You should always be very careful when handling these finish pieces. Use the proper tools and take care not to mar or scratch the finishes or to overtighten screws on a fixture or trim piece. For threaded items, be sure to use pipe joint compound or wrap white Teflon sealing tape clockwise around the threads to achieve a good seal.
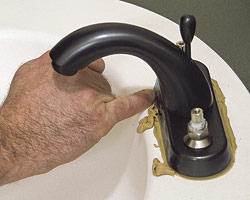
If I haven’t mentioned it earlier, I find it easier if the faucet is mounted to the washbasin before the basin is set into the countertop. However, if you have the proper tools, the project can go smoothly—even if the washbasin has been installed first. After the faucet you can install the basin drain with pop-up stopper.
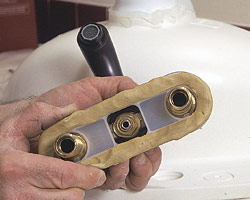
Plumber’s putty will become your best friend in this stage of the work. Soften it up, apply it to the underside of the plastic bottom plate, and position the plate over the faucet cutouts. Place the faucet into the center of the holes and hold it while you apply and finger-tighten the large friction washers and basin nuts. Check the position of the faucet before securing the nuts using a plastic nut basin wrench. Be sure to apply Teflon tape for three or four clockwise revolutions to the faucet inlet shanks. Place the lever trim (hub) according to the manufacturer’s instructions.
Basin drain with pop-up stopper.
Carefully adjusting the pop-up stopper and rod before you install the washbasin in the countertop will prevent you from having to crawl into the cabinet later. The following steps will guide you in completing the last of the faucet assembly.
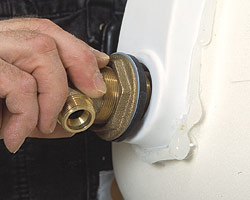
Apply plumber’s putty to the underside of the drain flange—enough so it oozes out, but not so much that it interferes with the threads on the flange. Push the flange into the center of the washbasin’s outlet hole. Hold onto the flange and fasten the pop-up body from the underside of the washbasin to the flange threads. Tighten by hand until the flange starts to twist. Then apply pressure against the flange and tighten the body nut so the rubber washer is snug to the washbasin. Now hold the upper portion of the pop-up body and tighten the body nut using an adjustable hex or slip-nut wrench. The ball rod opening should face dead center on the pop-up rod hole.
Insert the stopper in the position the manufacturer recommends and install the ball rod assembly. Do not overtighten the nut because it will distort the rod. I apply Teflon tape sparingly on the threads before assembly for a no-leak installation. Use a slip-nut wrench around the body nut to hold everything in place as you tighten the tailpiece. Hand tightening is usually sufficient.
Slide one of the holes in the pop-up rod strap extension over the shaft of the ball rod and secure the clip. One leg of the clip goes on one side of the strap and the other leg goes on the other side. Now secure the pop-up rod to the strap by sliding the rod into the two holes and securing the wing nut. Fine-tune the adjustment by making sure you can easily grasp the rod knob in the down position (stopper up/drain open) and that the rod knob doesn’t hit any portion of the faucet. When the rod is pulled, the stopper will lower to close the drain. After the supply lines are hooked up, fill the washbasin to test the stopper for leakage. As a final step, remove excess plumber’s putty from around the drain flange.
Basic sink installations
There are four basic types of sink installations: undermount, drop-in, wall-hung, and preformed vanity top and bowl.
Undermount
Washbasins mounted directly to the countertop’s underside or recessed into a substrate need support under the basin’s rim. In the first case, apply latex caulk to the top of the sink rim. In the second, apply caulk to the recessed area and to the top of the sink’s rim, holding it back by H in. in both situations. Finish caulking will be discussed in Chapter Ten.
Drop-in
These sinks require a cutout in order to be mounted in the countertop. I prefer to make washbasin cutouts in unfinished substrate rather than in the finish countertop. If your cutout hasn’t been made yet, use the template supplied with the washbasin. First trace the template, and then drill a hole larger than a jigsaw blade just inside the traced line. Finally, use a jigsaw to cut the hole. Before you cut, mask the bottom side of the jigsaw shoe to protect the countertop. Use a blade that’s not too coarse and take your time to cut carefully. If you don’t have an extra pair of hands when making the cutout, cut the section out in two pieces to prevent damage to the finished laminate top or to the floor of the cabinet if it should fall. For washbasins with hold-down clips, use plumber’s putty between the basin and the counter. For a self-rimming basin, apply caulk—it may be supplied by the manufacturer—and drop the basin into place
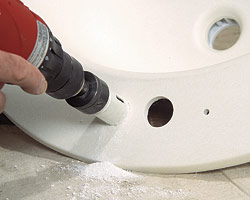
Drop-in composite basins without factory-drilled holes have pilot holes on the underside to indicate the 4- or 8-in. faucet spreads. You’ll need to drill holes into the washbasin to accept the faucet assembly before you can mount the sink in the countertop. For an undermount situation, put the washbasin in place and drill through the pilot holes up through the countertop. Remove the sink and then cut the actual holes from the finish side of the countertop using a hole-saw. Just line up the center bit with each pilot hole and start drilling. Finally, using the same hole saw, cut the holes in the undermount sink.
Wall-hung
This type of washbasin requires mounting a wall bracket about 33 in. off the finish floor or at a height that is comfortable for you. Make sure this bracket is level. Use lag screws and center the bracket over the drainpipe. The lag screws should be fastened to a backer board that was installed during framing rough-in. Mount the washbasin on the bracket and apply latex caulk where the sink meets the wall.
Preformed
This washbasin, a popular item in many bathrooms today, comes molded right into a countertop; you have only a single unit to install. Trial fit the unit in the cabinet first. If it doesn’t fit properly, you might have to sand out any imperfections on the backside.
In Detail
If you have ever removed an older faucet or put one in after the countertop has been installed, you know that removing or installing basin nuts is a challenge; they are tucked up behind the washbasin in the back of the cabinet, and it’s difficult to reach and see them at the same time. The smaller your cabinet is, the harder this job will be.
A plastic nut basin wrench, however, offers a good solution to this problem.It can reach and turn plastic mounting nuts on faucets, sprayers, and ballcocks. The notched ends are designed to self-center on 2-, 3-, 4-, and 6-tab nuts and to fit metal hex nuts. The 11-in. length makes it ideal for tight-clearance pedestal washbasins.
Leon Frechette has been doing remodeling work for more than 20 years. He aslo leads seminars on popular building topics at trade shows around the country. Photos by: Calvin Lea