FHB Logo Facebook LinkedIn Email Pinterest Twitter Instagram Plus Icon Close Icon Navigation Search Icon Navigation Search Icon Arrow Down Icon Video Guide Icon Article Guide Icon Modal Close Icon Guide Search Icon Skip to content
Subscribe

In every issue you'll find...

  • Expert insights on techniques and principles
  • Unbiased tool reviews
  • Step-by-step details to master the job
  • Field-tested advice and know-how
Subscribe Now!
Subscribe
  • How-To
  • Design
  • Tools & Materials
  • Videos
  • Blogs
  • Forum
  • Magazine
  • Members
  • FHB House
  • Podcast
  • Join
  • Log In
Subscribe
There's a Better Way Video Tips

Keep a Paintbrush From Drying Out Between Coats

Washing a brush after every coat of paint can be a real drag. Follow this tip and your bristles will stay straight, and the brush should stay wet for days.

By Chuck Miller

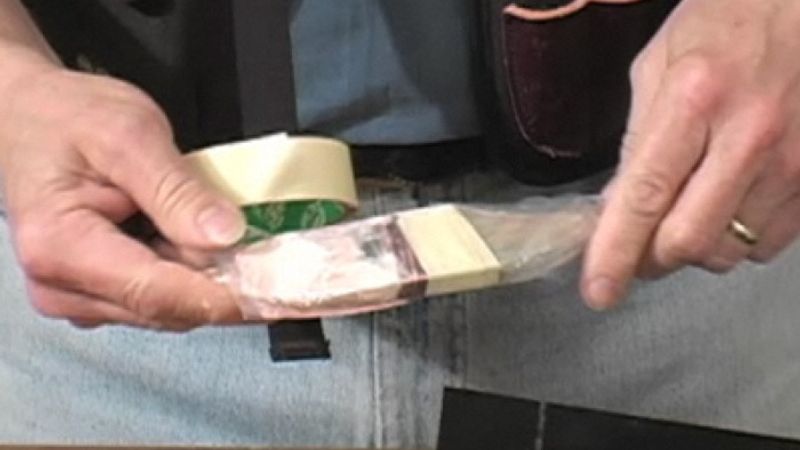
Wet paintbrush storage

Don R. Simon, Jr., from Bremerton, Washington writes:

For years I have used plastic sandwich bags to store my wet paint brush till the next coat was ready or till the next workday. I would just open the bag and stuff the brush inside. The problem with this method is that it’s messy. Paint gets all over the opening of the bag, and the brush’s handle.

Here’s a method that I’ve devised that allows me to minimize the mess while still achieving a virtually air-tight seal. As shown in the drawing (location), I cut a small wedge out of the side of the bag about 1 1/2 in. above its corner. Now I can insert the wet brush handle first, with the opening of the bag wide enough to keep the wet bristles from making contact with the self-sealing strip. Once the brush is in the bag I pull the handle down until the brush neatly tucks into the corner against the bottom of the bag. Next, I wrap the bag around the brush, seal its ziplock strip and wrap a piece of tape around the whole thing to keep it tightly bound. The wet brush will stay fresh for days.

This also works great for clean brushes that are dry and ready to store. Just wrap the excess part of the bag around the brush and secure with some tape or rubber band. Your clean brush now has the bristles protected and the bag is ready if you wish to reuse it to store that brush when it is full of paint.

For more information:

  • Paintbrush Carrier
  • Keep Your Paintbrush Wet
  • Wet-Paintbrush Storage

Sign up for eletters today and get the latest how-to from Fine Homebuilding, plus special offers.

Signing you up...

This site is protected by reCAPTCHA and the Google Privacy Policy and Terms of Service apply.
See all newsletters
See all newsletters
×

Get home building tips, offers, and expert advice in your inbox

Signing you up...

This site is protected by reCAPTCHA and the Google Privacy Policy and Terms of Service apply.
See all newsletters
See all newsletters

New Feature

Fine Homebuilding Forums

Ask questions, offer advice, and share your work

View Comments

  1. jyang949 | Jul 05, 2010 06:17am | #1

    I have a method that is free and takes less time: "Repurpose" the plastic handled bags from a trip to the grocery store--a different bag each time, although you can re-use the bag.

  2. jyang949 | Jul 05, 2010 06:29am | #2

    (Continued)
    To bag the wet brush:

    Turn the bag inside out
    Put your hand into the bag
    Use your "gloved" hand to grab the bristle end of the brush
    Keep holding the bristle end. Use your other hand to pull the bag over the brush, rightside out.

    Twist the excess plastic around the handle of the brush. No need to further secure the bag if the brush is going straight into the fridge. The bristles stay wet and pliable for days.

  3. sephillips | Jul 05, 2010 07:36am | #3

    My tip keeps the paint brush good for a few days and it's EAZY! Just use "Glad Press & Seal". I wrap the paint brush with a piece a little bigger than the bottom part of the brush. The great thing about this product is that you can get a good air seal. Just unwrap when you are ready to reuse.

    This method is good for hours, but if I am not going to use it again that day I'll put it in the refrigerator...It will be good the next day!

  4. tpaul | Jul 05, 2010 07:37am | #4

    Forget about the bag. Just use cling wrap film. A few twists around the head of the brush ensuring all the wet paint bristles are covered and you're good to go

  5. User avater
    tbw | Jul 05, 2010 09:08am | #5

    I like cling wrap too, which also works great for paint rollers.

  6. Gough | Jul 05, 2010 09:38am | #6

    For years, we've used alumuninum foil. At a minimun, this let's us get the brushes and rollers back to the shop for cleaning, rather than having to do it on the jobsite. Brushes and roller covers for oil-based paint can go in the freezer for long-term storage, since it won't freeze. If we've been using water-based/latex paint and won't need the gear again for a few days, we use the 'fridge.

    We have a used mini-fridge that we use for this.

  7. 808Dave | Jul 05, 2010 01:34pm | #7

    For oil-based paint, what could be easier than immersing brush or roller in a bucket of water? Oil and water don't mix, and water keeps the solvents from evaporating, so the paint virtually never dries. Using oil primer, I've done this for up to several weeks without a problem. After removing from the water, a light shake of the brush flings off any water droplets. As for the roller, on removing from the water, you might or might not want to roll out the remaining wet paint on a scrap surface, depending on the project.

    For water-based stuff, I usually will put a brush in any handy plastic bag and freeze it for use the next day or so, but I have found some paints get 'gritty' from freezing, so I don't think I would use this method for other than a primer.

  8. mc_brockman | Jul 05, 2010 04:22pm | #8

    cling wrap or saran wrap work best...your brush or roller good to be used even after 3 - 5 days...no need refrigeration.

    Proven!!!

  9. NevSolarLiving | Jul 05, 2010 04:55pm | #9

    The other reason to not wash it is the environmental impact paint has on the water supply. I know it must be done but doing it fewer times really helps. Paint is very difficult to get out of water, so the less that is in it the less your sewage company has to work to make that water useable again.

  10. ron.taunton | Jul 05, 2010 10:23pm | #10

    I second Gough's idea. I've used aluminum foil for years. It will keep a brush or roller (with the handle) from drying out for several days. Just make sure you wrap it tight.

  11. nvman | Jul 06, 2010 12:38am | #11

    Cling wrap is the way to go.
    i always keep a roll in my workshop.
    I wrap about 3 times around a roller, finishing it off by giving the cling wrap a diagonal twist to get out all the air and then tucking in the ends.
    I have kept a roller from one weekend to the next.
    I only keep paint brushes for a few hours because the paint will always begin to dry near the top of the bristles.

  12. emilymoe | Jul 06, 2010 04:36pm | #12

    I usually use plastic wrap and it works great. I wrap the brush and put it in the refrigerator, and it lasts a good week.

  13. User avater
    chipkip | Jul 18, 2010 11:18am | #13

    Forget various wrappers, leave it in water. Easiest way is to use any fast-food cup with lid. Push the handle up through the straw hole in the lid and fill cup with water. Make sure the bristles are submerged but not touching the bottom. I use this method throughout the day as well.

  14. friskypainter | Jul 29, 2010 12:27am | #14

    Hi to all,

    All I've read are very useful solutions to the dilemma of paint brush storage, however I am the inventor of a new paint accessory, the ECO Prazi Paint Brush Storage Lid. It is a lid that stores your brush for a quick break, phone call, lunch, overnight, and even multiple days on end. If you have a second google it or go to praziusa.com for a video demonstration and price. I am a full time painter and it was born out of necessity. Hope you enjoy!

    friskypainter

  15. TLeonard328 | Jul 04, 2011 09:52am | #15

    For many years I've used a simple technique of folding two sheets of paper towel, running them under water, wringing out the excess and folding over and around my brush bristles - with care you can use the same paper towel multiple times during the day. When done just discard into the trash, simple cheap, no mess.

  16. friskypainter | Dec 18, 2011 11:18am | #16

    The new Paint Brush Storage Lid by Gadgetry is now available. Store your brush anytime needed. Just put in the lid and place on can. Press down to seal for overnight. It's available on Amazon. Here's another good one. Store an oil brush suspended in a gallon can of water. Use the lid to keep a sharp tip. Works every time. I've gone 3 days with success. Wipe off the water on a rag and go.

  17. User avater
    Michaelmaloney1 | Dec 29, 2014 10:53pm | #17

    Now that's not an idea that I've thought of to keep paintbrushes in storage. I normally just have them rinsed off and cleaned then put away. If I need them again then it's easy peasy. I don't even have to worry about clashing colours and the like.

  18. User avater
    MelBrandle | Jan 13, 2015 01:19am | #18

    I'm looking at the storage solutions involving water and I'm thinking that I need to try that out! Something tells me that it might be a very messy endeavour though!

  19. youy23 | Apr 08, 2015 02:12am | #19

    In the theatre world, we just submerse everything in water. The scenic artists who paint literally for a living are the ones who encourage it. We have a refrigerator in fact right next to us in the shop but I can keep a brush in water for an absurd amount of time. A friend of mine has 60-80 dollar fitches and they're good as new despite the submersion in water while wet for multiple days.

    We forgot about some brushes and rollers one time and it had black latex primer and we thought we would have to throw away a few hundred dollars worth of stuff but all the black primer came off and the stuff returned back to it's original color.

    I've honestly never heard of anyone using the refrigerator for brushes until now and I still don't see why. Submersion works for all types of paint as long as there is enough water to cover the brushes because the water in water based paint on the bristles can't evaporate if there's already water around and on top of it.

Log in or create an account to post a comment.

Sign up Log in

Become a member and get full access to FineHomebuilding.com

More There's a Better Way Video Tips

View All
  • Bending Rebar with Pipes
  • Shimming Roof Jack
  • Foam-Gun-Tip Cleaner
  • Bucket-Mixed Concrete
View All

Up Next

Video Shorts

Featured Story

Reusable Flood Bags for Fast Bulk-Water Control

These bags from Quick Dam arrive compact and swell to form a protective barrier on contact with water.

Featured Video

Micro-Adjust Deck-Baluster Spacing for an Eye-Deceiving Layout

No math, no measuring—just a simple jig made from an elastic band is all you need to lay out a good-looking deck railing.

Related Stories

  • Podcast 484: PRO TALK With Color Consultant Paula Gaull
  • Podcast 483: Members-only Aftershow
  • Podcast 480: PRO TALK With Painter-Remodelers Miquel and David McCarley
  • Repairing Drywall After Removing Wallpaper

Discussion Forum

Recent Posts and Replies

  • |
  • |
  • |
  • |
  • |
  • |
View More Create Post

Highlights

Fine Homebuilding All Access
Fine Homebuilding Podcast
Tool Tech
Plus, get an extra 20% off with code GIFT20

"I have learned so much thanks to the searchable articles on the FHB website. I can confidently say that I expect to be a life-long subscriber." - M.K.

Get home building tips, offers, and expert advice in your inbox

Signing you up...

This site is protected by reCAPTCHA and the Google Privacy Policy and Terms of Service apply.
See all newsletters
See all newsletters

Video

View All
  • Podcast 484: PRO TALK With Color Consultant Paula Gaull
  • Podcast 483: Members-only Aftershow
  • Podcast 480: PRO TALK With Painter-Remodelers Miquel and David McCarley
  • Removing Lead Paint: DIY or Hire a Contractor?
View All

Painting and Finishing

View All Painting and Finishing Articles
  • Cleaner Paintbrushes
  • An open container of wood putty
    Filling Nail Holes in Stained Trim
  • painting cabinets
    Brush Painting Kitchen Cabinets
  • polymerized tung oil
    Old-World Oil Finish for Interior Woodwork
View All Painting and Finishing Articles

BOOKS, DVDs, & MERCH

Shop the Store
  • Code Check Building 4th Edition
    Buy Now
  • 2021 Fine Homebuilding Archive
    Buy Now
  • Outdoor Projects
    Buy Now
  • Pretty Good House
    Buy Now
  • Shop the Store

Fine Homebuilding Magazine

  • Issue 309 - Aug/Sept
    • 10 Steps to Install Crown Molding on Cabinets
    • How to Get Sturdy Walls Without OSB
    • Choosing the Right Construction Tape for the Job
  • Issue 308 - July 2022
    • Pretty Good House Book Excerpt: Copper Farmhouse
    • 10 Dos and Don'ts for Electric In-Floor Heat
    • A Sturdy Rail for Outdoor Stairs
  • Issue 307 - June 2022
    • How to Raise a Post-Frame Home
    • Trimming Deck Stairs
    • Evolving an Energy-Efficient Envelope
  • Issue 306 - April/May 2022
    • Framing Stairs to an Out-of-Level Landing
    • Building a Zero-Energy Home for Less
    • Good-Looking and Long-Lasting Traditional Gutters
  • Issue 305 - Feb/March 2022
    • The Steady Surge in Residential Solar
    • The Fine Homebuilding Interview: William B. Rose
    • How Good Is Your Air Barrier?

Fine Homebuilding

Follow

  • twitter
  • facebook
  • instagram
  • pinterest

Newsletter

Get home building tips, offers, and expert advice in your inbox

Signing you up...

This site is protected by reCAPTCHA and the Google Privacy Policy and Terms of Service apply.
See all newsletters
See all newsletters

Membership & Magazine

  • Online Archive
  • Start Free Trial
  • Magazine Subscription
  • Magazine Renewal
  • Gift a Subscription
  • Customer Support
  • Privacy Preferences

Taunton Network

  • Green Building Advisor
  • Fine Woodworking
  • Fine Gardening
  • Threads
  • About
  • Contact
  • Advertise
  • Careers
  • Copyright
  • Terms of Use
  • Site Map
  • Do not sell my information
  • Privacy Policy
  • Accessibility
  • California Privacy Rights

© 2022 The Taunton Press, Inc. All rights reserved.

X
X
This is a dialog window which overlays the main content of the page. The modal window is a 'site map' of the most critical areas of the site. Pressing the Escape (ESC) button will close the modal and bring you back to where you were on the page.

Main Menu

  • How-To
  • Design
  • Tools & Materials
  • Video
  • Blogs
  • Forum
  • Reader Projects
  • Magazine
  • Members
  • FHB House

Podcasts

  • FHB Podcast
  • ProTalk

Webinars

  • Upcoming and On-Demand

Account

  • Log In
  • Join

Podcasts

  • FHB Podcast
  • ProTalk

Webinars

  • Upcoming and On-Demand

Popular Topics

  • Kitchens
  • Business
  • Bedrooms
  • Roofs
  • Architecture and Design
  • Green Building
  • Decks
  • Framing
  • Safety
  • Remodeling
  • Bathrooms
  • Windows
  • Tilework
  • Ceilings
  • HVAC

Magazine

  • Current Issue
  • Past Issues
  • Magazine Index
  • Subscribe
  • Online Archive
  • Author Guidelines

All Access

  • Member Home
  • Start Free Trial
  • Gift Membership

Shop the Store

  • Books
  • DVDs
  • Taunton Workshops

More

  • FHB Ambassadors
  • Reader Projects
  • Podcast
  • Customer Support

Account

  • Log In
  • Join

Newsletter

Get home building tips, offers, and expert advice in your inbox

Signing you up...

This site is protected by reCAPTCHA and the Google Privacy Policy and Terms of Service apply.
See all newsletters
See all newsletters

Follow

  • twitter
  • facebook
  • instagram
  • pinterest

Join All Access

Become a member and get instant access to thousands of videos, how-tos, tool reviews, and design features.

Start Your Free Trial

Subscribe

FHB Magazine

Start your subscription today and save up to 70%

Subscribe

We hope you’ve enjoyed your free articles. To keep reading, become a member today.

Get complete site access to expert advice, how-to videos, Code Check, and more, plus the print magazine.

Start your FREE trial

Already a member? Log in