FHB Logo Facebook LinkedIn Email Pinterest Twitter Instagram Plus Icon Close Icon Navigation Search Icon Navigation Search Icon Arrow Down Icon Video Guide Icon Article Guide Icon Modal Close Icon Guide Search Icon Skip to content
Subscribe

In every issue you'll find...

  • Expert insights on techniques and principles
  • Unbiased tool reviews
  • Step-by-step details to master the job
  • Field-tested advice and know-how
Subscribe Now!
Subscribe
  • How-To
  • Design
  • Tools & Materials
  • Videos
  • Blogs
  • Forum
  • Magazine
  • Members
  • FHB House
  • Podcast
  • Join
  • Log In
Subscribe

Getting Outlet Box Edges Flush

By Mike Litchfield
If you suspect faulty wiring--this receptacle moved when a plug was inserted into it--check the circuit with a plug-in analyzer. After the cover plate was removed, the electrician found that: the outlet box was set too low. In effect, a "remuddler" had used the cover plate to pull the receptacle flush to the surface. UNSAFE!

If an outlet box is more than 1/4 in. below a noncombustible surface, use an add-a-depth ring (AKA a “goof ring” or a box extender) to make box edges flush. Plastic goof rings, being nonconductive, are best.  

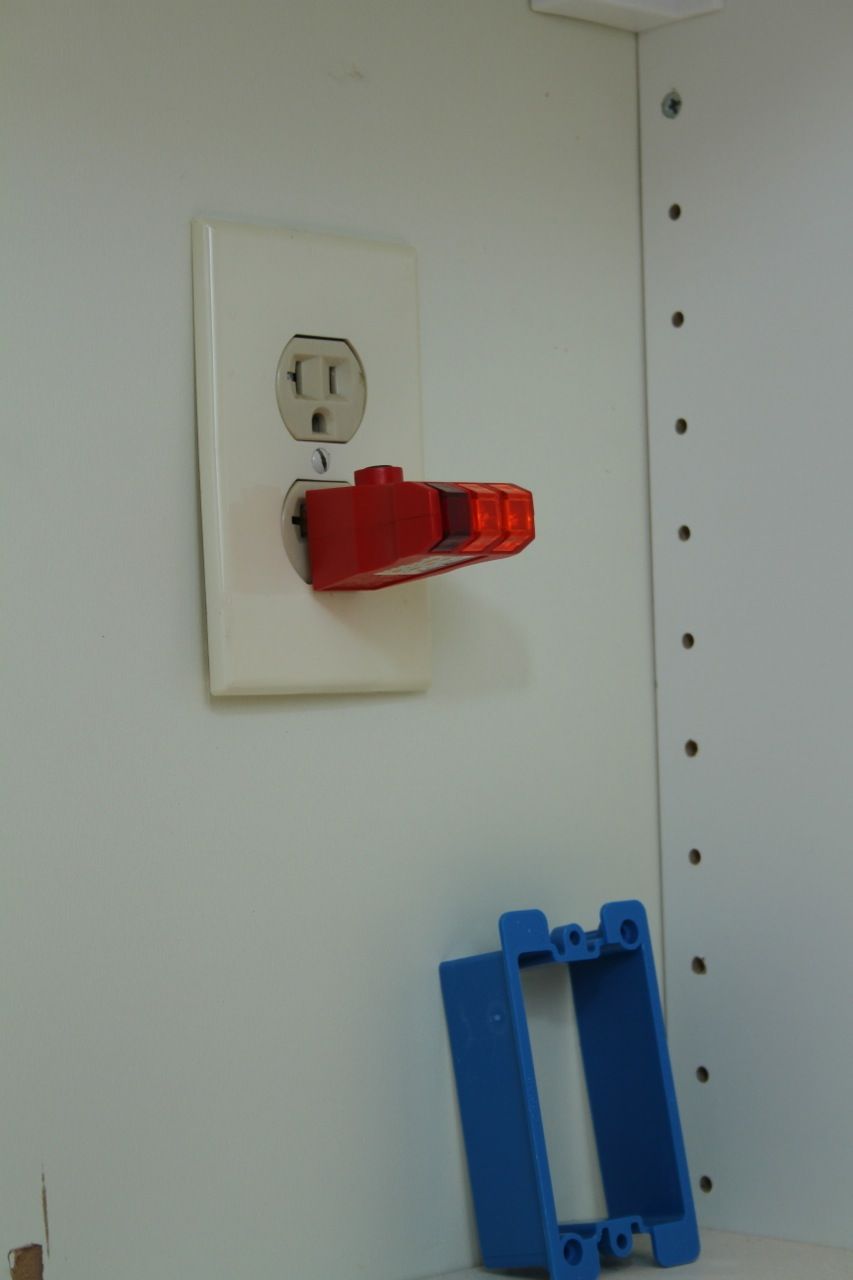
A common symptom of a box that’s set too deep is a receptacle that wobbles when you insert a plug. Typically, a remuddler got the bright idea of using the cover plate to suck the receptacle towards the surface. (Eventuallly, the cover plate will crack.) If this condition has existed for some time, it’s wise to plug in a circuit analyzer to see if the circuit is correctly wired. 

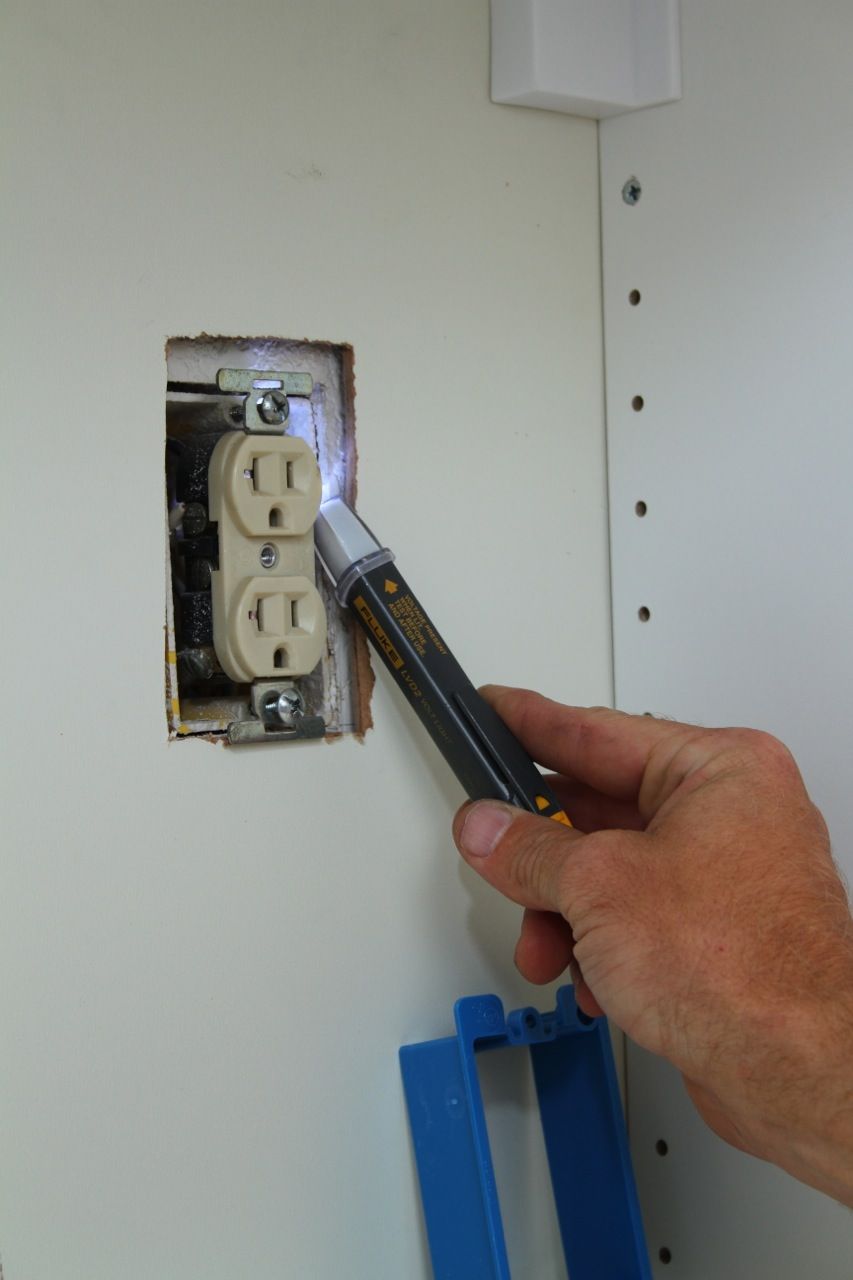
Before starting your repair, turn off the power to the outlet and test to be sure it’s off. Remove the plastic cover plate to expose the conductors in the box and test again. Once you’ve again verified that the power is off, unscrew the device and pull it out from the box. 

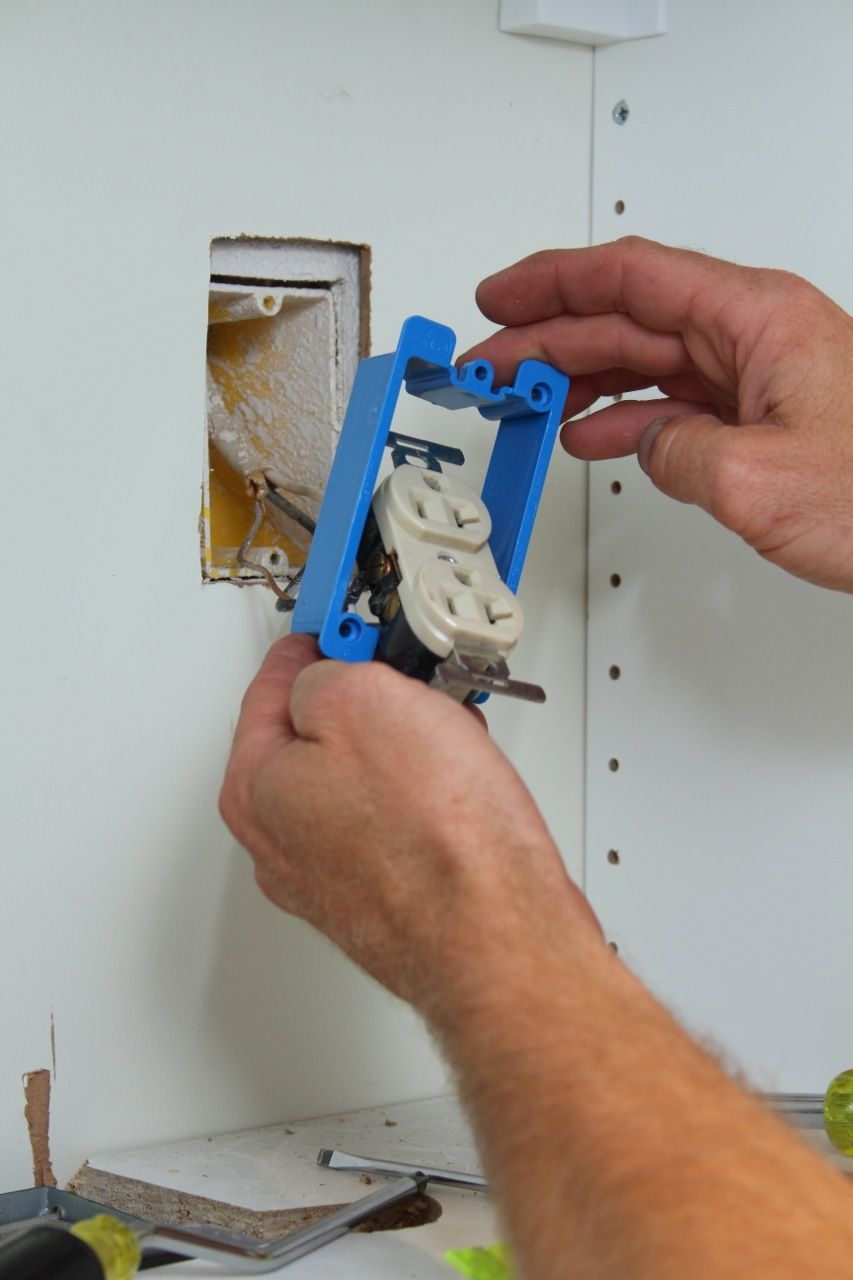
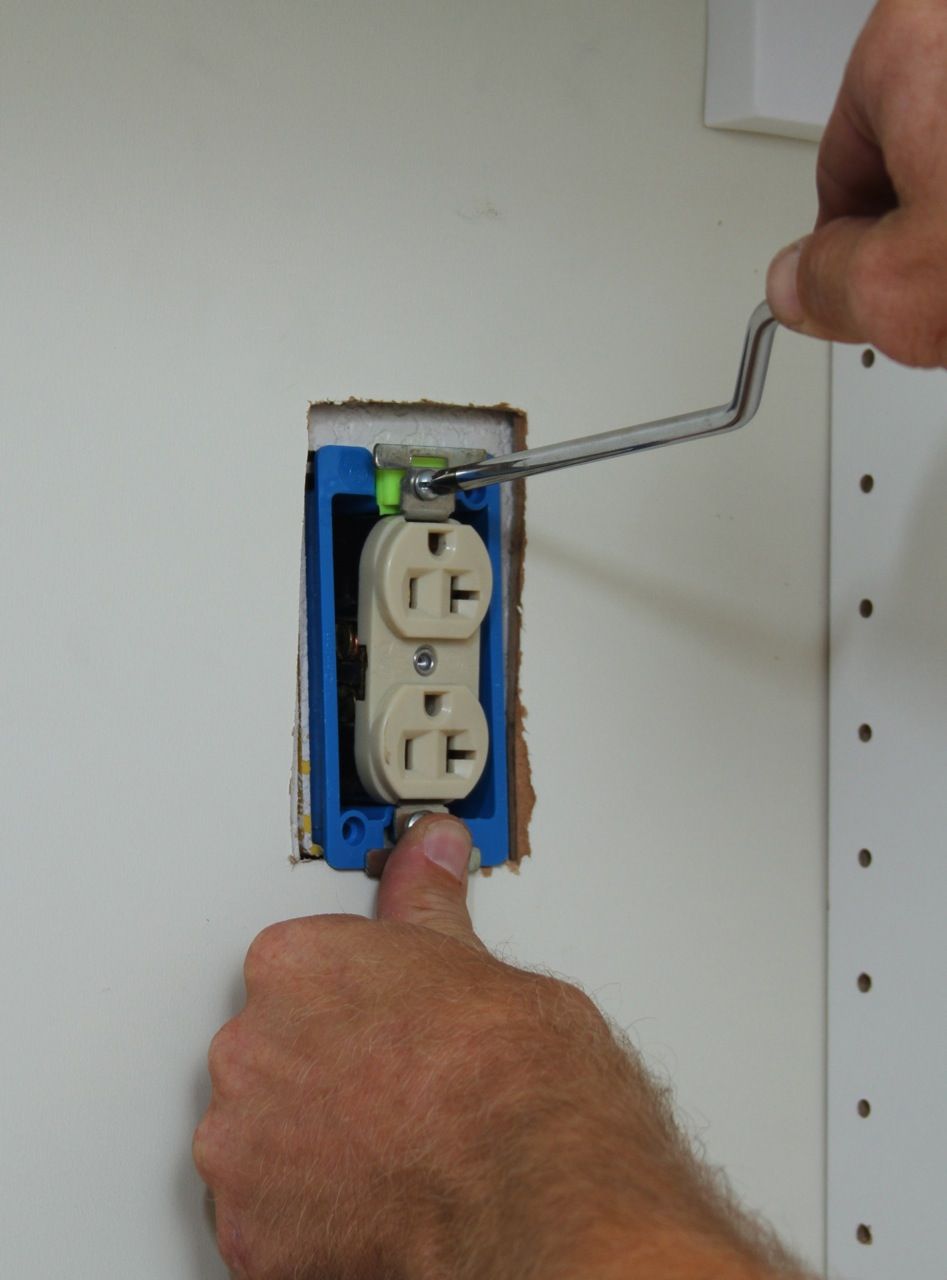
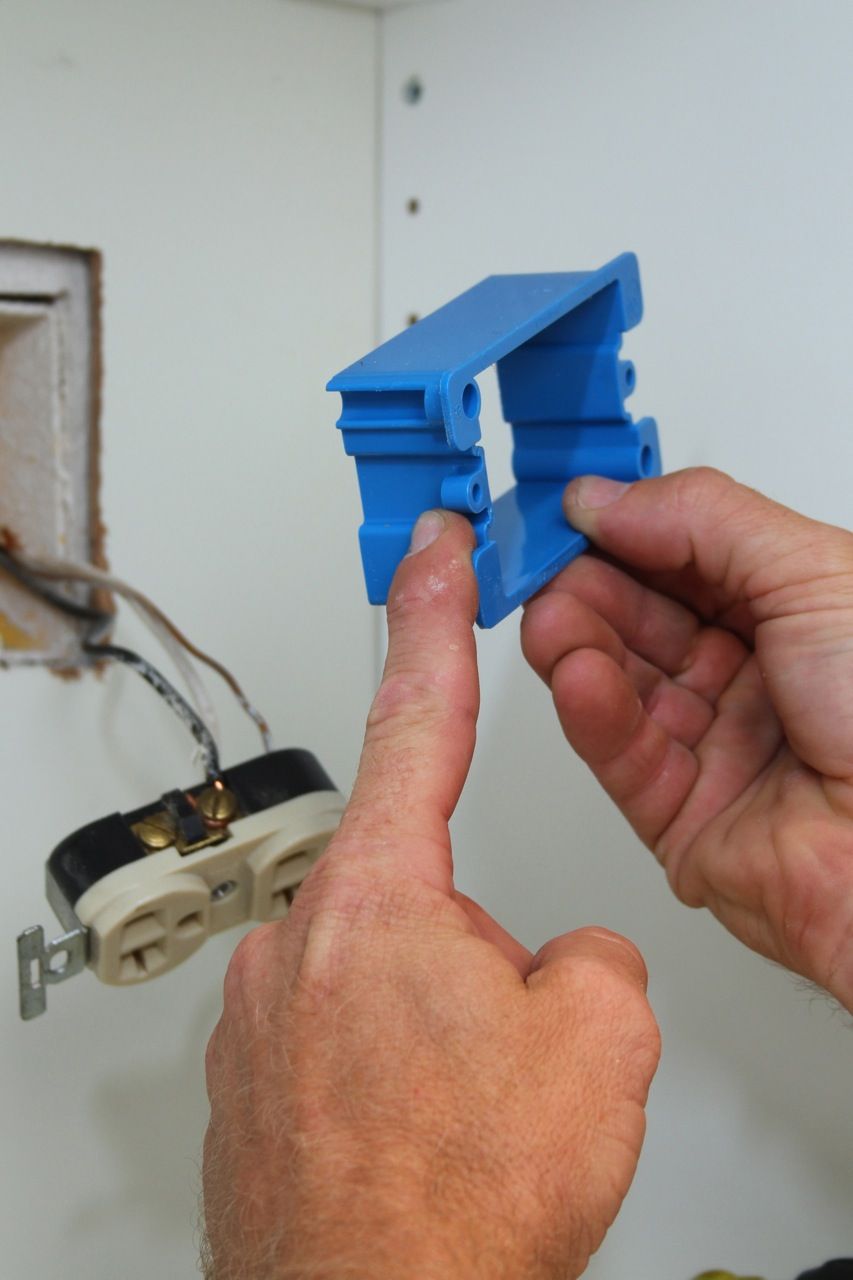
Slide the plastic goof ring over the receptacle and fit both back into the outlet box. As most goof rings have integral spacers you may not need to use plastic spacers to make the device flush. In the example shown, the cabinet back was not parallel to the wall (and to the outlet box behind it) so the electrician added plastic spacers behind the top mounting tab of the receptacle. When the receptacle was reinstalled, it sat flush and was solidly mounted.

Note: The cabinet back was particleboard, so the goof ring also corrected another code violation: Outlet boxes must be completely flush with combustible surfaces such as wood paneling or wood composites, with no gaps around the box.

—

This blog is adapted from Wiring Complete 2nd Edition, which just arrived from the printer this week (April 8), so you can be among the first to own it. WC2 has 800 photos, 50 detailed schematics and includes advanced products such as wireless switches, LED conversion kits, and whole-house systems. Click here for a complete Table of Contents. My co-author, Michael McAlister, is a licensed electrician, C-10 Electrical Contractor, and B General Building Contractor in California. 

On a related note, Renovation 4th Edition, which contains thousands of field-tested tips and techniques from master builders across North America, has topped Amazon’s carpentry category for the last five months. R4‘s 614 pages include 250+ technical drawings and 1,000 photos selected from the 40,000 that I have taken over the years. I hope you find these books useful on your next project. -Mike

© Michael Litchfield 2013

Sign up for eletters today and get the latest how-to from Fine Homebuilding, plus special offers.

Signing you up...

This site is protected by reCAPTCHA and the Google Privacy Policy and Terms of Service apply.
See all newsletters
See all newsletters

If you suspect faulty wiring--this receptacle moved when a plug was inserted into it--check the circuit with a plug-in analyzer. After the cover plate was removed, the electrician found that: the outlet box was set too low. In effect, a "remuddler" had used the cover plate to pull the receptacle flush to the surface. UNSAFE!

Cut the power, then test to be sure. This non-contact tester shows no voltage.

Unscrew the receptacle from the box, gently pull it out, then slide a plastic "goof ring" over it.

If needed, install additional spacers to raise the device flush to finish surfaces. (The neon green plastic spacers are just visible behind the receptacle's mounting tab.)

Renovation 4th Edition contains lifetimes of experience: thousands of field-tested tips and techniques that master builders across North America shared with Mike Litchfield, a founding editor of Fine Homebuilding. 

Goof rings have integral spacers. Once a ring is screwed to the box, the device (receptacle, switch) should be flush to the finish surface. 

×

Get home building tips, offers, and expert advice in your inbox

Signing you up...

This site is protected by reCAPTCHA and the Google Privacy Policy and Terms of Service apply.
See all newsletters
See all newsletters

New Feature

Fine Homebuilding Forums

Ask questions, offer advice, and share your work

View Comments

  1. Fredlf | Apr 22, 2013 05:04pm | #1

    That's all fine and good, but any tips for what to do when the box is proud of the sheetrock/finished surface?

  2. cbolton | Apr 25, 2013 01:39pm | #2

    In reply to Fredlf,
    You usually have to remove and reinstall the box (sometimes using a shallower as happens in plaster and lath walls which are right next to brick. Sometimes though a good wallop with the estwing or 3 pound sledge will solve a proud box :-)

  3. MarcioWilges | Feb 01, 2015 09:57pm | #3

    This is a great article sharing about the boxes edges and how to keep them from being fixed the wrong way. There might be some unforeseen circumstances if we were to simply fix the outlets without following proper methods. Not only will the tools not work properly, but there could be risks of hazards befalling us too. Therefore, always take precautions when handling electrical components.

Log in or create an account to post a comment.

Sign up Log in

Become a member and get full access to FineHomebuilding.com

Up Next

Video Shorts

Featured Story

Vent Your Rainscreen for Longevity

Ben Bogie overviews how Cor-A-Vent Rainscreen Siding Vent is integrated into a high-performance wall assembly to promote airflow and drying.

Featured Video

SawStop's Portable Tablesaw is Bigger and Better Than Before

The 10-in. Jobsite Saw PRO has a wider table, a new dust-control port, and a more versatile fence, along with the same reliable safety mechanism included in all SawStop tablesaws.

Related Stories

  • Insulation Project Guide
  • Podcast 531: Fixing Old Felt, Outsulation Penetrations, and Demolition by Neglect
  • Podcast 529: Cold Floors, Galvanic Corrosion, and Siding Over Board Sheathing
  • Fine Homebuilding – Feb/Mar 2023, Issue #313

Discussion Forum

Recent Posts and Replies

  • |
  • |
  • |
  • |
  • |
  • |
View More Create Post

Highlights

Fine Homebuilding All Access
Fine Homebuilding Podcast
Tool Tech
Plus, get an extra 20% off with code GIFT20

"I have learned so much thanks to the searchable articles on the FHB website. I can confidently say that I expect to be a life-long subscriber." - M.K.

Get home building tips, offers, and expert advice in your inbox

Signing you up...

This site is protected by reCAPTCHA and the Google Privacy Policy and Terms of Service apply.
See all newsletters
See all newsletters

Video

View All
  • Podcast 531: Fixing Old Felt, Outsulation Penetrations, and Demolition by Neglect
  • Podcast 529: Cold Floors, Galvanic Corrosion, and Siding Over Board Sheathing
  • Podcast 527: Members-only Aftershow – Educating new home buyers
  • Podcast 521: Missed Opportunities, Lax Airtightness Testing, and Low-Slope Roofs Under Solar
View All

BOOKS, DVDs, & MERCH

Shop the Store
  • Code Check Building 4th Edition
    Buy Now
  • Pretty Good House
    Buy Now
  • 2022 Fine Homebuilding Archive
    Buy Now
  • 2023 Tool Guide
    Buy Now
  • Shop the Store

Fine Homebuilding Magazine

  • Issue 313 - Feb/March 2023
    • Practical System for a Seismic Retrofit
    • Fine Homebuilding Issue #313 Online Highlights
    • Practical System for a Seismic Retrofit
  • Issue 312 - Dec 2022/Jan 2023
    • Tool Test: Cordless Tablesaws
    • Gray-Water System for a Sustainable Home
    • Insulate a Cape Roof to Avoid Ice Dams
  • Issue 311 - November 2022
    • 7 Steps to a Perfect Exterior Paint Job
    • Options for Smarter Home-Energy Tracking
    • The Fine Homebuilding Interview: James Metoyer
  • Issue 310 - October 2022
    • Choosing a Tile-Leveling System
    • Choosing Between HRVs and ERVs
    • Custom Built-in Cabinets Made Easy
  • Issue 309 - Aug/Sept 2022
    • 10 Steps to Install Crown Molding on Cabinets
    • How to Get Sturdy Walls Without OSB
    • Choosing the Right Construction Tape for the Job

Fine Homebuilding

Follow

  • twitter
  • facebook
  • instagram
  • pinterest

Newsletter

Get home building tips, offers, and expert advice in your inbox

Signing you up...

This site is protected by reCAPTCHA and the Google Privacy Policy and Terms of Service apply.
See all newsletters
See all newsletters

Membership & Magazine

  • Online Archive
  • Start Free Trial
  • Magazine Subscription
  • Magazine Renewal
  • Gift a Subscription
  • Customer Support
  • Privacy Preferences

Taunton Network

  • Green Building Advisor
  • Fine Woodworking
  • Fine Gardening
  • Threads
  • About
  • Contact
  • Advertise
  • Careers
  • Copyright
  • Terms of Use
  • Site Map
  • Do not sell or share my information
  • Privacy Policy
  • Accessibility
  • California Privacy Rights

© 2023 The Taunton Press, Inc. All rights reserved.

X
X
This is a dialog window which overlays the main content of the page. The modal window is a 'site map' of the most critical areas of the site. Pressing the Escape (ESC) button will close the modal and bring you back to where you were on the page.

Main Menu

  • How-To
  • Design
  • Tools & Materials
  • Video
  • Blogs
  • Forum
  • Reader Projects
  • Magazine
  • Members
  • FHB House

Podcasts

  • FHB Podcast
  • ProTalk

Webinars

  • Upcoming and On-Demand

Account

  • Log In
  • Join

Podcasts

  • FHB Podcast
  • ProTalk

Webinars

  • Upcoming and On-Demand

Popular Topics

  • Kitchens
  • Business
  • Bedrooms
  • Roofs
  • Architecture and Design
  • Green Building
  • Decks
  • Framing
  • Safety
  • Remodeling
  • Bathrooms
  • Windows
  • Tilework
  • Ceilings
  • HVAC

Magazine

  • Current Issue
  • Past Issues
  • Magazine Index
  • Subscribe
  • Online Archive
  • Author Guidelines

All Access

  • Member Home
  • Start Free Trial
  • Gift Membership

Shop the Store

  • Books
  • DVDs
  • Taunton Workshops

More

  • FHB Ambassadors
  • Reader Projects
  • Podcast
  • Customer Support

Account

  • Log In
  • Join

Newsletter

Get home building tips, offers, and expert advice in your inbox

Signing you up...

This site is protected by reCAPTCHA and the Google Privacy Policy and Terms of Service apply.
See all newsletters
See all newsletters

Follow

  • twitter
  • facebook
  • instagram
  • pinterest

Join All Access

Become a member and get instant access to thousands of videos, how-tos, tool reviews, and design features.

Start Your Free Trial

Subscribe

FHB Magazine

Start your subscription today and save up to 70%

Subscribe

We hope you’ve enjoyed your free articles. To keep reading, become a member today.

Get complete site access to expert advice, how-to videos, Code Check, and more, plus the print magazine.

Start your FREE trial

Already a member? Log in