FHB Logo Facebook LinkedIn Email Pinterest Twitter Instagram Plus Icon Close Icon Navigation Search Icon Navigation Search Icon Arrow Down Icon Video Guide Icon Article Guide Icon Modal Close Icon Guide Search Icon Skip to content
Subscribe

In every issue you'll find...

  • Expert insights on techniques and principles
  • Unbiased tool reviews
  • Step-by-step details to master the job
  • Field-tested advice and know-how
Subscribe Now!
Subscribe
  • How-To
  • Design
  • Tools & Materials
  • Videos
  • Blogs
  • Forum
  • Magazine
  • Members
  • FHB House
  • Podcast
  • Join
  • Log In
Subscribe
How-To

How to Install a Toilet

The essential step-by-step guide to removing your old toilet and installing a new one.

By Fine Homebuilding Editors

Unless you’re dealing with new construction, the first step will be to remove the old toilet.

To start, place a bucket or tray under the water supply valve to catch any drips. Then shut off the water supply to the tank by turning the handle clockwise. Add a dash of bleach to help disinfect the tank and bowl as you flush the toilet the last time. Hold the handle down until the tank is empty and use a sponge to soak up any remaining water.

Now disconnect the water supply line using a pair of slip-joint pliers to break the connection, then finish unscrewing the hose by hand. To make removal easier, separate the tank from the base. Use a large flat-head screwdriver to keep the through bolts from spinning as you reach under the tank to remove the nuts using a deep socket wrench. To remove the tank grab it securely and lift pouring any remaining drops of water into a bucket before carrying it out of the room.

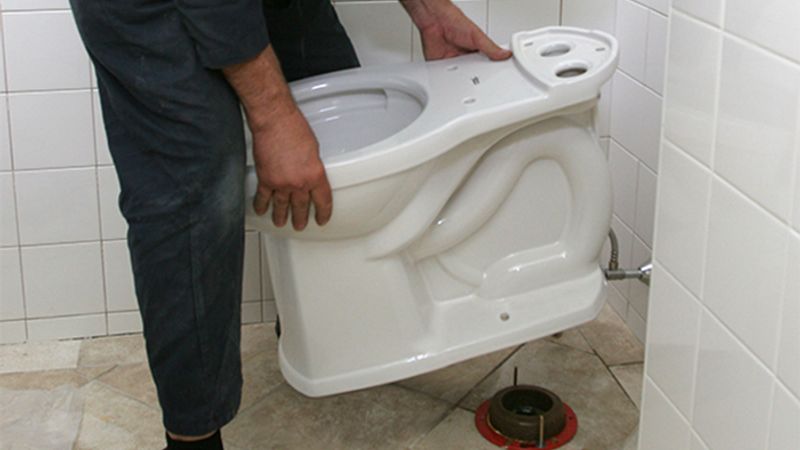
Now empty the bowl. Even though there’s bleach in the water it’s still good practice to wear disposable gloves. To remove the base use a putty knife to pop off the caps that cover the flange bolts and an adjustable wrench to loosen and unscrew the nuts. If the toilet was caulked or grouted in place break the connection using the same putty knife. To lift the toilet, hold the rim just behind the bowl with one hand and grab the underside of the base with the other as you lift it up and off the bolts, setting it on a scrap of cardboard so you can scrape the excess wax from around the outlet. Stuff a rag into the outlet to prevent any dripping as a bowl is carried through the house also insert a rag into the closet flange to prevent sewer gases from filling the room while you scrape residue from the floor and any remaining wax from the flange in preparation for the new toilet.

For standard sized toilets closet flanges are centered 12 inches from the back wall and are seated on top of the finished floor to minimize the gap between the closet flange and the outlet on the underside of the toilet. For installation, first dry-fit the base to check the fit. If there’s any wobble due to uneven tiles or minor inconsistencies and the flatness of the porcelain bowl use red rubber gasket material to remove the wobble. This product can be found at local home centers.

Once the shim is in place draw a reference line to help guide the toilet for repositioning. Next set the flange bolts that come supplied with a toilet into the slot on each side of the closet flange and use a tape measure to position them 12 inches from the wall on both sides. Pencil in lines to mark the location for each bolt making it easier to visually line the toilet when it’s installed. Remove the rag and tighten down the collars to the flange bolts stand straight on their own. Then place the wax ring centering it in the closet flange.

To install the new bowl lift it in place and hover over the flange as you align the bolts holes on both sides and then slowly drop it into place. The bowl will ride a little high until the wax is compressed. Use your body weight to compress the wax ring until the porcelain bowl make solid contact with the floor. Next thread the supplied nuts onto each flange bolt tightening them alternately so that the toilet rests evenly and never more than hand tight or you’ll risk cracking and porcelain. Finally, trim the rubber shim flush with the bowl.

Before installing the tank check that all the factory nuts are tight and all the gaskets are in place and secure. The tank simply drops into place behind the bowl and is secured with nuts that are hand tightened with a disposable plastic wrench that comes with the new toilet. To ensure the gaskets seat properly it’s important to work back and forth between bolts, tightening each a little at a time until the tank is snug.

With the bowl and tank both installed the supply line can be reconnected. Remember not to go beyond hand tight. Now turn the supply valve on and fill the tank. When it’s full adjust the height of the float valve until the water level is about three-quarters of an inch below the top edge of the fill tube. Give the toilet a test flush and check for leaks where it meets the floor.

If everything looks good, install the seat with the supplied hardware. Some flange bolts need to be cut with a hacksaw before installing the bolt caps, but this manufacturer eliminated that step allowing the bolt caps to fit over the full length bolts. The last step is to apply a bead of adhesive caulk around the joint where the toilet meets the floor—eliminating the chance of water wicking in around the base. Finally, position the lid on the tank and the toilet installation is complete.

Sign up for eletters today and get the latest how-to from Fine Homebuilding, plus special offers.

Signing you up...

This site is protected by reCAPTCHA and the Google Privacy Policy and Terms of Service apply.
See all newsletters
See all newsletters
×

Get home building tips, offers, and expert advice in your inbox

Signing you up...

This site is protected by reCAPTCHA and the Google Privacy Policy and Terms of Service apply.
See all newsletters
See all newsletters

New Feature

Fine Homebuilding Forums

Ask questions, offer advice, and share your work

View Comments

  1. jiffyjeffs | Aug 23, 2017 04:09pm | #1

    Wow - pretty detailed for this crowd.
    Well first I use a five gallon bucket about 1/2 full to help remove the remaining water in the bowl. How ? By dumping it in rapidly causing a rapid removal of all but a little water in the bowl.
    I also use a construction plastic bag to set the toilet in. I roll the edges down, set toilet in the bag, raise the edges and remove. No water spill unless your bag has a hole, so use a new bag.
    In some cases I have switched to the new neoprene doughnuts. Does not always work due to flooring, but I like them better than wax. That was a fancy two hole tank.

    1. iconoclast2222 | Aug 16, 2020 09:07am | #3

      There is now a material that gels the remaining water in the trap so that it doesn’t spill when removing and carrying the toilet. I have some but haven’t tried it yet.

  2. user-164326 | Feb 21, 2019 06:52pm | #2

    I was always taught not to caulk around the bottom of the toilet where it meets the floor. The reason was that this way if there is a leak at the donut for some reason you’ll hopefully see it coming from under the toilet before it works its way to the subfloor and rots it out. I imagine the trade off is dirty water and germs getting under the toilet.

    I’m curious to know if anyone else has any thoughts about this.

  3. iconoclast2222 | Aug 16, 2020 09:23am | #4

    MY TOILET PET PEEVE

    The projects and techniques published in FHB and GBA are arguably high end or at least better than average. Why is it that most of featured toilet installations use flexible plastic supply lines to the fill valve? I am a (serious) DIYer. Long ago I purchased basic bending tools and learned how to cut and bend the chromed copper supply lines. It doesn’t take but a few minutes and the appearance is far superior to plastic tubing.
    I have been annoyed when commercial plumbers have serviced toilets at my rental property, reset the toilet and replaced the perfectly good copper tubing with plastic. Sometimes they don’t even bother to remove the paper label from the plastic tubing.
    Jeez!

Log in or create an account to post a comment.

Sign up Log in

Become a member and get full access to FineHomebuilding.com

Up Next

Video Shorts

Featured Story

Q&A With Sarah Vadney, Historic Preservationist

Sarah talks with Fine Homebuilding about the skills needed for historic preservation and changing the trades to make room for caregivers.

Featured Video

SawStop's Portable Tablesaw is Bigger and Better Than Before

The 10-in. Jobsite Saw PRO has a wider table, a new dust-control port, and a more versatile fence, along with the same reliable safety mechanism included in all SawStop tablesaws.

Related Stories

  • Podcast Episode 523: Digital Shower Valves, DIY Foam Outsulation, and Air-Sealing Stem Walls
  • Podcast 515: The Best of the Fine Homebuilding Podcast, Volume 4
  • Podcast 512: PRO TALK With Water-Heater Expert Spencer Pope
  • Podcast 511: Floor-to-Ceiling Windows, Spray-Foaming Stone Foundations, and Supporting Cast-Iron Waste Lines

Discussion Forum

Recent Posts and Replies

  • |
  • |
  • |
  • |
  • |
  • |
View More Create Post

Highlights

Fine Homebuilding All Access
Fine Homebuilding Podcast
Tool Tech
Plus, get an extra 20% off with code GIFT20

"I have learned so much thanks to the searchable articles on the FHB website. I can confidently say that I expect to be a life-long subscriber." - M.K.

Get home building tips, offers, and expert advice in your inbox

Signing you up...

This site is protected by reCAPTCHA and the Google Privacy Policy and Terms of Service apply.
See all newsletters
See all newsletters

Video

View All
  • Podcast Episode 523: Digital Shower Valves, DIY Foam Outsulation, and Air-Sealing Stem Walls
  • Podcast 515: The Best of the Fine Homebuilding Podcast, Volume 4
  • Podcast 512: PRO TALK With Water-Heater Expert Spencer Pope
  • Podcast 511: Floor-to-Ceiling Windows, Spray-Foaming Stone Foundations, and Supporting Cast-Iron Waste Lines
View All

Plumbing

View All Plumbing Articles
  • Podcast Episode 523: Digital Shower Valves, DIY Foam Outsulation, and Air-Sealing Stem Walls
    Podcast Episode 523: Digital Shower Valves, DIY Foam Outsulation, and Air-Sealing Stem Walls
  • Podcast 515: The Best of the Fine Homebuilding Podcast, Volume 4
    Podcast 515: The Best of the Fine Homebuilding Podcast, Volume 4
  • Podcast 512: PRO TALK With Water-Heater Expert Spencer Pope
    Podcast 512: PRO TALK With Water-Heater Expert Spencer Pope
  • Podcast 511: Floor-to-Ceiling Windows, Spray-Foaming Stone Foundations, and Supporting Cast-Iron Waste Lines
View All Plumbing Articles

BOOKS, DVDs, & MERCH

Shop the Store
  • Pretty Good House
    Buy Now
  • 2022 Fine Homebuilding Archive
    Buy Now
  • Code Check Building 4th Edition
    Buy Now
  • 2023 Tool Guide
    Buy Now
  • Shop the Store

Fine Homebuilding Magazine

  • Issue 313 - Feb/March 2023
    • Practical System for a Seismic Retrofit
    • Fine Homebuilding Issue #313 Online Highlights
    • Practical System for a Seismic Retrofit
  • Issue 312 - Dec 2022/Jan 2023
    • Tool Test: Cordless Tablesaws
    • Gray-Water System for a Sustainable Home
    • Insulate a Cape Roof to Avoid Ice Dams
  • Issue 311 - November 2022
    • 7 Steps to a Perfect Exterior Paint Job
    • Options for Smarter Home-Energy Tracking
    • The Fine Homebuilding Interview: James Metoyer
  • Issue 310 - October 2022
    • Choosing a Tile-Leveling System
    • Choosing Between HRVs and ERVs
    • Custom Built-in Cabinets Made Easy
  • Issue 309 - Aug/Sept 2022
    • 10 Steps to Install Crown Molding on Cabinets
    • How to Get Sturdy Walls Without OSB
    • Choosing the Right Construction Tape for the Job

Fine Homebuilding

Follow

  • twitter
  • facebook
  • instagram
  • pinterest

Newsletter

Get home building tips, offers, and expert advice in your inbox

Signing you up...

This site is protected by reCAPTCHA and the Google Privacy Policy and Terms of Service apply.
See all newsletters
See all newsletters

Membership & Magazine

  • Online Archive
  • Start Free Trial
  • Magazine Subscription
  • Magazine Renewal
  • Gift a Subscription
  • Customer Support
  • Privacy Preferences

Taunton Network

  • Green Building Advisor
  • Fine Woodworking
  • Fine Gardening
  • Threads
  • About
  • Contact
  • Advertise
  • Careers
  • Copyright
  • Terms of Use
  • Site Map
  • Do not sell or share my information
  • Privacy Policy
  • Accessibility
  • California Privacy Rights

© 2023 The Taunton Press, Inc. All rights reserved.

X
X
This is a dialog window which overlays the main content of the page. The modal window is a 'site map' of the most critical areas of the site. Pressing the Escape (ESC) button will close the modal and bring you back to where you were on the page.

Main Menu

  • How-To
  • Design
  • Tools & Materials
  • Video
  • Blogs
  • Forum
  • Reader Projects
  • Magazine
  • Members
  • FHB House

Podcasts

  • FHB Podcast
  • ProTalk

Webinars

  • Upcoming and On-Demand

Account

  • Log In
  • Join

Podcasts

  • FHB Podcast
  • ProTalk

Webinars

  • Upcoming and On-Demand

Popular Topics

  • Kitchens
  • Business
  • Bedrooms
  • Roofs
  • Architecture and Design
  • Green Building
  • Decks
  • Framing
  • Safety
  • Remodeling
  • Bathrooms
  • Windows
  • Tilework
  • Ceilings
  • HVAC

Magazine

  • Current Issue
  • Past Issues
  • Magazine Index
  • Subscribe
  • Online Archive
  • Author Guidelines

All Access

  • Member Home
  • Start Free Trial
  • Gift Membership

Shop the Store

  • Books
  • DVDs
  • Taunton Workshops

More

  • FHB Ambassadors
  • Reader Projects
  • Podcast
  • Customer Support

Account

  • Log In
  • Join

Newsletter

Get home building tips, offers, and expert advice in your inbox

Signing you up...

This site is protected by reCAPTCHA and the Google Privacy Policy and Terms of Service apply.
See all newsletters
See all newsletters

Follow

  • twitter
  • facebook
  • instagram
  • pinterest

Join All Access

Become a member and get instant access to thousands of videos, how-tos, tool reviews, and design features.

Start Your Free Trial

Subscribe

FHB Magazine

Start your subscription today and save up to 70%

Subscribe

We hope you’ve enjoyed your free articles. To keep reading, become a member today.

Get complete site access to expert advice, how-to videos, Code Check, and more, plus the print magazine.

Start your FREE trial

Already a member? Log in