How Builders Turn Design Into Reality
The truth behind how a builder looks at the drawings.
When I first started in this business I thought the architect’s drawings were “gold”. I thought if I did what the drawings dictated, then I’d done my job. As I’ve grown in this industry I’ve learned this is not the case, and if I build what’s on the prints and it doesn’t work, it’s not the designers fault, it’s mine, the builder’s. If it’s not right the first time it costs me time and money, and that in turn, costs the client money (if you can get it from them, that is). We are professionals and this is what we do everyday, so it’s our job to find these issues and resolve them.
To be honest, my view on prints is that they are a suggestion as to how we should build any given addition, renovation, or new home. This is the approach I’ve learned to take over the years. This approach may cost me a little more time up front, but it saves me a whole lot of money and aggravation over the length of the project. Plus, the client thinks it’s magic how smooth everything comes together.
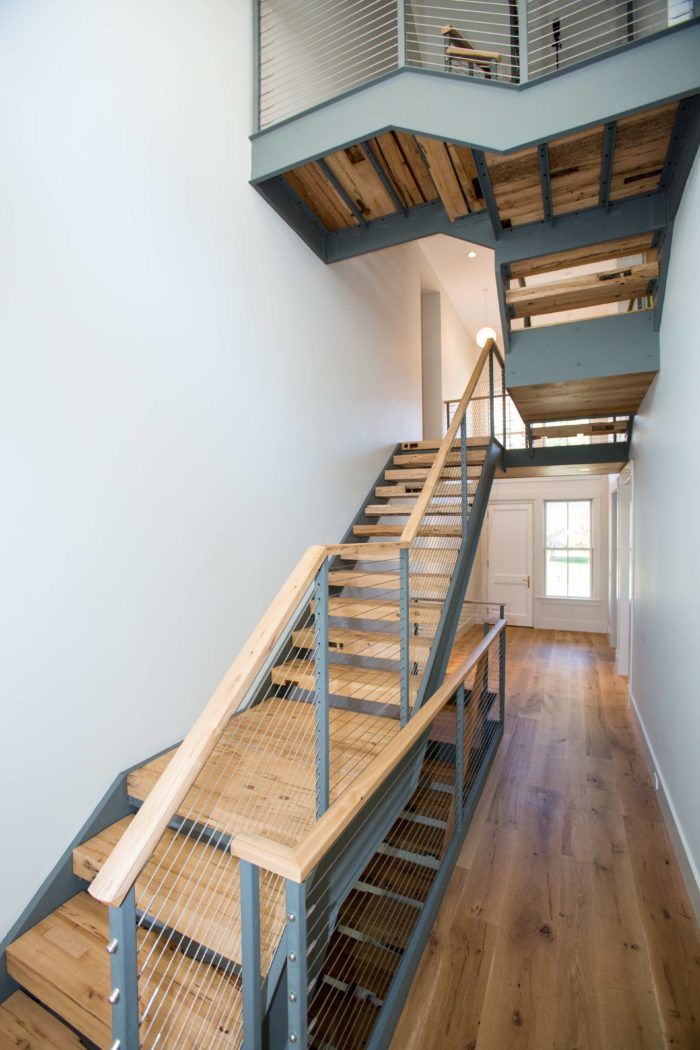
Here’s an example of this scenario: We started a new home where the prints showed a basement-to-roof staircase with open risers, 3-in.-thick solid wood treads, and metal railings. As a builder, something like this is exciting, because it’s one of the biggest challenges I’ve come across. So, I dove into the prints to understand every detail. For me, this means building this stair in my head 5-10 times, wrapping my head around the time required to do the job, planning how everything will be fastened, and most importantly, trying to anticipate problem areas now rather than bringing everything to a halt on the jobsite while we stand around and scratch our heads over unforeseen snags. That was particularly important in this case, because the metal stringers needed to be custom fabricated to match the needs of the job. And to make things more complicated, the stairs were not a simple straight run. There were varying floor heights, which meant a couple of intermediate landings and therefore a couple of intricate transition areas over a short distance.


So, once the first floor deck was built I asked the framers (the boys of Templar Construction) to build the garage
wall first, because this was where the stairs would be bolted. It’s also the wall that the kid’s wing above will sit on, which was a factor because the area directly above would be split into two different floor heights (kids wing over the garage was 30 in. lower than the master suite wing), e. After the framers wrapped up for the day I jumped on a ladder with my level, tape measure, sharpie, and blue tape. I laid out the rise and run per the prints to confirm the layout worked with the tricky situation above. It didn’t. 
What I found was the risers would have to switch from a 7-1/4-in. riser before the platform to a 6-3/4-in. riser after the platform. This was something I sniffed out when reviewing the drawings, but needed to confirm on-site. Yes, I could have re-drawn, but this is my way of working. That’s the beauty of this trade, every job is different, and every builder may take a different approach.
Next step, bounce it back to the architect via email. His first reaction was that I was wrong, and that the design works. Then I sent him my layout on paper and a photo of the physical layout on the site. I told him how I adjusted the wall height of the garage to shorten the overall riser height. This would let us align the riser’s throughout the entire stair run. This would only reduce the garage ceiling height by 6 in. (not noticeable given the 10 ft. ceiling height).
Once he dropped a defensive stance and saw I was only trying to make his “concept” work he came on board and re-drew the stair w/ my changes and corrected the landings to make everything work, we then sent our the design for steel bids & fabrication.

We made a few more tweaks to the planned design, too. Code states we can’t have an opening of 4 in. or greater, and with the treads at a 3 in. thickness we would be left with a 5-in. riser opening that would have to be covered with 3/8-in. plastic. Our solution was to instead use 5-in.-thick treads cut from reclaimed oak to bring our riser opening to 3 in., no plastic needed. We also introduced the reclaimed treads as the top-rail of the cable rail system.

The finished product was worth the effort. We could have built to the drawings. We could have ordered everything per the design. We could have charged the client for the errors, time, and materials lost due to the inaccuracies of the design and drawings, and some guys might run their company, jobs, and clients like this. This is not the approach we have, we committed to running a smooth project, being the exception to some other builders. Now this 44-ft. combination of steel, reclaimed wood, and cables was going to be a piece of art hanging in the center of their home, and it’s on us, the builders, to see through all the pencil lines and make a designers concept into reality.


For more photos of this, and other projects, check out my instagram feed @heresjohnnyrcb
Fine Homebuilding Recommended Products
Fine Homebuilding receives a commission for items purchased through links on this site, including Amazon Associates and other affiliate advertising programs.
Graphic Guide to Frame Construction

Not So Big House

All New Bathroom Ideas that Work


View Comments
Love this stair John, and your approach. Nice work
I thought this was an interesting article. The biggest issue is that it was hand drawn and you as the contractor had to pick up the slack of an architect living in the dark ages.
I am an architect but specialize in very complex media facilities, recording studios, etc. We are using Revit with Navisworks which alleviates errors such as this ahead of time. On the huge projects it has saved us countless hours and money for conflicts and clash detection.
Some of our jobs, there aren't even paper drawings. Everything is through BIM on tablets.
Having a proactive contractor leading the construction phase is invaluable to the process despite how much time has been put into the design or what kind of software or medium has been used to represent the contract documents. Field conditions vary and its construction - things happen - there are lessons to be learned on each project. Thank you for your article!
"hey boss, if we cut around these defects, we won't have enough material for all the treads" .... "Then leave 'em. We'll just put them on the underside and call it 'character'."
Nice work and right approach!
Thanks for the article. What I don't understand is why shop drawings weren't part of the construction process. An element like these stairs should require some level of shop drawing on the part of the fabricator and review by the architect so that these types of field changes could be picked up. It's great that you had the foresight to think far enough ahead to see how the framing would be impacted by the stair and vice versa. Finally,I second the comment about hand drawings vs. Revit. It's a steep learning curve to make the transition by t worth it.
Matt, here's the thing. Shop drawings from a fabricator would have come at a later stage of this build (after the house was fully framed w/ a shell). There were a couple warning signs on this design that lead me to investigate this design. Having (2) different riser heights from one landing to another is a no-no in my book.
I'm happy to investigate this and all the designs/ concepts that come across my desk. The problem I see is the "concept" isn't thought out fully.... It's not my job or the steel fabricator job to find issues w/ the design but instead value engineer it so its affordable for the project and fits the schedule.
The point of this post was to have arch's (or jr arch that's drawing the projects for the arch) to pause and think beyond the design and ask will it work. Have a young builder try and build the concept a few times in their heads to understand the up's & down's before actually getting to deep and having to react to the discovery of the issue.
Revit has dropped the feasibility and results in only small tweaks to fabrication and execution. Hey, I'm game for any way to get a better visual for the client and the builder to see the finished product sooner in the process.
Matt, thanks for your comment and taking the time to give the Blog post a read!
-J