here’s a 20×36 2-story addition..the Owner is the designer, plumber & electrician..
all of the structural is by a PE.. with design for 110 MPH wind-load ( local design criteria )
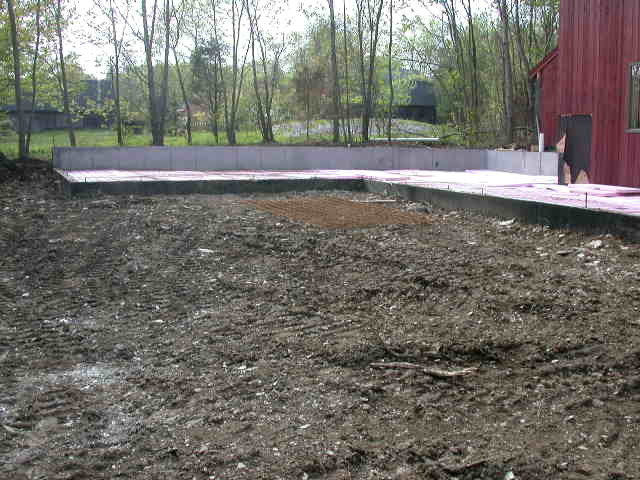
the owner hired the digger & foundation.. we take over after the slabs are poured..
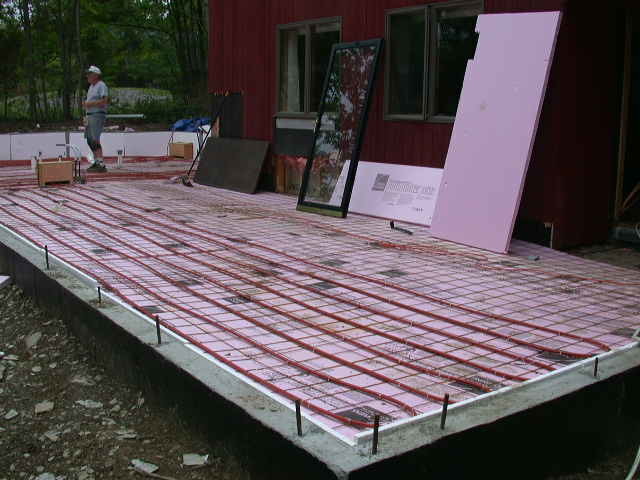
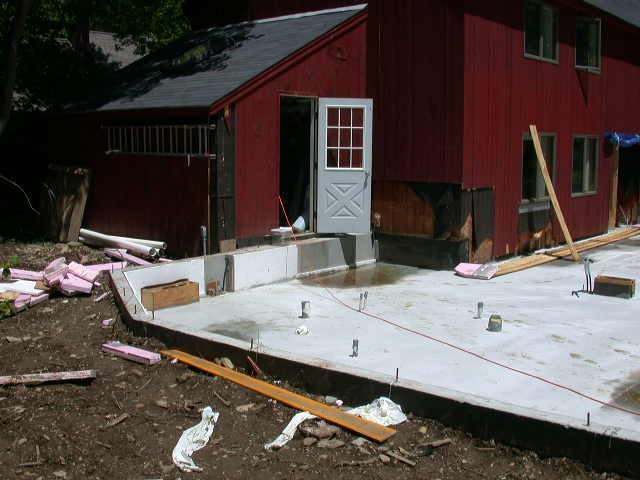
here’s the job before we started.. foundation.. sub-slab insulation.. and radiant floor heating .. finally the slab
Mike Smith Rhode Island : Design / Build / Repair / Restore


Replies
we mobilized with our dumpster, 7x14 trailer, and a lot of saw horses...
got the sills down.. and found a 3/4" level problem on the high wall..
Mike Smith Rhode Island : Design / Build / Repair / Restore
the main addition is 2-story.. with a dining room single story... we're framing the main part first..
2x4 common studs.. 2x6 on the high wall to conform to the 6" stem wall poured on that part to take care of a grading problem
walls up and braced and string & block.. then the 12" I-joists..
cut with a 10" Milwaulkee on a shooter board..
the stairwell framing is 12" LVL'sMike Smith Rhode Island : Design / Build / Repair / Restore
the ridge is going to be an Anthony Power Beam... 7x18 (36') so i need the gable ends and the center post to get ready for the beam delivery...
here's our chance to use our brand new Proctor Wall jacks...
Roy & Jim are doing the heavy lifting....
Mike Smith Rhode Island : Design / Build / Repair / Restore
Edited 6/17/2004 10:37 pm ET by Mike Smith
I ain't seen you in here for a while, I guess you've,been busy
I'd like to ask you a question, Since youv'e got the gable built on the floor, why don't
you finish out the gable with overhangs,siding, windows, etc.?
Do you do it this way to get to tar paper quicker(dried in) or to much that can go
wrong trying to finish out w/ siding etc.? Not trying to critique, just curious why
people do things the way they do.
when I framed gables, I even went to the trouble, when the rafters sat on top of
wall plate, to go ahead put them up(tacked in placed, to each other with a block in
between to simulate the ridge) level in louver sill( when called for), put down a
bottom plate (on top of the joists that I had plywooded previously)out to the rafters
nailing the bottom plate to the rafters, un tacking the rafters at the wallplate and
laying the gable back down and framing up, sheathing, siding, overhangs and
windows.( does that make sense)I did all this to not have to build scaffolds, and to
me it was safer, and I could do a better job with it laying on the ground. All I had to
do was finish up the corners with a extension ladder.
Mike, please don't take this the wrong way, as I'm always trying to learn from other
people, and especially from you cause I can tell you got your stuff together.
butch .. i've done it that way.... here my goal is to be ready for the ridge beam...
not to mention.. we have no windows.. have no siding.. have no trim...
on the plans... the short 2d floor wall was to be 5' .. but when we got to the 2d floor... it was 6'1"...since we have to match roof and fascia/soffit trim lines to the existing house
the gable we'll frame today is truncated ... that corner of the house is clipped off due to a zoning setback issureMike Smith Rhode Island : Design / Build / Repair / Restore
Mike-
Where do you get those turnbuckles for adjusting the walls? I've looked everywhere for them.You get out of life what you put into it......minus taxes.
Marv
marv... you can get them at a concrete supply house .. or a contractor's supply house..
they are really for bracing and adjusting concrete forms for commercial work...
here's another pic on a different job.. you can see how they're made..
also...is this the siding you're looking for ?... if so..it's not really siding .. it's 1x6 & 1x8 rough spruce, just butted together with the black felt paper showing in the vertical jointsMike Smith Rhode Island : Design / Build / Repair / Restore
What type/ kind of bridge is that along the side wall on the bracket. It seems to be a pretty long span for its thickness. Is it rated for only 1 person at a time?
F
one of the pics belongs to a friend.. it's rated for 250 #..they're a little lighter than we like....
all of mine are Alum-a-pole... 20" x 24' & 14" x 24'Mike Smith Rhode Island : Design / Build / Repair / Restore
Top of gable frame, I see a pair of 2x6 "rafters" notched to the gable stud top ends.
There is a little bit of labor in those notches. Why not straight-bevel the stud tops and plate the wall studs?
i've done it both ways.... this is the way i like it... i always try to please myself... life is short... those are 16' 2x8 rafters and the studs are all 2x4..
this will be a mooney-wall house except for that 2x6 back wall..
Mike Smith Rhode Island : Design / Build / Repair / Restore
today we framed the clipped gable... even almost got it right..
here's the clipped part ..
and the intersection with the main house....
and a long view looking across the slab for the one-story Dining Room addition..Mike Smith Rhode Island : Design / Build / Repair / Restore
Very nice work, Mike. It's good of you to post these pictures.
Greg
here's the back side of the clipped corner.. this grade is about a foot higher than the rest of the house.. thus the high foundation wall....
and not to take anything away from stan.. but we 've got our own set of stairs that travels from job to job with us... so we can get the trash barrels into the dumpster...
nice stairs , huh ?Mike Smith Rhode Island : Design / Build / Repair / Restore
I'm glad ya finally noticed that corner was clipped ...
I was getting ready to tell you the foundation guys didn't exactly get it square ....
JeffBuck Construction, llc Pittsburgh,PA
Artistry in Carpentry
square he*l.... it's the level part that had us shimming like crazy....some people should stick to landscaping.....Mike Smith Rhode Island : Design / Build / Repair / Restore
lookin good Mike
man, I'm still droolin for the 5ply fir...hmmmmm plyyyyywoooodd..
Spheramid Enterprises Architectural Woodworks
Repairs, Remodeling, Restorations.
did i mention that back corner was clipped..?....
and here's some of the 2d floor Radiant Heating the owner is installing
with a long view of the jobMike Smith Rhode Island : Design / Build / Repair / Restore
the Anthony Power Beam finallly arrived.. they even sent the knuckle boom to deliver it.... but the boom controls were not working very well.. so it took an hour in the rain to get it on the 2d floor deck
7" x 18" x 36'... about a 1000 lb....for the structural ridge.... the local marina will send a truck crane tomorrow morning to set it..
even with our 10" Milwaukee it still took two passes to trim it to lengthMike Smith Rhode Island : Design / Build / Repair / Restore
man that's a butt pucker ..cuttin that monster..measure HOW many times?
I made a running scarf joint ( like a Z ) with lock wedges in a pair of 8x18x 20' for a DECORATIVE ridge beam..it was hung under the scissors trusses ( not my idea, just the execution)..man I quadruple checked all my numbers then checked again..I think ea. 20' er was 600$
Spheramid Enterprises Architectural Woodworks
Repairs, Remodeling, Restorations.
that's about right.... this 40' was $1495.......plus tax..
oh well... sure hope i got it right....Mike Smith Rhode Island : Design / Build / Repair / Restore
Very nice job, Mike. I'm always impressed by how good you and your crew look in action. I like the way you stage things for working, too. I see too many jobs going up with guys teetering about on the top of cheap ladders and screaming at the helper to hold the f***er still so they can nail it in place....
Those Alumapole platforms you've got--can you give me a ballpark price on 'em? I'm thinking a few 10-footers set up with hooks to fit my scaffolding frames could be useful to have around.
Dinosaur
'Y-a-tu de la justice dans ce maudit monde?
dino .. send me an email and i'll fax or email you the Alum-a-pole price list... you can drag them back to CA behind your vehicle after RhodeFestMike Smith Rhode Island : Design / Build / Repair / Restore
yesterday, before it started raining.. we prefabbed some of the gable dormer parts.. here's the box header getting glued up and nailed..
we started at 7.. nailed up the 3 posts for the Anthony power beam.. the crane showed at 8.. and it was set and the crane left by 9...Mike Smith Rhode Island : Design / Build / Repair / Restore
once the beam was set we finished the front wall.. and did string and block to align the bearing walls...
here's the gable end for the dormer.. we built it in 2 pieces ..
and the gable end with the ridge set.. the ridge will hang from the main beamMike Smith Rhode Island : Design / Build / Repair / Restore
I use a roof rack. Easier to parallel park....
E-mail on the way.Dinosaur
'Y-a-tu de la justice dans ce maudit monde?
it is a treat to watch you work.
write a book man.
they got people to capitalize and punctuate
something about "Let's Get Mikey!."
a straightforward guide to earning a living as a builder...
hub.... watch me work ?
ain't that like watching grass grow ?Mike Smith Rhode Island : Design / Build / Repair / Restore
Roy and Jim continued with the common rafters.... Chuck was hanging plywood and i was busy making valley rafters short..... how many trees had to die before i remembered valleys and hips are 12/17.... not 12/12..
oh well...
here's the ridge hanger we fabricated to hang the gable dormer ridge off the power beam... and the valley rafter seat....
and the gable end view
Mike Smith Rhode Island : Design / Build / Repair / Restore
the ridge seat cut for the rafters....
the intersection of the addition and the existing house
Mike Smith Rhode Island : Design / Build / Repair / Restore
Mike,
I'm probably missing something, but is the addition directing runoff right into the existing wall? Will that be a gabled portion?
Jon Blakemore
yes.. it will either be a single pitch valley or a gable pitched both ways... it was designed as a single pitch towards the new addition... but since it isn't framed yet.... who knows ?Mike Smith Rhode Island : Design / Build / Repair / Restore
framing mostly finished.. time to sheath... talked Barry into bringing his laddervator over.. we whacked together a landing platform so we'd have some place to stack the 1/2" cdx..
then Jim got a lesson in laddervator operation so he can finish today..
while me and Chuck were on the roof catchingMike Smith Rhode Island : Design / Build / Repair / Restore
put the ladder rake on the gable dormer...
trimmed the clipped rafters on the back corner.. and started the sheathing on the back,.. we put the ice & water .. and the RoofTopGuardII on as we staged up...Mike Smith Rhode Island : Design / Build / Repair / Restore
Looks like you're all set to shingle from the top down.
You get out of life what you put into it......minus taxes.
Marv
Edited 7/1/2004 4:19 pm ET by Marv
i've been thinking about it.. we can get a roof top delivery.. and the staging is already in place..
now that most of the roof sheathing is in place, we can finally take down the braces and staging and take a look around......
here's the ridge hanger I fabricated to hang the dormer ridge off the structural ridge..
and the guys on the back sheathing...
a view out the front looking across to the existing wing...
and looking north to the 6x6 post to shorten the span of that ridge
Mike Smith Rhode Island : Design / Build / Repair / Restore
Edited 7/1/2004 9:31 pm ET by Mike Smith
Hi Mike,
I was wondering. Was there any reason why that intersecting gable wasn't framed using supportING and supportED valleys? Or did the archy spec the roof to be framed that way?
By the way nice work! Looks like you run a neat and most of all SAFE jobsite.
Erik
erik... the original framing plan was a "hail mary".. i pointed out a couple of ways to frame it ( i'm not a big framing whiz).... this is the one he decided to go with..
i think you are talking about one of the valley rafters extending to the ridge , right ? and then the other valley rafter frames to that ?....
that was the other solution... this hanger will be above the 10' ceiling line so it won't matter.. if the entire structure was cathedral to the ridge beam , then your method would have been preferredMike Smith Rhode Island : Design / Build / Repair / Restore
Mike,
Very nice work as usual! I always enjoy your threads because it's like reading a "how to" book on carpentry starting from site prep all the way to finish. Keep the pictures coming!"When I read about the evils of drinking, I gave up reading." ~ Henny Youngman
thanks , roger... your cape looks so typical '60's
it just screams old cape...
are you comming to RhodeFest with your wife ?... we'd love to meet you both..
so would everyone elseMike Smith Rhode Island : Design / Build / Repair / Restore
Hi Mike,
I'd love to come to RhodieFest and meet everyone but the scheduling is a bit tight. I'll be getting back from a two-week business trip on the 13th of Aug and will have renters leaving/arriving on the 14th. Check-in time is after 3 pm on the 14th so we'd get a late start. But I'll check with the wife in the morning. We'll be starting a two-week vacation and I can't think of a better way to begin!
Cheers! Roger"When I read about the evils of drinking, I gave up reading." ~ Henny Youngman
sounds like a busy weekend for you... hope you can make itMike Smith Rhode Island : Design / Build / Repair / Restore
Nice, neat work. I'm interested in those brackets holding the scaffolding under the gables. I've used homemade versions, but I've never seen an "off the rack" set like that. Where'd you get 'em? Do you use them for siding, too?
Actually, with those roofing brackets, I don't think I've ever seen so many brackets and holding up stuff in one place. The IRS might bump you up into another tacks bracket<G> Don't worry, we can fix that later!
buck.. those are wall jacks...used to be all anyone used around here for framing..
i probably have 15 or so of them..
the roofing jacks we usually go about 7' with 2x10's.. but some of this is 2x8 & 2x6 (doubled )... so we use a few more than normal... i intend to get a roof top delivery when we shingle ( a while from now, since we're already waterproof)... and with a couple heavy guys and several bundles of shingles.. we need a lot of support
here's another job with PT 2x10 roof planks and the shingles flying in..
and another view of the wall jacks... which you should be able to buy at any scaffold store... say like CapeCod Staging
Mike Smith Rhode Island : Design / Build / Repair / Restore
Edited 7/3/2004 8:53 pm ET by Mike Smith
So, how will you insulate the cathedral ceiling?
Interesting thing seen last week in my parts, re roofing and insulation. Everybody here uses the same brand, IKO, and the rep is insisting that if ventless insulation is used (spray urethane) at cathedral ceilings, the underlayment must be 100% waterproof, i.e., ice and watershield, because the "hot" roof will cause premature shingle failure.
Whole lotta Grace being sold at $82.50 per 3x75 foot roll.
the cathedral will be propa-vent with dens-pak cellulose and 2"EPS foam below..about an R-38 or so
the flat portion at the top will have 24" cellulose... about R-70Mike Smith Rhode Island : Design / Build / Repair / Restore
Cape Cod Staging, hmmm<G>an excuse for a junket!
If you get a chance, would you post a pic of how they're attached. Looks like they can take some weight. It's all ladder jacks here. Ties up two ladders, bouncy, but easy to side around.
You have a very impressive operation, who's the maid? LOL Don't worry, we can fix that later!
buck...if the ladder jacks will lure you to RhodeFest , i'll sell you 2 when you get here..
i'll take a pic.. basically.. they are meant for 2x4 wall with a flat 2x4 block thru-drilled on the inside Mike Smith Rhode Island : Design / Build / Repair / Restore
I'm workin' on it, my commitment papers say I can't get out until Aug. 16th, and Mrs 'Snort says my behavior's been real bad, so no early release. Don't worry, we can fix that later!
so bring your parole officer with you.....Mike Smith Rhode Island : Design / Build / Repair / Restore
That would be Nurse Ratched<G> Don't worry, we can fix that later!
buck.... here's those pics of the wall jacks... outside
and inMike Smith Rhode Island : Design / Build / Repair / Restore
built the 2d floor partitions.. 11' ceilings..
here's the Owner to give the picture some scale....
and a pic of me in the gable dormer..
looking into the stairwell...
and the 14' x 30' dining area we'll frame tomorrow..... lot's of wind uplift engineering on that portion
Mike Smith Rhode Island : Design / Build / Repair / Restore
Thanks Mike. Even I'd feel safe on that. I'm still workin on the warden, you might have to part with a set yet<G> Don't worry, we can fix that later!
the open corner on the dining room requires special engineering for wind-uplift..
here's the bottom part of the hold-down...
and part of the corner assembly.. there are 7 of these on the corner
and the 3/4" thru-bolt.. two of these on each holddown
tomorrow.. we get to the upper portionMike Smith Rhode Island : Design / Build / Repair / Restore
here's the tie-down straps... 3" x 36 "..
and the cut bench for the rafters.. each one a different length..
setting rafters.. and the frame at lunchtime
got a wedding down the cape this weekend.... so no more pics until MondayMike Smith Rhode Island : Design / Build / Repair / Restore
told you we went to a wedding... here's the bride..
and our family... with Dave & MarianneMike Smith Rhode Island : Design / Build / Repair / Restore
Mike,
The bride's a babe! The picture really captures the "look of love" in her eyes.
Love the bright green pants too. Gotta get me a pair of them!"When I read about the evils of drinking, I gave up reading." ~ Henny Youngman
we stayed in Falmouth.. the wedding was at the Pocasset Inn in Mashpee
..played golf at Sandwich Hollow................ any of that near you ?Mike Smith Rhode Island : Design / Build / Repair / Restore
Hey Mike,
That's a pretty area. My girlfriend in college worked summers in Falmouth (Falmouth Diner). Great times on the weekends. The summer people working the clubs and restaurants would take care of each other. We could bar-hop without paying covers. Of course, during the week I was stuck in New Bedford working for my father...
We're in Eastham, which is the fourth town from the end on the Cape. So I'd guess we're about 35 - 40 miles from that area.
BTW, this weekend I'm going to Worcester area to finish a "screaming eagle" in shingles on my bro-in-law's garage (if the weather cooperates). I'll try to post some pictures before I leave on Monday for yet another business trip.
From my trip last week, I have some pictures of topless women on the beach in the Netherlands. But I doubt that Breaktime would like me to post those even tho you see pictures like that all over Europe... ;-)
"When I read about the evils of drinking, I gave up reading." ~ Henny Youngman
Edited 7/14/2004 7:36 am ET by Roger "Crash" Dumas
Hey Crash!
We used to own a cottage on Huckleberry Lane (not Road) off of Campground Road. My father built it in '72ish.
What was the name of the beach at the end of Campground? or more appropriately, you'd hand a left and then get to it. I see the target ship in the harbor is pretty much gone now.
I was a little kid I used to hang out at The Landing, which I think is still there and ride my bike all over Eastham.
My father now live in Wellfleet...sorta near the light on Rt 6 (near Gusty Benders, if it's still called that)
Small world."My mother failed to see the irony in calling me a sonofabitch" - Jack Nicholsen
Edited 7/15/2004 1:00 pm ET by Doug
Hey Doug,
The beach at the end of Campground is Campground Beach! My wife tells me that there used to be a religious camp there and it developed over the years into a bunch of cottages. The Landing is still there and it's for sale. So you can make a career move! You're right, the target ship is pretty much gone. You can still see it at (very) low tide but there isn't much left. It's a good structure for Tautog. Gutsy Benders is still there too. I'll bet you used to go to Coast Guard Beach when you came to Eastham. I love this place!
Crash"When I read about the evils of drinking, I gave up reading." ~ Henny Youngman
while we were at the wedding in Falmouth we took a ride out to P-town to look up some of my old haunts..
here's the breakwater i built for Campanella Corp from '70 to ' 73..
at the foot of MacMillen Wharf is the Surf Club.. where the Jug Band used to perform..
i had a Rhodesian Ridgeback then.. he's hang out there.. used to sleep in this door.. after awhile , i'd get a call from the bartender.. " hey , Mike, come get your damned dog, he won't let anyone in or out !"
Mike Smith Rhode Island : Design / Build / Repair / Restore
Edited 7/15/2004 9:46 pm ET by Mike Smith
yesterday we set the post for the front entry roof.. and Scott framed the mudroom /entry roof
Jim was upstairs framing the ceiling joists
Mike Smith Rhode Island : Design / Build / Repair / Restore
Edited 7/15/2004 9:50 pm ET by Mike Smith
today.. here's the front with the dining room sheathed (almost ).. slow.. still fighting with all of the simpson connectors..
and the mudroom with ice & water and RoofTopGuardII
the ceiling frame on the 2d floor..
and the Owner is doing all his own plumbing and electrical.. here's his manifold for the radiant floor heating
Mike Smith Rhode Island : Design / Build / Repair / Restore
Edited 7/15/2004 9:59 pm ET by Mike Smith
here's the pump set-up and manifoldMike Smith Rhode Island : Design / Build / Repair / Restore
What's with the notches in the mudroom roof corners, where rakes meet eaves?
Owner wanted some extra overhang to dodge the raindrops.. didn't want gutters..Mike Smith Rhode Island : Design / Build / Repair / Restore
decide to strip the south roof of the existing house ..
here's 8 am after we did some cleanup and staged the bottom of the roof..
and 1030 am.. still stripping
11am.. starting to paper in with ice & water on the bottom and RoofTopGuard II on the rest....Mike Smith Rhode Island : Design / Build / Repair / Restore
after lunch we rigged two 24' pics from the roof to the dumpster , put all the debris in cans and lugged it over the bridge to the dumpster..
by 1pm we were back to framing and sheathing
Mike Smith Rhode Island : Design / Build / Repair / Restore
Edited 7/16/2004 9:48 pm ET by Mike Smith
this is our regular super friday cleanup.. but the owner is entertaining this weekend so she wanted her new dining room to look more liveable..
and her husband got most of his RFH control center done..
meanwhile Jim has finished putting up all of the ceiling joists and cleaned the big room up for the weekendMike Smith Rhode Island : Design / Build / Repair / Restore
Looks very comfortable and safe to work on Mike.
Looks like you snap lines to put those roof brackets on! Very straight looking. Nice work!
Mike
That roof work makes me thirsty, I think I'll have to have another beer!
Job looks like it's going good.
Doug
So, we are looking at one row of something different at the eave, and Rooftopguard II above that, right? The Rooftopguard II won't function as I&WS?
BTW, how much of a cost premium is there for the Rooftopguard versus 15# felt? I cannot get it local, but am asking all the same.
Gene.... RTG says it's an ice & water.... probably is.. but it doesn't stick to the roof , so we still use conventional I&W on eaves and valleys..
i forget what i'm paying.. seems like $125 a roll rings a bell... which is $12.50 / sq
felt is about the same , right ?.. so this is faster, better, and we can sleep at night ... what's to ponder ?Mike Smith Rhode Island : Design / Build / Repair / Restore
Mike,
I can get 15lb. felt for $3.75/sq., 30 is twice that. How much does a 10sq. roll of RTG weigh?
Jon Blakemore
it weighs less than a roll of felt.. a lot lessMike Smith Rhode Island : Design / Build / Repair / Restore
We have been using 30# felt everywhere, except for where we use the I&WS. My material cost, tax included, runs about $4.20/sq.
Other than the lighter weight of the RTG-II, and the 5 foot versus 3 foot strip coverage width, how do you justify the additional cost of over $7.50/sq.
I realize it is only a few hundred dollars cost on a routine house-plus-garage job, but money is money.
Gene: i can justify it pretty easily... money is money.. and the biggest potential money on a remodeling job is liability... RTG II is so good it reduces the liability to something manageble... can't get that kind of reassurance with 15lb. felt and not even with 30lb..
next item: money is money.. the biggest cost is always labor.. i get the extra cost back on the labor right off the roll...
i probably get it back just carrying a 10 sq. roll up the ladder.. and it just keeps getting better from there...
View ImageMike Smith Rhode Island : Design / Build / Repair / Restore
Gene : are you and your wife still comming to RhodeFest ?.. have you booked a place ?Mike Smith Rhode Island : Design / Build / Repair / Restore
got ready to strip the north side of the main house tomorrow.. not much room and lots of wall to protect... neighbor's fish pond is next door, yada, yada, yada..
we staged it with alum-a-pole and our safety nets.. we'll drop everything into the nets and then crank it down to ground level for it's final trip to the dumpster..
here's the north side..
and a pic of the backside of the intersection of the old and new...Mike Smith Rhode Island : Design / Build / Repair / Restore
stripping the back...
and a view of the pretty Bow-roof cape next door....Mike Smith Rhode Island : Design / Build / Repair / Restore
boxed the cornice for Koma trim.. then the Koma ear board
and the whole magillaMike Smith Rhode Island : Design / Build / Repair / Restore
setting doors and windows in the Dining Room.. need this enclosed so we can finish the demo into the existing house..
ramset a pt subsill..
then end of day....Mike Smith Rhode Island : Design / Build / Repair / Restore
Roy finished the foam blocking and glued it all in with spray foam.... then the Owner set his two inch foam about 6 " below the RFH heat tubing..
set the clipped corner window
Mike Smith Rhode Island : Design / Build / Repair / Restore
Edited 7/23/2004 7:55 pm ET by Mike Smith
finished framing out the circle top window..
then put our ice & water splines on ..
set the window on our alum-a-pole and pumped it up while scott balanced it
scott & jim set it
while i shimmed and operated
and , whadda ya know.. it's doneMike Smith Rhode Island : Design / Build / Repair / Restore
Owner added a pent roof over the unprotected door.. here's the basic framing..
and the existing Terratone windows from the old front wall have been painted white and moved to the 2d floor...
picked up the 2" EPS foam for the slant ceiling areas...
and the last interior door has been framed.. Owner wanted a pocket door here.. so we did our usual Johnson hardware shimmed out to a 2x6 pocket wall widthMike Smith Rhode Island : Design / Build / Repair / Restore
here'sa link for site if you like construction..
http://quittintime.infopop.cc/ubbthreads/logout.php?Cat=
meanwhile , Roy was building foam boxes in each joist bay so we can blow cellulose around the entire perimeter.. this will form a 12x12 box . we'll poke a hole and stick our cellulose nozzle in to fill the cavity...
the gable end bays will be filled completely..
and another view of the RFH disappearing into our box..then the Owner will cover the bottom of the bay with more of the 2" foil-faced foamMike Smith Rhode Island : Design / Build / Repair / Restore
then yesterday we did some more framing.. Scott joined the crew.. so I gave him the mudroom to frame
here's the dining room & entry roof..
and the mudroom walls...
today... rain.. so I grabbed Barry off the enclosed porch job and we went to breakfast at Oatley's..
then spent the rest of the day inside doing partitions and blocking..
Mike Smith Rhode Island : Design / Build / Repair / Restore
Mike,
In your area they allow you to use double studs as the post for the holddown? In some areas around here they let us, but in others they don't. I read in Thor Matteson's book that engineers don't really like to use built up posts because they have to spec so many fasteners to hold the 2 or 3 peices together.
What are the specs for your posts?
As always your framing looks great. What approach to you take to cutting a roof?
tim... the PE didn't spec anything special other than double studs... kinda think the 2 (3/4") bolts in shear would take care of the whole problem...
as to the roof... we're slow... and haven't got a lot of production methods..
once that 7 x 18 ridge beam was in place, it became an immoveable object.... and not exactly centered... i measured to a centerline stringline and adjusted our tail pattern to the measurements....
we are so used to out of square, out of plumb, off center... that we usually calculate our common rafters and then Plus or Minus each one... if a common rafter fits, i usually think something is wrongMike Smith Rhode Island : Design / Build / Repair / Restore
man, that all is soooo cool...I finally had a moment to see it all...great stuff Mike...see ya soon..
gotta post to inject here...cedar tree..12'' dia. uggggh...
later
Spheramid Enterprises Architectural Woodworks
Repairs, Remodeling, Restorations.
here's the profile of the Trex sill we use on all of our windows..
and the sill in placeMike Smith Rhode Island : Design / Build / Repair / Restore
in the attic portion we'll blow 24" of cells.. so i installeda catwalk so i'll be able to maneuver..
and here's some of the mooney wall before we put the insul-mesh on...Mike Smith Rhode Island : Design / Build / Repair / Restore
Mike,
I just replaced some old windows with andersen 400's and would like to do a similar casing and sill as you show in this older thread. We are using Azek for the trim, how much of a gap do you leave between the casing and window frame. What type of caulking do you use, I was looking at Big stretch as a good caulking with the benefit of water clean up.
dday... we butt the casing tight... but the profile of the andersen casing holds the casing & sill away anyways
View Image
we caulk with DAP 50 year , which is also a water cleanup..
we caulk, tool with a finger, and clean all the excess off immediatelyMike Smith Rhode Island : Design / Build / Repair / Restore
Thanks, I appreciate the reply.
with the new wind code ... we have to put blocking in at the 4' edge of all plywood roofs.. this conflicts with the venting requirement.. so the vents have to jump over the blocking.. this leaves a void that will allow our dens-pak cellulose to plub ht events and fill the soffits..
so here's the vents jumping over the blocks...
and here's me foaming the voids...
then the 2" foam we're using on all of the slant ceiling..
and the foam in place...Mike Smith Rhode Island : Design / Build / Repair / Restore
today ( Tuesday, 10 August ).. we got our rooftop delivery of Hatteras shingles..
here's the boomtruck..
and the guys... and finished for lunch.. after lunch we went over to my house to set up the stuff for RhodeFest
Mike Smith Rhode Island : Design / Build / Repair / Restore
Edited 8/10/2004 10:13 pm ET by Mike Smith
Mike,
Will you strap the ceiling with 1x3's over the foam?
Jon Blakemore
yes.... actually , we've already done thatMike Smith Rhode Island : Design / Build / Repair / Restore
You guys move fast <g>
Jon Blakemore
"we have to put blocking in at the 4' edge of all plywood roofs.. "
trying to think outside the box...........,
Would this work in lieu of all that blocking, Like you do on the inside w/strapping, run
strapping on top of your rafters and 1x2's vertically in between horizontal 1x3's?
I think one strap every 4' might be easier than cutting all that blocking. Just thinking
out loud.
Your project really looks good, nice work.
Edited 8/11/2004 5:35 am ET by butch
it might... but since we did this roof.. the state has come down with aruling that 5/8 T&G roof sheathing will be accepted instead of blocking... just too late for us to take advantage...
looks like a lot of Advantech 5/8 T&G will be sold in the futureMike Smith Rhode Island : Design / Build / Repair / Restore
thanks so much for sharing your project and pictures
seeing all that roof decking makes me think of your riding mustachioed good friend ( name escapes me right now ) pray he is coming together w/ godspeed and has a hand in finishing that up w/ you
I've made sure I have some cold ones at the ready to toast you guys at your fest ( I'll also look for some microbrewery product from the northeast ) salud John
thanks , john... here's one of barry ( on the left).. he loaned us his laddervator when we sheathed the roofMike Smith Rhode Island : Design / Build / Repair / Restore
continuing with the mooney wall... here's the dining room corner where we had all of those tie-downs...
Chuck is gluing the fabric.. we put some blue chalk in the glue so we could see where the glue is... and isn't..Mike Smith Rhode Island : Design / Build / Repair / Restore
while the guys were getting on with the interior, i started the roof.. wanted to do one of the top-down jobs......
and i also wanted to try that system of marking the courses on drywall paper tape..
after all of the drip edge was in place i measured the roof and did the math for the shingle layout... this is Hatteras, so the normal course is 8"..with the ShingleVent II ridge vent we use.. this made 22 even courses at 7 13/16"... so i marked three tapes with that layout and nailed them to the ends and middle..
then i snapped my lines and started with the top of course #19....
hope Shazlett isn't too concerned with my emulation of his article in FHB..
here's the bottom left corner and some of the tape markings...
then the shingles at the ridge...
and yours truley just bangin away with our newest roofing gun ... one of the new Bostich..Mike Smith Rhode Island : Design / Build / Repair / Restore
Mike,
You are a total babe! Those glasses would make Paris Hilton proud ! I can't say anything. Check out my hat. These were taken today. I felt really cool. Didn't realize I didn't look so cool :-) Good thing I'm married eh?
That hat sure is an improvement from the last one!
At least you won't get hung up un those 16'' centers anymore!
All your missing is a peice of straw in your mouth! :-)
Stay Cool,
Erik___________________________________________
Common sense is a gift from God that cannot be taught.
tim... almost bought one of those Prazzi's at Quaker Lane Tool..
but decided to leave the big toys to you...
here's some more of our roofingfromthetopdown... alla Shazlett...
left side of the old roof , where we covered the valley intersection with the new matched addition..
and Chuck tucking the 2d to last course... found it was easy to tuck the 2d to last.. the last course is far easier with two guys.. and teh heat makes it possible to unstick the top Hatteras .. this is VERY aggressive adhesive..
and a pic of the drywall tape with the course layout markings..Mike Smith Rhode Island : Design / Build / Repair / Restore
here's the valley with the ridge shingles in place...
and the main roof looking good... the roof temp was about 110 deg with the direct sun..
these shingles would have been toast with boot marks all over them... gotta say..
hot weather.... or getting the ridge on for protection.. the top-down has a lot to recommend it.... including being able to load the roof and stage it in advanceMike Smith Rhode Island : Design / Build / Repair / Restore
while Chuck and i were playing with the roof.. Roy was running trim..
here's some of the Alcoa Probead vinyl soffit we use....
and Roy showing the freize to the owner
and some step flash .. we bend our own from coil stock and then cut off 8" steps..
Mike Smith Rhode Island : Design / Build / Repair / Restore
inside... the dining room is ready for cellulose to be blown in. with the 2" foam on the ceiling.. and the Mooney wall and insulmesh for the walls..
we got the stairs delivered and installed..
and the jacuzzi is framed and getting roughed-in..Mike Smith Rhode Island : Design / Build / Repair / Restore
1) ... yer gonna trim then valley shingles and not just wrap them around, right?
2) ... uh oh .... an owner with a tape measure AND a pointy stick!
3) ... You do stuff other than host parties??
JeffBuck Construction, llc Pittsburgh,PA
Artistry in Carpentry
jeff.. here's some more of your valley... and the finished main roof...
Mike Smith Rhode Island : Design / Build / Repair / Restore
yeah .. but what happened with that valley?
I see no W valley flashing ....
did ya weave ... cut .... what?
JeffBuck Construction, llc Pittsburgh,PA
Artistry in Carpentry
it's gonna be a california cut when we're done..hold your horsesMike Smith Rhode Island : Design / Build / Repair / Restore
whooaaa ....
JeffBuck Construction, llc Pittsburgh,PA
Artistry in Carpentry
shuff.. here's those pics of the soffit.. this is Alcoa ProBead.... with a 1 1/4 x 3/8 decorative molding at the fascia....
and the 7/8" upside down J-mold at the wall side.. the siding will slip up into the J-mold
also . a pic of the Andersen Sand tone windows the owner spray painted to match the new white windows
and a pic. of the Trex sills we use with our casings ..Mike Smith Rhode Island : Design / Build / Repair / Restore
Mike, thanks for the pics i feally like the Probead looks great. that has a much better look than traditional vented soffit. great moulding at the fascia too, really looks good. thanks for your input and pics, really nice to learn from others. thanks again.
shuff
ready for the main roof.. here's the 4 layout tapes in place to keep it aligned across the gable...Mike Smith Rhode Island : Design / Build / Repair / Restore
So Mike: you use just regular drywall paper tape stapled to the underlayment and then do your layouts on that? Is that because the RTGII is harder to mark on than regular felt? Full time roofers around here don't use much layout, but I like to chalk a line for at least every other course. chalk 2 vertical lines to keep things going straight up the roof too. Matt
no... the way i conceptualized it ( phrase just kinda rolls off your tongue , don't it ? )
i measured the roof ... subtracted my cap overlap... took out my Construction Master II calc.... divided by the course exposure.. this was 8" with Hatteras..
anyways it came out to 22.6 courses.. so i used 23 courses ....
and the exposure was 7 13/16...plugged that into the calc. memory and punched out the sequence... 7 13/16...... 15 5/8..... 23...... etc..
laid out the drywall tapes on a plank and marked them.... the marks are 1, 2, 3, 4....etc.. for course number 1..2... 3... all the way to the top....#22
then we aligned the bottoms with the drip edge and snapped any line we wanted..
helps me to think my way thru rather than 4 guys on a roof yelling numbers back and forth....roofers that do it every day have their own tricks... guys like me and my guys need a little help to get it right
but hey, whadda i no ?Mike Smith Rhode Island : Design / Build / Repair / Restore
here's the roofs again.. clipped and gable dormerMike Smith Rhode Island : Design / Build / Repair / Restore
Mike:
I never quite got the reason for the clipped corner. Was it a zoning/setback thing, a style/design thing or what?
BTW - you do super work. (What else is new? ;-) ) One thing that I most respect is that you have built up a clientele that can/will pay you to do the excellent job you do. For example, being in the mid-south, people around I can guarantee have NEVER seen an insulation job as thorough as yours.
BTW - re your Trex sills... What do you think of the vinyl sills they now sell?
Have a good one,Matt
matt.. the clipped corner was a zoning setback issue.....
vinyl sills ? do you have a link ?Mike Smith Rhode Island : Design / Build / Repair / Restore
http://www.royalmouldings.com/
although thir web site is not too good. They have a bunch of dirrerent profiles. It is called "Never Rot" and is actually a cellular vinyl PVC
Matt
thanks .. i found the mouldings...but i couldn't find a sill profile.. have you used any sill ..
do you know how much it costs ?Mike Smith Rhode Island : Design / Build / Repair / Restore
I have not used the sill, but I have use the brick mold and the one by. The brick mold is about $11 for 8' and the 1x4 is about $21 for 12'. The brick mold also comes in a 3 pc "door kit" for about $20. I also used it on my own house around the garage door. I know that it is a permanent installation, but also know that it's hard to keep it caulked because it expands and contracts.
Matt
finished all the high roofs..... wanted to get our insulation done so we'll be ready for blueboard & plaster..
got 186 bales of borate cellulose and started on the 2d floor with the sloped ceiling portion..
here's what it looks like behind the 2" foam....
Mike Smith Rhode Island : Design / Build / Repair / Restore
Edited 9/3/2004 9:31 pm ET by Mike Smith
ok..... here's what it looks like...Mike Smith Rhode Island : Design / Build / Repair / Restore
anyways..... this is a 2x8 rafter bay so there is enough room to get above the ceiling..
lower the nozzle all the way to the soffit dam.. and pull it up as it packs..
chuck is running the hopper..
i'm taping extensions onto the nozzle.. and up in the attic blowing the slopes from the bottom up Mike Smith Rhode Island : Design / Build / Repair / Restore
Just stumbled back here. Still lookin' good. That top down roof really does work,eh?
I think it was John Caroll who wrote the FHB article, wasn't it? He's sort of a neighbor, and this area needs all the credit it can get<G>
So, what, you on vacation AGAIN? Don't worry, we can fix that later!
Mike--
Not sure I'm following all the details on this insulation job. Looks to me like you've got Raft-R-Vent glued up to the underside of the roof deck with canned foam, then 2" rigid foam board nailed up on the rafter bottoms, then blown in cellulose to the cavity thus created between the Vents and the rigid boards. So, I say, scratching my head, where's the vent cavity? Unless you just foamed the edges of those vent panels, I musta missed something somewhere along the line....
Dinosaur
'Y-a-tu de la justice dans ce maudit monde?
guess you did..
the propa-vent is continuous from the soffits to the attic.. the foam is to seal the edges to keep the cells from clogging the vents..
these vents had to jump over a 2x4 flat block which left the gaps that needed sealing...Mike Smith Rhode Island : Design / Build / Repair / Restore
Gotcha. It was the 2x4 I missed. Makes perfect sense now....
Dinosaur
'Y-a-tu de la justice dans ce maudit monde?
I like that combination you used to insulate the rafters while allowing ventilation. What do you end up with, around an R-30?
I've seen other people using Raft-R-Mate. Does that small gap it creates really provide enough air flow to keep the space ventilated?
Previously we had nailed furring strips (1x3) inside either side of the rafter and then cut EPS to sit on the strips (which created a gap the thickness of the strips). Nailed the EPS to the strips and then put fiberglass rolls in. Seems like that Raft-R-Mate would be a WHOLE lot easier! And you lose less space to your ventilation.
Personally, I'd like to see more rafters in new houses. Seems like such a waste of space using standard trusses.
jt8
here's the latest....the guys have been siding outside and finishing up the minor details inside to prep for the board hangers..
outside we're putting up vertical siding .. prefinished cedar shiplap
and a sill detail .. we make our sills out of Trex..
and the entry ceiling with the solid Alcoa ProBead..
a long view of the siding and..
another view of the gableMike Smith Rhode Island : Design / Build / Repair / Restore
Looks GREAT!!!
I sure am glad you take the time to post these pictures
keep em coming, Mike
As usual, looks good!
jt8
the board hangers showed today.. all 7 of them.. 160 twelve ft. shts..started at 7:30
two guys up.. one in the closets... one on the patches.. the other three took the rest... they finished by 3...
tomorrow they go to Martha's Vineyard for a 600 sheet house
here's the 2 on the slopes of the 2d floor
and the closet guy...
and the 3 working the ceiling of the bath
Mike Smith Rhode Island : Design / Build / Repair / Restore
Edited 10/5/2004 8:50 pm ET by Mike Smith
Good drywallers are an amazing site to watch. Stuff that would take me a couple weeks, they do in a single day.
Mike, who gets to play with the mud?jt8
I could be wrong, but down in Mike's neck of the woods, the rock you likely see in the pics is blueboard, not gypboard. It is the base for a veneer plaster job, and the plasterers will come in after the board hangers, and knock out the job in about three days. No dust.
Bob, I realize I'm going to restoration purgatory, but I've never put plaster back in (old lath makes really good kindling). I've never even bothered to get a quote, assuming that it will be 2 or 3x as much as drywall.
Am I correct on my guess? (just thinking ballpark here, not accurate numbers).
jt8
Sometimes the look and performance are worth the extra cost. A plaster (or in this case a veneer of same) wall looks and sounds so much more substantial than drywall that it is worth it to some people. I grew up with smooth plaster walls, so the textured drywall in my own home is always something of a disappointment. Around here the drywallers don't even quote on smooth finishes, it just isn't done.
Aye, but here's the rub. A veneer plaster over blueboard job in RI, eastern MA and CT, will go for maybe just a tiny bit more than a messy dusty time consuming mud job over sheetrock.
It is a regional thing. There must be good plasterers there, and some real competition.
Roy & Chuck continue the siding.. here's the circle top gable end..
the curved casing is ripped from some Koma 5/4 x 12..
and the Owner is painting the trim around the windowsMike Smith Rhode Island : Design / Build / Repair / Restore
>>"and the Owner is painting the trim around the windows"
How's your liability insurance?
Jon Blakemore
Mike,
Forgive me if I sound stupid, or you covered this elsewhere, but I was curious about the siding details. I see horizontal and vertical runs of tarpaper, so I was wondering if you put horizontal runs under the vertical just on the lower part of the wall, and why vertical runs on the bulk of the wall? What additional steps you take to compensate for the vertical siding (as opposed to horizontal)?
Keep 'em comin'. I love seeing your work.
Froed
the original house had 90 wt. paper under 1x6.... 1x8 spruce boards.. butted.. no shiplap..
this is cedar shiplap.. we have flashing at all horizontal trim.. and we have 15# felt behind the siding with ice & water (Grace) splines at all the windows and doors..
wether it's horizontal ... or vertical... all of the felt laps to shedMike Smith Rhode Island : Design / Build / Repair / Restore
Thanks for the info. I appreciate the response.
hot and muggy today... perfect roofing weather , right ?
anyways , didn't set any records today.... got the back of the main roof done..
and most of the gable dormerMike Smith Rhode Island : Design / Build / Repair / Restore
Mike:
I'm going to do the same window trim treatment on 2 houses I'm building so I have a few questions about the window sills/trim you all install:
1) It looks like you are using 5/4 decking boards - is that correct?
2) What do you do with the gap between the top of the Trex sill and the bottom of the vinyl window sill?
3) Is that body putty I see you using to cover the screw holes?
4) What do you use for the casing – is that Hardi 5/4 x 4 I see?
5) Any specific recommendations for weatherproofing when using this style window trim treatment, other than just using adhesive flashing tape around the windows? Alsi, I plan to use metal drip cap above the head casing.
To all: Just to remind everyone, below are the links to the previous pictures:
This type of window trim gives a very traditional (historic?) look, but is not very common here on new construction in NC. The city is requiring us to use this type of trim detail.
Thanks Much,Matt
http://forums.taunton.com/tp-breaktime/messages?msg=44500.106
http://forums.taunton.com/tp-breaktime/messages?msg=44500.129
Edited 11/24/2004 7:48 am ET by DIRISHINME
Edited 11/24/2004 8:03 am ET by DIRISHINME
matt... i'm in Charlotte recovering from a tryptyfan attack ( too much turkey )
saw your post..
lessee..
we use old style Trex .... i think the bevel ( and all of the angles ) is 10 deg.
we get two pieces of sill from each piece of Trex.. mind... this is "old style "Trex which is 1.25" the new style is 1 1/8" so a couple things result... you can go to your supplier amd offer to take their old inventory off their hands at a reduced rate.. or you can make your sill from the new stock which is a little bit harder..
the casing is 5/4 GP Prime trim.. but we've also use Koma ( same as Azek) pvc..
we predrill the sill stock from the back to the front so we have more control over exactly where the screw will enter the rough framed sill under the window..
the gap between the window unit bottom and the top of the Trex sill is caulked before painting..
and Trex loves paint..
we typically use bondo for filling the screw holes..
View Image
Mike Smith Rhode Island : Design / Build / Repair / Restore
Thanks Mike. I'm gonna copy your sill method... Not sure how much luck I'll have finding the old Trex decking though. I think they stopped selling that around here at least a year ago, and there is only one Trex dealer I know of that keeps much of anything in stock. I guess I could contact the local Trex rep too. I know him from being involved in the Trex Pro thing... Matt
matt... we'll still be using the new Trex when we run out of the old thicker stuffMike Smith Rhode Island : Design / Build / Repair / Restore
here's move-out day.. 11/3/04...
I'll go back and get some more pics... the Owners did a nice job of the exterior painting.. and they still have a lot of work on the interior painting.. but all-in-all.. nice job
for some reason i haven't been able to post pics for a couple of weeks
when i click on "attach files"...... nothing happens.. nothing
Mike Smith Rhode Island : Design / Build / Repair / Restore
when i click on "attach files"...... nothing happens.. nothing
Mike, do you have Pop-ups blocked?
If you click on the link below, does it pop up in a new window, or does it do nothing?
http://www.taunton.com/
I've had to do a lot of work on Mom's PC. Her Mcafee security suite was causing all kinds of trouble. Firstly it was blocking ads, so then she couldn't compose Yahoo email messages. Secondly, its anti-SPAM was registering 99% of her email as SPAM (and making it disappear).. when only about 5% of it was really SPAM.
Thirdly, it turned on all her auto-updates, so she was virtually unable to surf the internet, cuz either the 6-program security suite, Windows, or HP wanted to update something (so her dial-up ground to a halt).
I should have just had her buy the anti-virus & firewall, not the whole security suite.
jt8
Edited 12/16/2004 1:51 pm ET by JohnT8
john.. it opens a new window..
i can post attachments from my computer at home but not here..
Mike Smith Rhode Island : Design / Build / Repair / Restore
Hmm.. hard to say without looking at it. I assume you were able to post pics from the work PC prior to a couple weeks ago? Nothing comes to mind at the moment. You could always try my Internet Explorer voodoo cure:
Tools --> Internet Options --> Temporary Internet Files "Delete Files" --> toggle "delete all offline content" OK --> delete cookies --> OK
Occasionally some of your temp files or cookies will interfere with the way a page is loaded. On the hard drive, these files are located: C:Windowstemptemporary internet files (assuming XP).
jt8
got some pics finally.... and i can actually get them to load
here's the final.. with a snow landscape...prettier than the mud underneath
View Image
Mike Smith Rhode Island : Design / Build / Repair / Restore
Edited 2/5/2005 10:44 pm ET by Mike Smith
two more shots of the exterior... the entry...
and the south gable end...Mike Smith Rhode Island : Design / Build / Repair / Restore
about two blocks south is a 1890 shingle style we remodeled about 10 years ago
here's some of the shingle details...... the detail around the new foundation pilasters is unique...
i know.. i invented it....
the 2d floor overhanging porch had sagged about 6 inches.. so we jacked it and poured new sonotube footings for the posts... but now we had 12" diameter piers to conceal.. so....
View Image
Mike Smith Rhode Island : Design / Build / Repair / Restore
Edited 2/5/2005 10:52 pm ET by Mike Smith
Edited 2/5/2005 10:52 pm ET by Mike Smith
Very nice, Mike. Both jobs. Tasty.
Sure would like to see you Yankees embrace roof overhangs, but I know it wouldn't be historically accurate.
Sure would like to sink my teeth into a project like that addition someday. Keep it up, man.
jim... i love roof overhangs.... when i'm doing the design i usually try for about 16"
and at least 12".. i want to keep the water away... and i hate guttersMike Smith Rhode Island : Design / Build / Repair / Restore
Mike, It looks like you succeded.......
made that addition look like it was always there.
You can't tell where the new and the old meet
Very well done...imho
Thanks for sharing
Oh yeah, almost forgot, tell that
homeowner someone left the window open over that
entry way.
i noticed that too... sure hope everything is ok...it was mighty cold last week and they're out of townMike Smith Rhode Island : Design / Build / Repair / Restore
Mike, that one turned out really nice. Did you have any finished interior shots? jt8
Our lives improve only when we take chances -- and the first and most difficult risk we can take is to be honest with ourselves. -- Walter Anderson
no... but i'll get some... the owner is doing the interior finish... we hung dors and ran trim..Mike Smith Rhode Island : Design / Build / Repair / Restore
someone was discussing roof shingling from the top-down..
i know it's in here someplaceMike Smith Rhode Island : Design / Build / Repair / Restore
went to my "high interest" list and saw you had a new post here - and here you are wondering where that upside down post is
not 100% sure but I don't think you started that thread where you gave a very succinct outline of how to cover your adze from the top to the bottom and most of all keep things horizontal / parallel to eave
taint in this thread I don't think
john.. i think it starts here....
http://forums.taunton.com/tp-breaktime/messages?msg=44500.120
Mike Smith Rhode Island : Design / Build / Repair / Restore
Mike
Sorry to bring up an old thread, but definately good stuff here. I have a few questions if you do not mind.
A detail that maybe I missed is the exterior top casing/moulding of the windows. Do you have any closeup pictures before paint? You also mentioned having to use slightly smaller "new trex" for your sills and that they are more work in making the proper profile. http://forums.taunton.com/tp-breaktime/messages?msg=44500.167 Can you expand on that? Also, what kind/brand of caulk do you use betwen the sills (and also casing) and the window? I know this is a lot of questions, I hope you do not mind.
Phil
P.S. As I said, you should write a book!
phil... i'll see what i can dig up.
this link goes to the two pics of our typical Trex sill..
http://forums.taunton.com/tp-breaktime/messages?msg=44500.106Mike Smith Rhode Island : Design / Build / Repair / Restore
Thanks Mike. Yeah, I saw those pics. I searched the whole thread and also searched the site looking for trex and your name, looking for the top of the window detailing. If you have pix that would be great.
Did you 45* mitre the tops or some other 90* detail?
No rush either.
thanks
Phil
the caulk we use is DAP 35 year, Acrylic Latex Caulk plus silicone
same stuff we use for almost all of our exterior / interior workMike Smith Rhode Island : Design / Build / Repair / Restore
phil.... here's some pics of the trex sill stock.. old trex used to be 1 1/4..
new trex is 1 1/8... you can still do it.. just reduce the rabbet by 1/16, and the face by 1/16
View Image
teh new Trex is on the left... the old Trex is on the right
the other two pics are our typical casing detail..
5/4 x 4 side casing and 5/4 x 6 head casing over Trex sill the casing is usually GP PrimeTrim
Mike Smith Rhode Island : Design / Build / Repair / Restore
Edited 10/18/2005 9:42 pm ET by MikeSmith
Thanks Mike for taking the time posting the pics. Beautiful work. I am going to copy your details.
From the pics it looks like the head casings are square cuts, right? Not 45* miters.
Is there a Z-flashing or drip edge above the head casings?
Thanks again,
Phil
most of our head casings are butted, not mitered.. i have a healthy dislike for miters outdoors..
anyways the head casings run from outside of side casing to outside of side casing, and they run up & out at 30 deg,
i usually have to hide the biscuit jointer so Roy can't biscuit them.. i like nails ( SS )
we use a head flash on all our head casings unless they are right under a soffit or a frieze
Mike Smith Rhode Island : Design / Build / Repair / Restore
Edited 10/19/2005 12:24 am ET by MikeSmith
OK Smith, you better not be selling me a bill of goods on that Advantech crap. I'm leaning towards using it on my next project. Somewhere in the back of my mind is this thought that someone has tricked me into using water resistant particleboard.
Got a lumber yard about a mile up the road from the next project. They have free delivery. Their prices:
3/4 ply was $32 (what I usually use and prefer to pay $14-20 for assuming no natural disasters or wars)
3/4 Advantech was $30
The rental place is across the street from the lumber yard. Looks like I got "location, location, location" on this one :)
jt8
"Real difficulties can be overcome; it is only the imaginary ones that are unconquerable. " --Theodore N. Vail
Mike, I really hope that I can make it. I'd love to meet everyone! I don't want to whine but my summer sucks. Here's what I'm facing:
Overseas this coming week (leave Sunday, home Friday)
Home for one week
DC for week of 20 July
Charleston, NC for week of 26 July
Georgia for weeks of 2-13 Aug
Home 14-29 Aug (no trips planned yet)
Overseas 29 Aug - 10 Sept...
I could go on until April 2005
I really, really hope I can make RhodieFest. It beats what I normally do. Peace!
"When I read about the evils of drinking, I gave up reading." ~ Henny Youngman
geesh, roger... how's your frequent flyer miles ?... anyways.. lots of people would love to see you.... and anyone else who's reading this .. you're invited too !Mike Smith Rhode Island : Design / Build / Repair / Restore
"i think you are talking about one of the valley rafters extending to the ridge , right ? and then the other valley rafter frames to that ?.... "
Yep, There actually not to hard to figure out. (Pic attatched)
Since there will be a 10' ceiling line I guess it doesn't matter what way you frame it. I always open my mouth to soon :-)
Keep the pics coming I enjoy watching others bustin the butt for a livin' too :-)
Stay cool,
Erik
finished the sheathing and papered-in with RoofTopGuard II ... drove the last nail at 3:17 cleaned up .. and everyone is gone for the 4th until Tuesday
here's the rear.....
the ridge.....
the gable end.. with 4' of plywood left out so we could get in and out...
and the long view...
all of the valleys have ice & water.. and the RTGII is also an ice & water.. great stuff !Mike Smith Rhode Island : Design / Build / Repair / Restore
Probably single pitched in the front....and possibly double pitched in the back , we ran into that problem once before
Shavey
jon.. here's the beginning of the valley framing for the intersection of the two roofs..
and... the clipped corner framing
and the cathedral gable dormer...Mike Smith Rhode Island : Design / Build / Repair / Restore
Thanks for taking the time to post your progress pics. I found them very interesting. The crane certainly came in handy to hoist things in place.
K Ross
Edited 7/1/2004 10:13 pm ET by great white north guy
great white.. is that you , jim ?.. where you been ?Mike Smith Rhode Island : Design / Build / Repair / Restore
Sorry, Mike. Just a crazy canuck in Ontario. Have a good one.
nicknames and internet names...remember ? ... mike & ike, they look alike...
s'sok...... welcome .......Mike Smith Rhode Island : Design / Build / Repair / Restore
"some people should stick to landscaping....."
Right - so they can pitch the drainage towards the foundation!
;)
Welcome to the Taunton University of Knowledge FHB Campus at Breaktime. where ... Excellence is its own reward!
Whats that stuff you used for sheathing? ;) It seems I saw that used many years ago, but now all the house builders around here use cordboard.You get out of life what you put into it......minus taxes.
Marv
wall sheathing is that quaint olde 5 ply fir plywood ( 1/2" )
go figgerMike Smith Rhode Island : Design / Build / Repair / Restore