900 CFM dust collector makeup air
peteshlagor
| Posted in Construction Techniques on
First, I’m in the south Denver snob-burbs. 300 + days of sunshine a year. A few nasty ones with below 0. But usually quite mild overall.
I have a one story with full walkout basement. Small lot doesn’t allow any other structures.
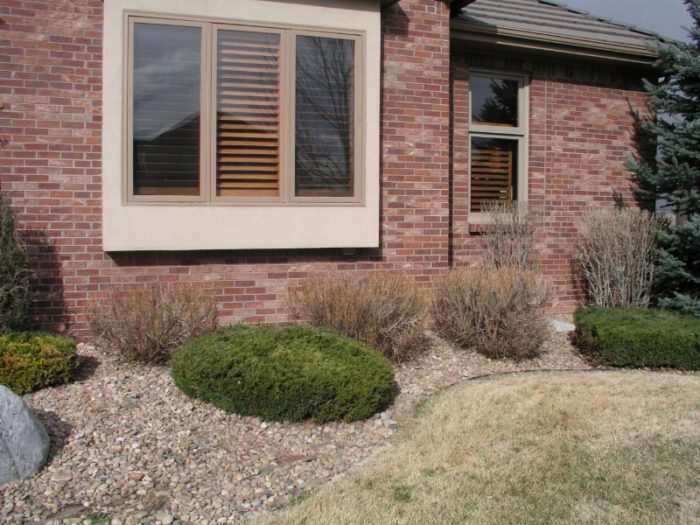
This is the front of the house. Note the spruce on the right. And the bumped out window of my office in the middle.
See that something hanging from the right side of the window structure? That’s the plastic cover for my Xmas light circuit.
Continued…
Edited 2/2/2007 4:45 pm ET by peteshlagor


Replies
Now, just to the left of that spruce, looking down we see the exhaust vent for the dust collector.
View Image
This was constructed out of a 24" dia, by 12" long concrete pipe, cut vertically in half. A half sits a top the other, and both cut ends are siliconed to the brick below grade forming the half circle. The bottom is poured and smoothed concrete draining to a 3" pipe going to daylight around the side of the house.
The custom steel grid covers the well and provides air movement. That's a 7" SS pipe coming out the house and angled 45° down. The pipe was completely siliconed as it passed thru the wall.
Both are the same pic, but of different sizes.
Edited 2/2/2007 4:46 pm ET by peteshlagor
On the other side of the window is my office. Note the raised paneling.
View Image
Edited 2/2/2007 4:47 pm ET by peteshlagor
Under that office is my workshop.
We all have our own personal definitions of "Our Workshop." This is mine.
Not totally done, as I got the floor to deal with after I had the floor drain installed. I need to came back with a shotblaster to clean off the old epoxy, grind for smoothness and reapply a new surface.
The shop originally was unfinished basement representing space equalling 2 open rooms 10 x 12 next to each other, off set by 3'. So ruff of 240 ft.²
The first looks towards the right of the outside picture or towards the sink area.
View Image
The second from the other side, looking towards where the first was taken from.
View Image
Note the corner cabinet to the right of the sink.
Edited 2/2/2007 4:48 pm ET by peteshlagor
Edited 2/2/2007 4:49 pm ET by peteshlagor
That cabinet hides the collector. This picture shows the doors open.
View Image
If you can, look inside the open wall cabinet, and behind the upward angling pipe is the exhaust vent going into the wall - which is the inside of the earlier outside picture.
This room is traditionally framed with 1/2" drywall over 2x4 studs, 1½" air gap and then 1½" of foam insulating board against the 9" concrete poured walls. The exhaust of the collector is rectangluar thus causing the need of a transition to round. That transition piece is in the wall framing. The exhaust itself bolts to a 1½" thick, 16" wide piece of red oak solidly attached to the framing. This oak also serves to be the mounting piece for the cabinets when installed.
The upward angling pipe goes into the overhead plenum above the ceiling tiles. Up there, it branches into eventually five outlets. One can see two of them dropping down out of the ceiling.
The wife gets freaked over dust and too much noise. The room is fully insulated with 3½" batts in the walls and 10" up in the 12" I joists. I overlapped the batts when stapling so they would serve as a form of vapor or air barrier between the rest of the house.
This second picture is of the entrance double doors into the shop. Although these are interior doors, I had the mill shop frame them with exterior framing. Note the weatherstripping. Basically, this shop has been completely sealed off from the rest of the house.
So when the dust collector is running, where's the makeup air coming from?
Edited 2/2/2007 4:50 pm ET by peteshlagor
This is my desk area of the shop looking up - slightly turned towards the sink side of the shop.
View Image
Note the ceiling vents. The two near the middle section are incoming heat ducts. The one off to the left of the photo is simply a vent between the plenum and the room. In the subsequent photos, you'll see other vents. All save for these two heat vents, are plenum vents.
Their purpose is to keep the air pressure above and below the ceiling tiles equal.
Edited 2/2/2007 4:51 pm ET by peteshlagor
From practically the same position, this photo shows the ceiling with that middle ceiling tile removed.
View Image
Inside we can see the pants Y for the heating ducts, but behind that, one can see the lined air vents leading up into the framing plates of the exterior wall framing. There are 5 of these vents sized 2½ x 14 that we cut into the bottom plate going up into the exterior wall framing. 5 x 2.5 x 14 = 175 in². All 5 of these ducts feed into the plenum. Following pictures will follow this further.
One the other side of the room is a converted 6" former intake combustion air duct for the furnace. At the same time I did this shop, I had the furnace pulled and replaced with a power vented high efficency unit. Therefore, I redirected this unneeded supply air into the shop. 6" pipe = 113 in².
Total of 288 in² of incoming makeup air. The BI says his rule of thumb for makeup air is twice the size of exhaust. The exhaust of 7" equals 154 in². He says those numbers are close enough considering the combustion devices are self fed and sealed off from this room.
Edited 2/2/2007 4:52 pm ET by peteshlagor
Back upstairs to the office. (pictured again)
View Image
I had my trim carp carefully disassemble the paneling around the bottom of the window. This gave us access to the drywall behind, which we cut out to gain access to the stud bays above the previously mentioned bottom plate.
After removal of the insulation batts, we could see down into the shop, as well as the base of the framing for the bumped out window. Here, there were 2 x 12's extending out for the window. And they were open into the space under the window. (Sorry for no pictures of this, it's been since closed up.)
From the outside, the bottom of this bumped out window was simply EIPS'ed over. We cut through this and could see from the office out. Then we installed these vent covers.
View Image
Before closing up, we installed 6 x 12 dampers into each bay and sealed up around them. This allows air to come in, but no to go out.
Upon replacing the paneling, the wife had no idea surgey was done on the wall.
Although one could criticize the removal and non replacement of the insulation, as I first mentioned, the weather is usually mild. After two winters, this is not an issue.
Remember I mentioned the hanging outlet cover for Xmas lites? there were actually 6 bays under the window, but one was too small for the damper. However, since I was doing major electrical upgrades, it made a perfect spot for a dedicated Xmas lite outlet. This third picture shows the timer on the wall that controls two 20 amp Xmas lite circuits.
View Image
Edited 2/2/2007 4:54 pm ET by peteshlagor
Edited 2/2/2007 4:55 pm ET by peteshlagor
Edited 2/2/2007 4:56 pm ET by peteshlagor
This is the wall where I plan on having some form of dust creation machine. Note the 30 amp outlet, as well as the floor dust sweep. Kinda difficult running the pipes down inside the wall, especially making the curve overhead to avoid the steel supporting beam. Had to fur out the wall inside the furnace room to make room.
View Imagee This shot shows the gate valves attached to the overhead pipes. This is a 4" and a 5".
These pipes are connected using clamps. They are quite easy to disassemble and reassemble if needed. I've got a couple of pieces laid out for review. These pipes have been purchased from a local industrial dust collector supplier. His selections were vastly superior to those offered by Oneida. Even these gate valves are SS.
View Image
Among a few other items of mention is the corian counters and the front edging.
The mirror to the right of the bench opens to reveal the water meter access.
Note the end of the wall cabinets. Since the top shelf is kinda high for a stump like me, as well as this bank of cabs being a bit over 8', I felt it would be a great place for the storage of longer stock up to 8". This shot looks into the end with the end door open. The other looks across the front with the doors open.
View Image
View Image
I've tried to take shots under various lighting. You'll note the 4' 4 bulb t8 fluorscents. For this (now reduced) 240 ft² room, I use 8 of these troffers. I also have direct halogens task lites for the bench. Bright enough to do surgery. Or if not, one bank of lites can be turned off as needed.
The sink is actually a photography sink (SS). I was so impressed with the size and flexibility of its use, that I had to have it. Has the full plumbing package, including bottom feed adn temp control for water bath purposes.
I'm planning on having a custom hood fabbed to fit over the sink. The 7" exhaust piping is already in place.
The cabinetry was custom. The cabinet maker used my drawings for his plans and delivered the raw structures for me to finish. Two coats of fruitwood Watco over this #1 cherry followed by 2 of a 1½ lb cut of amber shellac. Used 3" utility knive blades as a scraper and lite sanding between coats. Then 6 to 8 coats of Target Coatings water based Ultima Spray Lacquer. Frankly, I've yet to see and feel manufactured cabinets with a smoother finish.
The printer is a networked machine. I have two of the house's network terminals ending in this room.
There's a lot more in these pic's but I'm sure I'm boring some.
On the other hand, I'm not going to show the secret hidden alcoves for contraban & such.
I guess this is what happens when a DIY'er has some extra $ and time on his hands...
Thanks for taking time.
Edited 2/2/2007 4:57 pm ET by peteshlagor
Edited 2/2/2007 4:59 pm ET by peteshlagor
Edited 2/2/2007 5:01 pm ET by peteshlagor
Edited 2/2/2007 5:02 pm ET by peteshlagor
I read your post and was awestruck by your shop - cleanliness, design, anal-ness, expense. Wow. MAybe everyone else is too awestruck to comment? :-)
On a serious note, that is an impressive job you did to get the make-up air solution installed as you did. I may borrow some of the ideas for make-up air for my new range hood. My shop is messy, and my dust collector uses filters, so no need out there.
-Tony
cleanliness
Those cabs and drawers hold alot. But for real - I'm not done yet. For instance, I plan on putting a full size wood working bench under those wall cabs.
design
I'm sure the next guy following me won't want exactly the same things. So the collector could be pulled and that section refitted. The sink too, but I was thinking that some Italian women like a second downstairs kitchen which this could be turned into easily.
anal-ness
Can't argue. But most of us do that when and where we can.
Is there noticable dust with your filtered machine? I mean that real tiny stuff that could slip thru the bag? Or how about smells from say a dull saw blade smoking up the place? Or don't you do that?
Awestruck is right... your shop is nicer than where I live.
Congratulations, must be a great place to make sawdust ;)
PaulB
Why the need for make-up air ? My oneida system has the pleated cartridge filter, the only dust that comes out of it, is out the bottom when I remove the pan. I get about equal mess when I empty the drum. It did not make sense to exhaust the warm air out of my shop for dust collection.
Vented out side because this shop is inside the building envelope, being heated and cooled by the house's HVAC system. I would loose my manhood if there were to be a layer of dust develop on her piano upstairs.
I'm concerned about the microscopic dust and smell that could come out of the pleated filter.
You apparently have good success with yours. But would you run a computer in the same room?
You are correct about the smells. I would consider having a computer in the same room. I would be more worried about the uncollected dust that I create affecting it than dust from the collector exhaust.
MDF dust. Computers & monitors can hold a lot of that stuff.
It's worse than DW dust (or equal maybe).
Joe H
That would be my concern. The dust that goes thru my oneida collector is contained better than the old china 4 bag unit I had. When the old unit started dust would filter thru the bags. The oneida exhaust is clean.
If I cut mdf some dust will fly off a blade or cutter and be air borne, the collector does not catch that dust. That dust would bother a computer or other equipment. I just don't worry about my collector exhaust contributing to the problem.
It probably would have been easier to keep the basement shop at a slight negative pressure with respect to the rest of the house. This could have be done with an exhaust fan that vents basement air outside. By doing this, you would ensure that any fine or odors get carried away from the living space by the make up air (coming from structural leaks). If some time was spent thinking about it, a few well placed "leaks" would ensure that fresh air was continuously swept across the computer stuff.
By the way, nice looking shop.
David
I used to blow mine out occasionally, just air nozzle into the case. Lots of crap came out.
I don't know if they die any quicker because of all that dust, if they don't die they obsolete so what's the difference?
Gotta say I was kinda sad when my 21" Hitachi went belly up, but it was about 5 years old.
Joe H