FHB Logo Facebook LinkedIn Email Pinterest Twitter X Instagram Tiktok YouTube Plus Icon Close Icon Navigation Search Icon Navigation Search Icon Arrow Down Icon Video Guide Icon Article Guide Icon Modal Close Icon Guide Search Icon Skip to content
Subscribe
Log In
  • How-To
  • Design
  • Tools & Materials
  • Restoration
  • Videos
  • Blogs
  • Forum
  • Magazine
  • Members
  • FHB House
  • Podcast
Log In

Discussion Forum

Discussion Forum

applying texture to walls….

chrisfox | Posted in General Discussion on March 8, 2007 07:19am

I posted a few weeks ago about this, now just getting around to testing the texture tonight. A co worker has a Texture Pro hopper gun by Walboard. Attached are a few pics. I am using a tip that has .25″ opening, the largest he has. The area I am doign first is in a walk in closet, not so picky here but the bathroom other side of wall is critical to blend in as best as I can.

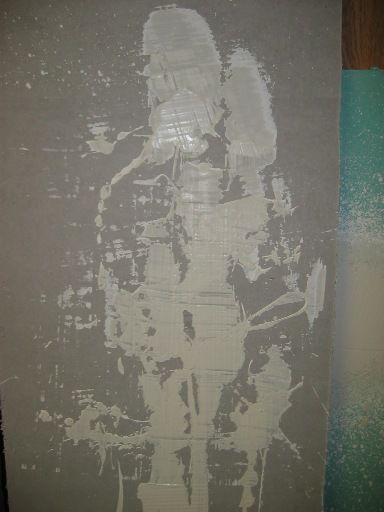
I mixed mud to oatmeal consistancy and get small grouped together mud plater that pretty much covers the entire area. (see attached pic) The air is set at 25psi.

I mixed in very little water – not much of a difference.

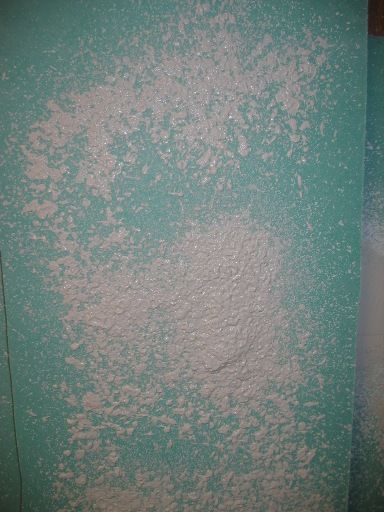
I experimented with flicking it on(attached is a pic)

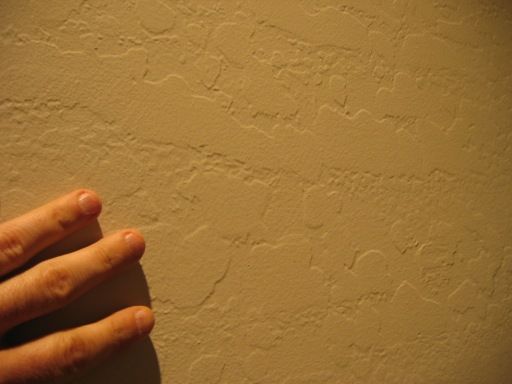
Also attached is the texture of the eniter home which I am attempting to match, my hand is in the pic to show scale. The texture looks very thick blobs that have been knocked down with alot of area between – not so close and thick.

Any ideas to pass on?

thansk again for the all the help.

Chris


Reply
  • X
  • facebook
  • linkedin
  • pinterest
  • email
  • add to favorites Log in or Sign up to save your favorite articles

Replies

  1. rez | Mar 08, 2007 07:32am | #1

    I was just going to say that first pic looked ok then I read it was the existing. Roar!

    Tim or others should be along to help you out.


    Cheers


    every court needs a jester

  2. 1muff2muff | Mar 08, 2007 07:39am | #2

    Are you trying to match the existing? (new here missed first part)

    1. chrisfox | Mar 08, 2007 09:17am | #8

      1muff...

      I am remodeling a master bath and added a pocket door to a closet, the walls are vaulted and need to blend in the texture. I hate texturing, now spending the time trying to get the hang of it. I only need to blend in a 8 sq ft of wall.

  3. calvin | Mar 08, 2007 07:40am | #3

    sorry, can't comment on the mix.  How long did you wait till you knocked it down.  Looks like it was too soft when you hit it.

    A great place for Information, Comraderie, and a sucker punch.

    Remodeling Contractor just outside the Glass City.

    http://www.quittintime.com/


  4. 1muff2muff | Mar 08, 2007 08:00am | #4

    Your existing reminds me of afloor leveling mix I used years ago. It would go from a liquid to a solid about 30 seconds after a wet mix. Flick it, and hit it with trowel.


  5. IdahoDon | Mar 08, 2007 08:00am | #5

    What are you knocking it down with?  A lightweight knockdown blade is much easier to use than a 12" knife.  The key is waiting until it's starting to firm up, but not so firm that it can't be flattened.

    Practice with slight variations until you get it.

    I like a little more pressure (50 lbs) and simply adjust the air delivery ball valve to what works best.


    Beer was created so carpenters wouldn't rule the world.

    1. chrisfox | Mar 08, 2007 09:20am | #10

      I am using a large heavy staright edge knife that the co worker had stuck in the box, so scraping the set mud(20-30min) at 45 deg. I will increase the air flow.

      You think thickening the mud(less water) would give me the heavy blobs? 

  6. dovetail97128 | Mar 08, 2007 08:06am | #6

    I am no expert and I may well be wrong but I am thinking that what you have in the existing is not a sprayed on texture that was knocked down. It looks more like a hand applied "brocade" .
    A "brocade" here is put on by using a simple tool that looks like an plaster hawk with carpet ot plastic wrapped over the top of it, after applying the mud the mud is "knocked down" using a broad knife.
    Similiar to the old hand plastered look that was done with a plasterers trowel in a "skip" fashion.

    1. chrisfox | Mar 08, 2007 09:13am | #7

      Dovetail,

      This is a semi track Phoenix, AZ home(1995), so figure guys tear through these houses pretty fast. My guess it would be with a hopper. I will have to reseach Brocade technique a little more.

      chris

      1. dovetail97128 | Mar 08, 2007 09:18am | #9

        Like I said I may be wrong. But tracks here have been done with brocade quite often.
        Heavier mix , not as wet , bit more air, stand back about 4', let it "skin" a bit before knocking down .

        1. chrisfox | Mar 08, 2007 09:22am | #11

          Come to think of it I was pretty close to these test baords, standing back may give me the blobing effect I need.

          1. catfish | Mar 09, 2007 01:38am | #15

            I've had good luck with the mud thinned to where it fell back together as soon as you drug a finger thru it.  HO  has done the whole house, with different helpers  We tried around 30 to 35 psi

  7. User avater
    xxPaulCPxx | Mar 08, 2007 10:28am | #12

    The "Thick Splatter.jpg" looks more like the "orange peel" texture I have in my bathrooms. 


    Please keep posting your progress, and mistakes... we all can learn from both.

    Rebuilding my home in Cypress, CA

    Also a CRX fanatic!

  8. 5brown1 | Mar 08, 2007 04:34pm | #13

    I'm not an expert but it sounds like you need to thin out the mudd and go to a smaller hole and about 45 lbs pressure. You really don't want to wait too long before knocking the mudd down. Keep the blade almost perpendicular to the wall and just let it glide over the mudd.
    Get some cardboard and practice getting the mix just right. I find that usually the problem I tend to have is not getting the mudd thin enough.
    Good luck with a little experimenting it will turn out great.

    1. IdahoDon | Mar 09, 2007 05:10am | #17

      I was thinking the same thing, thinning the mud a little will let the mud spread out more easily. 

      Beer was created so carpenters wouldn't rule the world.

  9. valleyboy | Mar 08, 2007 05:57pm | #14

    I am not an expert by any means but I did do all the ceilings in my house to achieve what you are after. 

    I first put on a thin layer of drywall mud (about 4'x4' area), then use a tile float and push it into the mud and then pull down quickly.  This leaves an even look of pointed mud.  After about 20 mins or so, I use a 12" drywall tool to flatten the points.  The finished look is what we call "California" finish.

    It actually came out very well and after using the textured look in a few houses I built, this is quite a change.  I do have a hopper and tried it once and was not successful so used the above approach.

    If you only have a small area, you could easily match it using this technique.

    1. rez | Mar 09, 2007 03:17am | #16

      What is the 12" drywall tool you use for flattening the points?

      I've been using that exact technique for years now and never knew it had a name. Like the true random effect and makes it easy to match late in the event of a patch. 


      every court needs a jester

      1. valleyboy | Mar 09, 2007 03:57pm | #18

        The 12" tool is just a normal 12" mud applicator only I rounded out the two corners.  Without the rounded corners, I got marks from the corners.  When the mud dried to fairly hard, I just used the applicator to flatten the surface.  Almost no pressure applied.

        When I applied the mud to the drywall, I liked it nice and sticky....not too thin....that way the float pulled the mud down nice.  If you have it too thin, it took too long to dry and if I flattened it when too wet, it gave too large an area of flat spots.

        All in all, took some practice to get everything right but the job, when done, is very nice.

        1. chrisfox | Mar 09, 2007 07:45pm | #19

          Thanks all for the good input. I will let you know how this turns out.

        2. rez | Mar 09, 2007 08:43pm | #20

          Yes, I like a lightweight plastic straightedge with the rounded corners to help prevent the errant occasional straightline that always wants to crop up if the feathertouch ever gets a bit too heavy. Roar!

          I use a wooden float with rounded convex edges to level the mix and pull for the pucker power to make the mountain caps.

          Started doing walls the same way and find that people often will stop walking and stare at it, then usually a positive comment about those walls.

          I haven't experimented with it yet but it seems to me that a sculpted design or scenery pic, or even a shadowbox type drywall paste side profile portrait of Marilyn could be hidden in those random patterns only viewable if one is looking for it.


          be a wild thought 


          every court needs a jester

          1. valleyboy | Mar 10, 2007 04:57pm | #21

            You mentioned that you do walls that way also......here's what I did with a wall that is 10' along one wall and they goes to 20' high for the gable end....inside walls.

            I mix drywall mud with stuff used for texture ceiling spray then use a 6" drywall knife to apply it to the wall.....the texture mix keeps the sheen off the wall that drywall mud seems to make it.   I use random strokes with the 6" knife to apply it so that you see the ridges and strokes of the knife.  Painting is a real PITA as I found I could only use a brush to get into the ridges but have two walls done in deep maroon that is really nice looking.

            All in all, it is amazing what one can do with little money and some imagination.

Log in or create an account to post a comment.

Sign up Log in

Become a member and get full access to FineHomebuilding.com

Video Shorts

Categories

  • Business
  • Code Questions
  • Construction Techniques
  • Energy, Heating & Insulation
  • General Discussion
  • Help/Work Wanted
  • Photo Gallery
  • Reader Classified
  • Tools for Home Building

Discussion Forum

Recent Posts and Replies

  • |
  • |
  • |
  • |
  • |
  • |
View More Create Post

Up Next

Video Shorts

Featured Story

FHB Podcast Segment: Finding the Right Fixer-Upper

Get expert guidance on finding a fixer-upper that's worth the effort.

Featured Video

Micro-Adjust Deck-Baluster Spacing for an Eye-Deceiving Layout

No math, no measuring—just a simple jig made from an elastic band is all you need to lay out a good-looking deck railing.

Related Stories

  • Guest Suite With a Garden House
  • Podcast Episode 688: Obstructed Ridge Vent, Buying Fixer-Uppers, and Flashing Ledgers
  • FHB Podcast Segment: Finding the Right Fixer-Upper
  • Keeping It Cottage-Sized

Highlights

Fine Homebuilding All Access
Fine Homebuilding Podcast
Tool Tech
Plus, get an extra 20% off with code GIFT20

"I have learned so much thanks to the searchable articles on the FHB website. I can confidently say that I expect to be a life-long subscriber." - M.K.

Get home building tips, offers, and expert advice in your inbox

Signing you up...

This site is protected by reCAPTCHA and the Google Privacy Policy and Terms of Service apply.
See all newsletters
See all newsletters

Fine Homebuilding Magazine

  • Issue 332 - July 2025
    • Custom Built-ins With Job-Site Tools
    • Fight House Fires Through Design
    • Making the Move to Multifamily
  • Issue 331 - June 2025
    • A More Resilient Roof
    • Tool Test: You Need a Drywall Sander
    • Ducted vs. Ductless Heat Pumps
  • Issue 330 - April/May 2025
    • Deck Details for Durability
    • FAQs on HPWHs
    • 10 Tips for a Long-Lasting Paint Job
  • Issue 329 - Feb/Mar 2025
    • Smart Foundation for a Small Addition
    • A Kominka Comes West
    • Making Small Kitchens Work
  • Issue 328 - Dec/Jan 2024
    • How a Pro Replaces Columns
    • Passive House 3.0
    • Tool Test: Compact Line Lasers

Fine Home Building

Newsletter Sign-up

  • Fine Homebuilding

    Home building tips, offers, and expert advice in your inbox.

  • Green Building Advisor

    Building science and energy efficiency advice, plus special offers, in your inbox.

  • Old House Journal

    Repair, renovation, and restoration tips, plus special offers, in your inbox.

Signing you up...

This site is protected by reCAPTCHA and the Google Privacy Policy and Terms of Service apply.
See all newsletters

Follow

  • Fine Homebuilding

    Dig into cutting-edge approaches and decades of proven solutions with total access to our experts and tradespeople.

    Start Free Trial Now
    • Facebook
    • Instagram
    • X
    • LinkedIn
  • GBA Prime

    Get instant access to the latest developments in green building, research, and reports from the field.

    Start Free Trial Now
    • Facebook
    • YouTube
  • Old House Journal

    Learn how to restore, repair, update, and decorate your home.

    Subscribe Now
    • Facebook
    • Instagram
    • X

Membership & Magazine

  • Online Archive
  • Start Free Trial
  • Magazine Subscription
  • Magazine Renewal
  • Gift a Subscription
  • Customer Support
  • Privacy Preferences
  • About
  • Contact
  • Advertise
  • Careers
  • Terms of Use
  • Site Map
  • Do not sell or share my information
  • Privacy Policy
  • Accessibility
  • California Privacy Rights

© 2025 Active Interest Media. All rights reserved.

Fine Homebuilding receives a commission for items purchased through links on this site, including Amazon Associates and other affiliate advertising programs.

  • Home Group
  • Antique Trader
  • Arts & Crafts Homes
  • Bank Note Reporter
  • Cabin Life
  • Cuisine at Home
  • Fine Gardening
  • Fine Woodworking
  • Green Building Advisor
  • Garden Gate
  • Horticulture
  • Keep Craft Alive
  • Log Home Living
  • Military Trader/Vehicles
  • Numismatic News
  • Numismaster
  • Old Cars Weekly
  • Old House Journal
  • Period Homes
  • Popular Woodworking
  • Script
  • ShopNotes
  • Sports Collectors Digest
  • Threads
  • Timber Home Living
  • Traditional Building
  • Woodsmith
  • World Coin News
  • Writer's Digest
Active Interest Media logo
X
X
This is a dialog window which overlays the main content of the page. The modal window is a 'site map' of the most critical areas of the site. Pressing the Escape (ESC) button will close the modal and bring you back to where you were on the page.

Main Menu

  • How-To
  • Design
  • Tools & Materials
  • Video
  • Blogs
  • Forum
  • Project Guides
  • Reader Projects
  • Magazine
  • Members
  • FHB House

Podcasts

  • FHB Podcast
  • ProTalk

Webinars

  • Upcoming and On-Demand

Podcasts

  • FHB Podcast
  • ProTalk

Webinars

  • Upcoming and On-Demand

Popular Topics

  • Kitchens
  • Business
  • Bedrooms
  • Roofs
  • Architecture and Design
  • Green Building
  • Decks
  • Framing
  • Safety
  • Remodeling
  • Bathrooms
  • Windows
  • Tilework
  • Ceilings
  • HVAC

Magazine

  • Current Issue
  • Past Issues
  • Magazine Index
  • Subscribe
  • Online Archive
  • Author Guidelines

All Access

  • Member Home
  • Start Free Trial
  • Gift Membership

Online Learning

  • Courses
  • Project Guides
  • Reader Projects
  • Podcast

More

  • FHB Ambassadors
  • FHB House
  • Customer Support

Account

  • Log In
  • Join

Newsletter

Get home building tips, offers, and expert advice in your inbox

Signing you up...

This site is protected by reCAPTCHA and the Google Privacy Policy and Terms of Service apply.
See all newsletters
See all newsletters

Follow

  • X
  • YouTube
  • instagram
  • facebook
  • pinterest
  • Tiktok

Join All Access

Become a member and get instant access to thousands of videos, how-tos, tool reviews, and design features.

Start Your Free Trial

Subscribe

FHB Magazine

Start your subscription today and save up to 70%

Subscribe

Enjoy unlimited access to Fine Homebuilding. Join Now

Already a member? Log in

We hope you’ve enjoyed your free articles. To keep reading, become a member today.

Get complete site access to expert advice, how-to videos, Code Check, and more, plus the print magazine.

Start your FREE trial

Already a member? Log in

Privacy Policy Update

We use cookies, pixels, script and other tracking technologies to analyze and improve our service, to improve and personalize content, and for advertising to you. We also share information about your use of our site with third-party social media, advertising and analytics partners. You can view our Privacy Policy here and our Terms of Use here.

Cookies

Analytics

These cookies help us track site metrics to improve our sites and provide a better user experience.

Advertising/Social Media

These cookies are used to serve advertisements aligned with your interests.

Essential

These cookies are required to provide basic functions like page navigation and access to secure areas of the website.

Delete My Data

Delete all cookies and associated data