Do any of you guys ever cut the birdsmouth to fit around the beams’ outside corner like the one on the right there? (on a 4×12 beam)
If so, how would you do it? (just curious)
is there a name for that type of birdsmouth?
the reason I might do it is because the hip will extend quite a ways out (6’8″) and I’d like to have full bearing there for inward/downward forces.
Edited 3/7/2006 4:22 pm by JoeWood


Replies
I did once Joe. You can't see it in this photo, but you can see why. It was for show reasons with all the framing exposed, rather than structural. I can't remember, but I think that hip beam was an 8x10.
What I do remember well about this job was that we framed this portion in mid-winter, with temps around ten to twnety below zero, on the north side of the house, and a north wind coming in on us right off the bay.
That fact, and an intervening 14 years means I can't remeber too much about the tooling. I think i did my layout on both sides but test fitting a 1/4" plywood to a string, tracijng that ontop the sides of the beam, then cuttiong in with a jigsaw, and finishing with a chisle to clean up. BTW, this was a bastard hip. about 3/12 on one roof side and 6/12 on the other. We also beveled the top of the hip to the pitches. Yeah, it was a bastard in more than one way.
But it came out well
Welcome to the
Taunton University of Knowledge FHB Campus at Breaktime.
where ...
Excellence is its own reward!
10 to 20 below . . . . . . . . ?man! I don't understand how you could work in that!I'm freezing at 40º above zero!
Joe Bartok over at JLC has given me some ideas .."Joe, I don't know if there's a special name for that cut but check out the Valley intercepts Post drawing in the bottom right-hand corner of this Hip/Valley Framing page. http://tfguild.org/tools/tool2.htmlThe upslope faces of the post are cut at the bevel angle for this intercept, while the corresponding planes on the Valley are cut square to avoid a feather edge and provide planes to distribute the forces. The cuts on the Valley on the downslope side of the post (not shown in the diagram) would be as per your drawing. Also note the tenon on the post; the upslope face is cut square and it functions the same as a corbel on a column."so, maybe I could just bevel the top corner of where my beams meet, and not even touch the hip rafter. But, I might be taking too much off there. Gives me some ideas though.
Great site! Now I really don't remember what all I did! LOLUsing as tenon to pin them together could save some work in the long run.did you notice another thing on mine that made it unigue? The hip beam sits right on a round cedar post. So that is where I remeber a lot of chisle work. Somehow we got it up there and scribbed the post tops and then flipped the beam to chisle that portion into the seat cut. We had some 2x12 nailed to the poststo hold them in place and to hold our staging planks while working this out. Then the beams that function as top plates were cut and set to the hip beam, with just enough purchase on the post top edge.I don't do that sort of work regularly so I have puzzle it out as it comes and explaining how is not a language I am fluent in.
Welcome to the Taunton University of Knowledge FHB Campus at Breaktime. where ... Excellence is its own reward!
No, but I've clipped the outside corner of the top plate at 45 degrees, so the seat-cut sat tight. Didn't do it the way you showed it, because I'd have had to chisel it out, which is too tedious for the jobs I've been on. This one is for yourself, 'tho, so go for it if you have the time! Oughtta look cool.
"he...never charged nothing for his preaching, and it was worth it, too" - Mark Twain
Edited 3/7/2006 7:16 pm by Huck
What program you using for these pic.s?
TIA,Phil.
"If 'tis to be,'twil be done by me."
I'm a happy SketchUpper!
You certainly are!
Welcome to the Taunton University of Knowledge FHB Campus at Breaktime. where ... Excellence is its own reward!
I meant to post this yesterday but didn't get a chance due to a lack of time and corrrupted pfd files.
This is how I would cut the Hip Rafter/Wall intercept. Any feather edges created by acute angles on the "upslope" faces of the Hip are chamfered or "square cut" to provide plane at right angles (or as close as possible to right angles) to the axis of the Hip and optimize the distribution of the forces. Wherever the cuts are made square on the Hip rather than at the "natural" angle of intercept, the equivalent bevel is cut on the wall (or post, as the case may be).Joe Bartok
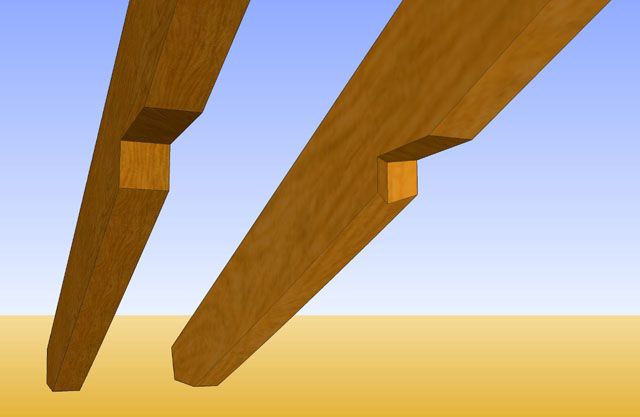
You know, I think I'm leaning towards doing a regular seat cut like the one on the left there
View Image
and cutting the corner of the beams on a 45. That's probably the easiest and cleanest, and probably just as strong as the other methods don't you think?
Joe, I agree. I would use the pic on the left, unless there were some mitigating circumstances. I've made the cuts on the right, in my younger days of discovery, but I discovered that it takes more time and provides no extra benefits.
If you just want the challenge, then do it but if you just want something that looks good, the one on the left will look exactly like the one on the right if you fit them both tight.
blue
Yes, I agree. But make sure that you adjust your measurements accordingly. A normal seat cut is made to sit outside that corner, so move your vertical leg of the seat cut in accordingly, before you cut it. The horizontal cut of the birdsmouth should remain the same, as the Height-Above-Plate should remain constant at the outside edge of the top plate."he...never charged nothing for his preaching, and it was worth it, too" - Mark Twain
Joe, I'm with the other guys. The only benefit to the cut shown on the right would be appearance if the joint is visible. In terms of distributing the forces the seating inside the wall would be more important.
Most of my Hips/Valleys aren't cut with the overhang as shown in the drawing I posted. They terminate in a mortise at the wall. I might be able to get a hold of some pics in a few weeks and will post them.Joe Bartok
I'd really appreciate that Joe!
OK, I'd like to ask some structual advice. What connectors do you usually see there at the hip? (the hips are 4x12s)How about for the rafter/beam connections? These rafters will be 2x10s, with a 4' 6" overhang!I'm still in the design phase and haven't thought about the connections yet. I sure would appreciate any advice about this!I'd hate to have to use visable straps/connectors, but may be no way around that unless I build this as a timberframe?No hurricanes here in San Diego but we do have seismic issues!I don't think this'll need a Permit (less than 500 sq ft roof area) but I'd sure want to do it right!
Joe,Just make sure you come in towards the the ridge from your outside corner mark 1-3/4" which is 1/2 the thickness of the 3-1/2" hip and mark your plumb line measure down from the top the same HAP cut as the common HAP cut. Scribe that line all the way down and that's also your cut you make with the saw set at 45° that will butt you up tight to the outside wall.If you descide to make that cut on the inside you will come from that same line towards your ridge in if your plate is 3-1/2" at 45° you will come in 4-15/16" and scribe a plumbline from your level seatcut mark and down that will get cut with the saw set at 45° also cutting in the same direction as the first one.Joe Carola