*
b Exploring techniques and personal experiences about the tools, raw materials and techniques to do cast-in-place concrete counter tops.
Discussion Forum
Discussion Forum
Up Next
Video Shorts
Featured Story
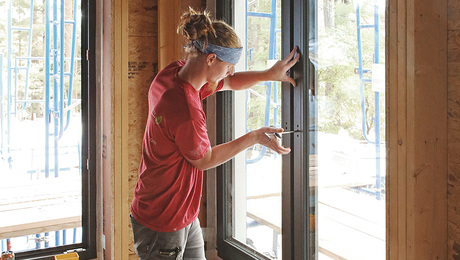
This time-tested installation method for flangeless windows ensures smooth operation and provides air, water, and vapor control.
Featured Video

Highlights


"I have learned so much thanks to the searchable articles on the FHB website. I can confidently say that I expect to be a life-long subscriber." - M.K.


Replies
*
Hello all,
I am currently experimenting with concrete counter tops. I have poured and worked a 3' X 1' sample. 'Still working on it, but I think that I would want to refine the mix I use.
I know that there are a zillion different types of additives that can be used in concrete.
I have heard of fiberglass mesh, to make the surface more crack-resistant. I have seen acrylic additives, but don't know what they are supposed to do.
As far as dyes go, I have only tried the powder type, which seemed to work fine.
As far as the final appearance is concerned, I am pretty sure that nothing can replace the proper TLC of experience and smooth trowel work.
But, if additives can help, what should they be? The goal is to have a finished product as smmoth as possible, with no cracks, and deep color. I would like a deep, deep blue.
I am also curious on finishing / sealing techniques.
Any comments?
*
Try ordering a copy of FHB #90. You can order it here. There are some nice ideas and photos in it. I ordered it for the same reason. I believe the way to get that smooth as a baby's rear end finish is sanding with a wet dry 120 grit paper. I really don't want to read the whole article now and retype all to you but there are products and methods mentioned to seal and fill with to bring out a great durable finish.
I always thought that throwing a bunch of clear and dark blue bits of glass into a mix of black cement and then finishing it down with a terrazzo grinder would give a real nice effect.
Pete Draganic
*
Pete,
Thaks for your reply!
Regarding the terazzo effect, how does one grind it down? What kind of tool does one need? I cannot imagine that the big heavy polishers that Terazzo contractors use would be the thing for a counter top?
Plus, if there is such a thing as a smaller machine that can be rented, or is not cost-prohibitive to purchase, then I could rely on it to do the final polishing!
Regards,
Luc
PS: WHat is on the cover of FHB #90? I am trying to remember if I have it already.
*
I believe you can rent a small terrrazzo grinder that would be perfect for countertops. They do make them for for getting into corners and tight spots. I believe they are as small as maybe a coffee can in a hand held unit. This may time to do a little terrazzo grinder web surfing!!
I just bought a new (to me) house and I plan to do something like what I mentioned for my kitchen there.
Pete Draganic
*To get the smoothest possible finish, you'd have to cast inverted. No amount of troweling or sanding/grinding will get you as smooth a surfaces as inverted casting.If you use fibers, use them in the bottom 2/3rds of the slab. A hairy slab is tough to trowel smooth, and the fibers give openings in the slab that could make it tough to seal against bacteria.I use the equivalemt of a 7-sack mix with pea gravel as the aggregate. Use as dry a mix as you can while still maintaining workability. In addition to reducing the final strength of the slab, too much water can cause cracking or curling. You could use an acrylic additive in place of water. It's available through concrete suppiers or at HD in the tile section.For color purity, you may want to consider using white portland cement. The typical gray portland tends to muddle pure colors. It's a few dollars more per bag, but you use so little price isn't a factor. Integral coloring is better than surface IMO.I use half-inch hardware cloth and rebar embedded in the slab. No fibers.As for casting inverted and then moving the cctop, I've moved slabs of up to 550 pounds by myself by screwing caster wheels on the rim of the form and wheeling it in place on edge. Not tough to do, but best to have help for balancing. Just in case... Sealers, in general you have two choices. A curing urethane or epoxy film finish, or a wipe on, usually silicone-based penetrating finish. Typically, to use a film-type finish you need to acid etch the slab, then neutralize, then rinse. Many a person has botched this part and the film ande up peeling off down the road. Plus, it's fairly messy if done in place. Wipe on penetrating sealers are much easier to apply (wipe on), but IMO are not as tough as film finishes. They are, however, well within reach of the average fabricator.The games on, I've gotta go watch the Patriots lose...it's a New England tradition.Mongo
*
Guys,
As to finishing, my advice is to trust your local epoxy dealer. I did a concrete bartop about ten years ago in Denver with a food safe epoxy designed for the inside of concrete water tanks. This is a very sucessful operation that handles thousands of drinks per night{the bar is about 70 ft long} and works every day. Only just recently have some places started to show through - you couldn't put this kind of wear on your home kitchen in 100 years. It is also quite viscous in application and by adding small amts of concrete dust can fill imperfections very nicely - so no need to mess with that cast up side down stuff which is impossible unless you have straight small regular sections, no corners, no curves etc. Not super cheap but from a shine and durability stand point, the only way to fly.
*
Hey, one of my earliest memories as a New Englander was watching the Bears maul the Patriots in the Super Bowl. The Pats had negative yardage at halftime, when we turned if off out of mercy...
Cast upside-down -- in what for a form? Why is this better than trowel&sand? Doesn't aggregate show more?
*
Mongo,
Replacing water with an acrylic?
I saw the acrylic at HD, but I could not figure out what the net benefit is. What effect does it have on the final product? On the mix as you work it?
Also, do you litteraly mean replace, or mix with, water?
Luc
PS: I am based out of San Francisco. Sad to say, but the 9ers are not going too strong either...
*What good customer service from Taunton!I just called to order a copy of FHB #90. It is out of stock. But they are sending me a copy of the article on concrete countertops, for free!I am keeping that subscription for sure!
*
Hmmm... Wait 'til that column by Martha Stewart starts...
*Andrew,Quit trying to stir up trouble! Not to mention giving our hosts bad ideas! (You realize that if said column should ever appear, we will blame you.)Rich Beckman
*Ah yes, I remember it well...Patriots start Tony Eason instead of Grogan...Eason throws three incomplete passes, they punt, game over...good snacks, though.I cast 2" thick most of the time. Occasionally 1.5". Build form with a 3/4 ply base, a rim of 2-by stock, insert sink/cooktop cutouts, dowels for plumbing penetrations, line the form with cheesiest, glossiest formica you can find. Insert any decorative molding for a beaded edge, etc. Realize the molding you use needs to be the "negative" of the edge you want. Ex: Want a beaded corner on your slab? Use a cove molding.The formica gives a great mirror smooth finish. Literally. When you "uncrate" the slab, you can see your reflection in the surface of the slab. I can't do that with a trowel, so I cast inverted. There are folks that, unlike me, can actually use a trowel. I can't, so I don't.Aggregate doesn't literally show, but being slightly below the surface of the slab it gives the slab a mottled appearance. You could get a more monochromatic finish by omitting it.
*Luc, I always use the admix in thinset. I've never used it in a cctop. I suppose you could.Admix theoretically increases the strength, water resistance, and shock absorption capabilities of cementitious products. A great additive for thinset when bonding tiles. Use it solely, no water. In a cctop? Once again, I suppose you could, though I never have. Maybe if I was pouring thinner slabs...Next time you see a jug, read the fine print. I'm sure they list a myriad things it's good for. Or, note the 1-800 number and ring them with questions regarding benefits in a cctop slab.
*I must be missing something here. For about a year now, every bag of thinset that I see says very plainly on the package that the latex additive is already added. They say very clearly NOT to use the liquid additive because they have already mixed it in dry form with their product. They say to add water only. Am I missing something here? I used to use the latex/acrylic additive until the products started telling me it was already added. Do you STILL add the liquid, even though it's supposed to be in there already? How does this affect the product strength, or it's adhesive abilities?I also started using distilled water to mix my grouts and thinsets in. I mixed up a batch of white grout once that turned orange after it started to dry. Seems the iron content of the water I used (from the house) was high. I had to clean out all the grout before it got too hard, and start all over. I do not plan to have to do that again. Just my thoughts...James DuHamel
*
What are you guys using for coloring on concrete tops? Acid stains, or mixed in color? Which is better, and what are your sources for them? I am aware of kemiko, and increte, but what else is out there?
Jeff
*
To Mongo et. al.
As Jeff asked, do you like to stain the concrete after its cured or add color to the mix? Or both? What different looks have you achieved?
I built a test form last night with melamine boards and some different pieces of molding for different edge "looks". Would it be a good idea to run an orbital sander around the form after it's filled to settle the concrete and take out voids?
thanks, jim
*Jeff, Jim...Personally I prefer an integral color. To get that, I add pigment to the concrete mix. I would advise using different percentages of pigment in your test samples to gauge your desired end color.How much color? Try 2%, 4%, 6%, 8%, 10%, whatever...mix and match...It's not advisable to go over 10%. The percentage is by weight of dry portland cement used in your slab batch mix. Example...if you were using an entire 94 lb sack of portland cement, for a 10% slab use 9.4 pounds of pigment. Most samples I make are 12" squares, thus only require a few ounces of pigment. I actually measure in "grams", as my scale is more precise when using grams over ounces.I get my pigments from the local block supplier. They sell small 3 and 5 pound boxes. If needed in bulk I buy it in 50 lb bags over at their block manufacturing facility.Realize that when you uncrate the sample, it's still wet, thus the color may be darker than the finished, dry-slab color.I've never seen a countertop get chipped, but with an integral color the colorant runs through the slab. Saves the mess of an acid wash, and a 3% coloration in the sample is a 3% coloration in the slab. No problems on the customer's end with the acid being "slightly lighter or darker" than the sample.For vibrating the form, someone offered the idea of running a sawzall against the form, I think that would work well. Anything like that will help. To minimize air, I've had success soaking the aggregate in water prior to adding to the batch. It helps "coat" the aggregate with water, thus reducing the amount of air trapped in the textured surface of the aggregate. Sounds silly, but in side-by-side testing it does make a difference. Especially effective when using perlite for a light-weight slab.Best of luck with your projects...
*The growing interest in concrete countertops is starting to look like profit. Have yet to do one, but it sounds like a lot more fun than stamping with cast-on color on a windy day.My first though is that the smoothest possible finish would be given by hand trowel. Be patient;don't overwork or "play" w/the mud. Try using a wood float for this application (pulls less water to the surface) The moisture and portland; or "cream" required for a smooth trowel finish is actually squeezed out/upward by using downward pressure and an increased angle of the tool; when the material is ready. When is it ready? Practice. Given such a small area, you will never have greater control. A hand trowel really needs to be "broken in" properly. The next best choice would be a Marshalltown ultalite which is "preset"; 16"x4" or 18"x4" are user friendly. A 14"x3" will provide increased leverage (stiffer leading edge) to polish when surface is hard.Casting inverted ? By the time you can see what you"ve got, it's too late to change. Air buubles are common even with architectural precasters. How much extra time/risk is involved in moving and setting the piece? Reinforcment is a must given the thin application of a brittle material. The suggestion of a heavy hardware cloth sounds good. I would also include some 1/4" pencil rod at cantilevers and leading edges. I have yet to find a more durable combination than rebar and fiber. There is a new fiber available now which is much smaller and virtually invisible at the surface. (unless you really stand your trowel on edge and scrape).Color choices are endless these days. Integral is easy. Cast on has some portland in it to increase strength. It can be more of a challenge to apply. (leading edges?) I would like to try integral as a base color, and cast on verigated strips or areas of color for interest. Given that it is a food prep area , look a I would look at food safe epoxies previously mentioned. Most concrete sealeres are nasty and meant to be walked on.The application of decorative mouldings sounds good. I would recommend that when placing any material near the leading edges use a shovel and tap the underside of it with a hammer to consolidate cream. Unload the shovel such that the cream falls back against the edge. The fines will fill in much more easily. I would tap w/hammer (at low intensity) to fill voids and minimize air bubbules. Bomanite and Scofield(sp?) distribute all color products. The StampedConcrete Network has more info.Food for thought, Rick
*
I'm just starting design on my house and we're building a concrete bar and several other concrete counter areas. Carson Concrete out of Tucson has a video availabe (about 40 bucks) on concrete counters. The video is very specific and detailed. call them at 1-888-325-0557. Mike H
*I recently poured a top for our counter in my office. After having read the articles in FH and consulting with various experts in my area, I was able to cast a 13' x 3' counter with a segmented radius front cantilevered 8" beyondthe front of the supporting cabinet. In addition, I tinted the concrete a deep rust red with a powdered tint and cast an ogee edge on the front of the slab. I started with a plywood base for the form and attached an inverted standard crown molding to a removable support to act as a mold for the edge. The overall thickness of the slab was 2". I poured the first 1 1/2" using regular concrete mixed with fiberglass fibers to reinforce it over expanded metal lath (diamond wire). The remaining 1/2" was filled with tinted Rapid Set cement. I did this prevent any cracking. After I poured the cement (pancake batter consistancy) I waited for it to stiffen and then I went over it with a pool plaster trowel. I managed to acheived a very rich rustic texture to the top with a nice variation in the color. My only advice for anyone wanting to pour a top using this method would be to make sure that the Rapid Set is mixed rather thin so that the it fills the edge of the forms completely (and vibrate the form to reduce air bubbles). Its been about seven months since I poured the top and I am happy to report absolutely no cracks whatsoever. I originally thought about sealing it with a clear sealer but have changed my mind since then. I like it the way it is.
*
b Exploring techniques and personal experiences about the tools, raw materials and techniques to do cast-in-place concrete counter tops.