FHB Logo Facebook LinkedIn Email Pinterest Twitter X Instagram Tiktok YouTube Plus Icon Close Icon Navigation Search Icon Navigation Search Icon Arrow Down Icon Video Guide Icon Article Guide Icon Modal Close Icon Guide Search Icon Skip to content
Subscribe
Log In
  • How-To
  • Design
  • Tools & Materials
  • Restoration
  • Videos
  • Blogs
  • Forum
  • Magazine
  • Members
  • FHB House
  • Podcast
Log In

Discussion Forum

Discussion Forum

curved rafters by Joe’s formula

NEXTLEVEL | Posted in Photo Gallery on November 11, 2004 04:51am

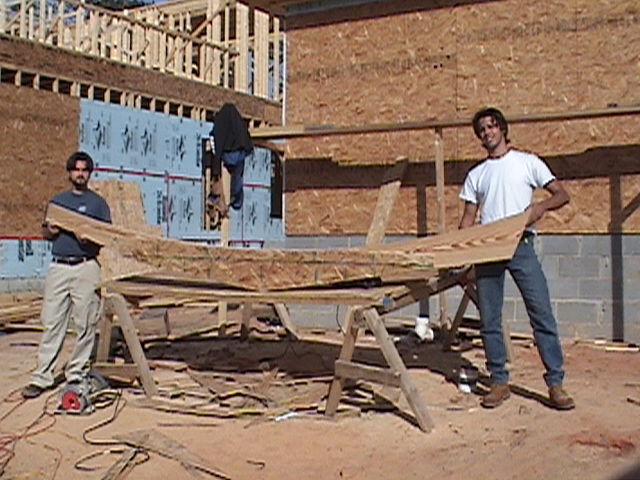
If we ever do something like this again I will cut them out of LVL’s.  These are strong but they took to long and I think cutting them out of one piece would have been more consistent.  As it is, it took 2 12 days to cut, put together and set. 

James Hart

Reply

Replies

  1. User avater
    JeffBuck | Nov 11, 2004 05:01am | #1

    how'd ya cut them?

    Jeff

    1. NEXTLEVEL | Nov 11, 2004 05:07am | #2

      We cut the osb with the worm drive saw and the 2x12 with a very rough cutting jig saw blade in a bosch jig saw.

      James Hart

      1. jimblodgett | Nov 11, 2004 06:27am | #3

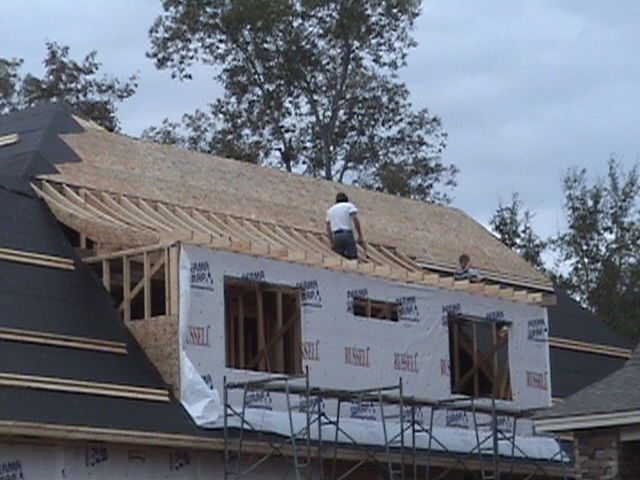
        Cool lookin' project.  Got any photos of the entire house with the roof on?

        1. NEXTLEVEL | Nov 11, 2004 07:18am | #4

          Yes.  Go to *roof framing pics* under photo gallery and you will see where I sent some to tmuhler.  It was his original post of a roof he did and we got to talking about using LVL's for hips and valleys and he wanted to see a roof we were doing where we used 9 inch LVL's for hips and valleys. 

          James Hart

      2. User avater
        JeffBuck | Nov 11, 2004 09:27pm | #8

        I asked because you said it took so long ....

        next time ... try just running the circular saw thru ....

        looks like those radius wouldn't be a problem at all.

        it's much quicker.

        Jeff

        1. NEXTLEVEL | Nov 12, 2004 03:35am | #10

          Years ago there used to be a circle cutting blade that you could buy.  It looked like a triangle.  It had 3 cutting teeth so that it could move through thick wood better.  Have you seen any of these lately?  We tried cutting with the circular saw but the curve was too much. 

          James Hart

          1. Framer | Nov 12, 2004 03:50am | #12

            James,

            Did you try cutting with the circular saw half the depth and then cut through the rest of the way?

            Joe Carola

          2. User avater
            Timuhler | Nov 15, 2004 06:51am | #14

            I've been looking for one of those triangle blades for years.  About a year and a half ago, we "made" one.  We just cut the circ blade so that it was a triangle blade.  Didn't work too well :-)  Seemed like a good idea.  I got the idea from Will Holladay's book, but it didn't work too well. 

            For small curves, we set up our Bosch 3 1/4 hp router with a trammel arm and just make successive passes, that can be quick.  We have a Bosch jigsaw that works well in 1 1/2 stock.

            Looks great.

          3. jimblodgett | Nov 18, 2004 04:18am | #18

            Wait.  I think I might HAVE one of those things.  Gotta go look. 

          4. blue_eyed_devil | Nov 16, 2004 01:19am | #17

            We cut all our lumber with a circular saw. I've tried those three headed monsters....good idea...bad manufacturing.

            I simply use my makita and only drop it into the lumber about 3/8". A coupla passes later, we're done. Letting the saw run backwards is usually perfect too...the saw tends to pull itself through and automatically curl. I usually work each 1' section back and forth three times before moving to the next foot. The last pass will finish off the cut and it will separate. A little cleaning and everything looks bootiful!

            I'd figure one minute per cut...or two minute per rafter.

            All of the curved work on this wall was done with a Makita power saw. I wish I would have had my camera ready when we were hoisting it up....

            blueWarning! Be cautious when taking any framing advice from me. Although I have a lifetime of framing experience, all of it is considered bottom of the barrel by Gabe. I am not to be counted amongst the worst of the worst. If you want real framing information...don't listen to me..just ask Gabe!

  2. Framer | Nov 11, 2004 02:47pm | #5

    James,

    Nice job. What are you using for the rakes and did you save the pattern to scribe for the rakes? When I cut the rafters that I did I used my circular saw and set the blade about 1/2 the thickness of the lvl's and made one pass and then set the blade just a little over the depth of the lvl and made a second pass. It made it easier that way and the blade didn't bind up. Keep the pictures coming.

    Joe Carola

    1. NEXTLEVEL | Nov 11, 2004 07:28pm | #6

      We did save the osb pattern for the barge rafter.  I have decided to cut the barge out of an 18 inch LVL because I want it to be continuous.  We tried cutting the 2x12 with the circular saw but the arch was to much.  I am uncertain about what to cover the barge with.  We will be putting vinyl on the rest of the cornice but I'm not sure how that will work on the curved barge.  Think I'll take blue's advice and let the builder decide.  We have determined that 12 inch osb will screw down to the curve.  Do you think we need to glue it?  Do you think it needs two layers?  The plans call for shingles.

      James Hart

      1. johnharkins | Nov 11, 2004 08:40pm | #7

        noting your reply to Jim I went to roof framing pics and noted this swale roof will face a side yard - don't see that very often these days

        hope it is a very visible side elevation so the world will see!

        I've done a couple of those on smaller bay window type scenarios and you've inspired me to another on a dormer I'll be doing on my own place off a 14 / 12 roof maybe sistering 2 X 6 ceiling rafters to some "swaled" 2 X 12 roof rafters

        you mentioned to be roofed w/ shingles / cedar by chance?

        great work and any future photos would be most appreciated

        thanks John

      2. Framer | Nov 12, 2004 03:26am | #9

        It can't hurt to glue it but I've never used osb on a roof before so maybe 2 layers isn't bad or 2 layers of 3/8 because the bottom area looks a little flat.

        Joe Carola

        1. NEXTLEVEL | Nov 12, 2004 03:49am | #11

          We decided to glue it down.  I read with great enthusiasm all the discussion about osb vs. plywood.  I just do not know.  All I really know is that down here, all we could get in a 12 inch cdx was a 3 ply.  To get a 5 ply we had to buy a bc grade.  That was cost prohibitive.  Well, I do not know anymore about the plywood because we have been using the osb for about 16 years.  Sometimes a job calls for 58 and sometimes 34 and then we use plywood.  Since I have osb on job we'll use that.  I will put one layer and see how I like it and go from there. 

          Joe, thanks for all your help and information.  It really helped.

          James Hart

          1. Framer | Nov 12, 2004 03:52am | #13

            Any time James.

            Joe Carola

  3. rez | Nov 15, 2004 03:43pm | #15

     dialups...


  4. User avater
    jazzdogg | Nov 15, 2004 05:37pm | #16

    Nextlevel,

    Nice job. These rafters appear to be identical. I'm curious to know if you considered making a master template and using a router with a bearing-guided patternmaker's bit to cut the curves?

    -Jazzdogg-

    Whether you think you can, or you think you can't, you're right.

Log in or create an account to post a comment.

Sign up Log in

Become a member and get full access to FineHomebuilding.com

Video Shorts

Categories

  • Business
  • Code Questions
  • Construction Techniques
  • Energy, Heating & Insulation
  • General Discussion
  • Help/Work Wanted
  • Photo Gallery
  • Reader Classified
  • Tools for Home Building

Discussion Forum

Recent Posts and Replies

  • |
  • |
  • |
  • |
  • |
  • |
View More Create Post

Up Next

Video Shorts

Featured Story

FHB Podcast Segment: Embodied Greenhouse Gas Emissions and the Building Codes

Could a building code update make your go-to materials obsolete?

Featured Video

Micro-Adjust Deck-Baluster Spacing for an Eye-Deceiving Layout

No math, no measuring—just a simple jig made from an elastic band is all you need to lay out a good-looking deck railing.

Related Stories

  • Podcast Episode 692: Introduction to Trade Work, Embodied Carbon, and Envelope Improvements
  • FHB Podcast Segment: Embodied Greenhouse Gas Emissions and the Building Codes
  • Old Boots Learn New Tricks
  • Install Denim Insulation Like a Pro

Highlights

Fine Homebuilding All Access
Fine Homebuilding Podcast
Tool Tech
Plus, get an extra 20% off with code GIFT20

"I have learned so much thanks to the searchable articles on the FHB website. I can confidently say that I expect to be a life-long subscriber." - M.K.

Get home building tips, offers, and expert advice in your inbox

Signing you up...

This site is protected by reCAPTCHA and the Google Privacy Policy and Terms of Service apply.
See all newsletters
See all newsletters

Fine Homebuilding Magazine

  • Issue 332 - July 2025
    • Custom Built-ins With Job-Site Tools
    • Fight House Fires Through Design
    • Making the Move to Multifamily
  • Issue 331 - June 2025
    • A More Resilient Roof
    • Tool Test: You Need a Drywall Sander
    • Ducted vs. Ductless Heat Pumps
  • Issue 330 - April/May 2025
    • Deck Details for Durability
    • FAQs on HPWHs
    • 10 Tips for a Long-Lasting Paint Job
  • Issue 329 - Feb/Mar 2025
    • Smart Foundation for a Small Addition
    • A Kominka Comes West
    • Making Small Kitchens Work
  • Issue 328 - Dec/Jan 2025
    • How a Pro Replaces Columns
    • Passive House 3.0
    • Tool Test: Compact Line Lasers

Fine Home Building

Newsletter Sign-up

  • Fine Homebuilding

    Home building tips, offers, and expert advice in your inbox.

  • Green Building Advisor

    Building science and energy efficiency advice, plus special offers, in your inbox.

  • Old House Journal

    Repair, renovation, and restoration tips, plus special offers, in your inbox.

Signing you up...

This site is protected by reCAPTCHA and the Google Privacy Policy and Terms of Service apply.
See all newsletters

Follow

  • Fine Homebuilding

    Dig into cutting-edge approaches and decades of proven solutions with total access to our experts and tradespeople.

    Start Free Trial Now
    • Facebook
    • Instagram
    • X
    • LinkedIn
  • GBA Prime

    Get instant access to the latest developments in green building, research, and reports from the field.

    Start Free Trial Now
    • Facebook
    • YouTube
  • Old House Journal

    Learn how to restore, repair, update, and decorate your home.

    Subscribe Now
    • Facebook
    • Instagram
    • X

Membership & Magazine

  • Online Archive
  • Start Free Trial
  • Magazine Subscription
  • Magazine Renewal
  • Gift a Subscription
  • Customer Support
  • Privacy Preferences
  • About
  • Contact
  • Advertise
  • Careers
  • Terms of Use
  • Site Map
  • Do not sell or share my information
  • Privacy Policy
  • Accessibility
  • California Privacy Rights

© 2025 Active Interest Media. All rights reserved.

Fine Homebuilding receives a commission for items purchased through links on this site, including Amazon Associates and other affiliate advertising programs.

X
X
This is a dialog window which overlays the main content of the page. The modal window is a 'site map' of the most critical areas of the site. Pressing the Escape (ESC) button will close the modal and bring you back to where you were on the page.

Main Menu

  • How-To
  • Design
  • Tools & Materials
  • Video
  • Blogs
  • Forum
  • Project Guides
  • Reader Projects
  • Magazine
  • Members
  • FHB House

Podcasts

  • FHB Podcast
  • ProTalk

Webinars

  • Upcoming and On-Demand

Podcasts

  • FHB Podcast
  • ProTalk

Webinars

  • Upcoming and On-Demand

Popular Topics

  • Kitchens
  • Business
  • Bedrooms
  • Roofs
  • Architecture and Design
  • Green Building
  • Decks
  • Framing
  • Safety
  • Remodeling
  • Bathrooms
  • Windows
  • Tilework
  • Ceilings
  • HVAC

Magazine

  • Current Issue
  • Past Issues
  • Magazine Index
  • Subscribe
  • Online Archive
  • Author Guidelines

All Access

  • Member Home
  • Start Free Trial
  • Gift Membership

Online Learning

  • Courses
  • Project Guides
  • Reader Projects
  • Podcast

More

  • FHB Ambassadors
  • FHB House
  • Customer Support

Account

  • Log In
  • Join

Newsletter

Get home building tips, offers, and expert advice in your inbox

Signing you up...

This site is protected by reCAPTCHA and the Google Privacy Policy and Terms of Service apply.
See all newsletters
See all newsletters

Follow

  • X
  • YouTube
  • instagram
  • facebook
  • pinterest
  • Tiktok

Join All Access

Become a member and get instant access to thousands of videos, how-tos, tool reviews, and design features.

Start Your Free Trial

Subscribe

FHB Magazine

Start your subscription today and save up to 70%

Subscribe

We hope you’ve enjoyed your free articles. To keep reading, become a member today.

Get complete site access to expert advice, how-to videos, Code Check, and more, plus the print magazine.

Start your FREE trial

Already a member? Log in