FHB Logo Facebook LinkedIn Email Pinterest Twitter X Instagram Tiktok YouTube Plus Icon Close Icon Navigation Search Icon Navigation Search Icon Arrow Down Icon Video Guide Icon Article Guide Icon Modal Close Icon Guide Search Icon Skip to content
Subscribe
Log In
  • How-To
  • Design
  • Tools & Materials
  • Restoration
  • Videos
  • Blogs
  • Forum
  • Magazine
  • Members
  • FHB House
  • Podcast
Log In

Discussion Forum

Discussion Forum

Do I flatten joists before adding subfloor and cement board for tile, or will subfloor and cement do the job?

pulper_11 | Posted in General Discussion on November 18, 2020 07:00am

Going to tile my bathroom floor.  I’m down to the joists here.  They aren’t perfectly flat. 

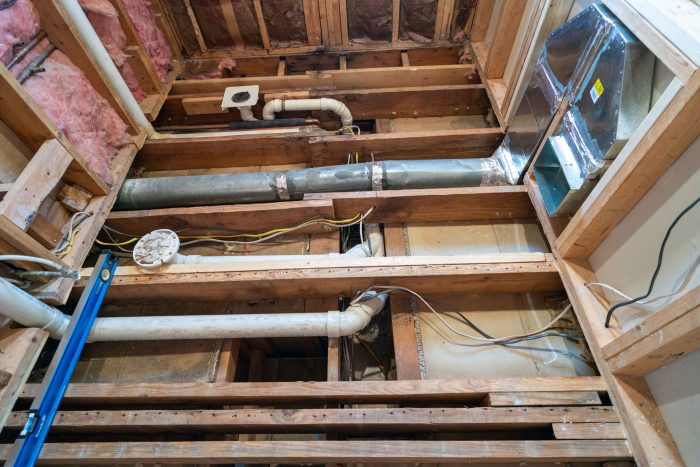
I’ve attached a document showing, in one foot intervals, how far off each position of each joist is from a standard value (for example, +1/8, -1/4), using a laser level and a combination square.  This drawing is not to scale, and I’ve also attached a picture so you can see how the joists are positioned.  The picture doesn’t show the first joist in the room (joist #1 in the drawing). 

This is driving me a little crazy and has put a stop to my plans as I try to figure this out. 

Do I put down the subfloor and cement board, and that will make it flat enough for tile?  Or do i need to somehow shim/plane low/high spots of the joists before subfloor and cement board?  Will be using 22/32 Advantech t&g.

Thank you.

File format
Reply
  • X
  • facebook
  • linkedin
  • pinterest
  • email
  • add to favorites Log in or Sign up to save your favorite articles

Replies

  1. User avater
    unclemike42 | Nov 18, 2020 10:17am | #1

    This is why tile guys use self-leveling compound.

    You could shim below the flooring, but this would reduce contact between the subfloor and joists to the shim locations.

    I think you will get better results if you glue and screw the subfloor to the joists, then use self leveling compound to get the floor level and flat.

    https://www.finehomebuilding.com/forum/tile-work-self-leveling-compound

    Are you planning an isolation layer under the tile?

    My sister had her bath done, and they used an isolation layer with integrated in-floor heat. (she took out a radiator which was needed when the bath was on the outside wall, but seemed not to be needed after an addition closed it off from the outside)

    https://www.schluter.com/schluter-us/en_US/Floor-Warming/Schluter%C2%AE-DITRA-HEAT/p/DITRA_HEAT

  2. pulper_11 | Nov 21, 2020 02:51pm | #2

    Thanks Mike for your reply! Sorry for not thanking you earlier.

    Regarding your reply, I'm more concerned with flatness instead of level. Of course it can't be out of level by a good amount, but it doesn't have to be perfectly level (i don't believe). But, to handle a tile job without the tiles cracking or without lipping, the floor has to be flat. Or, so i've read. What do i know?? lol.

    I do like your idea though of putting down the subfloor first and then making corrections. I think that does sound a little easier than doing it on the joists.
    My plan was to use the 22/32 advantech, then 1/2" durock or other cement board, and then the tile. I have seen the schluter stuff before but am interested in your thoughts on it. I believe that it takes the place of the cement board. That certainly saves on lifting! If I'm doing a small section of my bathroom with heated flooring than this might be an option. However, it's hard for me to make out what it is I need to do this. There are so many options for their stuff and I'm still learning, so that it isn't easy. But it seems everyone who uses it online, after dealing with the expense, really likes it.

    Maybe something like this:
    https://www.amazon.com/Schluter-DHEKRT12056-Touchscreen-Programmable-Thermostat/dp/B00K1I8TY0/ref=sr_1_6?dchild=1&keywords=Schluter+DITRA+HEAT+DHEKRT12040+26.7+SF+120V+Kit&qid=1605988047&sr=8-6

    One question on the advantech. along one of the walls where the tongue would land, do I trim off the tongue from the tongue and groove?

    Thanks again!

  3. User avater
    unclemike42 | Nov 21, 2020 04:35pm | #3

    Last time I checked, level would also be flat.

    You can get flat without level.

    I have not personally used the self-leveling compound, but watched the tile guys do this.

    (when I remodeled my wife's bathroom, my wife did not trust me to do the tile, so we had it hired via the local home despot. they did an ok job, but forgot to put the thermostat for the heated floor in under the tile. We used an earlier in-floor heater, which came in a mesh that was placed between cement board and tile embedded in the thinset. these guys used self-leveling compound, and topped with cement board, and then the tile (over the in-floor heat)) This was almost 15 years ago. I think they bedded the cement board to the self-leveling compound with thinset, but don't quote me on this.

    My sister had her bath done early this year, and they used the isolation layer with the heater I linked to.

    the layout of in-floor heat really calls for a scale drawing, to figure out how to route the wire on the floor, so you get enough. they sell heat elements in certain lengths, and you have to come up with a route for the heat cable that fits criteria. (something like between two and three inches apart, with specified turns and avoiding things like toilets and sink cabinets) You don't have to heat the whole floor. so can put a smaller one where it does the most good for toasty feet. (keep in mind if you use mats, or have slipper wearers in the house, it might not really do any good. My wife started wearing slippers all the time, and the heating in her bath is now turned off. Besides, you already have a great heat duct in the room.) In-floor heat calls for a dedicated circuit, and you can run to either 120 volts or 240 volts.

    You can use cement board over self-leveling if you need more height, or need more stiffness.

    I think the utility of the isolation layer depends on the tile you plan to use. It seems like a good idea to me. I defer to the real floor experts to provide more info. The Canadian home improvement tv star used to swear by it.

    I would cut the tongue off the tongue and groove at the wall.

  4. pulper_11 | Nov 22, 2020 01:06pm | #4

    Thanks Mike again!

    No wife here so if I screw it up, only myself to blame (and no "I told you not to do it"). lol.

    One of the links in your previous post was to a discussion on using SLC instead of the cement board. Like you said I could use both if I need added height. Not sure that I will though. Will look into after I learn more about the subfloor.

    the in flooring heat is not necessary but i think i'll do it. my bathroom is only 6x9 and
    i'm planning on a full width shower, so the area heated will not be a lot. therefore, as you suggested, i'll have to do a good amount of planning before buying. one thing i learned by watching some videos is that you can't cut the heating element to make it fit. if you have too much, you have to figure out a way to use it.

    I have watched Mike Holmes use the ditra a lot. i'm assuming that's who you're referring too. i've lived in canada and we have a few good diy people on tv that have also rec'd a good deal of tv exposure in the US. i believe that bryan baeumler also uses an uncoupling membrane too, although i'm not sure it's ditra. it's not cheap but if i look at the kits that include the ditra as well as the heating stuff vs buying all separately, it might not be too bad. and if it works better, then that's great.

    thanks again for your reply. very helpful.

  5. ASwissCarpenter | Nov 23, 2020 10:48pm | #5

    I work on a decent amount of prewar houses and I've seen this many times before (particularly in bathrooms where early plumbers went nuts on joists). What we do is pull a string line to find the high and low joists in the plane of the floor. The high ones we snap a chalk line along the side to get "flat" and take the high spots down to the line with a planer. For the low ones, we sister on some 2x stock to match things up with what we planed down. Once its reasonably flat we, fasten down 3/4 OSB with 2" screws every 8". The resulting floor is very solid and much flatter than before. 90% of the time our tile guy is fine with it - sometimes he'll use leveling compound, but its not that often.

Log in or create an account to post a comment.

Sign up Log in

Become a member and get full access to FineHomebuilding.com

Video Shorts

Categories

  • Business
  • Code Questions
  • Construction Techniques
  • Energy, Heating & Insulation
  • General Discussion
  • Help/Work Wanted
  • Photo Gallery
  • Reader Classified
  • Tools for Home Building

Discussion Forum

Recent Posts and Replies

  • |
  • |
  • |
  • |
  • |
  • |
View More Create Post

Up Next

Video Shorts

Featured Story

Fire-Resistant Landscaping and Home Design Details

These defensive details give homes a better chances of surviving wildfires.

Featured Video

A Modern California Home Wrapped in Rockwool Insulation for Energy Efficiency and Fire Resistance

The designer and builder of the 2018 Fine Homebuilding House detail why they chose mineral-wool batts and high-density boards for all of their insulation needs.

Related Stories

  • From Victorian to Mid-Century Modern: How Unico Fits Any Older Home
  • Designing the Perfect Garden Gate
  • Vintage Sash Windows Get an Energy-Efficient Upgrade
  • Design and Build a Pergola

Highlights

Fine Homebuilding All Access
Fine Homebuilding Podcast
Tool Tech
Plus, get an extra 20% off with code GIFT20

"I have learned so much thanks to the searchable articles on the FHB website. I can confidently say that I expect to be a life-long subscriber." - M.K.

Get home building tips, offers, and expert advice in your inbox

Signing you up...

This site is protected by reCAPTCHA and the Google Privacy Policy and Terms of Service apply.
See all newsletters
See all newsletters

Fine Homebuilding Magazine

  • Issue 332 - July 2025
    • Custom Built-ins With Job-Site Tools
    • Fight House Fires Through Design
    • Making the Move to Multifamily
  • Issue 331 - June 2025
    • A More Resilient Roof
    • Tool Test: You Need a Drywall Sander
    • Ducted vs. Ductless Heat Pumps
  • Issue 330 - April/May 2025
    • Deck Details for Durability
    • FAQs on HPWHs
    • 10 Tips for a Long-Lasting Paint Job
  • Issue 329 - Feb/Mar 2025
    • Smart Foundation for a Small Addition
    • A Kominka Comes West
    • Making Small Kitchens Work
  • Issue 328 - Dec/Jan 2024
    • How a Pro Replaces Columns
    • Passive House 3.0
    • Tool Test: Compact Line Lasers

Fine Home Building

Newsletter Sign-up

  • Fine Homebuilding

    Home building tips, offers, and expert advice in your inbox.

  • Green Building Advisor

    Building science and energy efficiency advice, plus special offers, in your inbox.

  • Old House Journal

    Repair, renovation, and restoration tips, plus special offers, in your inbox.

Signing you up...

This site is protected by reCAPTCHA and the Google Privacy Policy and Terms of Service apply.
See all newsletters

Follow

  • Fine Homebuilding

    Dig into cutting-edge approaches and decades of proven solutions with total access to our experts and tradespeople.

    Start Free Trial Now
    • Facebook
    • Instagram
    • X
    • LinkedIn
  • GBA Prime

    Get instant access to the latest developments in green building, research, and reports from the field.

    Start Free Trial Now
    • Facebook
    • YouTube
  • Old House Journal

    Learn how to restore, repair, update, and decorate your home.

    Subscribe Now
    • Facebook
    • Instagram
    • X

Membership & Magazine

  • Online Archive
  • Start Free Trial
  • Magazine Subscription
  • Magazine Renewal
  • Gift a Subscription
  • Customer Support
  • Privacy Preferences
  • About
  • Contact
  • Advertise
  • Careers
  • Terms of Use
  • Site Map
  • Do not sell or share my information
  • Privacy Policy
  • Accessibility
  • California Privacy Rights

© 2025 Active Interest Media. All rights reserved.

Fine Homebuilding receives a commission for items purchased through links on this site, including Amazon Associates and other affiliate advertising programs.

  • Home Group
  • Antique Trader
  • Arts & Crafts Homes
  • Bank Note Reporter
  • Cabin Life
  • Cuisine at Home
  • Fine Gardening
  • Fine Woodworking
  • Green Building Advisor
  • Garden Gate
  • Horticulture
  • Keep Craft Alive
  • Log Home Living
  • Military Trader/Vehicles
  • Numismatic News
  • Numismaster
  • Old Cars Weekly
  • Old House Journal
  • Period Homes
  • Popular Woodworking
  • Script
  • ShopNotes
  • Sports Collectors Digest
  • Threads
  • Timber Home Living
  • Traditional Building
  • Woodsmith
  • World Coin News
  • Writer's Digest
Active Interest Media logo
X
X
This is a dialog window which overlays the main content of the page. The modal window is a 'site map' of the most critical areas of the site. Pressing the Escape (ESC) button will close the modal and bring you back to where you were on the page.

Main Menu

  • How-To
  • Design
  • Tools & Materials
  • Video
  • Blogs
  • Forum
  • Project Guides
  • Reader Projects
  • Magazine
  • Members
  • FHB House

Podcasts

  • FHB Podcast
  • ProTalk

Webinars

  • Upcoming and On-Demand

Podcasts

  • FHB Podcast
  • ProTalk

Webinars

  • Upcoming and On-Demand

Popular Topics

  • Kitchens
  • Business
  • Bedrooms
  • Roofs
  • Architecture and Design
  • Green Building
  • Decks
  • Framing
  • Safety
  • Remodeling
  • Bathrooms
  • Windows
  • Tilework
  • Ceilings
  • HVAC

Magazine

  • Current Issue
  • Past Issues
  • Magazine Index
  • Subscribe
  • Online Archive
  • Author Guidelines

All Access

  • Member Home
  • Start Free Trial
  • Gift Membership

Online Learning

  • Courses
  • Project Guides
  • Reader Projects
  • Podcast

More

  • FHB Ambassadors
  • FHB House
  • Customer Support

Account

  • Log In
  • Join

Newsletter

Get home building tips, offers, and expert advice in your inbox

Signing you up...

This site is protected by reCAPTCHA and the Google Privacy Policy and Terms of Service apply.
See all newsletters
See all newsletters

Follow

  • X
  • YouTube
  • instagram
  • facebook
  • pinterest
  • Tiktok

Join All Access

Become a member and get instant access to thousands of videos, how-tos, tool reviews, and design features.

Start Your Free Trial

Subscribe

FHB Magazine

Start your subscription today and save up to 70%

Subscribe

Enjoy unlimited access to Fine Homebuilding. Join Now

Already a member? Log in

We hope you’ve enjoyed your free articles. To keep reading, become a member today.

Get complete site access to expert advice, how-to videos, Code Check, and more, plus the print magazine.

Start your FREE trial

Already a member? Log in

Privacy Policy Update

We use cookies, pixels, script and other tracking technologies to analyze and improve our service, to improve and personalize content, and for advertising to you. We also share information about your use of our site with third-party social media, advertising and analytics partners. You can view our Privacy Policy here and our Terms of Use here.

Cookies

Analytics

These cookies help us track site metrics to improve our sites and provide a better user experience.

Advertising/Social Media

These cookies are used to serve advertisements aligned with your interests.

Essential

These cookies are required to provide basic functions like page navigation and access to secure areas of the website.

Delete My Data

Delete all cookies and associated data