FHB Logo Facebook LinkedIn Email Pinterest Twitter X Instagram Tiktok YouTube Plus Icon Close Icon Navigation Search Icon Navigation Search Icon Arrow Down Icon Video Guide Icon Article Guide Icon Modal Close Icon Guide Search Icon Skip to content
Subscribe
Log In
  • How-To
  • Design
  • Tools & Materials
  • Restoration
  • Videos
  • Blogs
  • Forum
  • Magazine
  • Members
  • FHB House
  • Podcast
Log In

Discussion Forum

Discussion Forum

Efficient Gable End Framing

JourneymanCarpenterT | Posted in Photo Gallery on August 24, 2007 02:56am

Efficient Gable End Framing <!—-><!—-> <!—->

Combining residential and commercial techniques, and using a couple of innovative tools, makes for more efficient gable end framing.<!—-> <!—->

<!—-> View Image <!—->

Here are a few simple tricks I thought of while framing this gable end.  As I relate these techniques, I’ll also explain some basic tricks of the trade that I don’t always see utilized in the field.  Feel free to add any tips you think could also be useful. <!—-><!—->

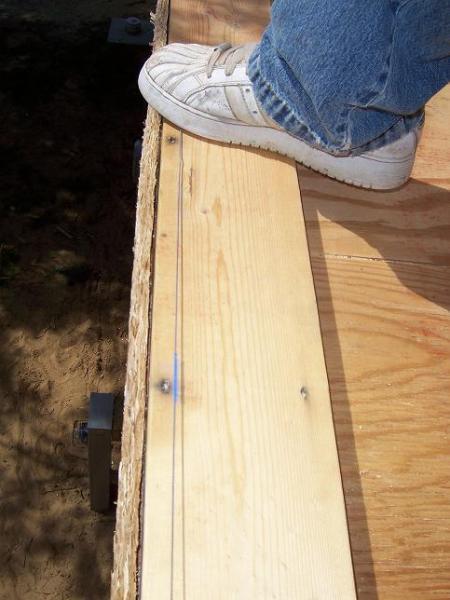
It’s far less complicated to layout any windows first, but after that I like to layout the rest of the studs with a Stud Line layout line.  It’s similar to a chalk line, but only leaves 1-1/2″ of chalk every 16″.  The tool is also available in 24″ increments, or you can special order whatever size you’d like – every 12″ for concrete forms or every 19.2″ for TGI’s for example.  This tool will save me the time of crawling on the floor with my tape measure and marking each increment with my pencil.<!—-> <!—->

You might be wondering how I can guarantee the Stud Line will be pulled at the proper tension, thus rendering an accurate layout.  Whenever I use the Stud Line, I always mark the layout of the last stud within 24′ with my tape measure.  The Stud Line is 25′ long.  Once I match up the last layout mark on the Stud Line with the last layout line I made with my tape, I know that I have the proper tension.  Since I’m working alone, and since there is also nothing to hook onto inside the gable end (for the Stud Line or my tape measure), I must also mark the layout of the first stud and drive an 8d nail there to hook onto.<!—-> <!—->

<!—-> <!—->

View Image

I use John Carrol’s technique (For Pros by Pros:  Working Alone) of snapping the chalk line without a helper, by holding the end of it in place with my foot.  Once the increments are marked, I work my way back with my speed square and pencil, making one line only for each stud.  This allows me to make my layout consistent – both inside and outside the wall – despite any twists there may be in the lumber.  The second line I see some builders draw for the other side of the stud serves no purpose, and is a waste of time.<!—-> <!—->

<!—-> <!—->

View Image

View Image

View Image

View Image

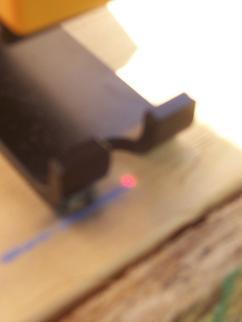
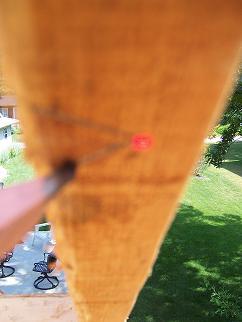
Instead of using a level, or the even slower plumb bob, I prefer to use a laser plumb bob to transfer my layout to the gable rafters.  Many lasers on the market don’t offer enough accuracy, but this one from Pacific Laser Systems offers accuracy within 100′.  This is the laser professionals use in commercial construction when framing with metal studs.  When I do layout work, I also like to use the round pencils you get from lumber yards (as opposed to the typical rectangular carpenter’s pencil), because it allows you to easily carve a precise point.

<!—->View Image <!—->

<!—-> View Image <!—->

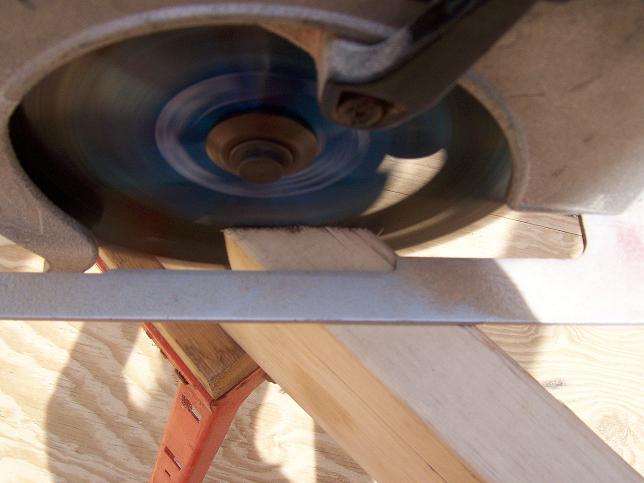
I like to work with a full length piece of lumber, so that I can easily mark and cut studs for both sides of the gable at one time.  I want the studs notched to fit around the gable rafter for face-nailing, but I also want them to be of consistent length for appearance sake.  I mark the length of the notch with my speed square, which allows me to use the same tool to mark the bevel cut at the bottom of the notch, as well as mark the rip.  I prefer using a genuine <!—-><!—-> <!—->Swanson Speed Square<!—-> <!—-> because it makes marking rips so easy. <!—-><!—->

<!—-> View Image <!—->

First I plunge into the edge of the stud to cut the bevel, and then I finish the notch by making the rip.  I then pull off the bottom of my notch to mark the stud for length.  My saw is set to a 1-1/2″ depth, which is of course the same thickness of the 2x and the 2x rafter I’m notching for.<!—-><!—->

<!—-> View Image <!—->

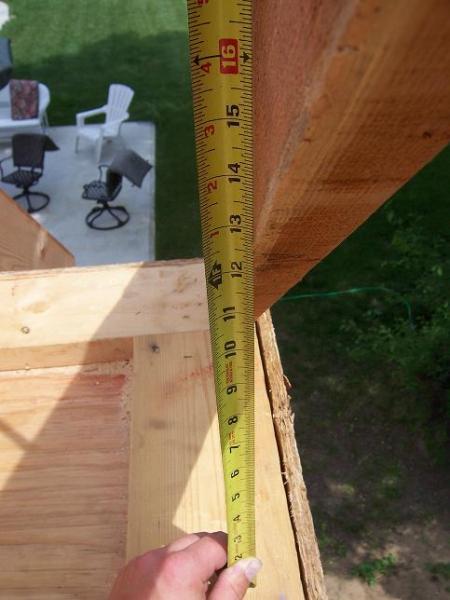
Something I see a lot of guys do is pull their tape measure, make a mark, and then retract their tape measure and make another mark with their speed square.  However, it is possible to skip a step by pulling your tape measure, then placing your speed square under your tape measure, then retracting your tape and making your full mark the first time.

View Image <!—-><!—->

<!—-> View Image <!—->

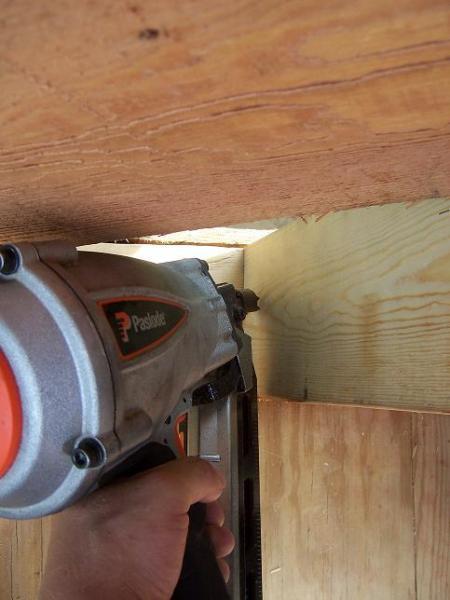
Once the pieces are cut, I shoot three 16d face-nails into them at the top, and three 16d toenails at the bottom.  To prevent possible splitting, I stagger the ones at the bottom so that no nail directly opposes another – two on one side, one on the other.

View Image <!—-><!—->

<!—-> View Image <!—->

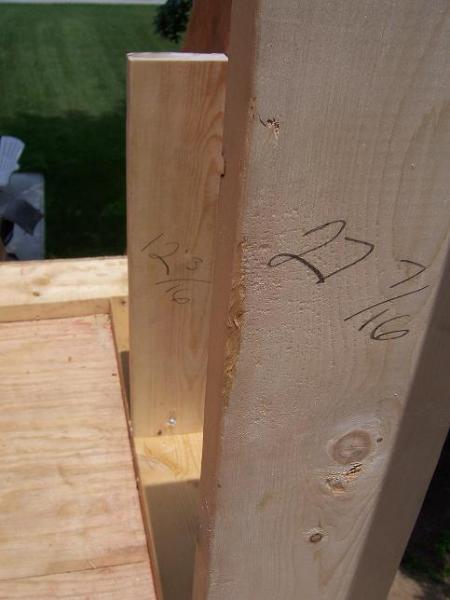
After measuring the first two studs, there’s no need to measure any more.  I use the old gable end framing technique called “the common length difference.”  Whatever difference there is between the first and second studs is what I will add to each additional stud.  From there the process simply repeats itself.<!—-><!—->

I’d post the finished product, but that’s about when my digital camera broke – Oh well.<!—-><!—->

–T


Edited 8/24/2007 2:48 am by JourneymanCarpenterT

Reply
  • X
  • facebook
  • linkedin
  • pinterest
  • email
  • add to favorites Log in or Sign up to save your favorite articles

Replies

  1. User avater
    JourneymanCarpenterT | Aug 24, 2007 02:58am | #1

    Alright, I have to go somewhere for a while this evening, so nobody get all mean while I'm gone.

    -T

  2. User avater
    jonblakemore | Aug 24, 2007 03:09am | #2

    Where did you get your stud line?

    I'm assuming that it's just a normal chalk line with some type of non-porous sleeve that covers 14-1/2" out of every 16". Is this right?

    My google search was fruitless.


    Jon Blakemore

    RappahannockINC.com Fredericksburg, VA

    1. MikeSmith | Aug 24, 2007 03:38am | #3

      journey...

       thanks for the nice series....

       how come you don't frame your gable ends on the deck and stand them up  ?Mike Smith Rhode Island : Design / Build / Repair / Restore

      1. User avater
        JourneymanCarpenterT | Aug 24, 2007 06:00am | #6

        I didn't have any wall jacks at the time, but the more I think about that question, the more I wish I did.  If I ever get around to working for myself again, I'll make sure I have them handy.  I don't know if they're available at stores in your area or not, but around here you have to special order that kind of thing.-T

    2. User avater
      JourneymanCarpenterT | Aug 24, 2007 05:55am | #5

      http://studline.com/-T

  3. User avater
    dieselpig | Aug 24, 2007 04:05am | #4

    Nice series dude. 

    Couple things.....

    1.  Why not do all that framing while the gable is still laying on the deck?  Much easier to take care of all that work at 'ground level' then up there in the air.  Get all your framing done, sheath it, build your cornice returns, and trim  that sucker out.  If you're working alone..... all the more reason to invest in a set of wall jacks, or better yet... a Lull.

    2.  You cut everything but the first stud with your Construction Master.... why not cut the first stud that way as well and leave the laser in the truck?  The distance from the "short point" of your rafter seat cut to the stud line is your "run".  The "pitch" is just the roof pitch.  Then hit "Rise" and you have your first stud length.  Next punch in your common difference (in length) and hit (+) then (=) and you have your second stud length.  Hit (=) again for number three.  Lather, rinse, repeat. 

    Same method can be used for find those window kings too.

    Word of caution though about using the CM for stud lengths..... make sure you're using rafter stock with little or no crown for your gable ends or your studs will be either too short or out of plumb towards center span.

    Which all bring me to another reason why I don't stick frame gables in place... only on the deck and rarely by math alone.  I set my rafters to a temp ridge block laying on the deck.  Then layout, cut and install the longest stud in the gable.  Then pull the entire rest of my layout off this stud and mark it on the rafter.  Now I put my tape away for good.  I just butt studs to the bottom plate, line 'em up with my marks on the rafter and mark them for cutting. 

    One other thing... but it's probably just personal preference..... I've never found anything faster than my tape for layout.  I've tried the "Studline" as well as layout sticks, but I always go back to my good old tape.  Maybe that's just me though.

    Not trying to criticize your well written and nicely detailed thread.  Just offering a few different perspectives because that's the best way we can all learn.  I see a new technique, pick out the parts that work for me, and leave the rest.  Hope you'll do the same.

    View Image
    1. User avater
      JourneymanCarpenterT | Aug 24, 2007 06:13am | #7

      I'll have to get those wall jacks.  Those are some killer tips you have for the Construction Master!  A dozen thanks for that one, that thing never ceases to amaze me.  I don't know if that tip was in that one article in Fine Homebuilding or not, but if it was, I sure didn't remember it.  The Stud Line seems to be a close call as to whether it's faster, primarily because of the fact that it's essential to pull your tape out first to establish the proper tension.  If they ever solve the tension problem, or if they ever make one say 50' long that still maintains accuracy, I think a lot more guys would use one.-T

Log in or create an account to post a comment.

Sign up Log in

Become a member and get full access to FineHomebuilding.com

Video Shorts

Categories

  • Business
  • Code Questions
  • Construction Techniques
  • Energy, Heating & Insulation
  • General Discussion
  • Help/Work Wanted
  • Photo Gallery
  • Reader Classified
  • Tools for Home Building

Discussion Forum

Recent Posts and Replies

  • |
  • |
  • |
  • |
  • |
  • |
View More Create Post

Up Next

Video Shorts

Featured Story

FHB Podcast Segment: Finding the Right Fixer-Upper

Get expert guidance on finding a fixer-upper that's worth the effort.

Featured Video

How to Install Cable Rail Around Wood-Post Corners

Use these tips to keep cables tight and straight for a professional-looking deck-railing job.

Related Stories

  • Guest Suite With a Garden House
  • Podcast Episode 688: Obstructed Ridge Vent, Buying Fixer-Uppers, and Flashing Ledgers
  • FHB Podcast Segment: Finding the Right Fixer-Upper
  • Keeping It Cottage-Sized

Highlights

Fine Homebuilding All Access
Fine Homebuilding Podcast
Tool Tech
Plus, get an extra 20% off with code GIFT20

"I have learned so much thanks to the searchable articles on the FHB website. I can confidently say that I expect to be a life-long subscriber." - M.K.

Get home building tips, offers, and expert advice in your inbox

Signing you up...

This site is protected by reCAPTCHA and the Google Privacy Policy and Terms of Service apply.
See all newsletters
See all newsletters

Fine Homebuilding Magazine

  • Issue 332 - July 2025
    • Custom Built-ins With Job-Site Tools
    • Fight House Fires Through Design
    • Making the Move to Multifamily
  • Issue 331 - June 2025
    • A More Resilient Roof
    • Tool Test: You Need a Drywall Sander
    • Ducted vs. Ductless Heat Pumps
  • Issue 330 - April/May 2025
    • Deck Details for Durability
    • FAQs on HPWHs
    • 10 Tips for a Long-Lasting Paint Job
  • Issue 329 - Feb/Mar 2025
    • Smart Foundation for a Small Addition
    • A Kominka Comes West
    • Making Small Kitchens Work
  • Issue 328 - Dec/Jan 2024
    • How a Pro Replaces Columns
    • Passive House 3.0
    • Tool Test: Compact Line Lasers

Fine Home Building

Newsletter Sign-up

  • Fine Homebuilding

    Home building tips, offers, and expert advice in your inbox.

  • Green Building Advisor

    Building science and energy efficiency advice, plus special offers, in your inbox.

  • Old House Journal

    Repair, renovation, and restoration tips, plus special offers, in your inbox.

Signing you up...

This site is protected by reCAPTCHA and the Google Privacy Policy and Terms of Service apply.
See all newsletters

Follow

  • Fine Homebuilding

    Dig into cutting-edge approaches and decades of proven solutions with total access to our experts and tradespeople.

    Start Free Trial Now
    • Facebook
    • Instagram
    • X
    • LinkedIn
  • GBA Prime

    Get instant access to the latest developments in green building, research, and reports from the field.

    Start Free Trial Now
    • Facebook
    • YouTube
  • Old House Journal

    Learn how to restore, repair, update, and decorate your home.

    Subscribe Now
    • Facebook
    • Instagram
    • X

Membership & Magazine

  • Online Archive
  • Start Free Trial
  • Magazine Subscription
  • Magazine Renewal
  • Gift a Subscription
  • Customer Support
  • Privacy Preferences
  • About
  • Contact
  • Advertise
  • Careers
  • Terms of Use
  • Site Map
  • Do not sell or share my information
  • Privacy Policy
  • Accessibility
  • California Privacy Rights

© 2025 Active Interest Media. All rights reserved.

Fine Homebuilding receives a commission for items purchased through links on this site, including Amazon Associates and other affiliate advertising programs.

  • Home Group
  • Antique Trader
  • Arts & Crafts Homes
  • Bank Note Reporter
  • Cabin Life
  • Cuisine at Home
  • Fine Gardening
  • Fine Woodworking
  • Green Building Advisor
  • Garden Gate
  • Horticulture
  • Keep Craft Alive
  • Log Home Living
  • Military Trader/Vehicles
  • Numismatic News
  • Numismaster
  • Old Cars Weekly
  • Old House Journal
  • Period Homes
  • Popular Woodworking
  • Script
  • ShopNotes
  • Sports Collectors Digest
  • Threads
  • Timber Home Living
  • Traditional Building
  • Woodsmith
  • World Coin News
  • Writer's Digest
Active Interest Media logo
X
X
This is a dialog window which overlays the main content of the page. The modal window is a 'site map' of the most critical areas of the site. Pressing the Escape (ESC) button will close the modal and bring you back to where you were on the page.

Main Menu

  • How-To
  • Design
  • Tools & Materials
  • Video
  • Blogs
  • Forum
  • Project Guides
  • Reader Projects
  • Magazine
  • Members
  • FHB House

Podcasts

  • FHB Podcast
  • ProTalk

Webinars

  • Upcoming and On-Demand

Podcasts

  • FHB Podcast
  • ProTalk

Webinars

  • Upcoming and On-Demand

Popular Topics

  • Kitchens
  • Business
  • Bedrooms
  • Roofs
  • Architecture and Design
  • Green Building
  • Decks
  • Framing
  • Safety
  • Remodeling
  • Bathrooms
  • Windows
  • Tilework
  • Ceilings
  • HVAC

Magazine

  • Current Issue
  • Past Issues
  • Magazine Index
  • Subscribe
  • Online Archive
  • Author Guidelines

All Access

  • Member Home
  • Start Free Trial
  • Gift Membership

Online Learning

  • Courses
  • Project Guides
  • Reader Projects
  • Podcast

More

  • FHB Ambassadors
  • FHB House
  • Customer Support

Account

  • Log In
  • Join

Newsletter

Get home building tips, offers, and expert advice in your inbox

Signing you up...

This site is protected by reCAPTCHA and the Google Privacy Policy and Terms of Service apply.
See all newsletters
See all newsletters

Follow

  • X
  • YouTube
  • instagram
  • facebook
  • pinterest
  • Tiktok

Join All Access

Become a member and get instant access to thousands of videos, how-tos, tool reviews, and design features.

Start Your Free Trial

Subscribe

FHB Magazine

Start your subscription today and save up to 70%

Subscribe

Enjoy unlimited access to Fine Homebuilding. Join Now

Already a member? Log in

We hope you’ve enjoyed your free articles. To keep reading, become a member today.

Get complete site access to expert advice, how-to videos, Code Check, and more, plus the print magazine.

Start your FREE trial

Already a member? Log in

Privacy Policy Update

We use cookies, pixels, script and other tracking technologies to analyze and improve our service, to improve and personalize content, and for advertising to you. We also share information about your use of our site with third-party social media, advertising and analytics partners. You can view our Privacy Policy here and our Terms of Use here.

Cookies

Analytics

These cookies help us track site metrics to improve our sites and provide a better user experience.

Advertising/Social Media

These cookies are used to serve advertisements aligned with your interests.

Essential

These cookies are required to provide basic functions like page navigation and access to secure areas of the website.

Delete My Data

Delete all cookies and associated data